InCountry logo
mobile-nav
Search
  • Products
    • Products
      • InCountry for Salesforce
      • Data Residency-as-a-Service
      • Alibaba Cloud InCountry Service
      • Compliance and security
    • Gateways
      • Email
      • Payment Vault
      • Web Forms
      • HTML
    • Developers
      • REST API
      • SDK
  • Solutions
    • Automotive
    • Energy
    • Financial services
    • Healthcare
    • Retail
    • Technology
    • Latest success story
      • IBM Consulting
  • Integrations
    • Cegid
    • Intertrust
    • MuleSoft
    • PayPal
    • Salesforce
    • ServiceNow
    • Stripe
    • Veeva Systems
    • Yandex
  • Resources
    • Country compliance
    • Documentation
    • Library
    • Partners
    • Pricing
  • About
    • News and Blog
    • Careers
    • Contact Us
    • FAQ
    • Leadership
  • Login
  • Schedule a Demo

›Administrator's guide

Home
  • InCountry Platform
Portal
  • Getting started
  • Documentation
    • Dashboard
    • Managing environments
    • Managing SDK credentials and services
    • Managing Border configuration
    • Managing payment vaults
    • Managing email gateways
    • Managing resident functions
    • Managing file imports
    • Managing profile and organization
    • Managing users
    • Managing encryption keys
  • Release notes
Border
  • Documentation
  • Release notes
REST API
  • Documentation
  • How to test CRUD requests through REST API
  • Release notes
Resident Functions
  • Documentation
Salesforce
  • About
  • Overview
  • Quick start guide for three-model package
  • Quick start guide for legacy package
  • Administrator's guide
    • Managing the package
    • Managing permissions
    • Managing OAuth2 authentication and authorization
    • Managing certificates
    • Registering CSP Trusted Sites
    • Managing InCountry Endpoints
    • Managing REST endpoints
    • Managing InCountry flags
    • Loading the application
    • Managing data regulation policies
    • Managing protected fields
    • Hashing the UserName field
    • Managing custom objects
    • Replacing standard elements
    • Configuring record search
    • Managing components
    • Setting up Salesforce Experience Cloud
    • Managing resident functions
    • Managing InCountry cache
    • Managing Apex triggers
    • Managing record synchronization
    • Managing web forms
    • Tracking changes to data regulation policies and regulated fields
    • Using Email-to-Case feature
    • Debugging
    • Migrating data from one Salesforce organization to another
  • Developer’s guide
    • Apex SDK
    • JavaScript API
    • Retrieving record statistics
    • Tracking field history
  • User's guide
    • Working with protected fields
    • Sending compliant email messages
    • Importing data into Salesforce
    • Migrating records
    • Managing audit reports
    • Converting leads
    • Managing reports
    • Using formula fields
    • Using frontend validations
    • FAQ
    • Release notes
Payment Vault
  • Documentation
BYOK
  • Documentation
FAQ
  • Get started with the platform
  • Integration options
  • Data regulation models
  • Limits and quotas
  • Video tutorials
Service Status
  • Status

Managing components

The InCountry Data Residency for Salesforce package provides the following components:

  • Web-to-Lead component
  • Activity component
  • Email message component
  • Lead Convert component

Web-to-Lead component

note

This component is supported in the legacy package and in the three-model package for the restriction and redaction models.

note

This component is available upon request.

The InCountry Data Residency for Salesforce package provides a Web-to-Lead component that captures data submitted by website visitors, including their contact information, and then stores it as a Lead record in Salesforce.

Adjusting the Web-to-Lead component

  1. From Setup, click Sites, and then click New.

  2. On the Site Edit page, enter Site Label, Site Name, Active Site Home Page and check the Active box. A new empty Visual Force page can be chosen as Active Site Home Page (you can create this page by navigating to the Developer Console and following this path File > New > Visualforce Page).

  3. Click Save.

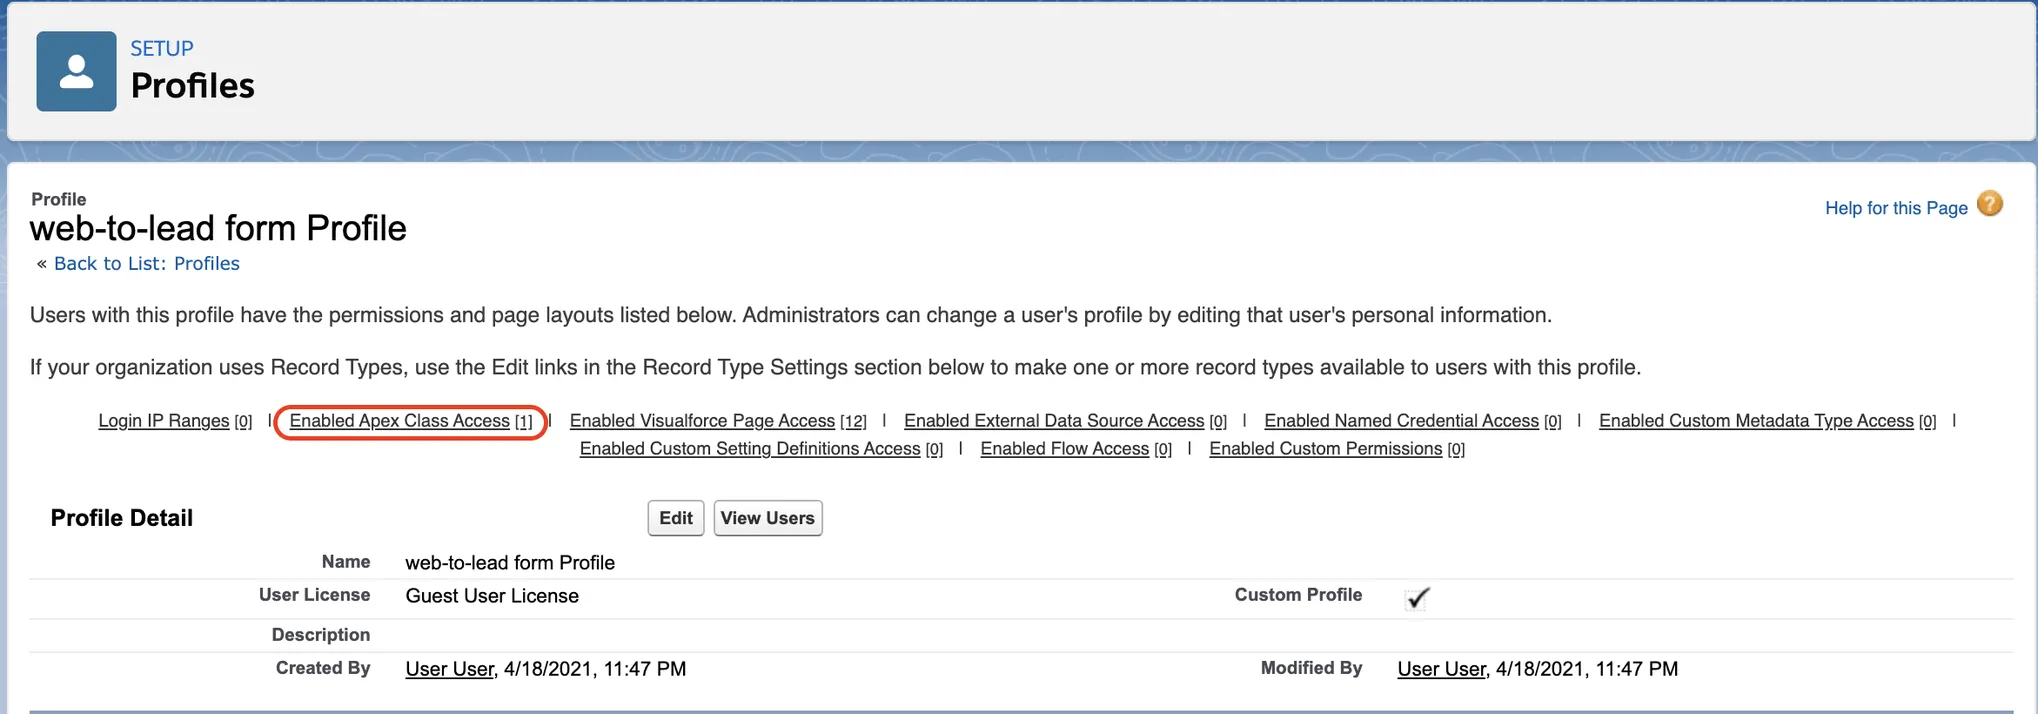
  4. Click Public Access settings.

  5. Click Enable Apex Class Access at the top of the page.

    Enable Apex Class Access

  6. Click Edit.

  7. Select the InCountryWebToLeadService class and click Save.

    Select class

  8. Return to the Sites list and copy the site URL.

  9. Go to the InCountry application and select the Web-to-Lead tab.

  10. Paste the Border URL address (for example, https://sa-proxy-mt-01.api.incountry.io/) and append x-inc-sa-mt-query/services/apexrest/leadservice to this address for the fields with values that will be passed as query parameters within the request body or x-inc-sa-mt-body/services/apexrest/leadservice for the fields with values that will be passed as JSON Body without query parameters. For more information, see the Creating new services section.

  11. Click the Save icon.

    Web-to-Lead Setup

  12. Select the fields you want to include in the form.

  13. Enter the Return URL if required. If not needed, leave it empty.

  14. Set the default user for the Lead, if needed.

  15. Move the Use parametrized requests toggle right to enable such option. By default, it is enabled.

    • If the toggle is activated, fields with values will be passed as query parameters within the request body. For example:

    • If the toggle is disabled, fields with values will be passed as JSON Body without query parameters. For example:

    As a result of the response, filed values will be returned to your Salesforce org as request parameters or within the request body, depending on the request type.

  16. Click + Add reCAPTCHA and populate Public and Private keys if captcha is required. If not needed, leave them empty.

    reCAPTCHA Settings

    You can find out how to generate those keys here: Developer's Guide

  17. Click Generate form > Copy to clipboard.

  18. Paste this code on the required HTML page.

Parameterized requests

The Web-to-Lead component supports the functionality to handle parameterized requests. Below you can see an example of such a request:

POST https://sa-proxy-mt-01.api.incountry.io
      /services/apexrest/leadservice?GRD_Sub_Type__c=Component%2FSystem+Mfr.
                                     &Company=Test+Company
                                     &GRD_Interested_In_Glass_For__c=Residential+Windows
                                     &GRD_With_Benefits_Such_As__c=Solar+Protection
                                     &FirstName=Sudesh
                                     &LastName=Kumar
                                     &Email=sudeshb1607%40gmail.com
                                     &MobilePhone=%2B49+69+978997668
                                     &GRD_Language__c=de
                                     &Country=CF
                                     &City=Munich
                                     &PostalCode=80992
                                     &GRD_Your_Message__c=Test+Message+for+Russia+Site
                                     &GRD_Do_Not_Solicit__c=1
                                     &Street=Test+Address+1+Test+Address+2
                                     &Status=Unqualified
                                     &GRD_Business_Reason__c=Web-To-Lead
                                     &GRD_Priority__c=Medium
                                     &GRD_Lead_Sub_Source__c=Information+Request
                                     &recordType=0123h000000R6rq
                                     &LeadSource=GRD_Website
                                     &oid=00D0n0000009H3m
                                     &encoding=UTF-8

Activity component

note

This component is supported in the three-model package for the redaction and restriction models.

The InCountry Data Residency for Salesforce package provides the Activity component as a replacement for the native Activity component.

Adding the Activity component to the page layout

note

Please follow these instructions if you use Salesforce Lightning.

  1. Open the list for a specific object and select a specific record.

  2. Click Setup, then select Edit Page.

  3. On the Lightning App Builder page, add a new tab. Select Custom and enter a custom label.

  4. Drag the activityPanel component to the tab.

    Lightning App Builder page

  5. Regulate the visibility of components by adding filters.

    Lightning App Builder page - Filtering parameters

  6. Click Save.

  7. Click Activation and activate the modified page.

Working with the Activity component

The Activity component allows you to manage tasks, log calls, and schedule events with your customers and prospects. InCountry’s equivalent of this component resembles the native Salesforce component and provides a similar user experience.

Creating a new task activity

  1. Within the Activity component, locate the New Task tab and select it.

  2. Click Add new Activity.

    Activity block

  3. Fill out details of a new activity.

  4. Click Save.

Filtering task activities
  1. Select the New Task tab.

  2. Locate the Filter icon and click it.

  3. Define the filtration criteria.

  4. Click Apply or Apply & Save (to permanently save the filtration criteria).

Activity block - Filtration criteria

Logging calls

  1. Select the Log a Call tab.

  2. Enter the log summary.

  3. Click Save.

Log a Call block

Managing events

  1. Select the New Event tab.

  2. Fill in details for the event.

  3. Define the event time.

  4. Click Save.

New Event block

Closing tasks

  1. Locate the Task Timeline block.

  2. Locate the task you want to close and hover over it.

  3. Check the box. The task is closed.

    Task Timeline block

  4. If you closed the task accidentally, clear the box.

    Choose Status form

  5. In the Choose Status form, select the current status of the task.

  6. Click Save.

Managing the Email Message component in the Legacy Replicated model

The InCountry Data Residency for Salesforce package provides the Email component supporting the data compliance when sending emails from Salesforce.

Configuring the Email Message component

To configure the Email message component for the replicated model, you need to perform the following steps:

Creating a data regulation policy

  1. On the menu, select Settings.

  2. In the Select Object box, select the Email Message object and click Add Policy. The Add Policy form opens.

    Add policy form

  3. In the Type box, select record. The data regulation policy will be applied to Salesforce objects of the record type. This means, that each email message (as a record) will be saved to the country of origin based on the country attribution.

  4. In the Behavior box, select Replication.

  5. In the Destination Country box, select the country for storing and processing the regulated data according to the select data regulation model. The following steps will customize the Related To field shown below:

    Related To

  6. Move the Controlled By Parent toggle right to enable the inheritance of configuration from the parent object.

    Controlled By Parent

  7. In the Select Parent box, enter Related To ID (Account).

    note

    Please note that the User, Lead, and Contact objects are not supported by the Related To field. When you create a regulation policy for these objects, start entering and choose from the drop-down list Related To ID (Account) or any other Salesforce object that has the same field that the required object (User, Lead, or Contact) includes.

  8. In the Source Field box, enter the name of the field which stores the country value. For example: Country field.

  9. In the Source Field Value box, enter the name of the country as you specify it while creating records related to the Email Message object. The value stored within the field will be saved to the country you select in the Destination Country box. This configuration option is available at the record level only.

  10. Save the data regulation policy.

Adding the InCountry Apex trigger

The InCountry Apex trigger allows you to set automated deletion of email messages from the InCountry platform, when they are deleted from Salesforce. To add the InCountry Apex trigger, follow the steps below:

  1. Open the Developer Console.

  2. From the File menu, select New, then click Apex Trigger.

  3. Populate the trigger name and select the respective sObject. The name must be InCountryEmailMessage.

    Apex Trigger

  4. Click Submit.

  5. Replace the trigger body with the code below.

trigger InCountryEmailMessage on EmailMessage (before delete, after delete) {
    SObjectType triggerType = Trigger.isDelete ? Trigger.old.getSObjectType() : Trigger.new.getSObjectType();

    if (Trigger.isDelete && !InCountryReplicationTriggerHandler.disableTrigger && !InCountryReplicationTriggerHandler.alreadyExecuted(triggerType)) {

        InCountryReplicationTriggerHandler handler = new InCountryReplicationTriggerHandler(triggerType.getDescribe().getName());
        if (Trigger.isBefore) {
            handler.handleBeforeDeleteEmailMessage();
        } else {
            handler.handleAfterDeleteEmailMessage();
            InCountryReplicationTriggerHandler.registerExecution(triggerType);
        }
    }
}

Creating a Visualforce page with the Email Message component

note

Please follow these instructions if you use Salesforce Classic.

  1. Navigate to Setup.

  2. On the sidebar, select Custom Code, then select Visualforce Pages.

  3. Click New.

    Add Visualforce page

  4. On the Visualforce Page page, specify the following information:

    1. Label - enter the page label.

    2. Name - enter the page name.

    3. Description - enter the description of the page.

    4. Visualforce Markup - add the following Apex code of the Email Message component:

    <apex:page showHeader="false" standardStylesheets="false" sidebar="false" docType="html-5.0" standardController="Account" applyBodyTag="False" applyHtmlTag="False">
    <head>
      <apex:slds />
        <apex:includeLightning />
    </head>
    
    <body class="slds-scope">
        <div id="lightning" />
    
            <script>
                $Lightning.use("c:inCountryEmailApp", function() {
                  $Lightning.createComponent("c:inCountryEmail",
                      {
                         recordId: "{!Account.Id}",
                         objectApiName: "Account"
                      },
                      "lightning",
                      function(cmp) {}
                  );
                });
            </script>
        </body>
    </apex:page>
    
  5. Click Save.

    note

    The code snippet above is valid for the Account object. To make it valid for any other Salesforce object, enter the appropriate Salesforce object name in the following parts:

    • standardController="Account"

    • recordId: "{!Account.Id}"

    • objectApiName: "Account"

  6. Once you have saved the page, you need to add it to the Flexipage layout. Navigate to Setup.

  7. On the sidebar, select Objects and Fields, then select Object Manager.

  8. On the Object Manager page, locate the Salesforce object which you want to add the Email Message page for and select this object.

  9. On the sidebar, select Page Layouts.

  10. Add a new section.

    Adding block to page layout

  11. Select Visuaforce Pages.

  12. Locate the newly added Visualforce page with the Email Message component.

  13. Drag the Visualforce Page to the new section.

  14. Click the Properties icon.

  15. In the Visualforce Page Properties form, enter the height in pixels (by default, use 550 px) and check the box to show the scrollbar.

    Adding block to page layout

  16. Click OK.

Adding the Email Message component to the page layout

note

Please follow these instructions if you use Salesforce Lightning.

  1. Open the list for a specific object and select a specific record.

  2. Click Setup, then select Edit Page.

  3. On the Lightning App Builder page, add a new tab. Select Custom and enter a custom label.

    App builder - adding tab

  4. Click Done.

  5. Select the newly added tab on the page layout.

    App builder - adding component

  6. Drag the InCountryEmail component to the tab.

  7. Click Save.

  8. Click Activation and activate the modified page.

Managing the Email Message component in the Redacted/Restricted model

When you use the redaction or restriction data regulation policies, redacted data is stored in Salesforce. This can cause problems when communicating with contacts or leads by email. The package provides the Email Message component that allows you to send emails with redacted values that will be unredacted by Email Gateway.

Prerequisites

Configure the Email Gateway which can accept requests from Salesforce.

  • Create an Email Gateway on the InCountry Portal. As the result, you will get credentials to integrate with Email Gateway.

Configuring the Email message component

warning

Before configuring the Email Message component, please register an email gateway within the same environment and country which your Salesforce service is attributed to.

To enable the email processing by Email Gateway, you need to perform the following steps:

Creating an email relay

You need to set up an email relay for Salesforce-generated emails by configuring Salesforce to automatically route emails through your company’s SMTP server. If your company sends emails from more than one email domain, you can configure an email relay for each domain.

  1. From Setup, select Email, then select Email Delivery Settings, finally, click Email Relays.

  2. On the list with email relays, click Create Email Relay.

    Create Email Relay

  3. Configure the email relay as follows:

    • Host - enter the address of the Border host you received when creating a Border configuration (for example, (se-proxy-mt-01.staging.incountry.io)).

    • Port - specify the SMTP port as 587.

    • TLS Setting - select the Required Verify option.

    • Enable SMTP Auth - check the box to enable SMTP authentication.

    • Auth Type - select the Auth Plain option.

    • Username - enter the Client ID that you received on the InCountry Portal after registering an email gateway.

    • Password - enter the Client Secret that you received on the InCountry Portal after registering an email gateway.

    • Confirm Password - re-enter the Client Secret.

  4. Click Save.

Creating organization-wide SMTP addresses

When sending emails from Salesforce, you can select your own email address or the organization-wide email address from which the email will be sent (the From field).

  1. From Setup, select Email, then click Organization-Wide Addresses.

  2. Click Add.

    Creating Organization-wide SMTP Addresses

  3. Fill out the following fields:

    • Display Name - specify the name explaining who an email is sent from.

    • Email Address - specify the email address which the letter will be sent from.

  4. Choose the user profile for this email address.

  5. Click Save.

Upon completion of this step, a verification email will be delivered to your mailbox.

Creating an email domain filter

An email domain filter determines whether an email relay is restricted to specific domains. You can create multiple domain filters and set their priority order. An email domain filter must be set up for email relay to work.

  1. From Setup, select Email, then select Email Delivery Settings, finally, click Email Domain Filters.

  2. Click Create Email Domain Filter.

    Create Email Domain Filter

  3. Enter the following information:

    • Sender Domain - leave it empty (leave the * (asterisk) sign as-is).

    • Recipient Domain - leave it empty (leave the * (asterisk) sign as-is).

    • Email Relay - select the email relay that you have created.

    • Active - check the box to activate the email domain filter.

  4. Click Save.

Configuring email deliverability

When you send emails from Salesforce, you would like to deliver emails to your recipients as coming from your domain instead of https://salesforce.com. The latter can cause problems in email deliverability and increase the chances of your emails being marked as spam. This is why you need to disable the Email Security Compliance feature.

  1. From Setup, select Email, then click Deliverability.

  2. Clear the Activate bounce management box.

  3. Clear the Enable compliance with standard email security mechanisms box.

    Clear the Enable compliance with standard email security mechanisms

  4. Click Save.

Lead Convert component

note

This component is supported in the legacy package and in the three-model package for the restriction and redaction models.

The InCountry Data Residency for Salesforce package provides the Lead Convert component that converts a lead to an account, contact, or opportunity using information from the lead you’re converting.

For the details on this functionality, please check our documentation.

Converting leads

In order for the leads to be converted according to the record level policy, it is mandatory to map the fields in Setup (country, address, city, state and so on) with the Lead, Account, Contact and Opportunity fields.

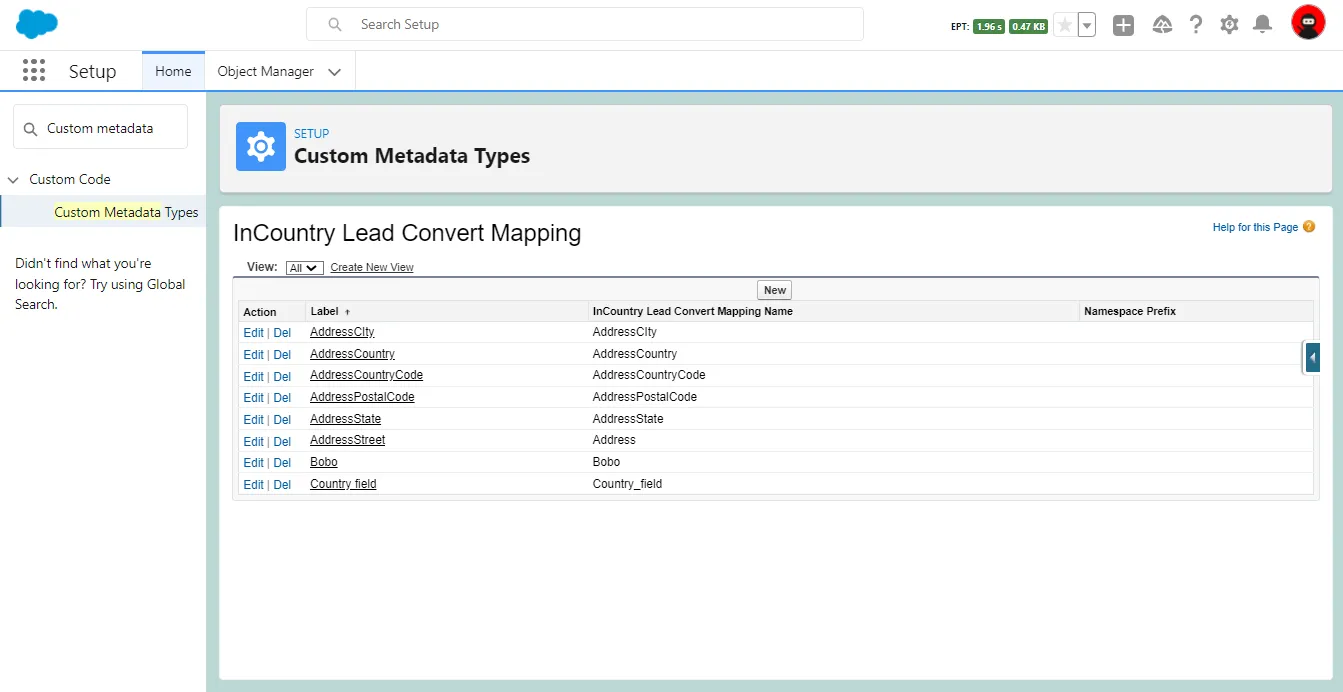
  1. From Setup, select Custom Metadata Types.

    Custom Metadata Types

  2. Click Manage Records next to InCountry Lead Convert Mapping.

    Manage Records

  3. To add a compound field (e.g. country field), click New.

    New

  4. Add other compound fields as shown above.

    note

    Compound fields are comprised of several fields (so-called constituents), for example the Address field includes the City, Zip code, State, and other fields. When converting, all these fields should be matched between the source Salesforce object and the target Salesforce object. You need to add the logic for each constituent of the compound Address field for all Salesforce objects which a lead can be converted to.

    To do this, it is necessary to add a new item to the Lead Convert Mapping. For EACH constituent of the compound Address field, you need to create a new item.

    When creating, you need to specify the API name of the field on the lead object. To get API names of fields, navigate to Object Manager, open the related Salesforce objects and on the Fields and Relationships tabs you can find the API names for required fields. These fields will take values from the lead record passing through conversion.

  5. From Setup, select Object Manager.

  6. Select Lead.

    Select Lead

  7. Select Fields & Relationships.

    Select Fields and Relationships

  8. In the top right part of the screen, click Map Lead Fields.

  9. Use the tabs (Account, Contact or Opportunity) to map each of your organization's custom lead fields to one of your custom account, contact, or opportunity fields.

    Map the fields

  10. Click Save.

← Configuring record searchSetting up Salesforce Experience Cloud →
  • Web-to-Lead component
    • Adjusting the Web-to-Lead component
    • Parameterized requests
  • Activity component
    • Adding the Activity component to the page layout
    • Working with the Activity component
  • Managing the Email Message component in the Legacy Replicated model
    • Configuring the Email Message component
    • Creating a data regulation policy
    • Adding the InCountry Apex trigger
    • Creating a Visualforce page with the Email Message component
    • Adding the Email Message component to the page layout
  • Managing the Email Message component in the Redacted/Restricted model
    • Prerequisites
    • Configuring the Email message component
    • Creating an email relay
    • Creating organization-wide SMTP addresses
    • Creating an email domain filter
    • Configuring email deliverability
  • Lead Convert component
    • Converting leads
InCountry logo blue
© InCountry 2022.
All rights reserved. InCountry, Inc
  • PRIVACY POLICY
  • TERMS OF SERVICE
  • Social share
    • YouTube logo
    • Facebook logo
    • Twitter logo
    • LinkedIn
  • Column 1
    • Products
      • Products
        • InCountry for Salesforce
        • Data Residency-as-a-Service
        • Alibaba Cloud InCountry Service
        • Compliance and security
      • Gateways
        • Email
        • Payment Vault
        • Web Forms
        • HTML
      • Developers
        • REST API
        • SDK
  • Column 2
    • Solutions
      • Automotive
      • Energy
      • Financial services
      • Healthcare
      • Retail
      • Technology
    • Integrations
      • Cegid
      • Intertrust
      • MuleSoft
      • PayPal
      • Salesforce
      • ServiceNow
      • Stripe
      • Veeva Systems
      • Yandex
  • Column 3
    • Resources
      • Country compliance
      • Documentation
      • Library
      • Partners
      • Pricing
    • About
      • News and Blog
      • Careers
      • Contact Us
      • FAQ
      • Leadership