Managing Endpoints
The legacy package supports OAuth2 authorization. The three-model package works with certificates and private keys. If you configure the legacy package, you need to set up OAuth2 authentication and authorization so the application can distribute and localize regulated data from Salesforce.
These instructions are applicable to the three-model package and the legacy package.
Prerequisites
Before configuring OAuth2 authorization, you need to create an account on the InCountry Portal.
Please follow these steps:
Once you have created a Salesforce service, you will get OAuth2 credentials and connection details, as follows:
-
Environment ID
-
Client ID
-
Client Secret
-
REST API address
Configuring endpoints
Creating a new endpoint
-
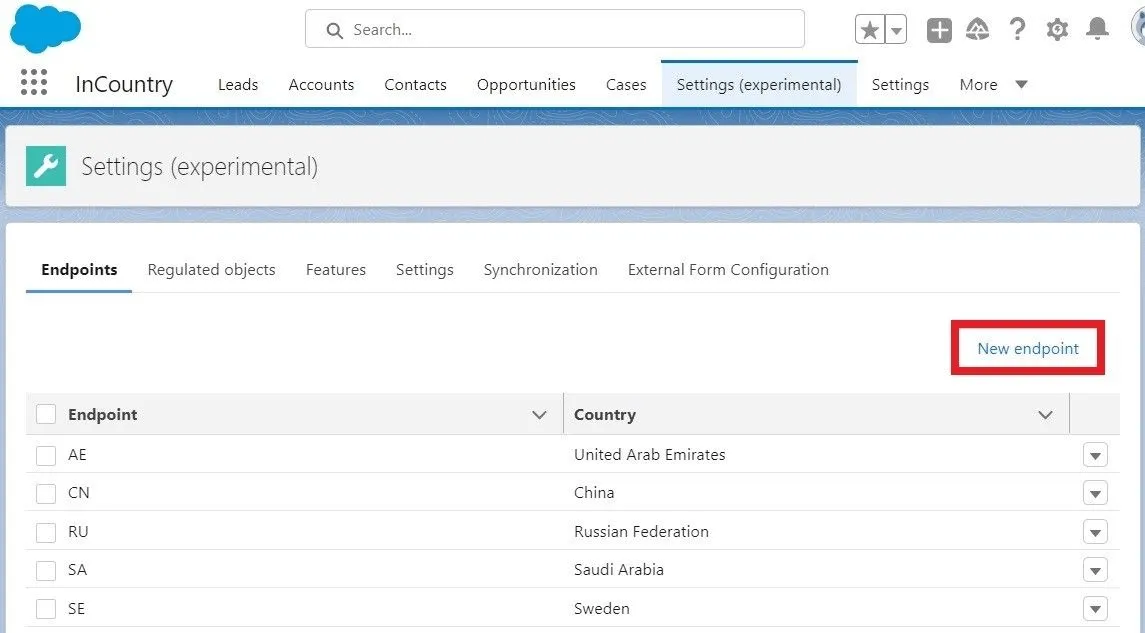
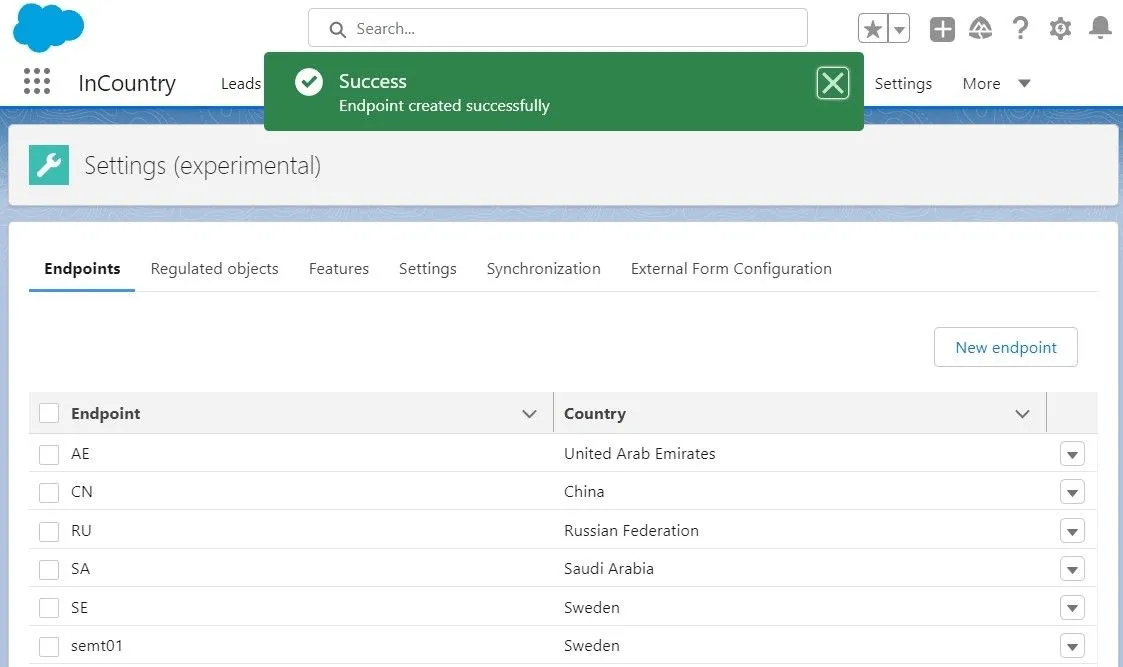
On the menu, select Settings. The page with the app settings loads, as follows:

-
On the Endpoints tab, click New endpoint.
-
In the Create New Endpoint form, fill out the credentials you received when created a Salesforce service:
-
Client ID - enter the client ID you got on the InCountry Portal when you created a Salesforce service.
-
Client Secret - enter the client secret you got on the InCountry Portal when you created a Salesforce service.
-
Environment ID - enter the environment ID you got on the InCountry Portal when you created a Salesforce service.
-
Subject claim - populate the subject claim that is provided as part of service credentials when you configure Salesforce integration on the InCountry Portal.
-
REST API address - enter the address of the REST API endpoint, for example,
https://se-restapi-mt-01.api.incountry.io/. -
Authentication address - select the authentication endpoint. For production installations, please use the following addresses of authentication endpoints:
-
InCountry EMEA:
https://auth-emea.incountry.com -
InCountry APAC:
https://auth-apac.incountry.com -
China (Alibaba Cloud):
https://auth.data-in.cn -
China (Digital China):
https://auth.api.dataresidency.cn
-
-
-
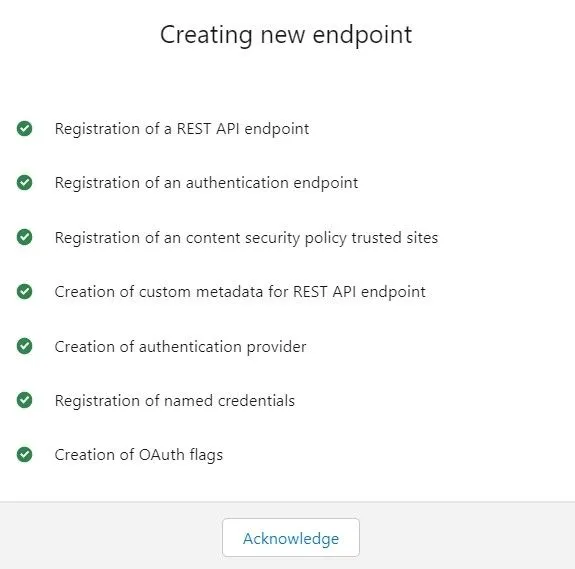
Click Create endpoint. Wait until the process of creating an endpoint is completed.
-
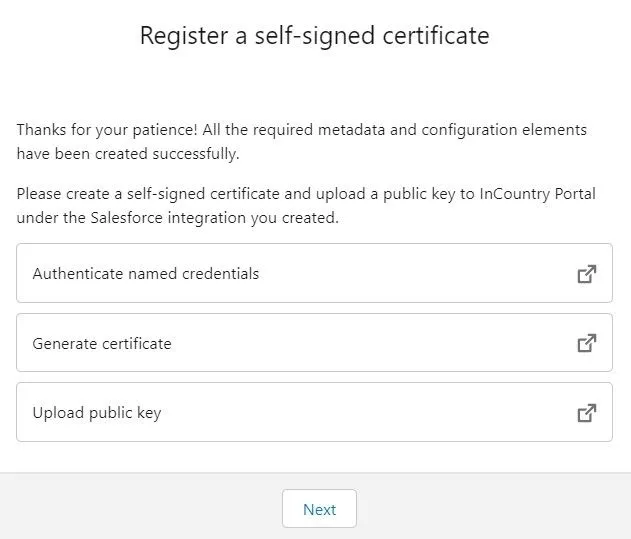
When complete, click Acknowledge. The Register a self-signed certificate form opens.
-
Click Authenticate named credentials. Named credentials specify the URL of a callout endpoint and its required authentication parameters in one definition.
-
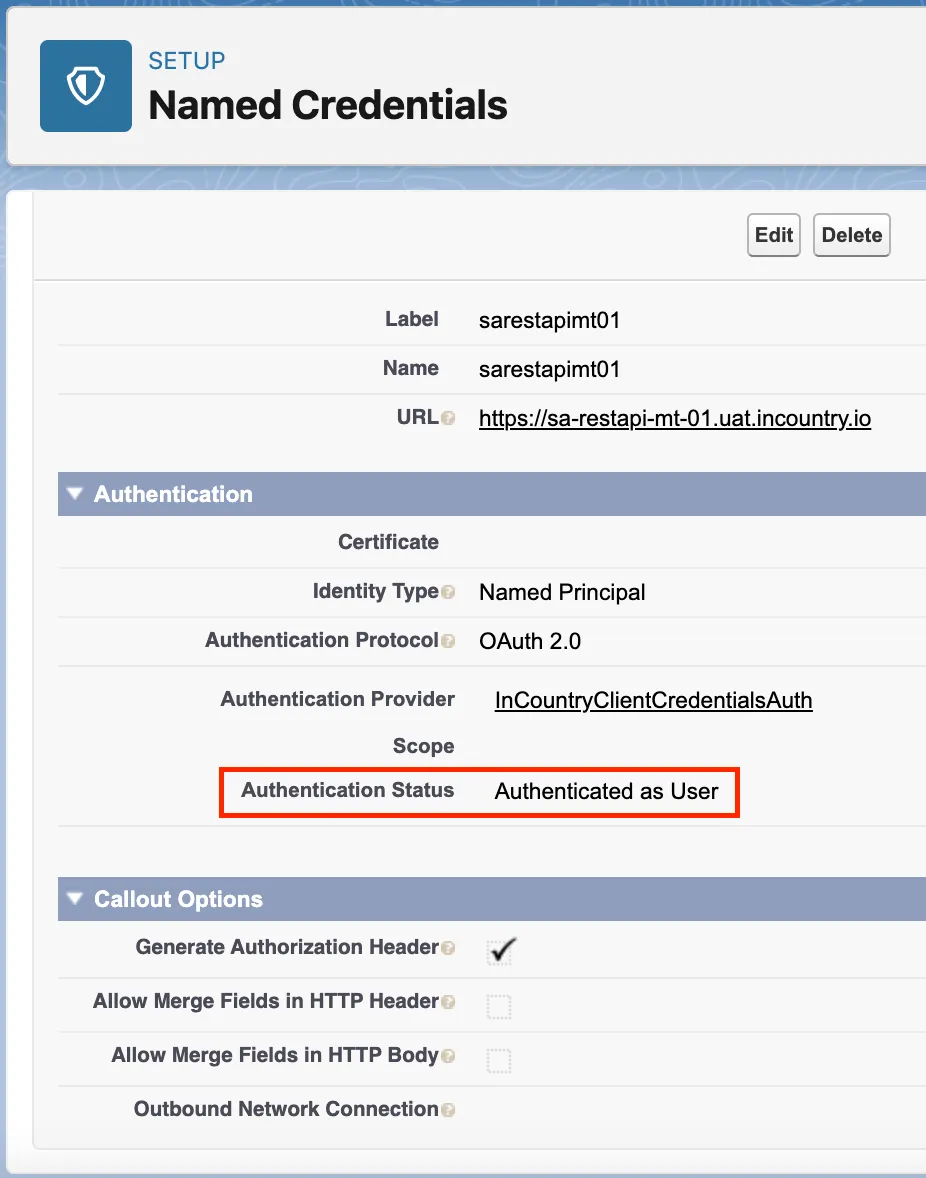
On the Named Credentials page, locate the Authentication section.
-
Ensure that the authentication status is displayed as
Authenticated as User.
-
-
Click Generate certificate. For the details on generating a certificate, please see our documentation.
-
Click Upload public key. Once you have generated a self-signed certificate in Salesforce, you need to upload the public key in the CRT format to the InCountry Portal. For the details on uploading it, please see our documentation.
-
When complete, click Next.
-
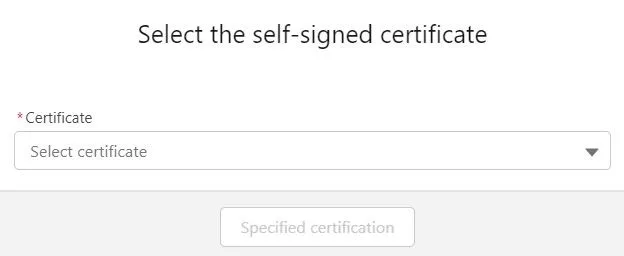
In the Certificate field, select the self-signed certificate that you generated in the previous step.
-
Click Specified certification.
UPLOAD OF THE PUBLIC CERTIFICATE TO THE INCOUNTRY PORTAL IS A MANDATORY STEP. IF YOU SKIP IT, REQUESTS COMING FROM THE APPLICATION FRONTEND WILL NOT BE PROPERLY HANDLED AND REGULATED DATA WILL NOT BE QUERIED FROM THE INCOUNTRY PLATFORM.
The new endpoint has been created successfully.
Generating a certificate
Generate a certificate signed by Salesforce to show that communications purporting to come from your organization are really coming from there.
-
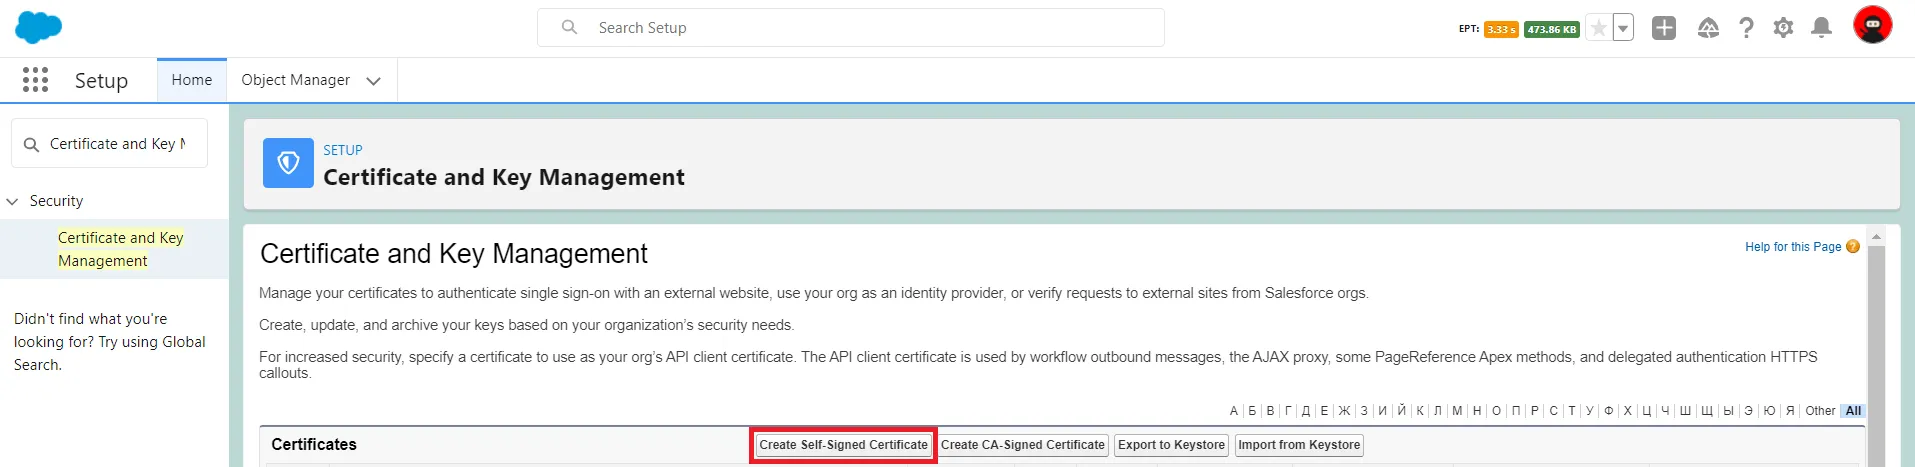
On the Certificate and Key Management page, click Create Self-Signed Certificate.
-
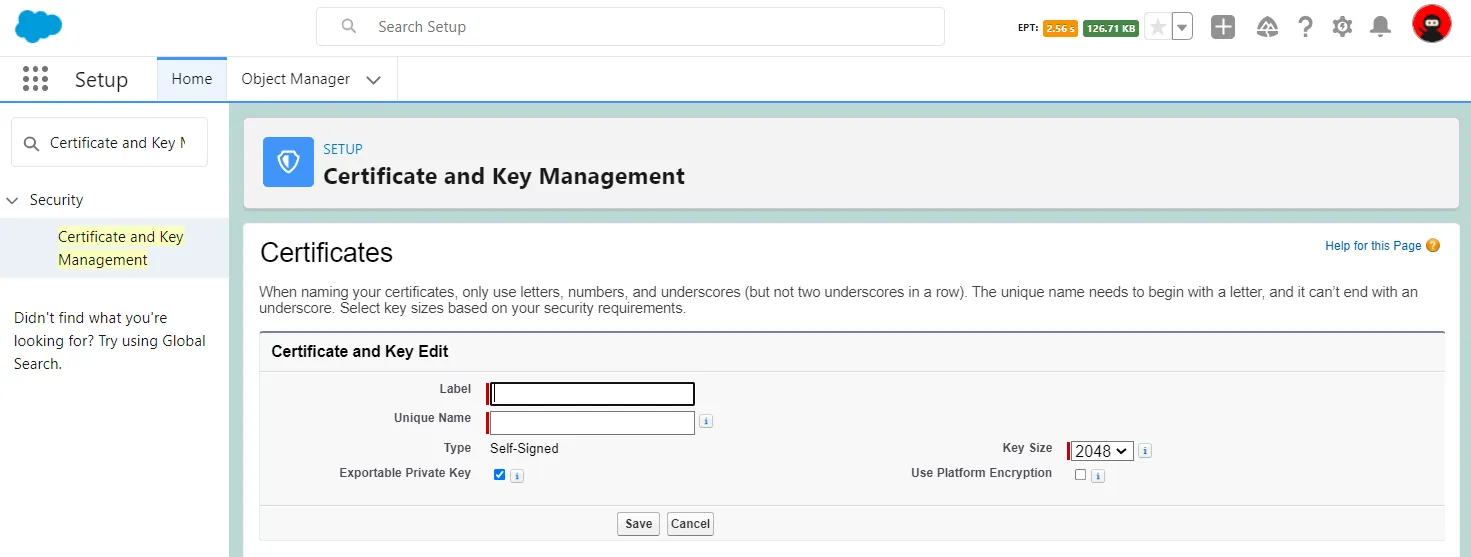
Enter a descriptive label for the Salesforce certificate. This name is used primarily by administrators when viewing certificates.
-
Enter a unique name. You can use the name that is automatically populated based on the certificate label you enter. This name can contain only underscores and alphanumeric characters, and must be unique in your Salesforce org. It must begin with a letter, not include spaces, not end with an underscore, and not contain two consecutive underscores. Use the unique name when referring to the certificate using Lightning Platform APIs or Apex.
-
Select a key size for your generated certificate and keys. Certificates with 2048-bit keys are valid for one year. Certificates with 4096-bit keys are valid for two years.
-
Click Save.
Please ensure that you renew your certificates before their expiration date and upload new public keys to the InCountry Portal.