Managing Web Components
The InCountry Data Residency for Salesforce package provides the following web components:
- InCountry Activities
- InCountry Activity
- InCountry Activity Highlights Panel
- InCountry Activity Record Detail
- InCountry Activity Related List Single
- InCountry Chatter
- InCountry History Report
- InCountry List View
- InCountry Notes & Attachments
- InCountry Opportunity Products
- InCountry Path Assistant
- InCountry Quote Line Items
- InCountry Record Detail
- InCountry Potential Duplicates
- InCountry Highlights Panel
- InCountry Record Header Container
- InCountry Record History
- InCountry Related List Quick Links
- InCountry Related List Single
- InCountry Related Record
- InCountry Search Panel
- InCountry Search Tab
- InCountry Search Box
- InCountry Search Results
- InCountry Settings (legacy)
- InCountry Email Message (Redacted/Restricted model)
- InCountry Email Message (Legacy Replicated model)
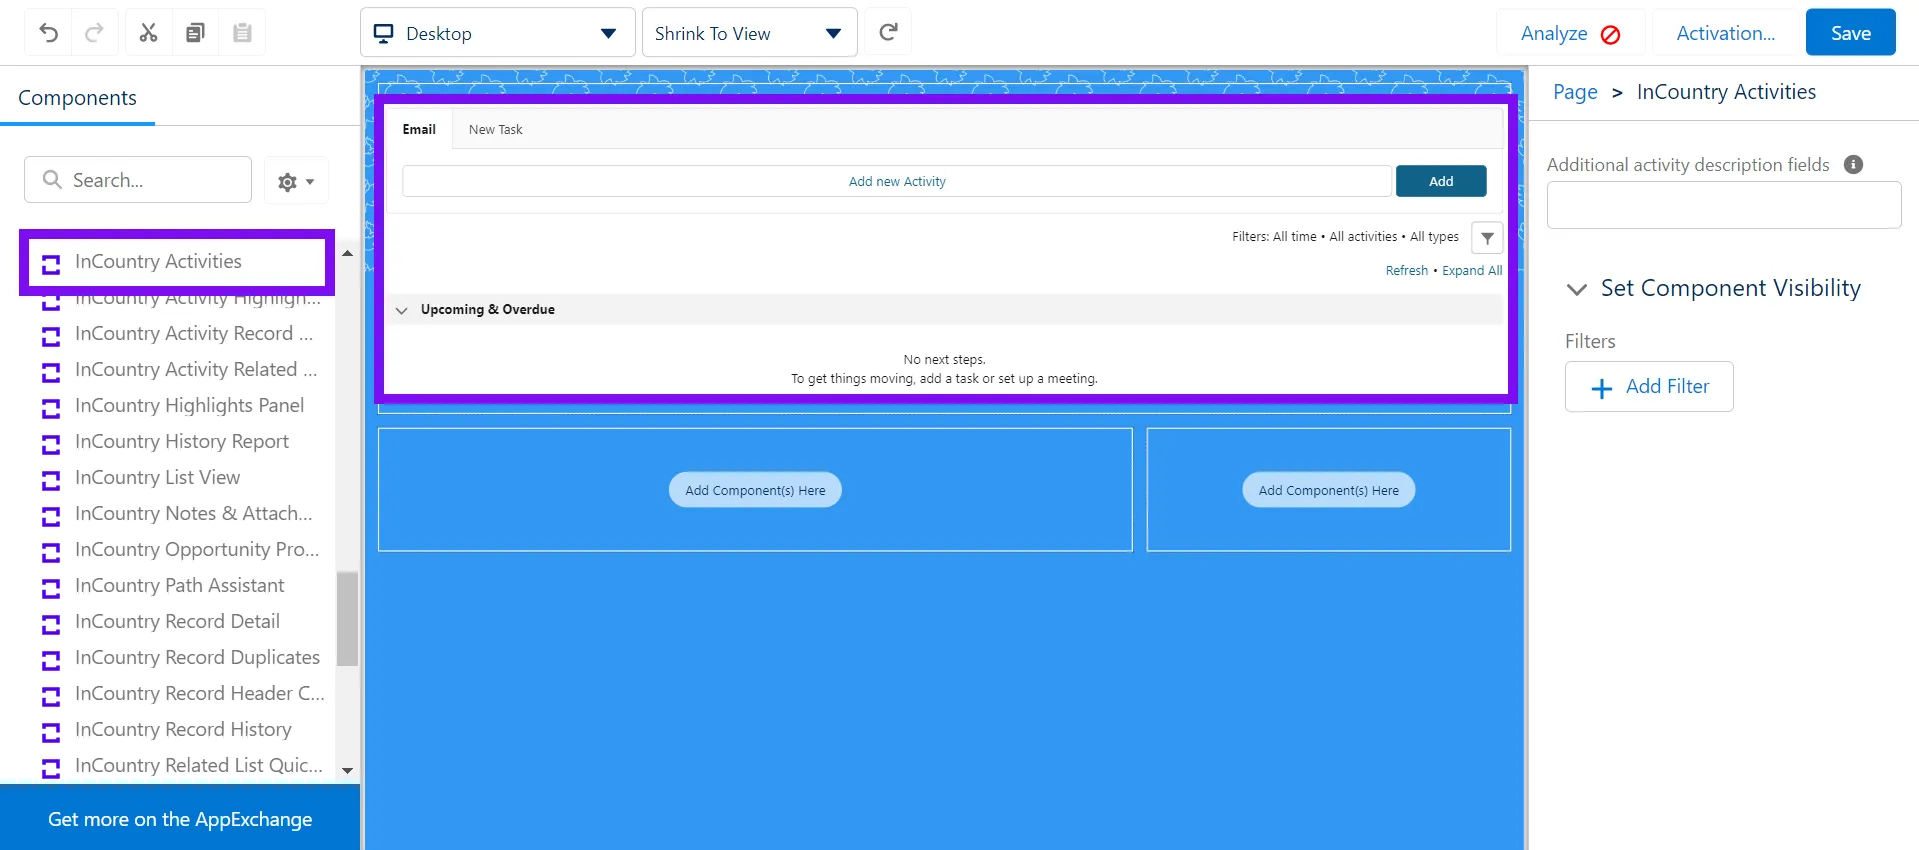
InCountry Activities
Description
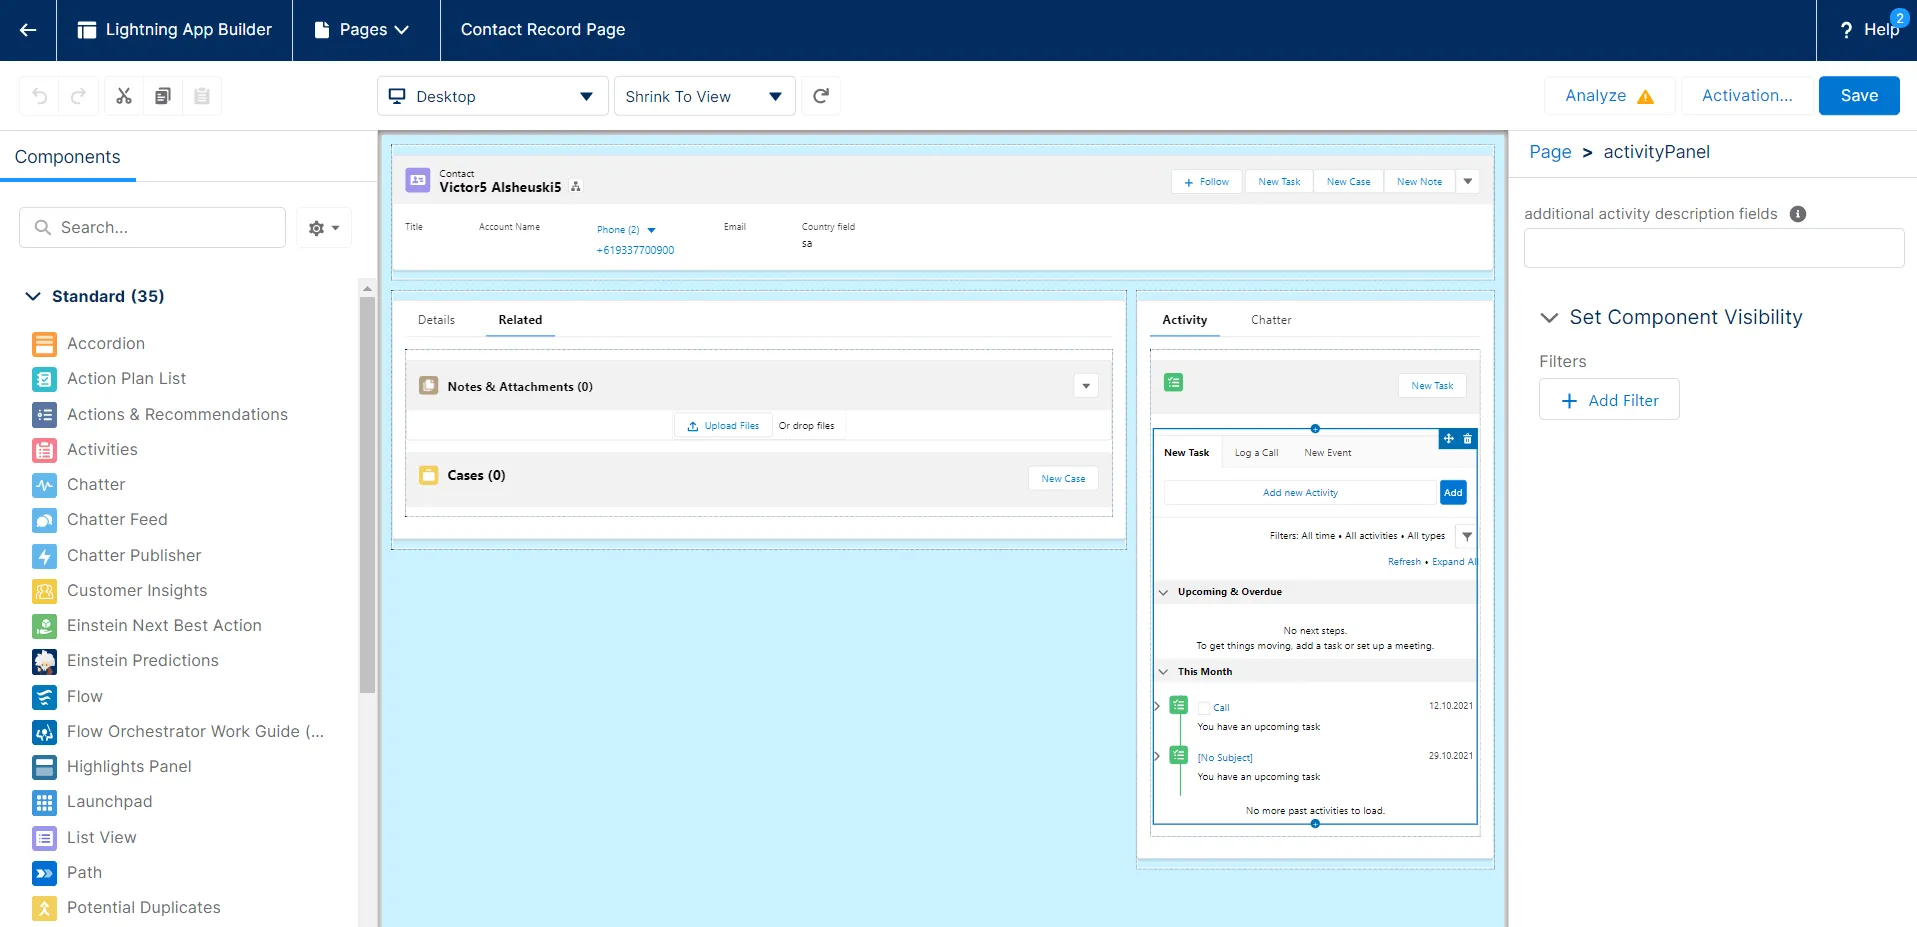
The InCountry Activities component is a replacement for the native Salesforce component - Activities. This component renders the list of activities in chronological order in breakdown by activity type.
When needed
Display fields with open activities and activity history on the record.
Configuring the InCountry Activities component
-
In Lightning App Builder, drag the component to the layout.

-
Select the component to open the settings in the right part of the screen.
-
In the Additional activity description fields box, list names of fields to display on the component. (Optionally)
-
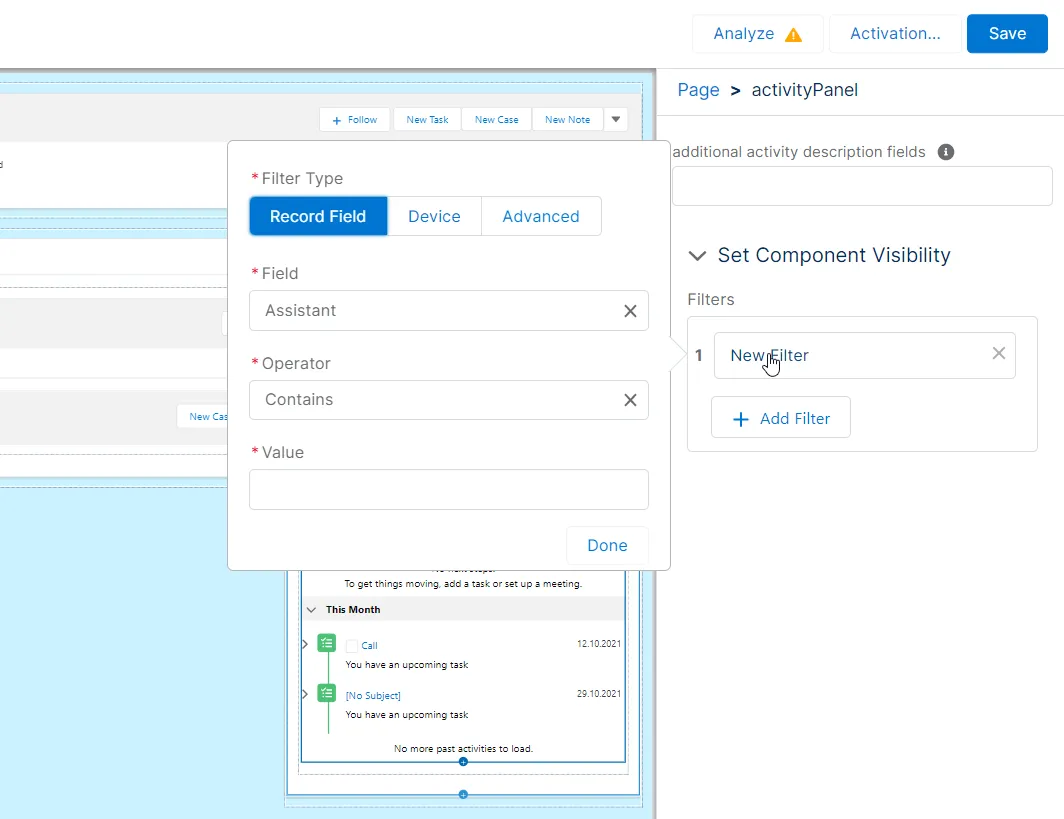
In the Set Component Visibility expand block, click + Add Filter. Define the filtration criteria for the component visibility on the layout according to your needs.
-
Activate the page layout.
InCountry Activity
This component is supported in the three-model package for the redaction and restriction models.
The InCountry Data Residency for Salesforce package provides the Activity component as a replacement for the native Activity component.
Adding the Activity component to the page layout
Please follow these instructions if you use Salesforce Lightning.
-
Open the list for a specific object and select a specific record.
-
Click Setup, then select Edit Page.
-
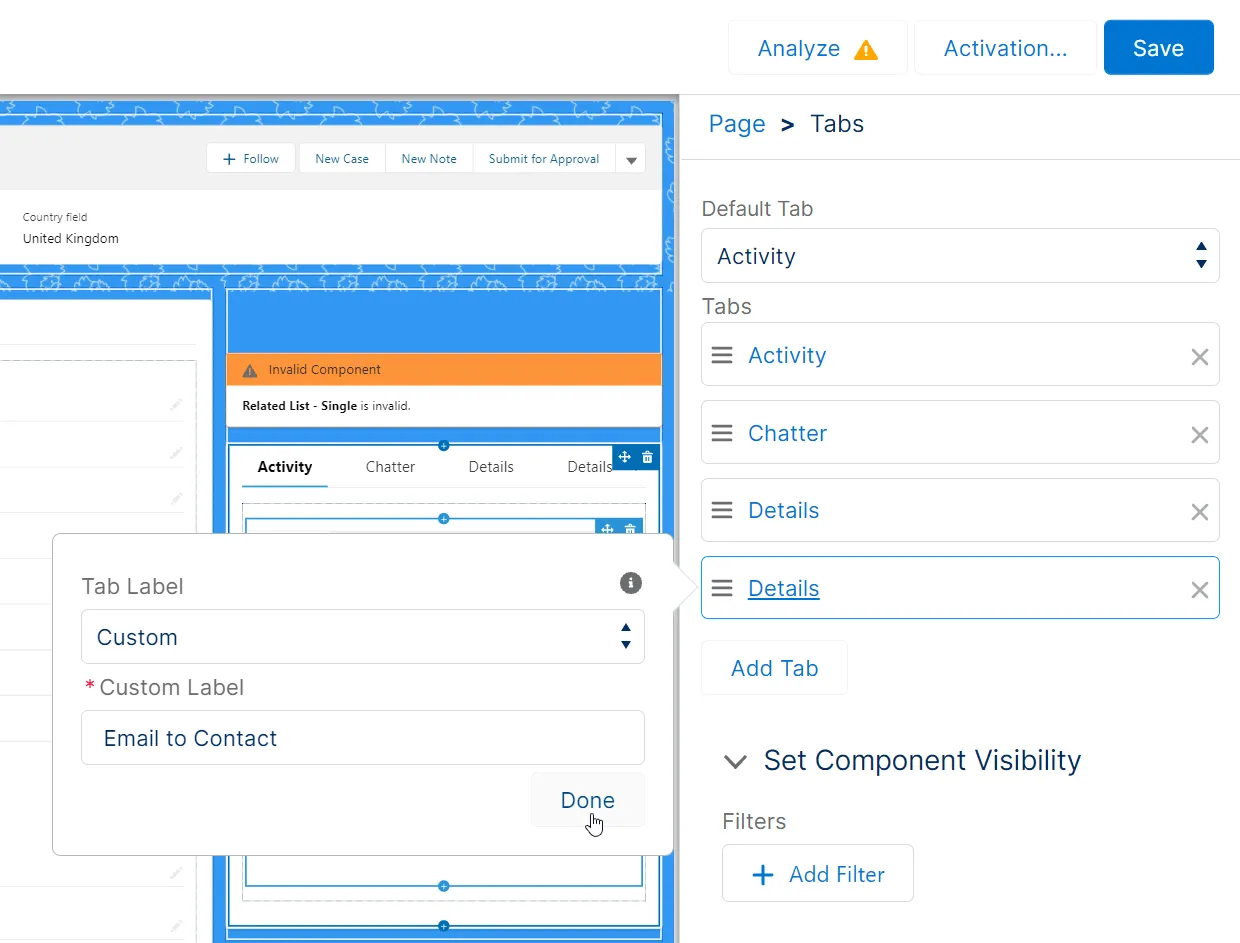
On the Lightning App Builder page, add a new tab. Select
Customand enter a custom label. -
Drag the
activityPanelcomponent to the tab. -
Regulate the visibility of components by adding filters.
-
Click Save.
-
Click Activation and activate the modified page.
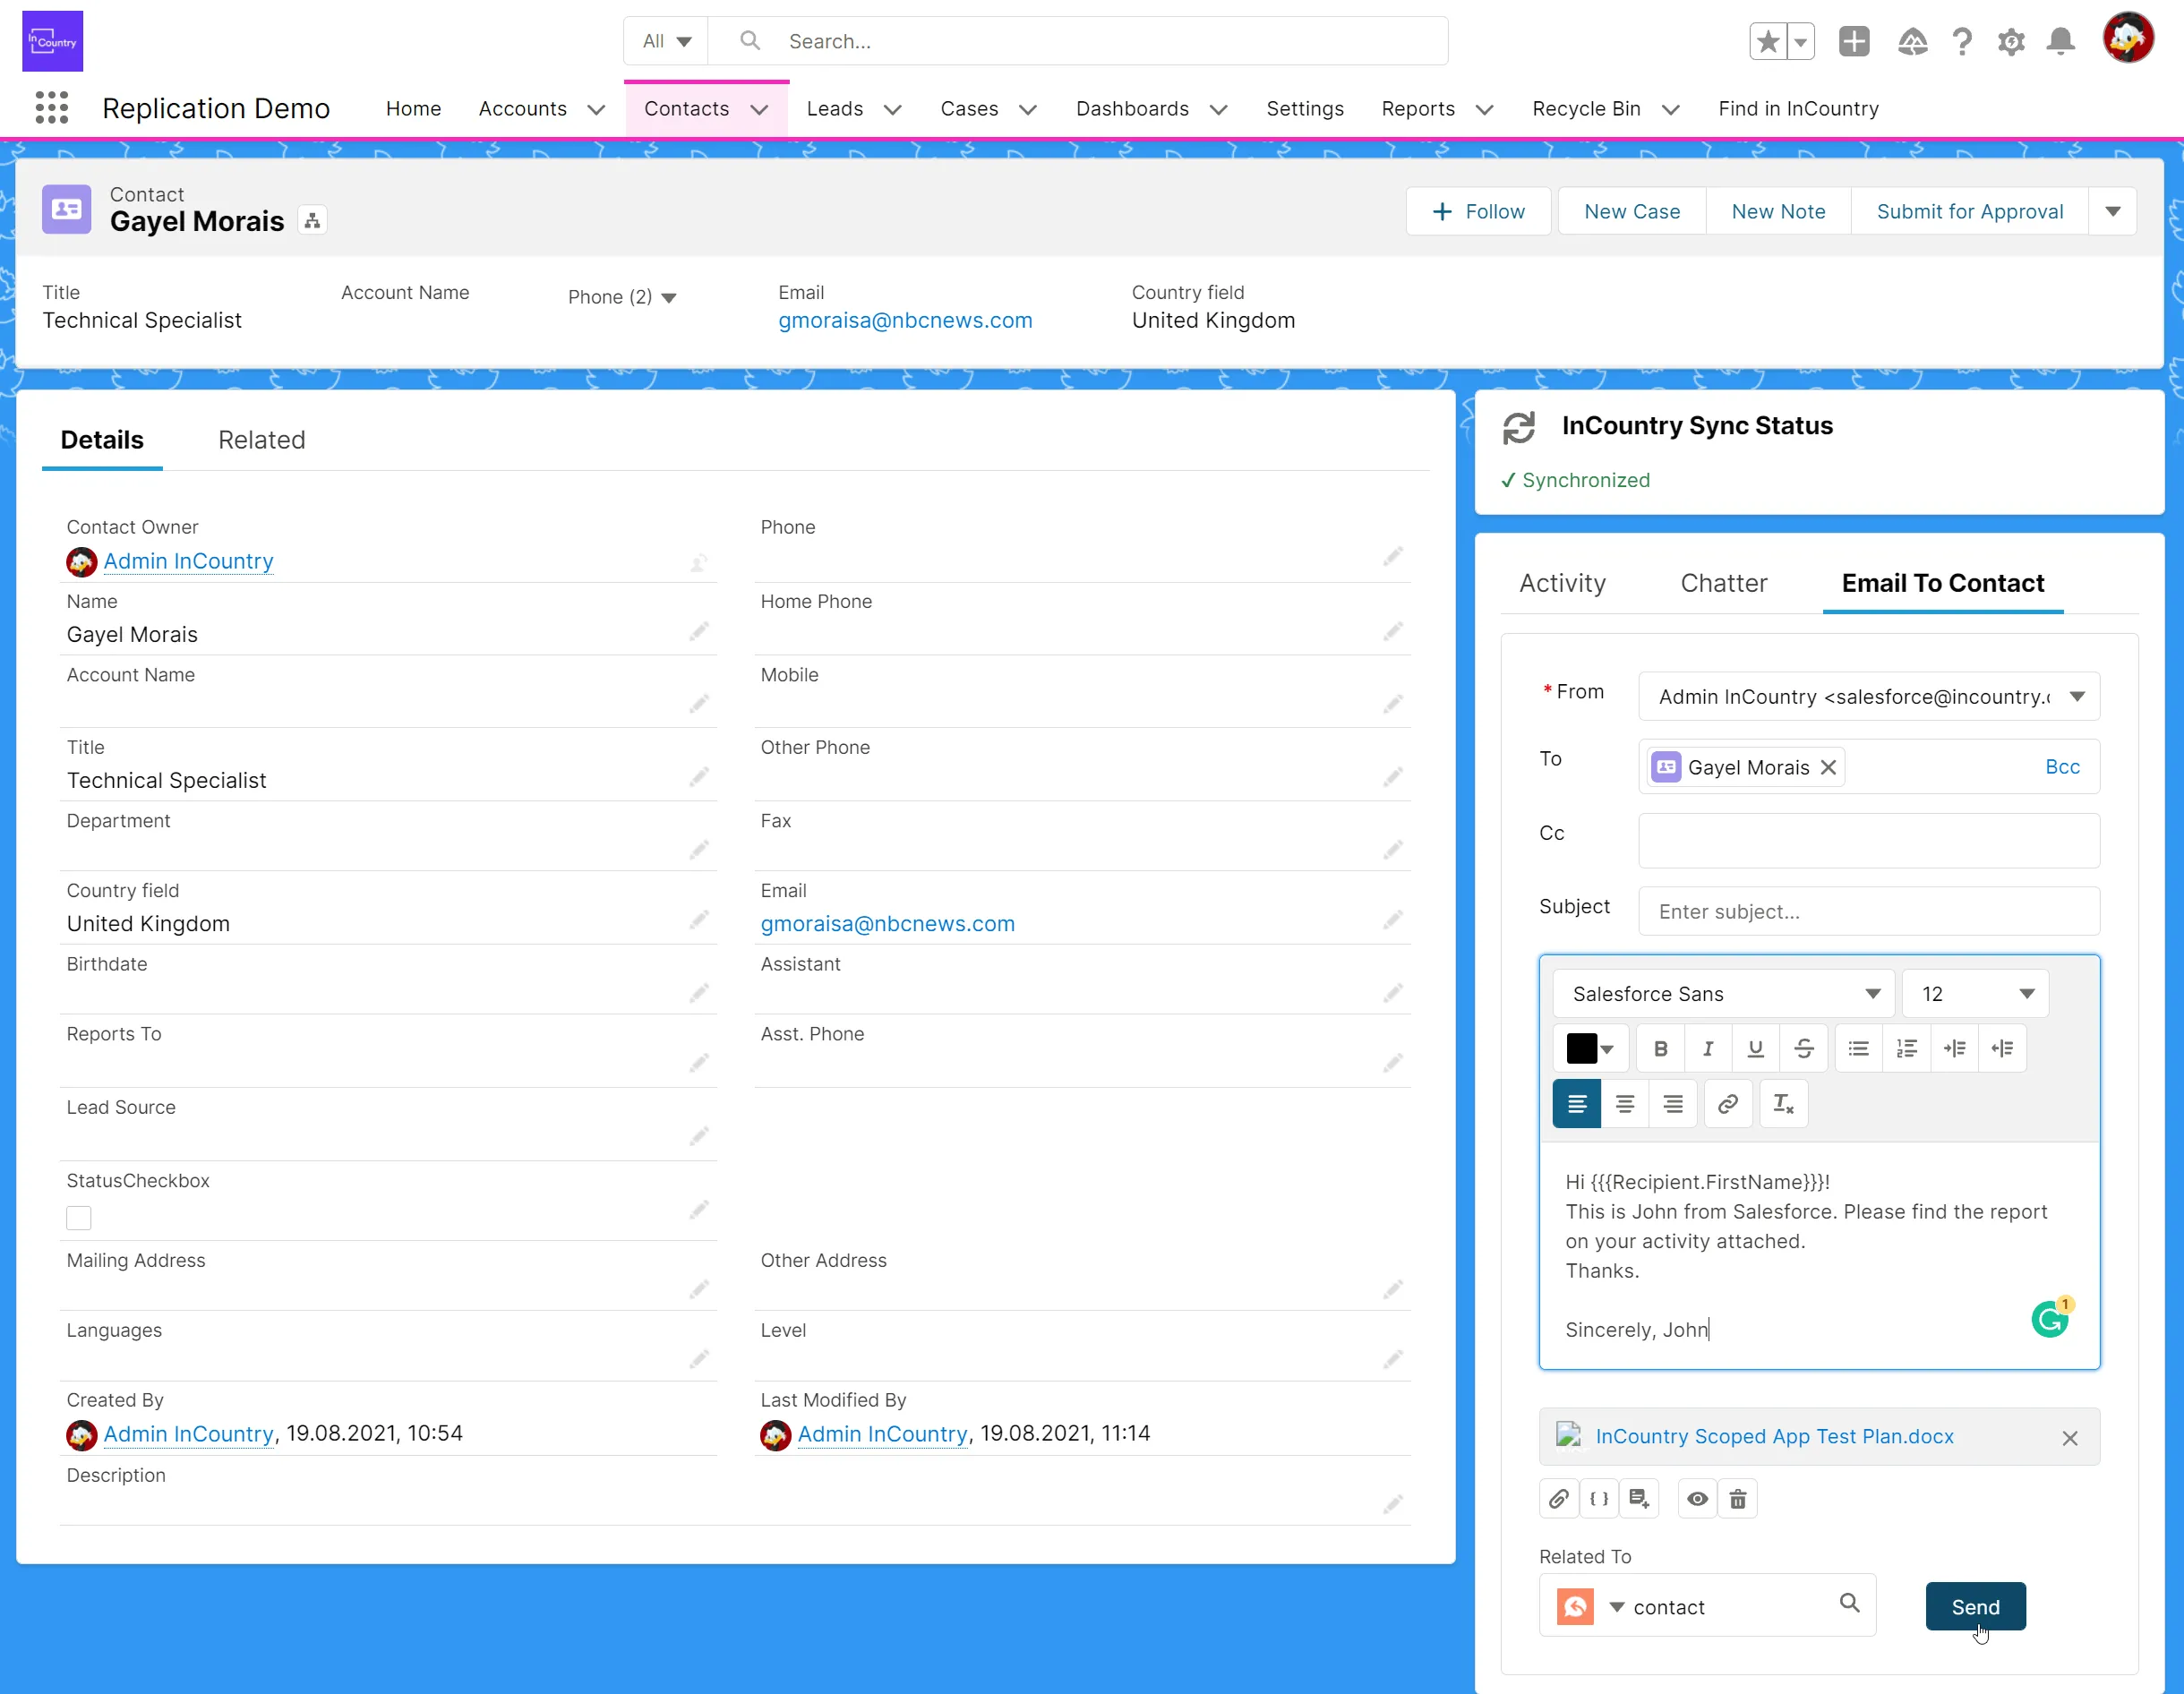
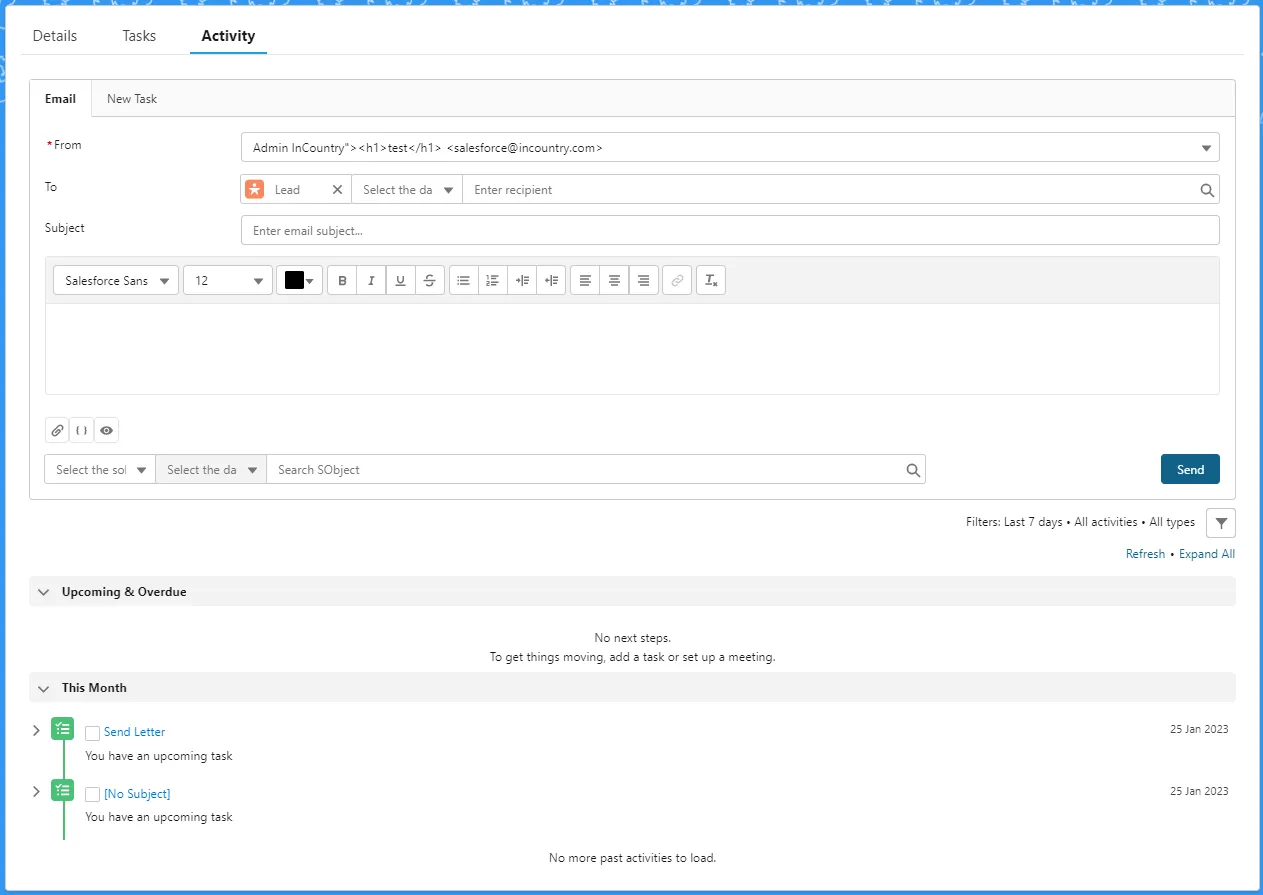
Working with the Activity component
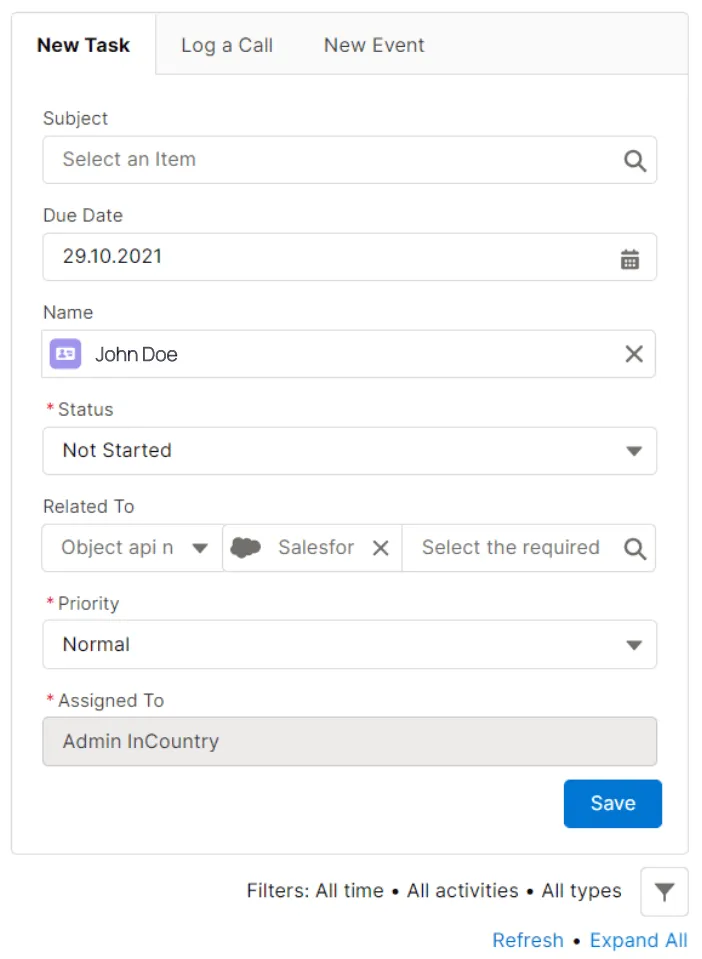
The Activity component allows you to manage tasks, log calls, and schedule events with your customers and prospects. InCountry’s equivalent of this component resembles the native Salesforce component and provides a similar user experience.
Creating a new task activity
-
Within the Activity component, locate the New Task tab and select it.
-
Click Add new Activity.
-
Fill out details of a new activity.
-
Click Save.
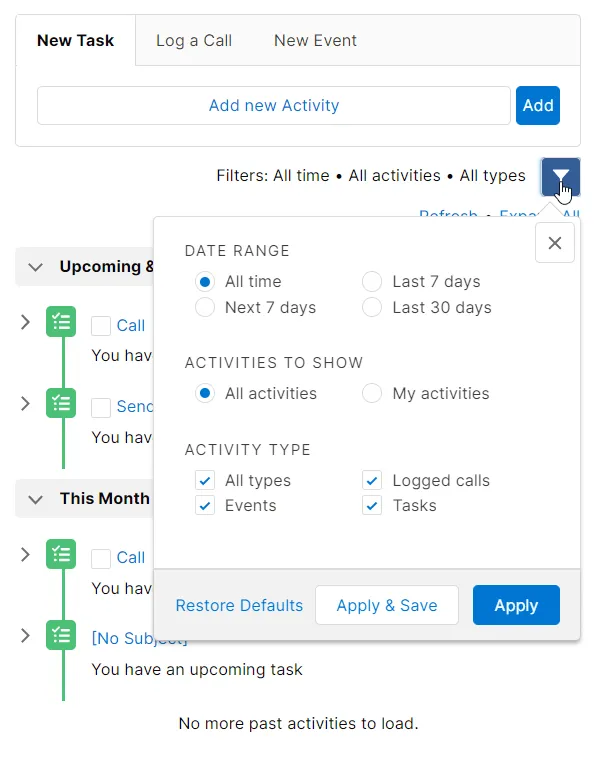
Filtering task activities
-
Select the New Task tab.
-
Locate the Filter icon and click it.
-
Define the filtration criteria.
-
Click Apply or Apply & Save (to permanently save the filtration criteria).
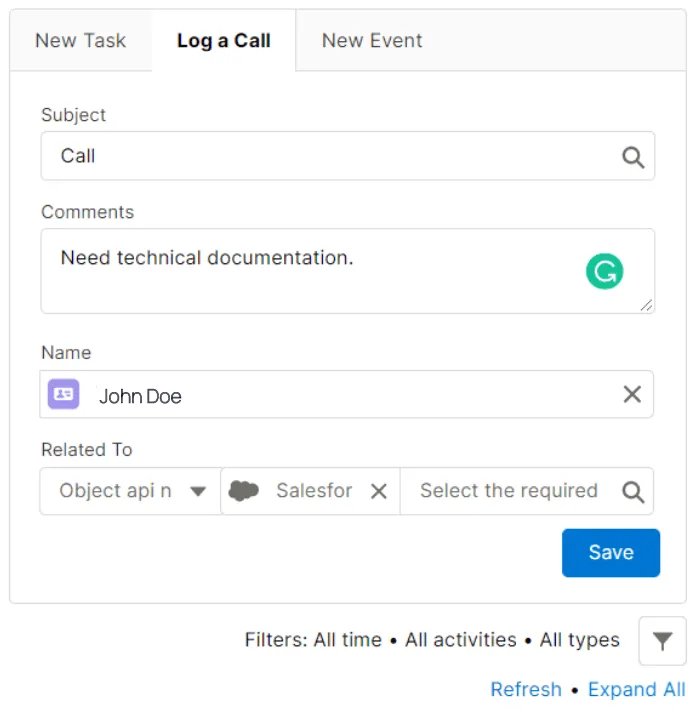
Logging calls
-
Select the Log a Call tab.
-
Enter the log summary.
-
Click Save.
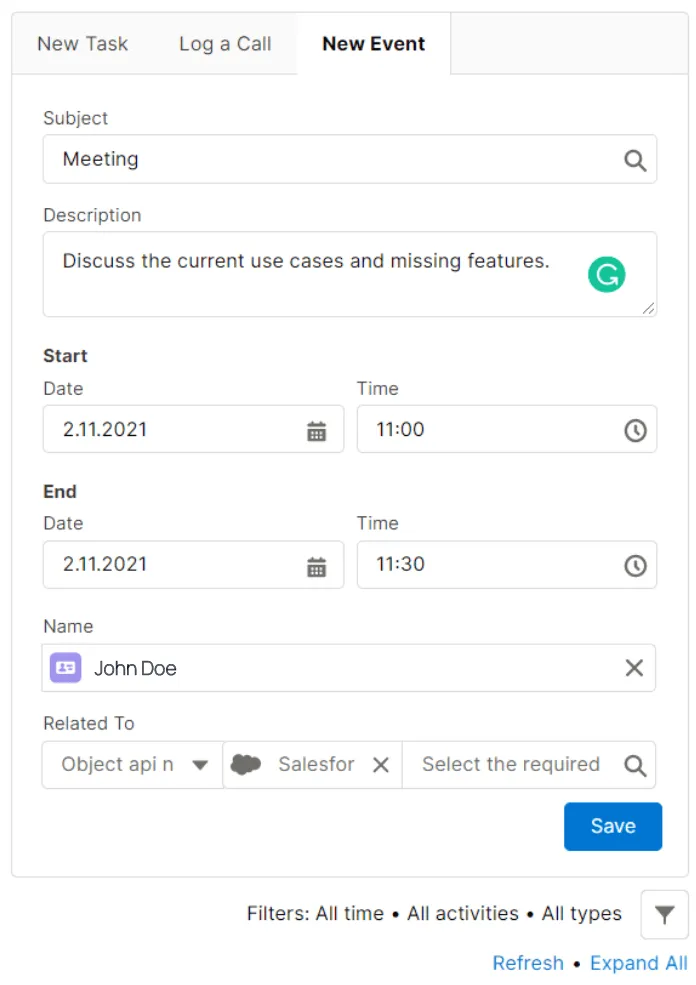
Managing events
-
Select the New Event tab.
-
Fill in details for the event.
-
Define the event time.
-
Click Save.
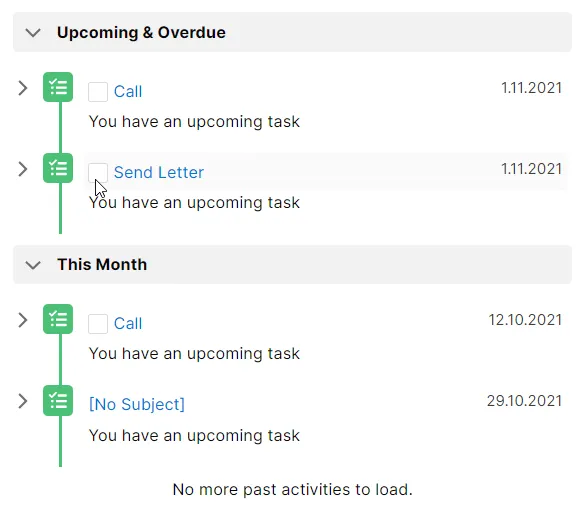
Closing tasks
-
Locate the Task Timeline block.
-
Locate the task you want to close and hover over it.
-
Check the box. The task is closed.
-
If you closed the task accidentally, clear the box.
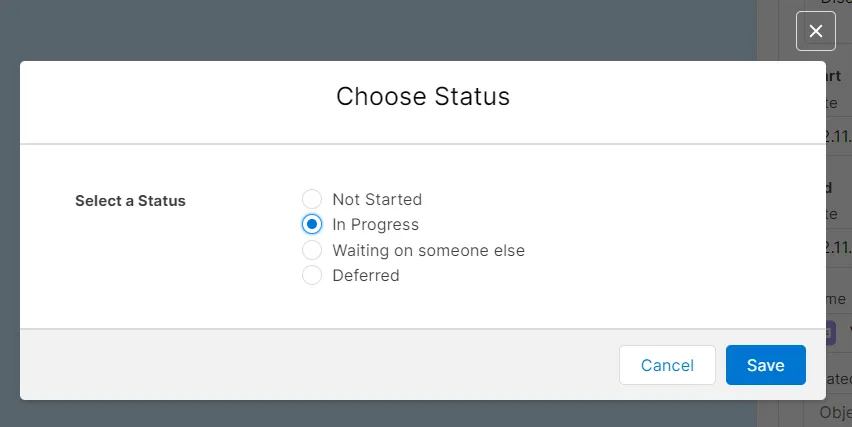
-
In the Choose Status form, select the current status of the task.
-
Click Save.
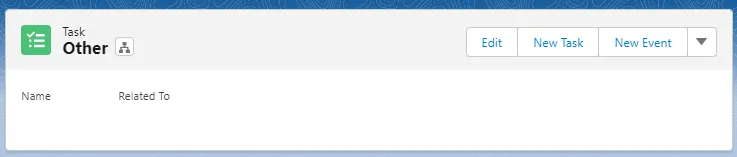
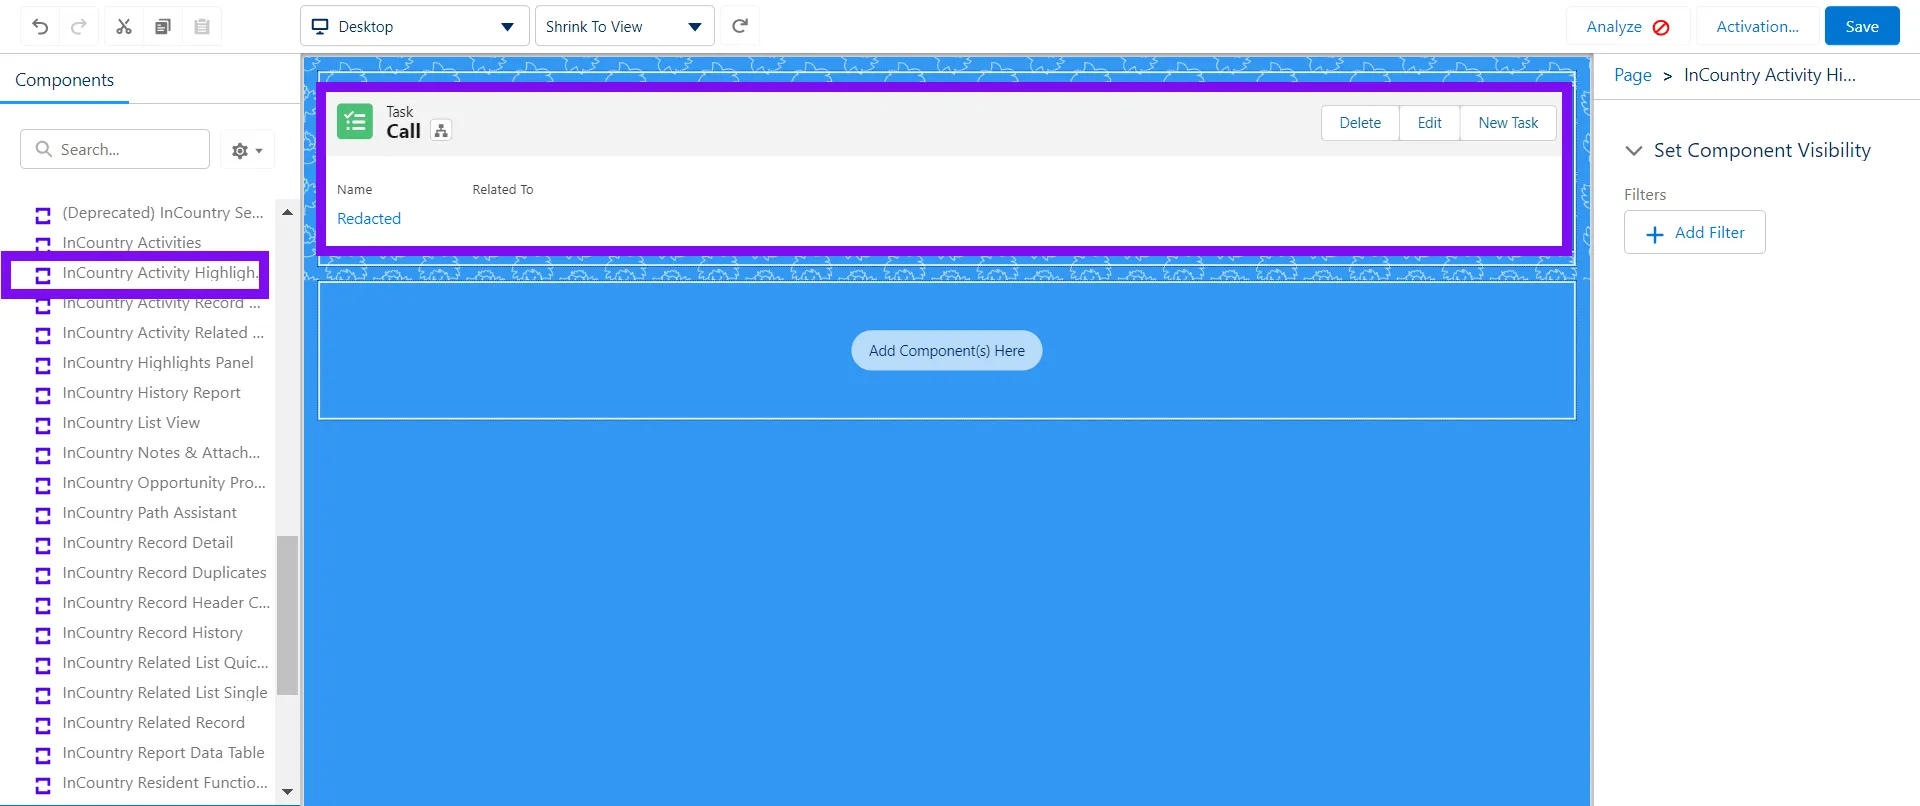
InCountry Activity Highlights Panel
The InCountry Activity Highlights Panel component is displayed for the Task and Event Salesforce objects in the record details view only.
Description
The InCountry Activity Highlights Panel component is a replacement for the native Salesforce component - Highlights Panel presented for the activity object. This component renders the header that contains page-level actions and the block of key activity fields.
This component should be used only for the Task and Event objects instead of the InCountry Highlights Panel component.
When needed
Display key information for specific activities, such as tasks and events.
Configuring the InCountry Activity Highlights Panel component
-
In Lightning App Builder, drag the component to the layout.
-
Select the component to open the settings in the right part of the screen.
-
In the Set Component Visibility expand block, click + Add Filter. Define the filtration criteria for the component visibility on the layout according to your needs.
-
Activate the page layout.
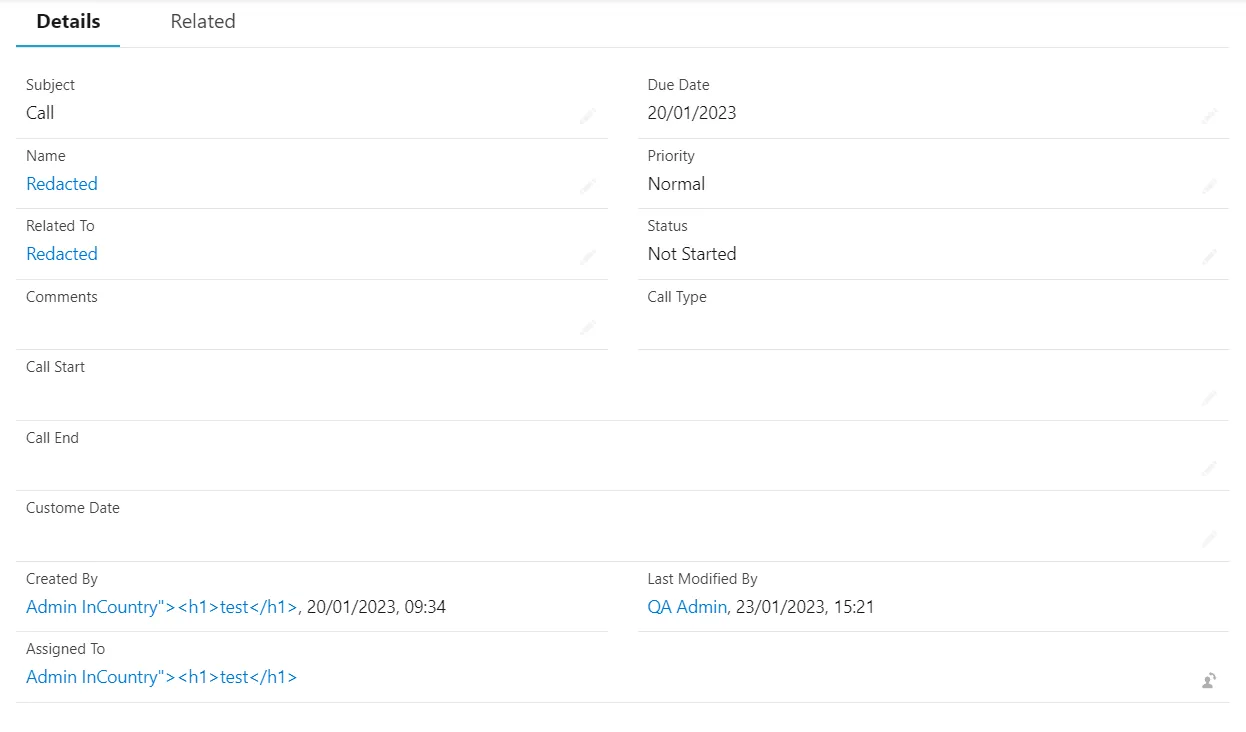
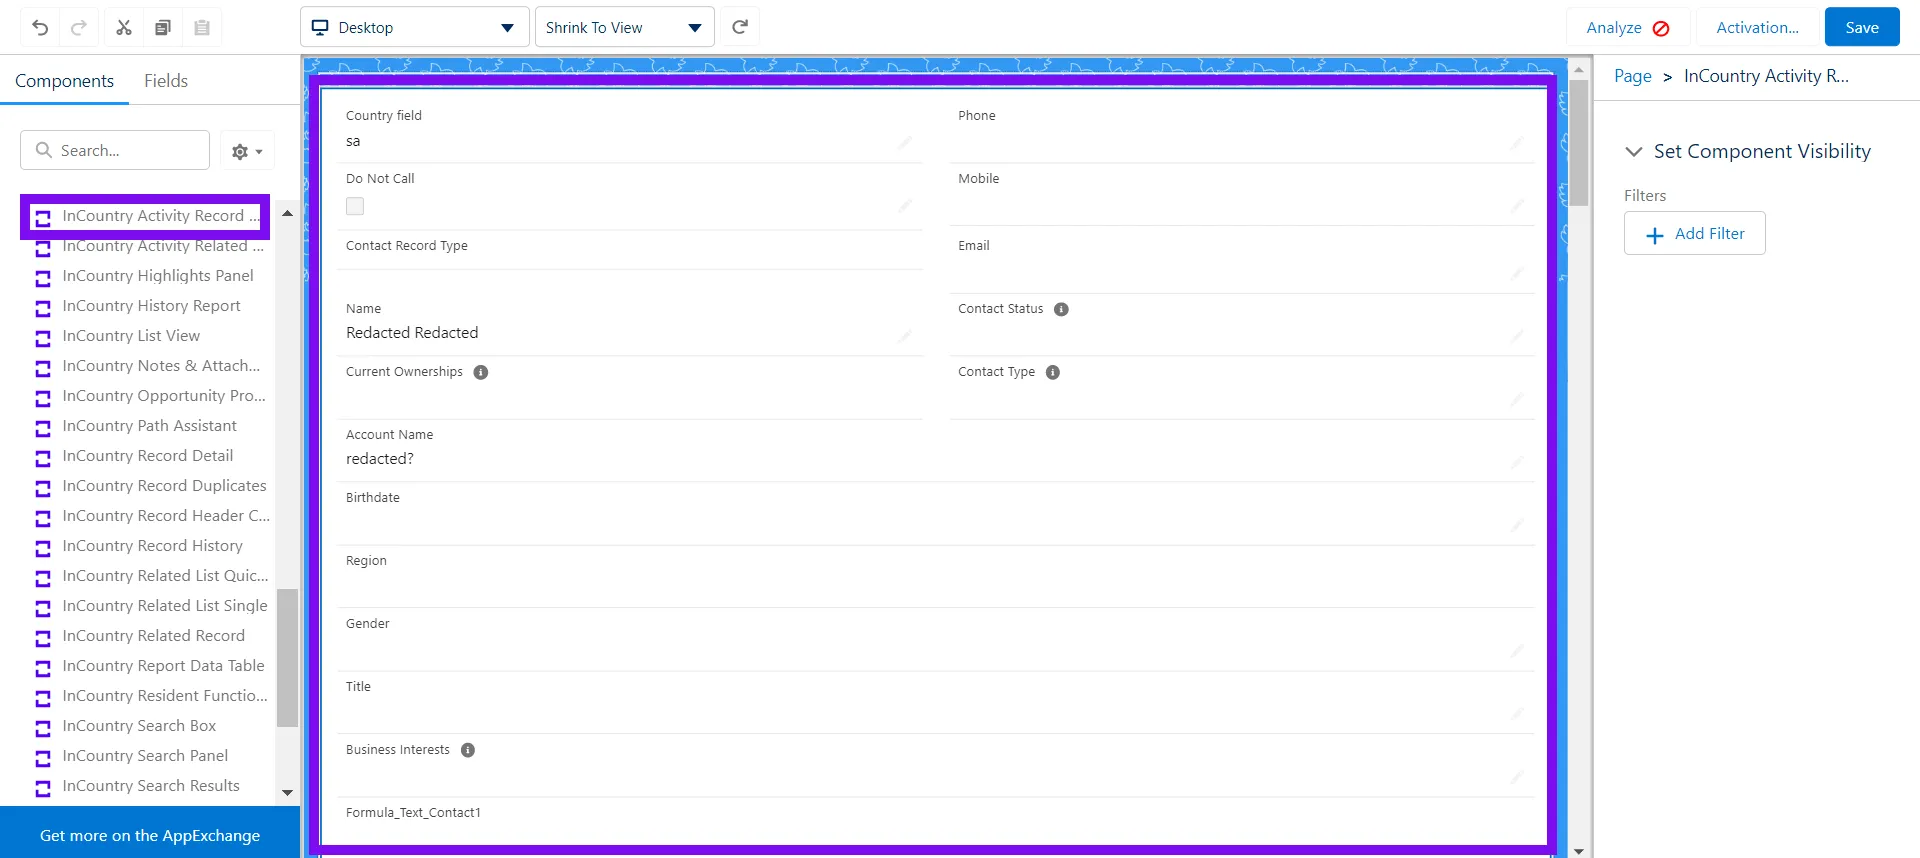
InCountry Activity Record Detail
The InCountry Activity Record Detail component is displayed in the record details view only.
Description
The InCountry Activity Record Detail is a replacement for the native Salesforce component - Record Detail which should be configured specifically for the Activity object. This component renders the block of fields displaying the activity record information.
When needed
Display fields with sensitive and generic information about records pertaining to the Activity object.
Configuring the InCountry Activity Record Detail component
-
In Lightning App Builder, drag the component to the layout.
-
Select the component to open the settings in the right part of the screen.
-
In the Set Component Visibility expand block, click + Add Filter. Define the filtration criteria for the component visibility on the layout according to your needs.
-
Activate the page layout.
InCountry Activity Related List Single
The InCountry Activity Related List Single component is displayed in the record details view only.
Description
The InCountry Activity Related List Single component is a replacement for the native Salesforce component - Related List Single displayed for the Activity object. This component renders a list of related activities for a record.
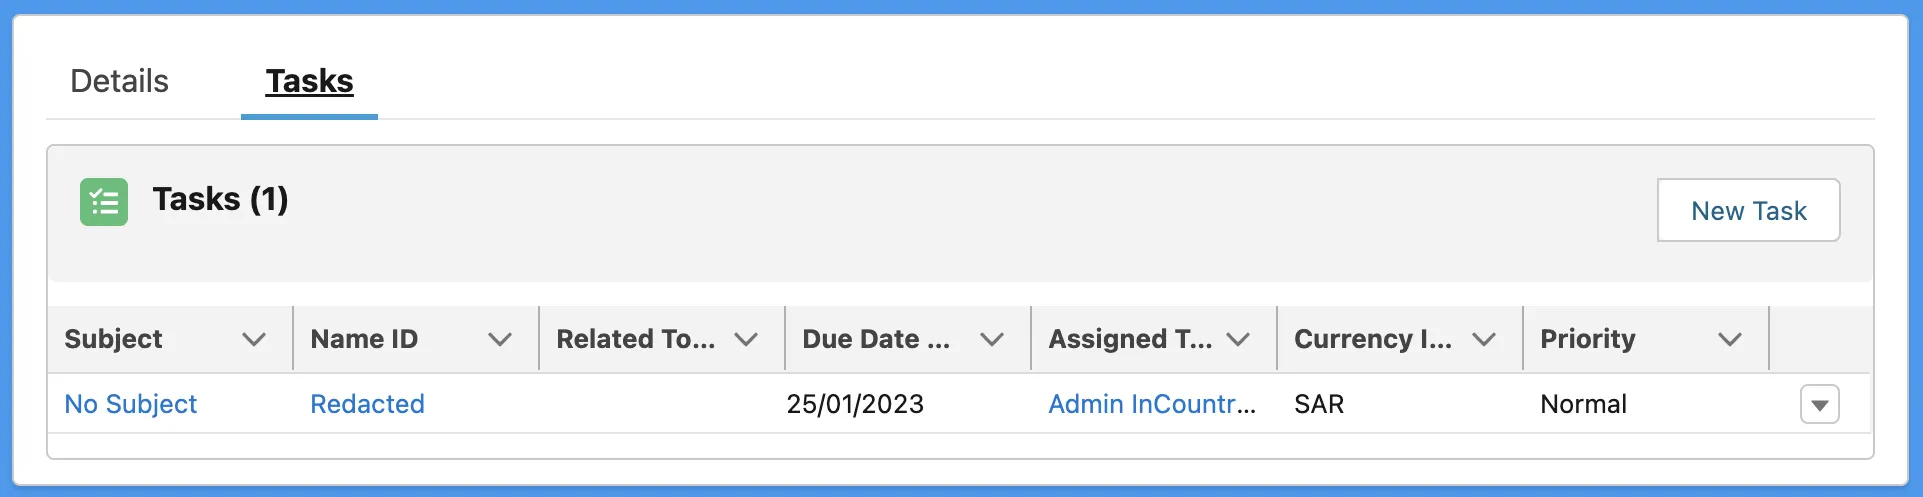
When needed
Display a list of related records for the following objects:
- Task
- Open Activity
- Activity History
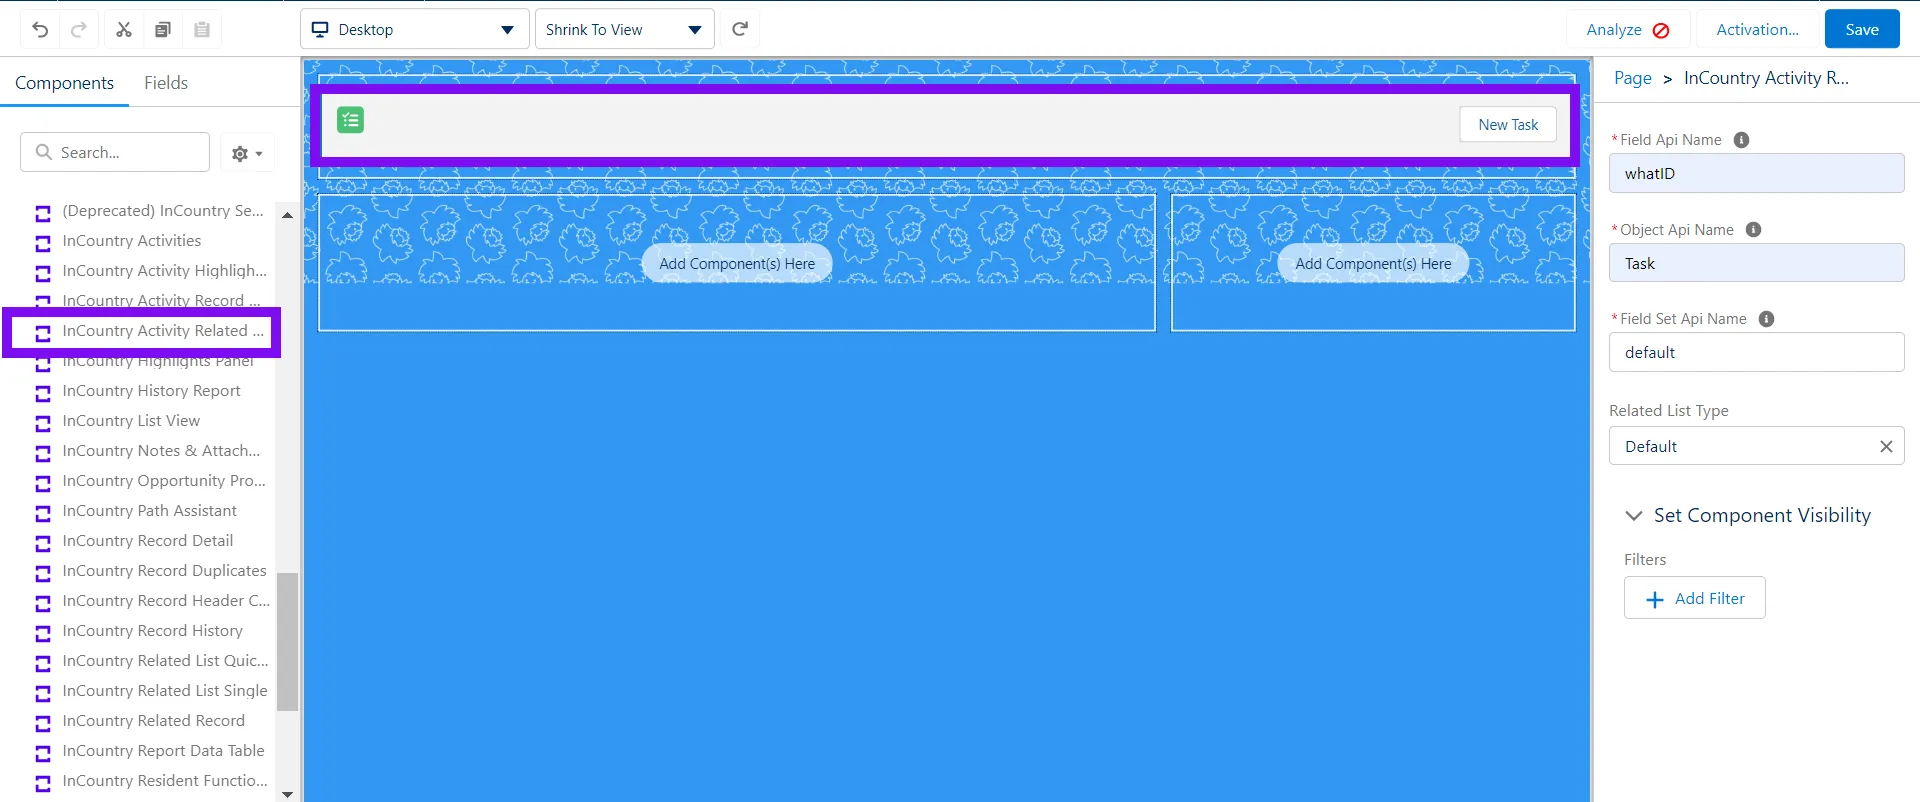
Configuring the InCountry Activity Related List Single component
-
In Lightning App Builder, drag the component to the layout.
-
Select the component to open the settings in the right part of the screen.
-
In the Field API Name box, enter the API name of the lookup field to display the Salesforce object (for example
whatID,whoID). For the details, please see documentation. -
In the Object API Name box, enter the Salesforce Activity object whose data you want to display (for example
Task,Event). -
In the Field Set API Name box, enter the API name of the Field Set. The field set defines which fields will be displayed on the component. The field set can be created in Object Manager. If you want to use the standard InCountry Field Set, add a namespace (for example
testInCountry1__default). -
Select the related list type:
-
Default - display a default related list type.
-
Basic List - display records as a list.
-
Tile - display records as a tile.
-
-
In the Set Component Visibility expand block, click + Add Filter. Define the filtration criteria for the component visibility on the layout according to your needs.
-
Activate the page layout.
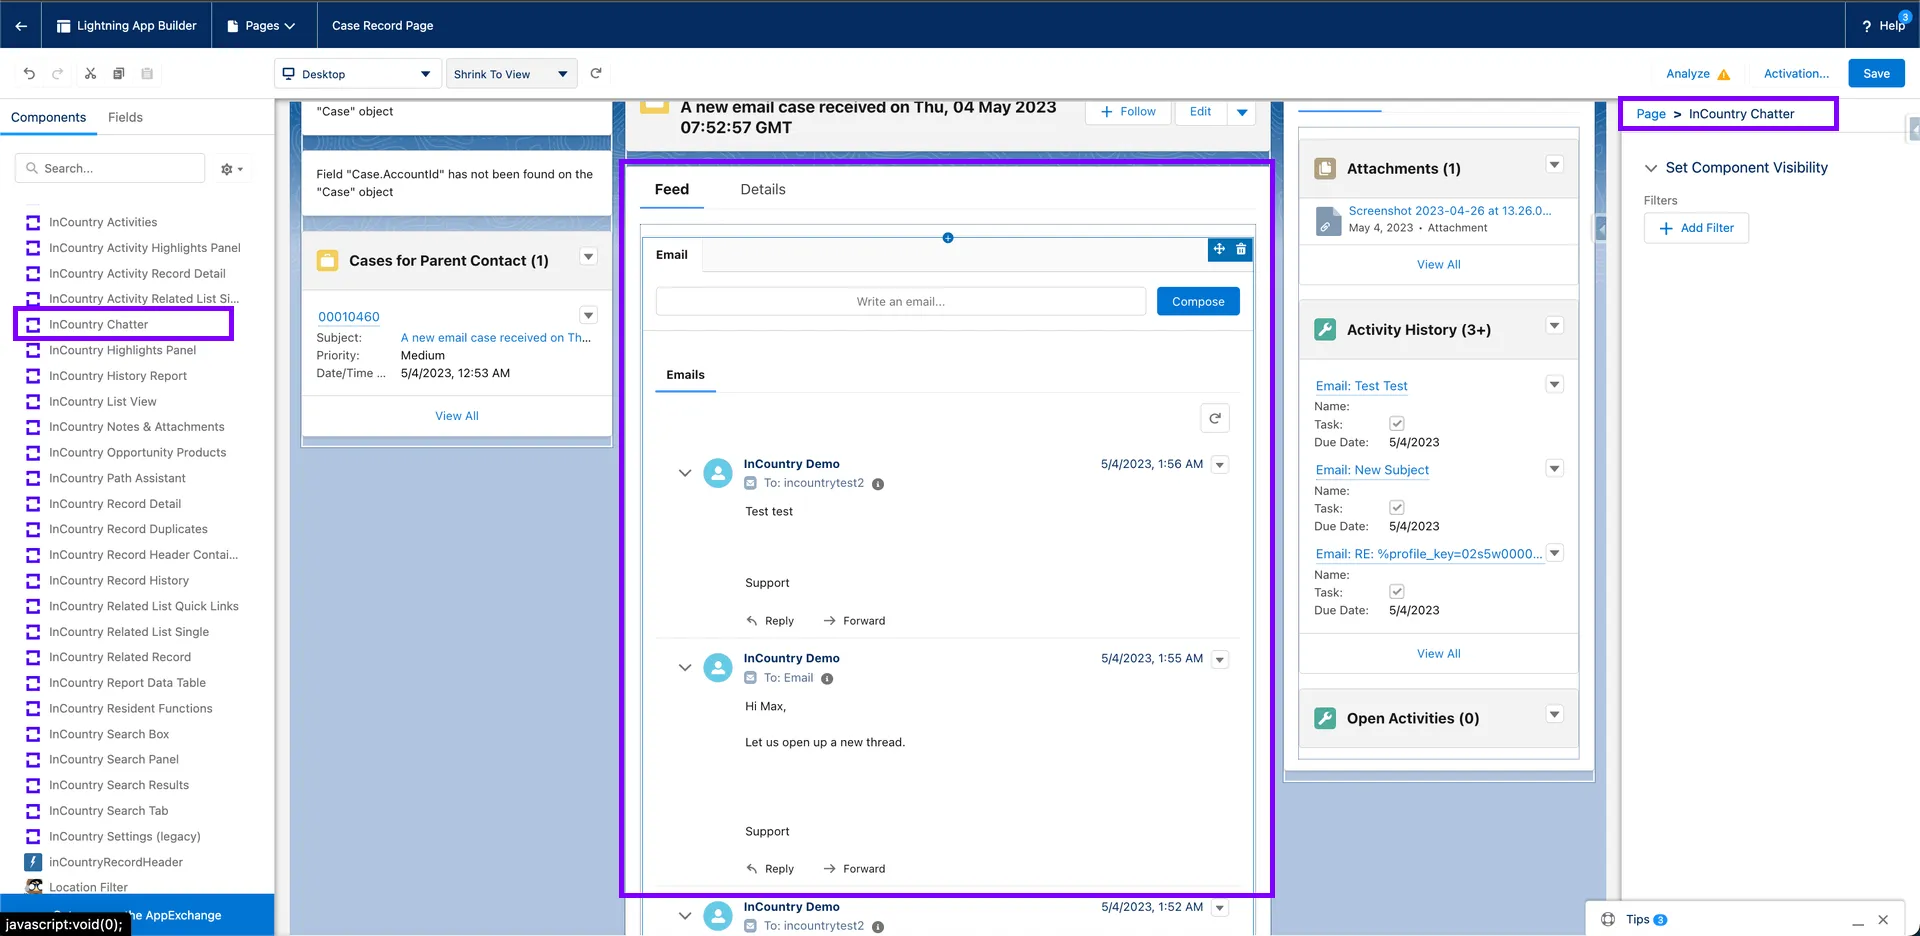
InCountry Chatter
Description
The InCountry Chatter component is a replacement for the native Salesforce component - Chatter. This component renders a feed with emails on the record detail page.
When needed
Display a feed listing emails pertaining to the opened case.
Configuring the InCountry Chatter component
-
In Lightning App Builder, drag the component to the layout.
-
Select the component to open the settings in the right part of the screen.
-
In the Set Component Visibility expand block, click + Add Filter. Define the filtration criteria for the component visibility on the layout according to your needs.
-
Activate the page layout.
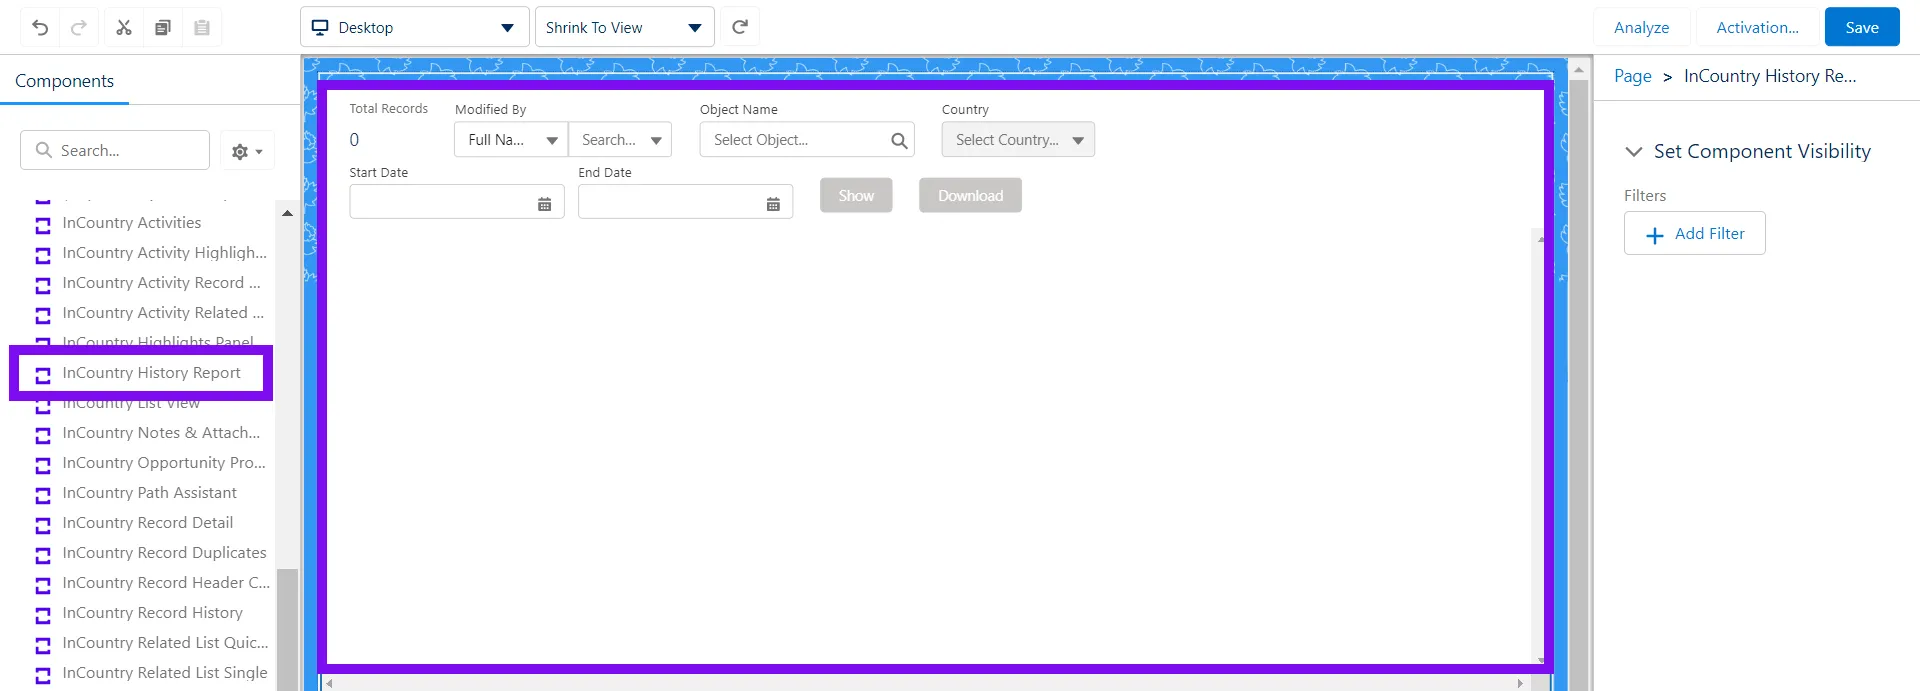
InCountry History Report
Description
The InCountry History Report component displays a historical report on record changes.
When needed
Display a historical report on record changes.
Configuring the InCountry History Report component
-
In Lightning App Builder, drag the component to the layout.
-
Select the component to open the settings in the right part of the screen.
-
In the Set Component Visibility expand block, click + Add Filter. Define the filtration criteria for the component visibility on the layout according to your needs.
-
Activate the page layout.
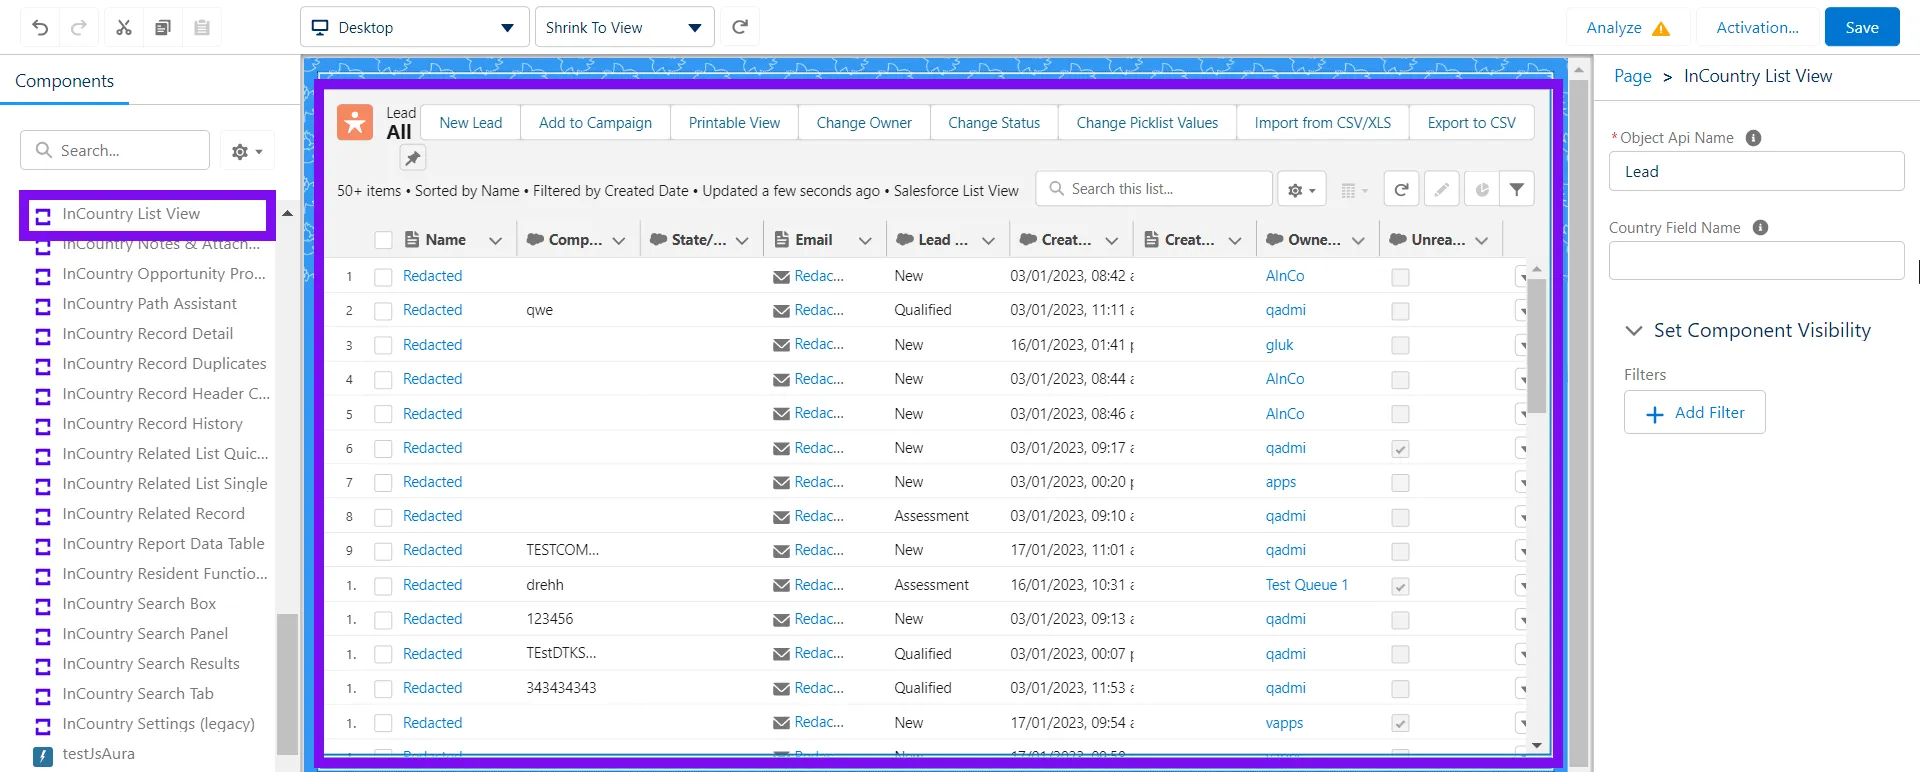
InCountry List View
Description
The InCountry List View component is a replacement for the native Salesforce component - List View. This component renders the list of records with regulated data and allows you to scroll down the list of these records.
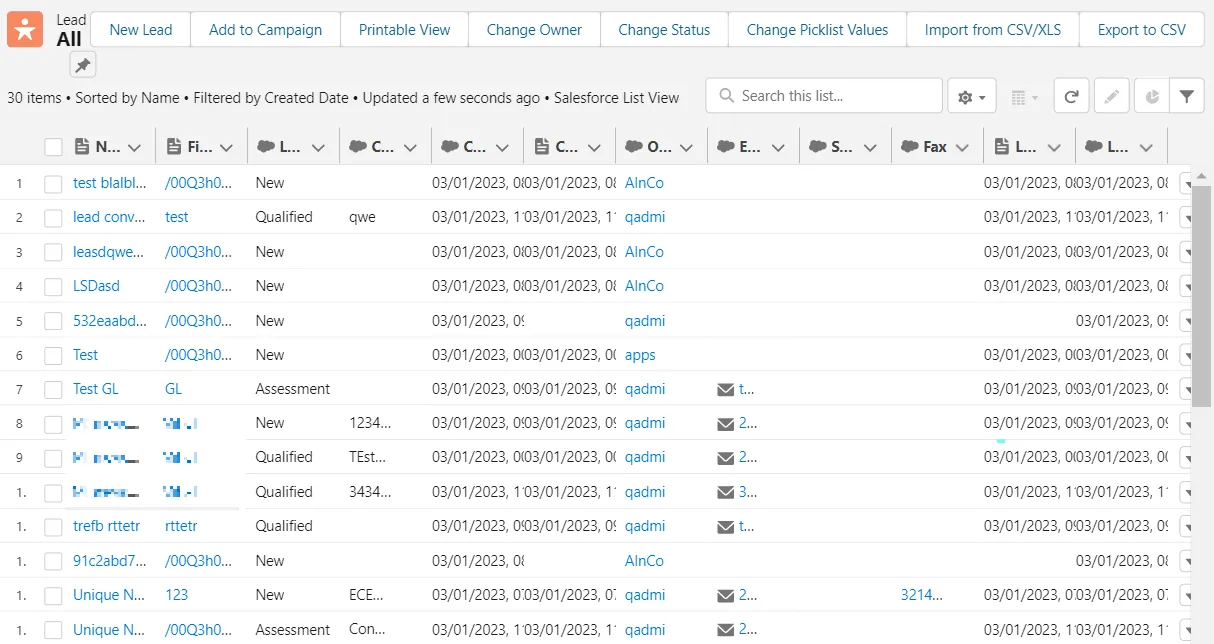
When needed
Display a list of records with regulated data queried from the InCountry platform.
Configuring the InCountry List View component
-
In Lightning App Builder, drag the component to the layout.
-
Select the component to open the settings in the right part of the screen.
-
In the Object API name box, enter the Salesforce object whose data you want to display.
-
In the Set Component Visibility expand block, click + Add Filter. Define the filtration criteria for the component visibility on the layout according to your needs.
-
Activate the page layout.
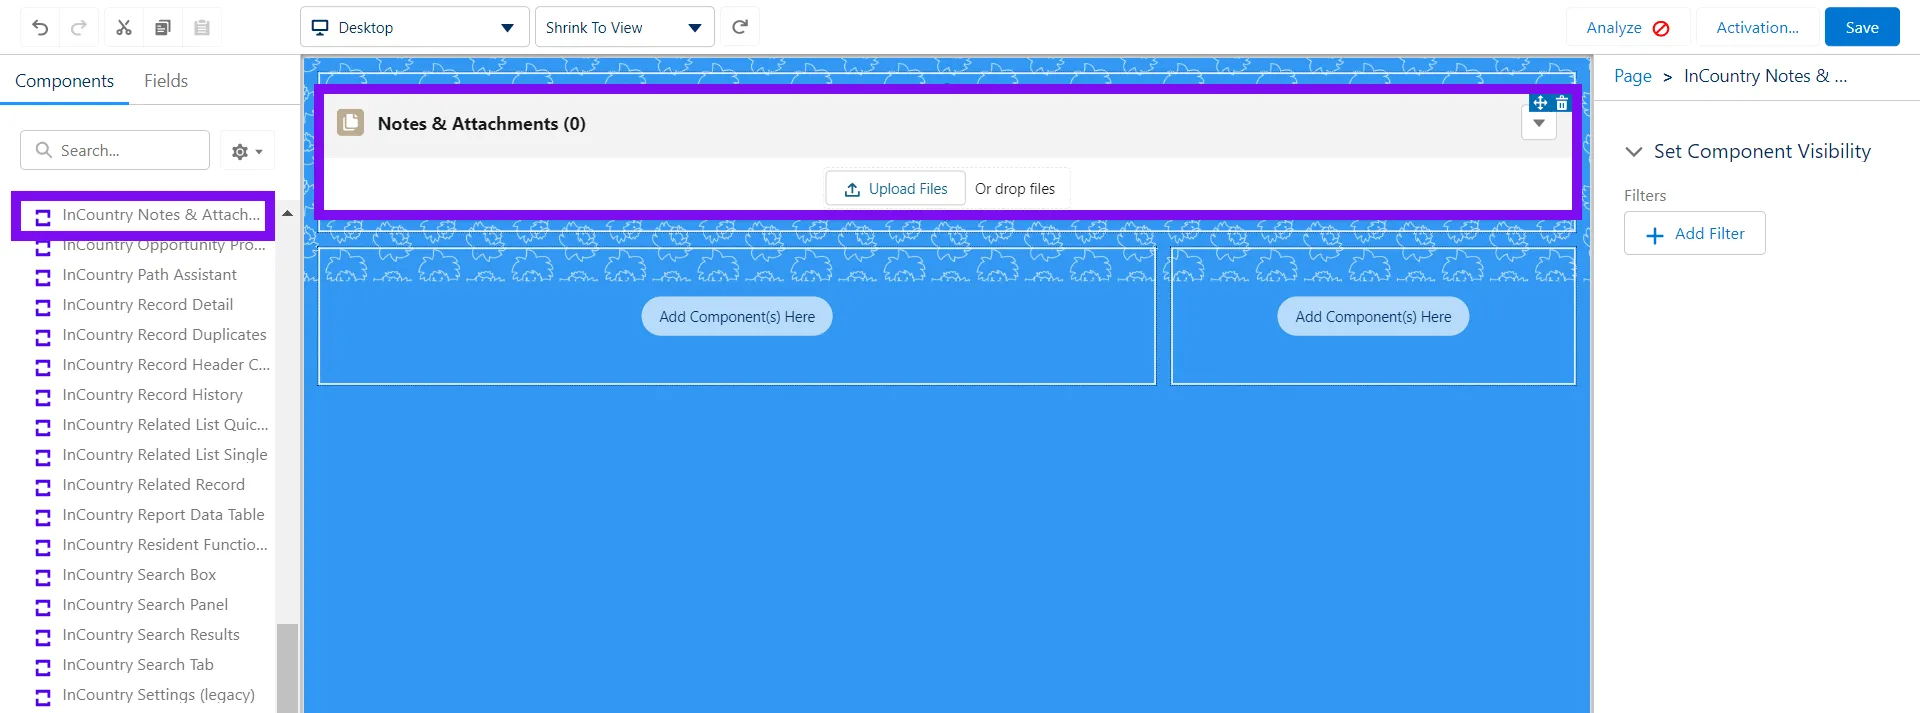
InCountry Notes & Attachments
The InCountry Notes & Attachments component is displayed in the record details view only.
Description
The InCountry Notes & Attachments component allows you to view, download and upload files pertaining to the currently opened Salesforce record. Such attachments are managed on the InCountry platform and are not physically stored in Salesforce according to the compliance requirements.
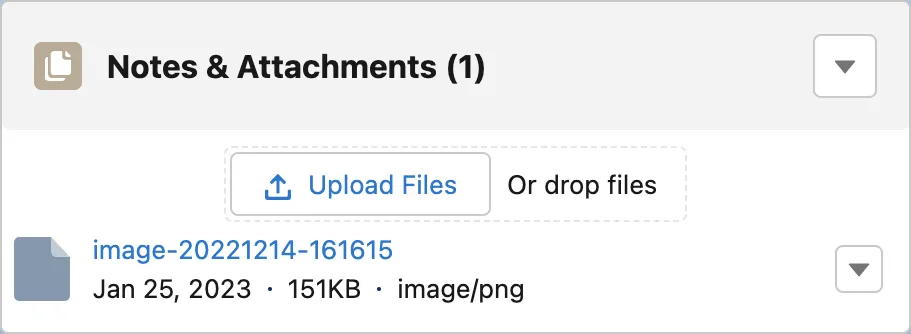
When needed
Manage attachments in a compliant way in Salesforce.
Configuring the InCountry Notes & Attachments component
-
In Lightning App Builder, drag the component to the layout.
-
Select the component to open the settings in the right part of the screen.
-
In the Set Component Visibility expand block, click + Add Filter. Define the filtration criteria for the component visibility on the layout according to your needs.
-
Activate the page layout.
Supported File Types
| File extension | Salesforce object type | Support |
|---|---|---|
| .doc | Contact, Case | Yes |
| .html/htm | Contact, Case | Yes |
| .jpg | Contact, Case | Yes |
| .msg | Contact, Case | Yes |
| Contact, Case | Yes | |
| .png | Contact, Case | Yes |
| .rtf | Contact, Case | Yes |
| .tif | Contact, Case | Yes |
| .txt | Contact, Case | Yes |
| .docx | Contact, Case | Yes |
| .pptx | Contact, Case | Yes |
| .xlsx | Contact, Case | Yes |
| .jpeg | Contact, Case | Yes |
Working with duplicates
For the web component approach, duplicates can be stored on the InCountry platform.
The InCountry platform can store duplicated files. The web component generates the unique name for every file by adding a timestamp to the name of the file.
Example of generated file name:
timestamp001__fileName.pdf
InCountry Opportunity Products
The InCountry Opportunity Products component is displayed in the record details view only.
Description
The InCountry Opportunity Products component renders all product records associated with the opened opportunity.
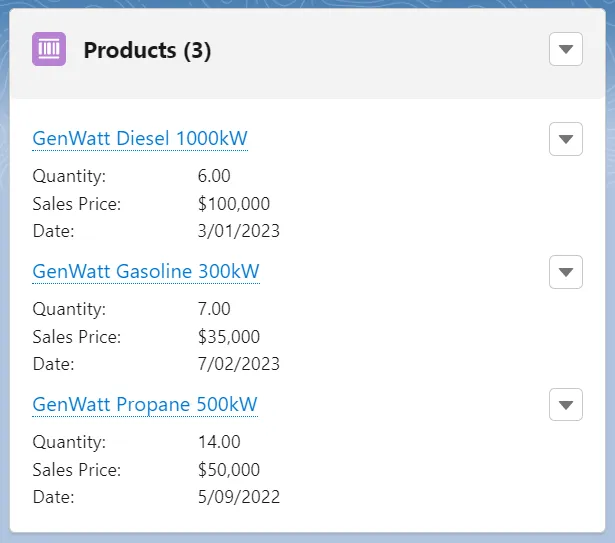
When needed
Display products related to a specific opportunity.
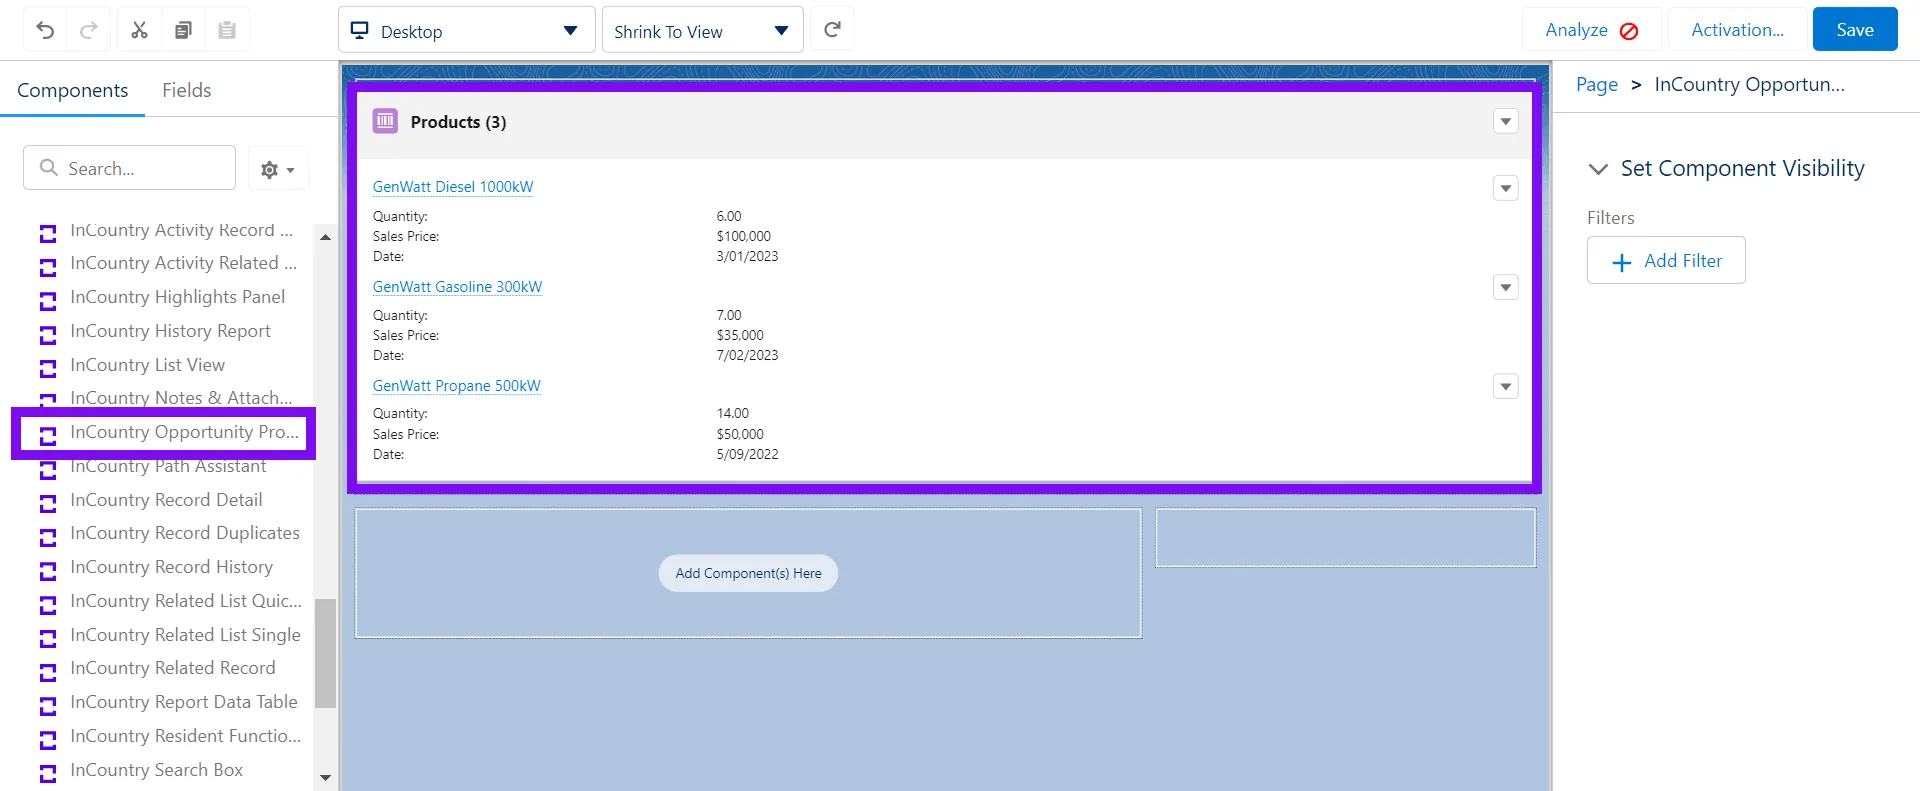
Configuring the InCountry Opportunity Products component
-
In Lightning App Builder, drag the component to the layout.
-
Select the component to open the settings in the right part of the screen.
-
In the Set Component Visibility expand block, click + Add Filter. Define the filtration criteria for the component visibility on the layout according to your needs.
-
Activate the page layout.
InCountry Path Assistant
The InCountry Path Assistant component is displayed in the record details view only.
Description
The InCountry Path Assistant component is a replacement for the native Salesforce component - Path. This component gives sales representatives a visual representation of the stages throughout the sales pipeline.

When needed
Display a visual representation of a business process and manage stages across the sales pipeline.
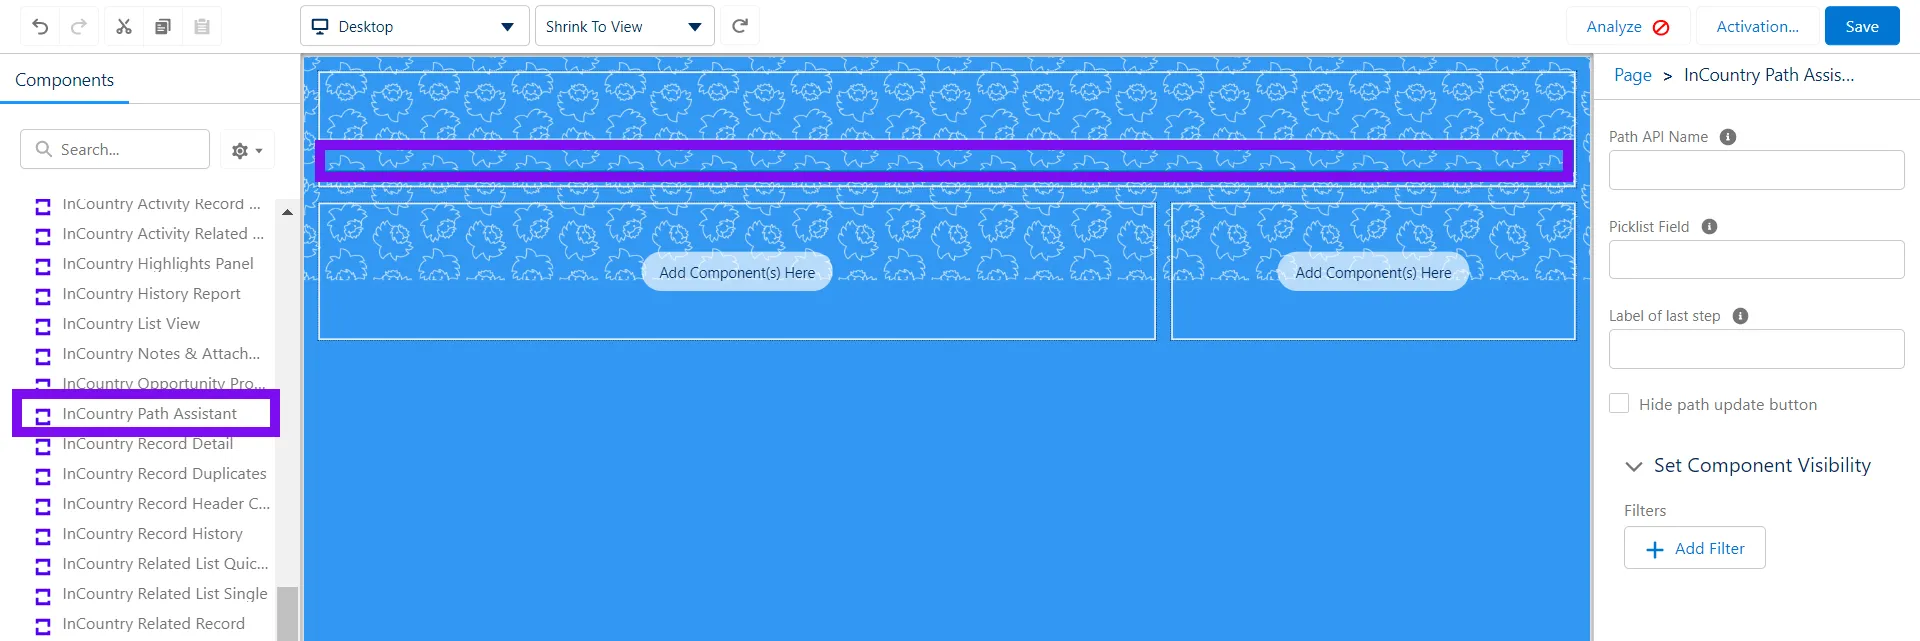
Configuring the InCountry Path Assistant component
-
In Lightning App Builder, drag the component to the layout.
-
Select the component to open the settings in the right part of the screen.
-
From the Path API name drop-down list, select the Path Assistant name.
-
From the Picklist Field drop-down list, select the field to display data from.
-
In the Label of last step box, enter the label name for the last step in the pipeline.
-
Select the checkbox Hide path update button to remove the Path Update button.
-
In the Set Component Visibility expand block, click + Add Filter. Define the filtration criteria for the component visibility on the layout according to your needs.
-
Activate the page layout.

InCountry Quote Line Items
The InCountry Quote Line Items component is displayed in the record details view only.
Description
The InCountry Quote Line Items component is a replacement for the native Salesforce component - Quote Line Item. This component is automatically created when the Quote is created from an Opportunity based on the Opportunity Products attached to that Opportunity.
When needed
Represents a quote line item, which is related to a product item (Product2 object) associated with a Quote, along with other information about those line items on that quote.
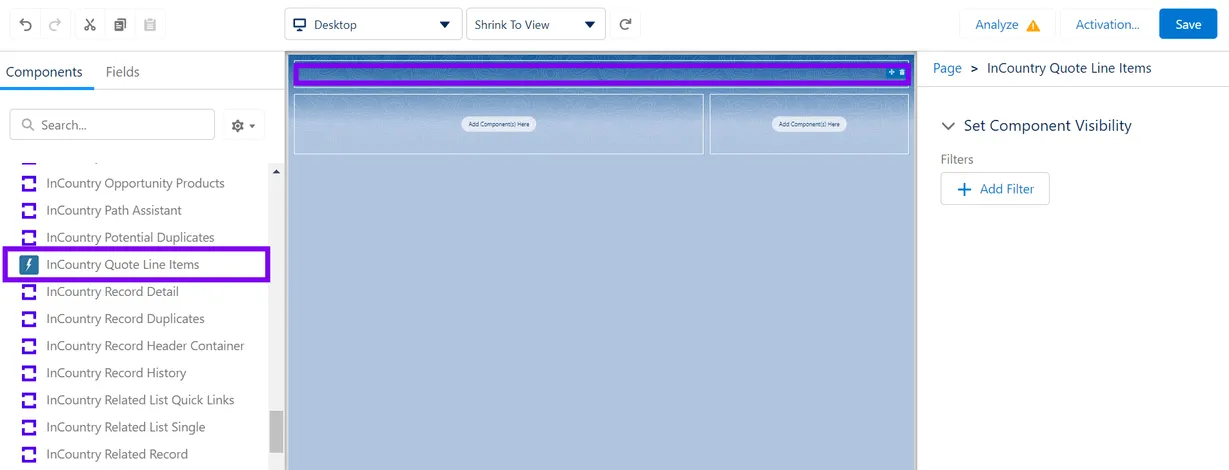
Configuring the InCountry Quote Line Items component
-
In Lightning App Builder, drag the component to the layout.
-
Select the component to open the settings in the right part of the screen.
-
In the Set Component Visibility expand block, click + Add Filter. Define the filtration criteria for the component visibility on the layout according to your needs.
-
Activate the page layout.
For the details on how to regulate calculated fields on the Quote object, please check our documentation
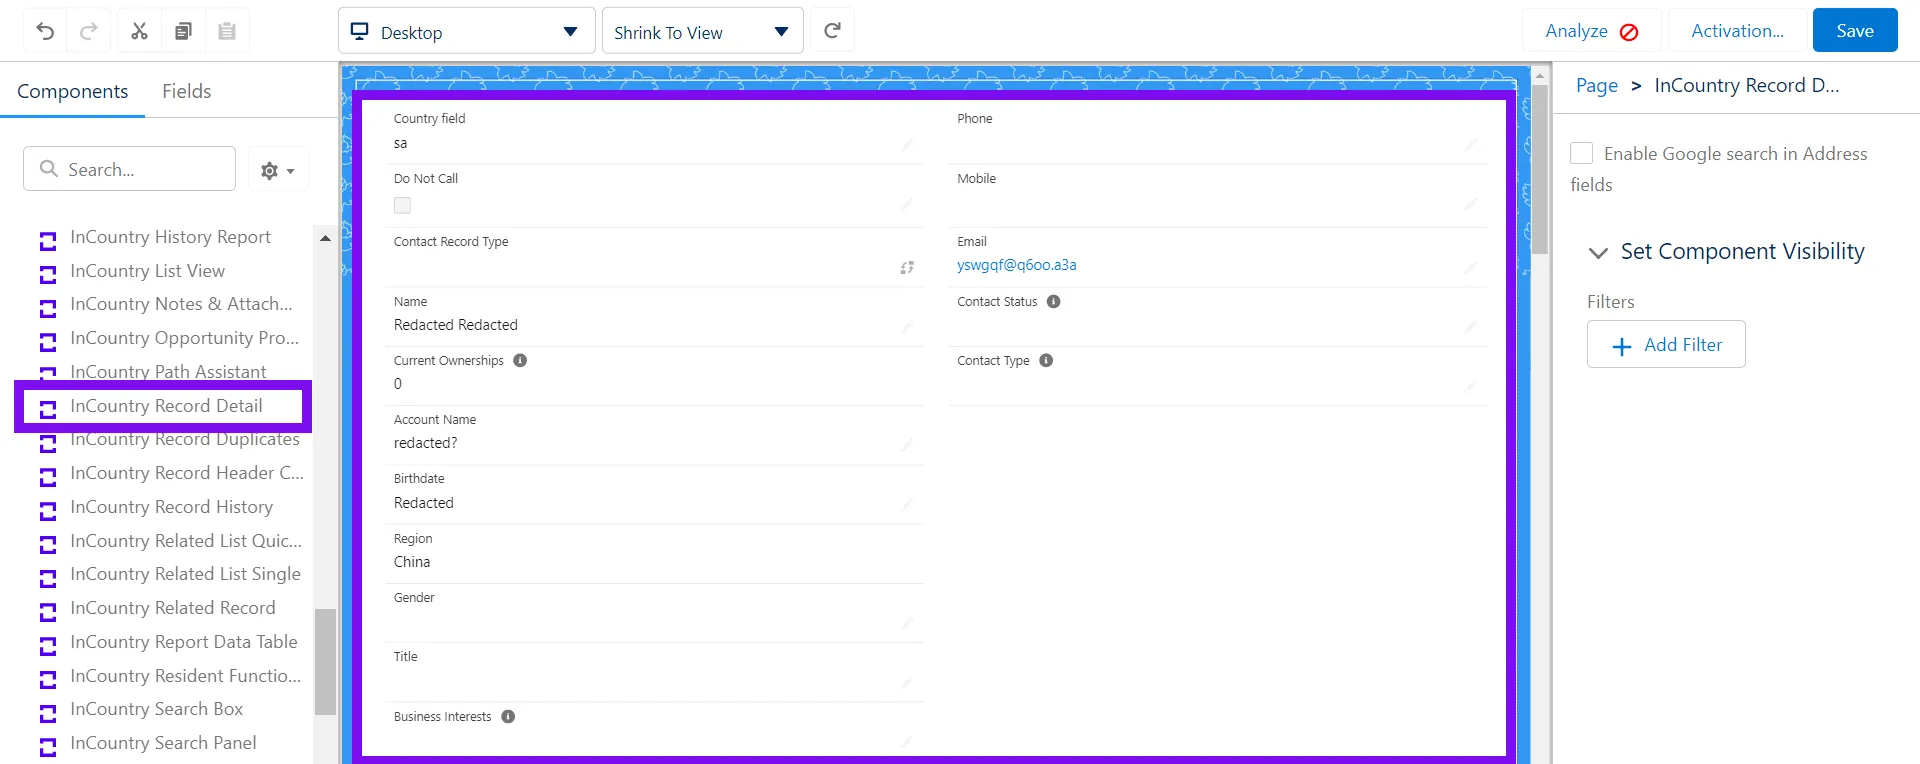
InCountry Record Detail
The InCountry Record Detail component is displayed in the record details view only.
Description
The InCountry Record Detail component is a replacement for the native Salesforce component - Record Detail. This component renders the block of fields displaying the record information.
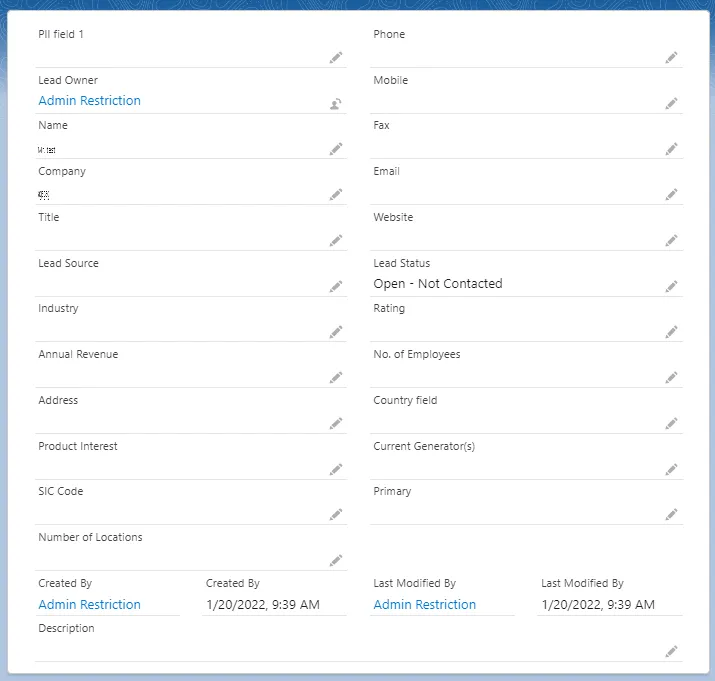
When needed
Display fields with sensitive and generic information about records pertaining to a specific Salesforce object.
Configuring the InCountry Record Detail component
-
In Lightning App Builder, drag the component to the layout.
-
Select the component to open the settings in the right part of the screen.
-
In the component property editor, check the box Enable Google Search in Address Fields if you want to enable address lookup using Google Maps.
-
In the Set Component Visibility expand block, click + Add Filter. Define the filtration criteria for the component visibility on the layout according to your needs.
-
Activate the page layout.
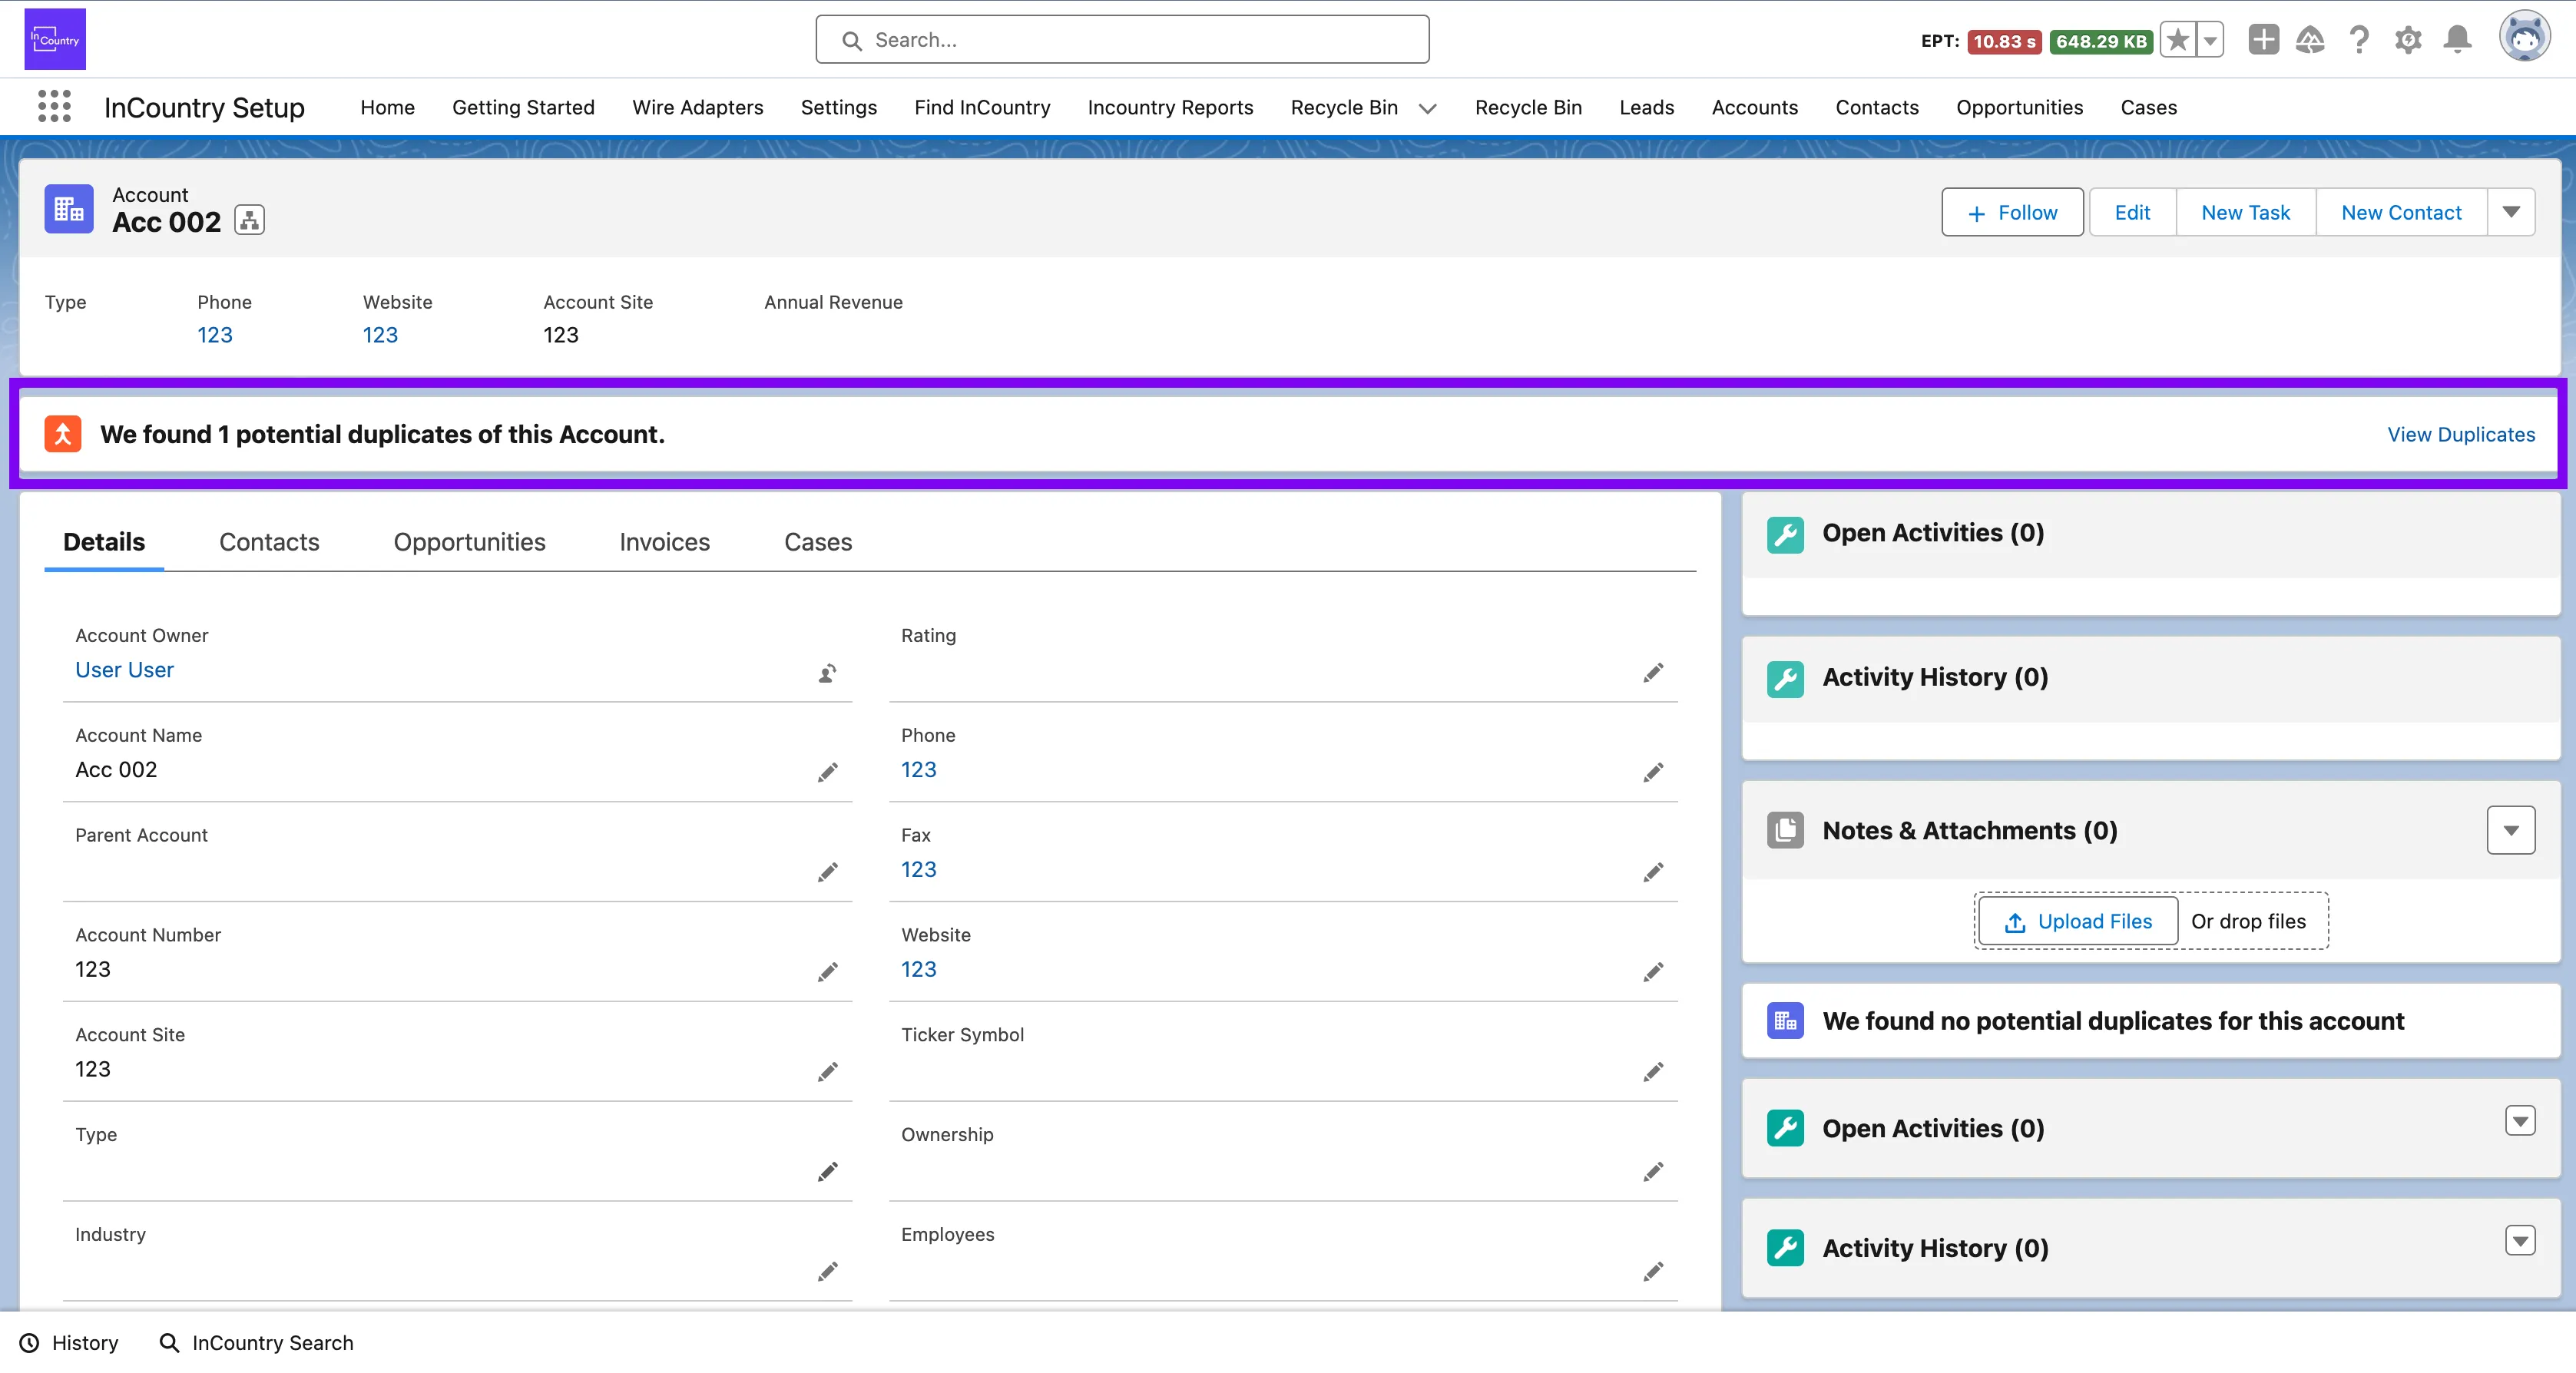
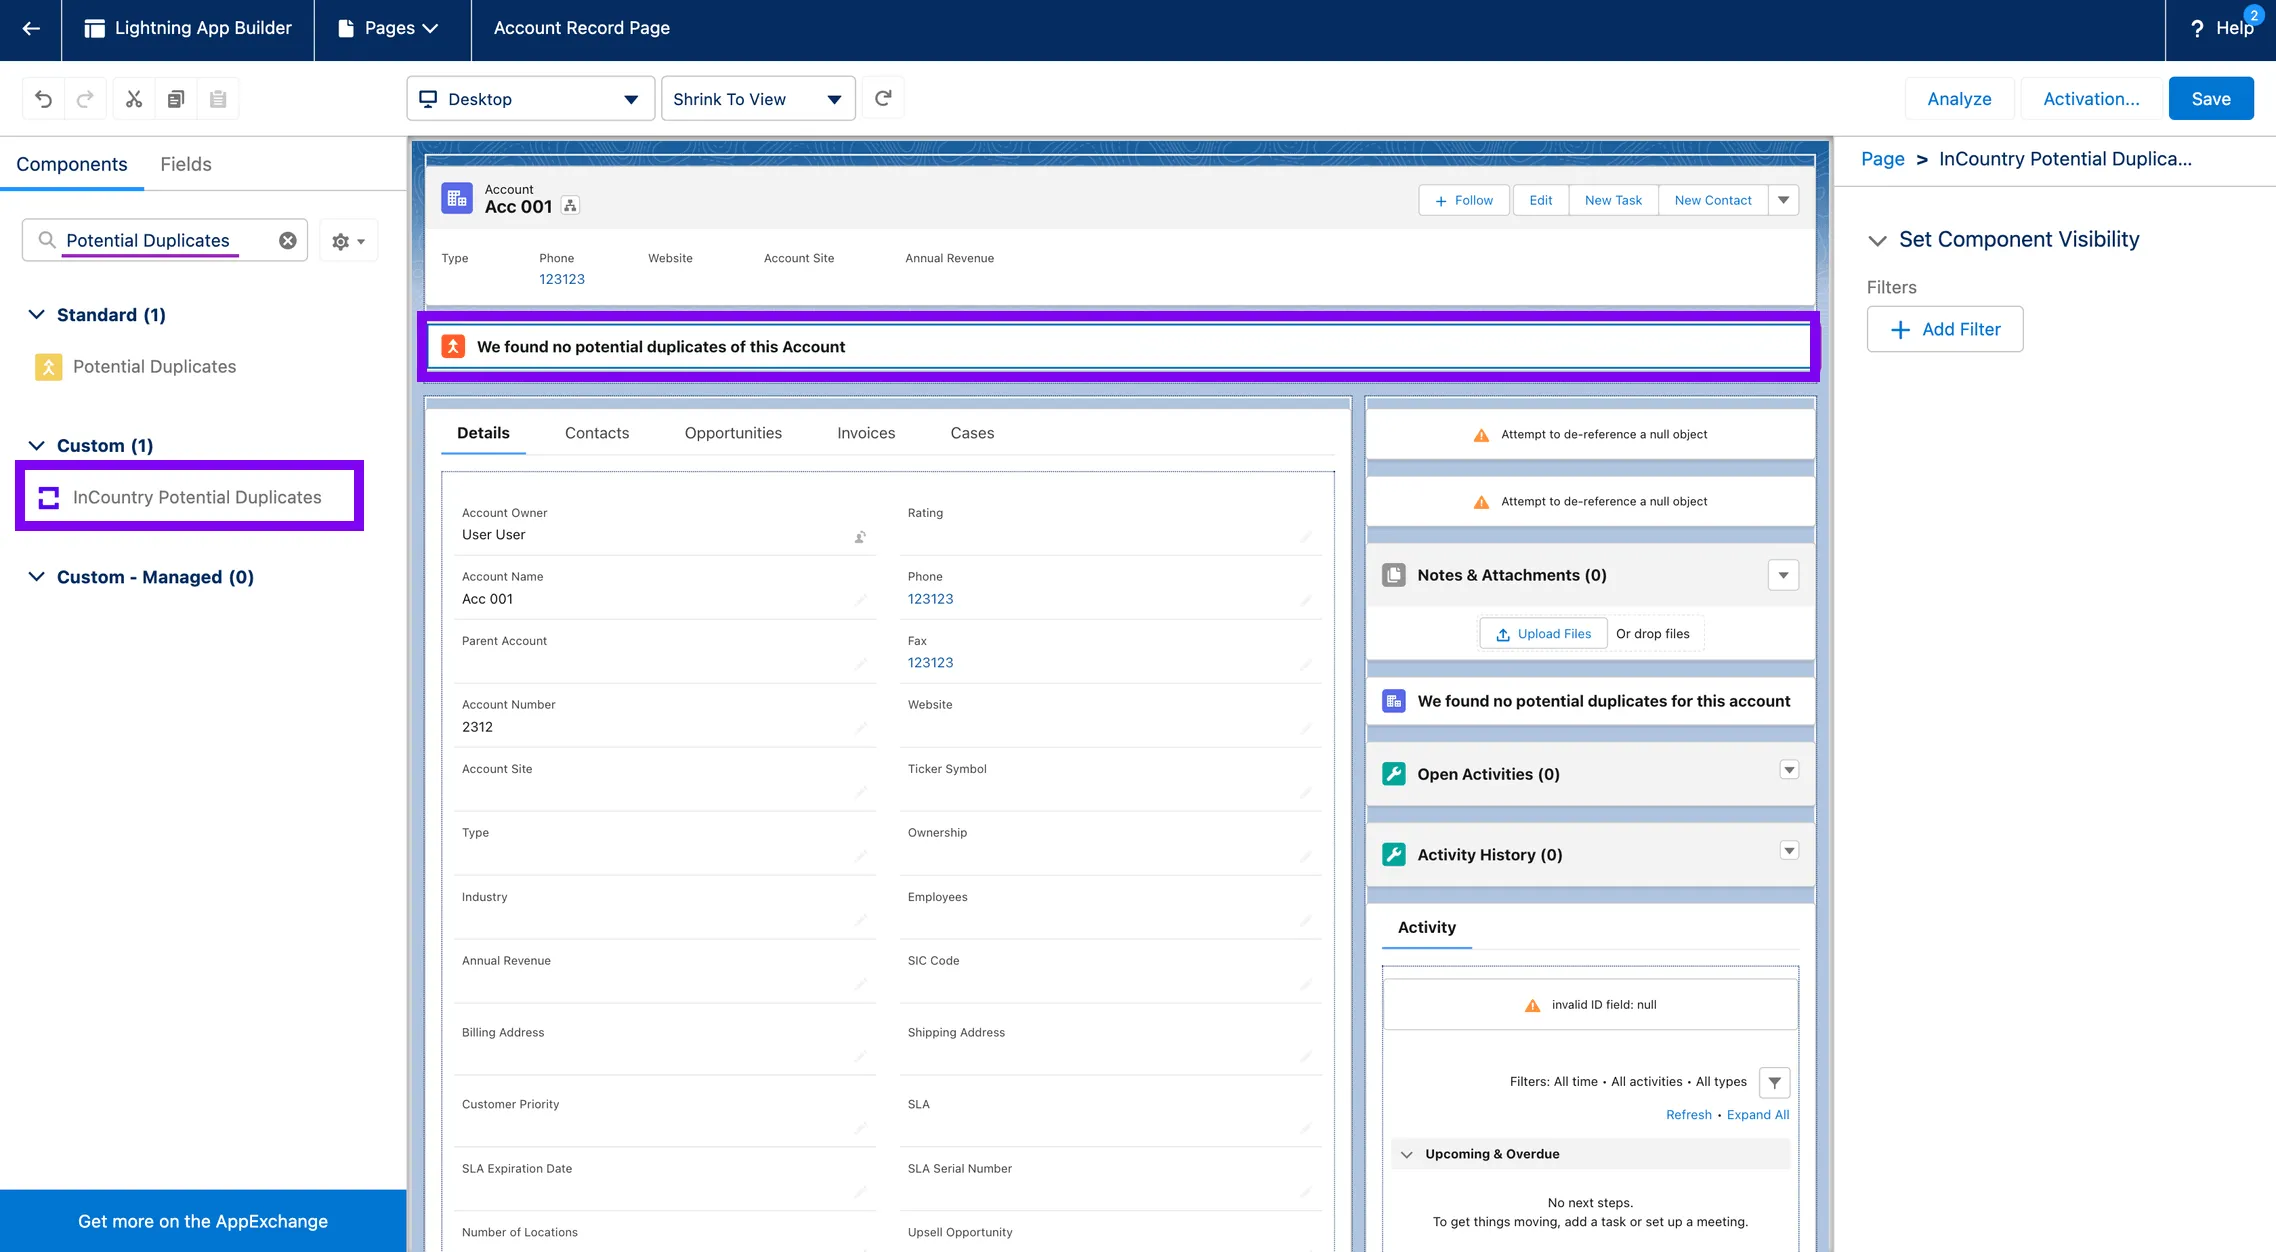
InCountry Potential Duplicates
The InCountry Potential Duplicates component is displayed in the record details view only.
The InCountry Potential Duplicates component cannot be used without the InCountry Highlights Panel and InCountry Record Detail components, otherwise duplicates are not displayed.
Description
The InCountry Potential Duplicates component renders the duplicate records for the currently opened record. Potential duplicates are found based on the native Salesforce Duplicate Rules and the matching rule methods activated on the object.
To enable the InCountry Potential Duplicates component, please follow the next steps:
-
Generate the Deterministic tokenization key in Settings. The hash function should be: [formula, dtkSha256].
-
Configure the policy and protected fields for the necessary object by using the hash function [dtkSha256, formula].
When needed
Display duplicate records for a specific Salesforce record.
Configuring the InCountry Potential Duplicates component
-
In Lightning App Builder, drag the component to the layout.
-
Select the component to open the settings in the right part of the screen.
-
In the Set Component Visibility expand block, click + Add Filter. Define the filtration criteria for the component visibility on the layout according to your needs.
-
Activate the page layout.
InCountry Highlights Panel
Description
The InCountry Highlights Panel component renders the header that contains page-level actions.

When needed
Display links to perform quick actions on the record.
Configuring the InCountry Highlights Panel component
-
In Lightning App Builder, drag the component to the layout.
-
Select the component to open the settings in the right part of the screen.
-
In the Set Component Visibility expand block, click + Add Filter. Define the filtration criteria for the component visibility on the layout according to your needs.
-
Activate the page layout.

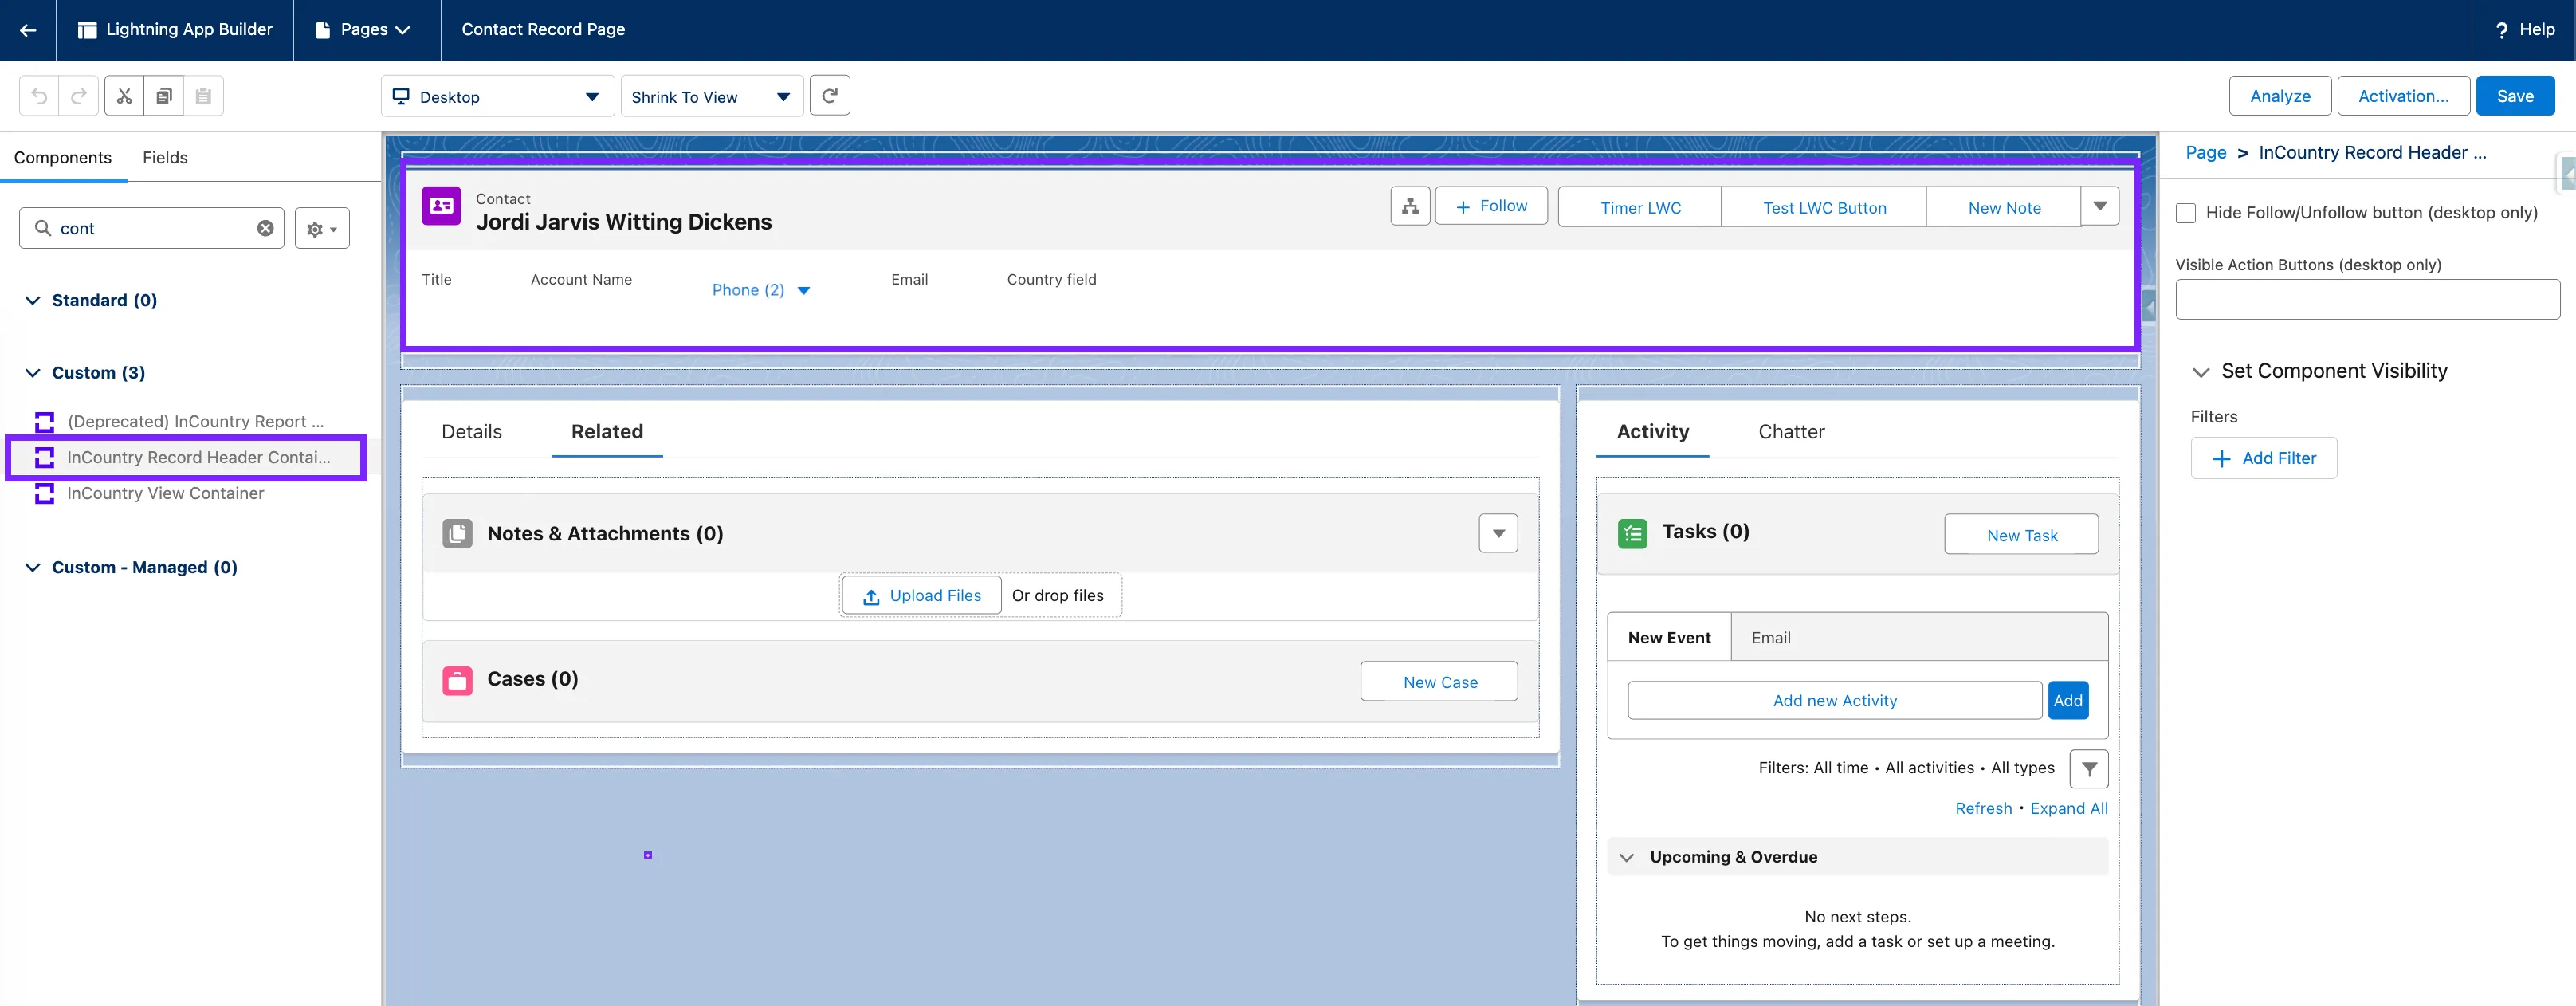
InCountry Record Header Container
Description
The InCountry Record Header Container component renders the standard record header section, displaying the record title, icon, and structural layout for key record information.

When needed
Use this component to present the primary record header, giving users immediate context about the record they are viewing.
Configuring the InCountry Record Header Container component
-
In Lightning App Builder, drag the component to the layout.
-
Select the component to open the settings in the right part of the screen.
-
In the component property editor, check the box Hide Follow/Unfollow button (desktop only) to remove the Follow/Unfollow control from the record header on desktop interfaces.
-
Set the number of action buttons to display in the record header on desktop by choosing a value between 1 and 10.
-
In the Set Component Visibility expand block, click + Add Filter. Define the filtration criteria for the component visibility on the layout according to your needs.
-
Activate the page layout.
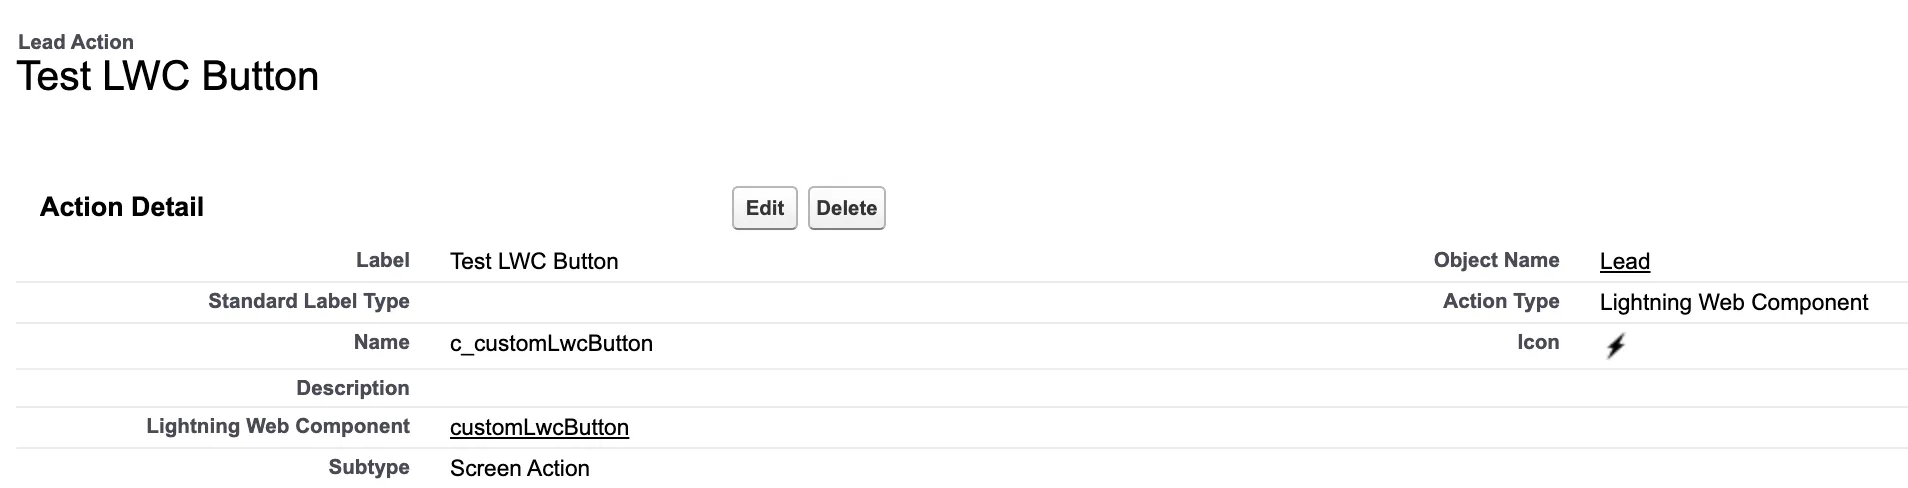
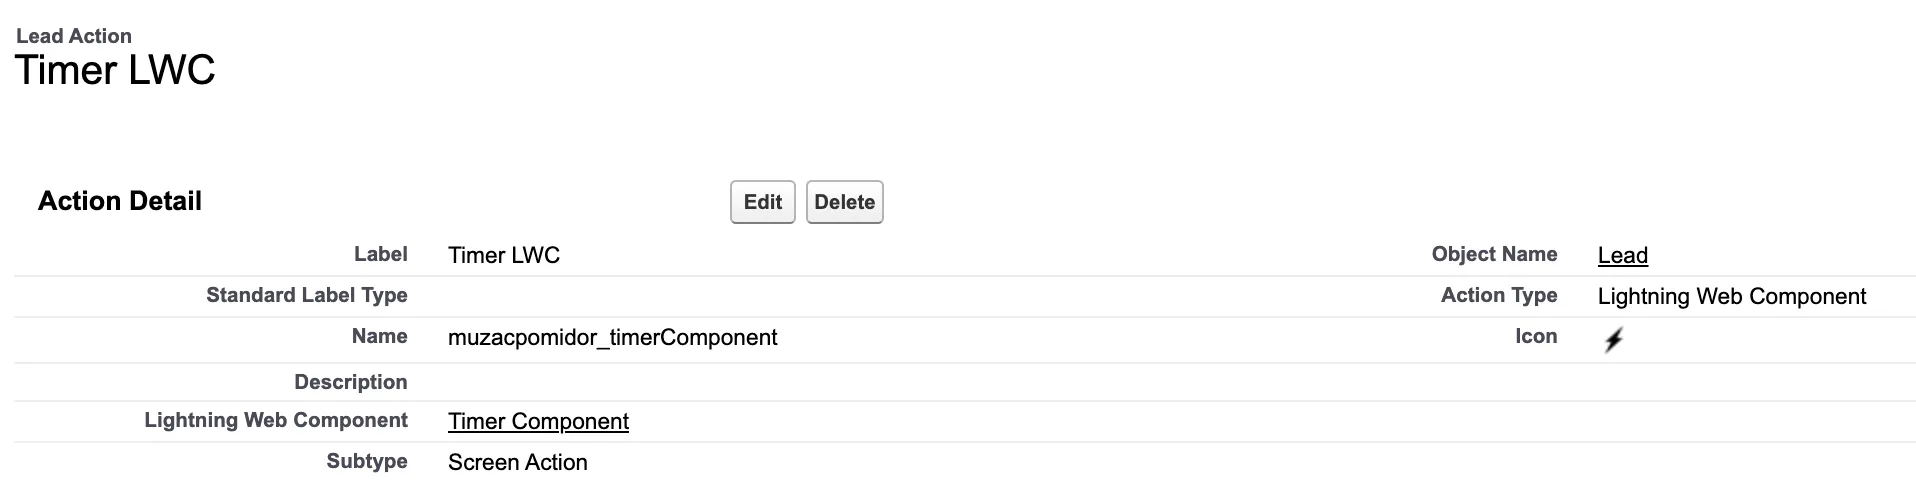
Naming Conventions
Quick Action API Names must follow proper formatting conventions:
- For components created directly in an org, the API Name of the Quick Action must begin with
c. - For components included in a managed package, the API Name must begin with the package’s namespace.
- The prefix should be followed by an underscore
(_).
InCountry Record History
The InCountry Record History component is displayed in the record details view only.
Description
The InCountry Record History component is a replacement for the native Salesforce component - Related List Single. This component renders records related to the record history.
When needed
Display the record history.
Configuring the InCountry Record History component
-
In Lightning App Builder, drag the component to the layout.
-
Select the component to open the settings in the right part of the screen.
-
In the Set Component Visibility expand block, click + Add Filter. Define the filtration criteria for the component visibility on the layout according to your needs.
-
Activate the page layout.
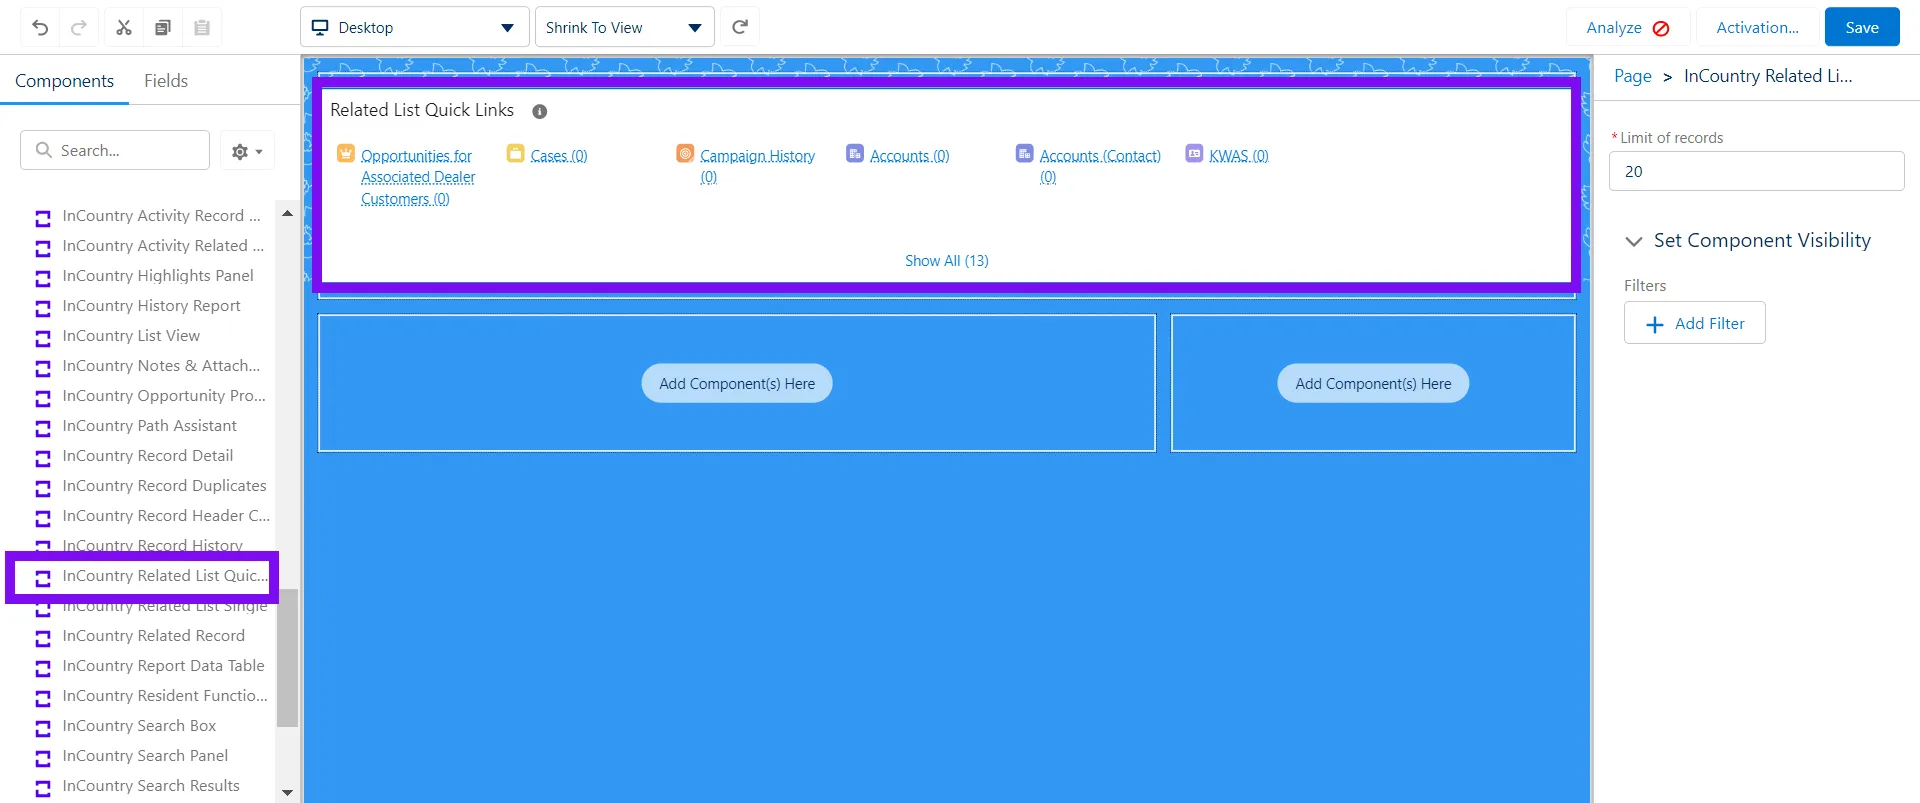
InCountry Related List Quick Links
Description
The InCountry Related List Quick Links component is a replacement for the native Salesforce component - Related List Quick Links. This component renders multiple links to preview related list data.
When needed
Display the links to view all the related list columns without opening the View All page.
Configuring the InCountry Related List Quick Links component
-
In Lightning App Builder, drag the component to the layout.
-
Select the component to open the settings in the right part of the screen.
-
In the Limit of records box, specify the maximal number of records to display.
-
In the Set Component Visibility expand block, click + Add Filter. Define the filtration criteria for the component visibility on the layout according to your needs.
-
Activate the page layout.
InCountry Related List Single
The InCountry Related List Single component is displayed in the record details view only.
Description
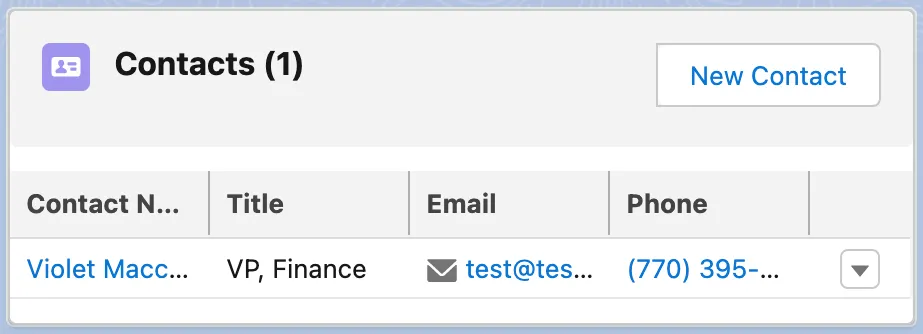
The InCountry Related List Single component is a replacement for the native Salesforce component - Related List Single. This component shows a list of related records for a specific Salesforce record.
The InCountry Related List Single component does not support the Activity and Opportunity products since these objects have special components.
When needed
Display a list of related records for a specific Salesforce record.
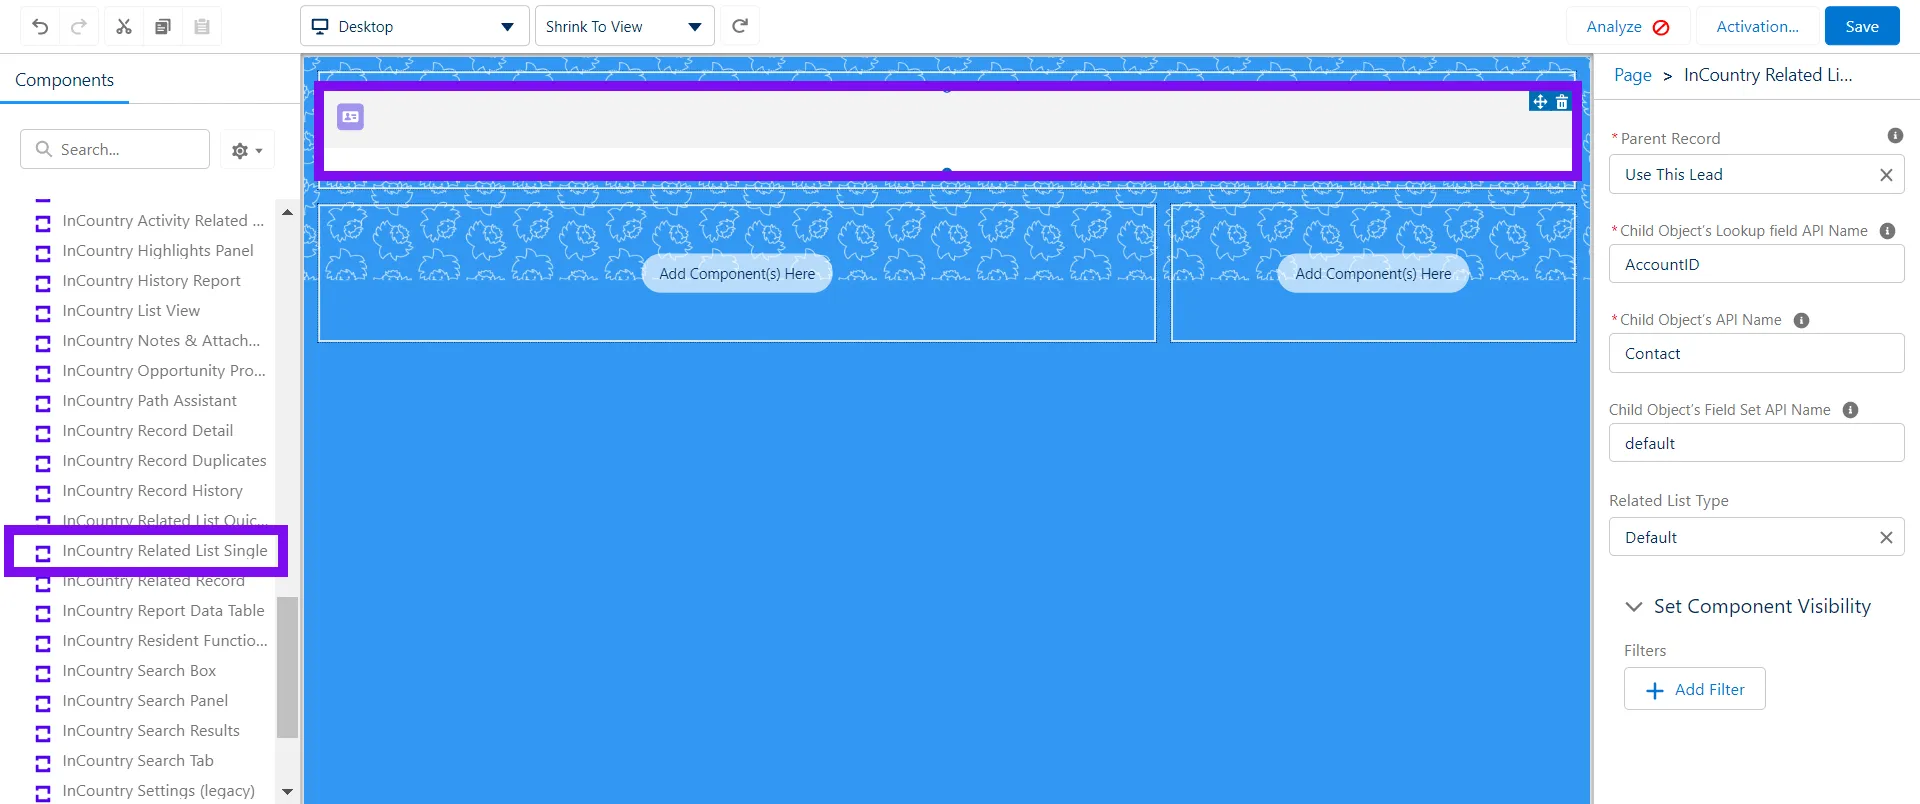
Configuring the InCountry Related List Single component
-
In Lightning App Builder, drag the component to the layout.
-
Select the component to open the settings in the right part of the screen.
-
In the Child Object’s Lookup field API Name box, enter the API name of the lookup field from the child object to display the Salesforce object (for example
AccountID). -
In the Child Object’s API Name box, enter the Salesforce object whose data you want to display (for example
Contact). -
In the Child Object’s Field Set API name box, enter the API name of the field set from the child object. A field set defines which fields will be displayed on the component. A field set can be created in Object Manager. If you want to use the standard InCountry Field Set, add a namespace (for example
testInCountry1__default). -
Select the related list type:
-
Default - display a default related list type.
-
Basic List - display as List.
-
Tile - display as Tile.
-
-
In the Set Component Visibility expand block, click + Add Filter. Define the filtration criteria for the component visibility on the layout according to your needs.
-
Activate the page layout.
Configuring the InCountry Related List Single component for the Campaign Member object
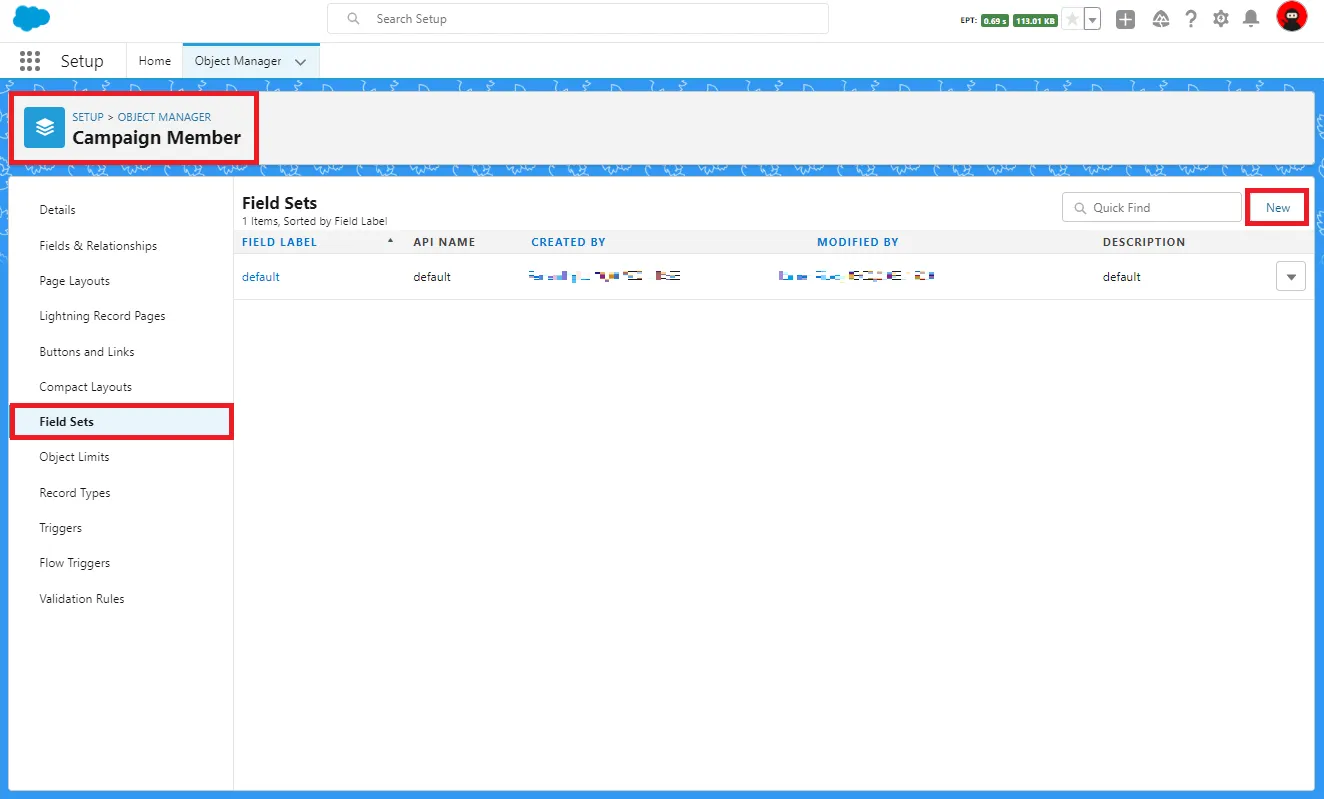
Creating a field set for the Campaign Member object
A field set defines which fields will be displayed on the component. To create a field set for the Campaign Member object, follow these instructions:
-
From Setup, select Object Manager.
-
On the list with objects, search for the
CampaignMembercustom object by its system name and click it. The actual object name may vary depending on the package version. -
On the sidebar, click Field Sets.
-
In the top right part of the screen, click New.
-
In the Field Set Label box, enter the label of the field set for the Campaign Member object.
-
In the Field Set Name box, enter the API name of the field set for the Campaign Member object.
-
In the Where is this used? box, enter description where the field set is used for the Campaign Member object.
-
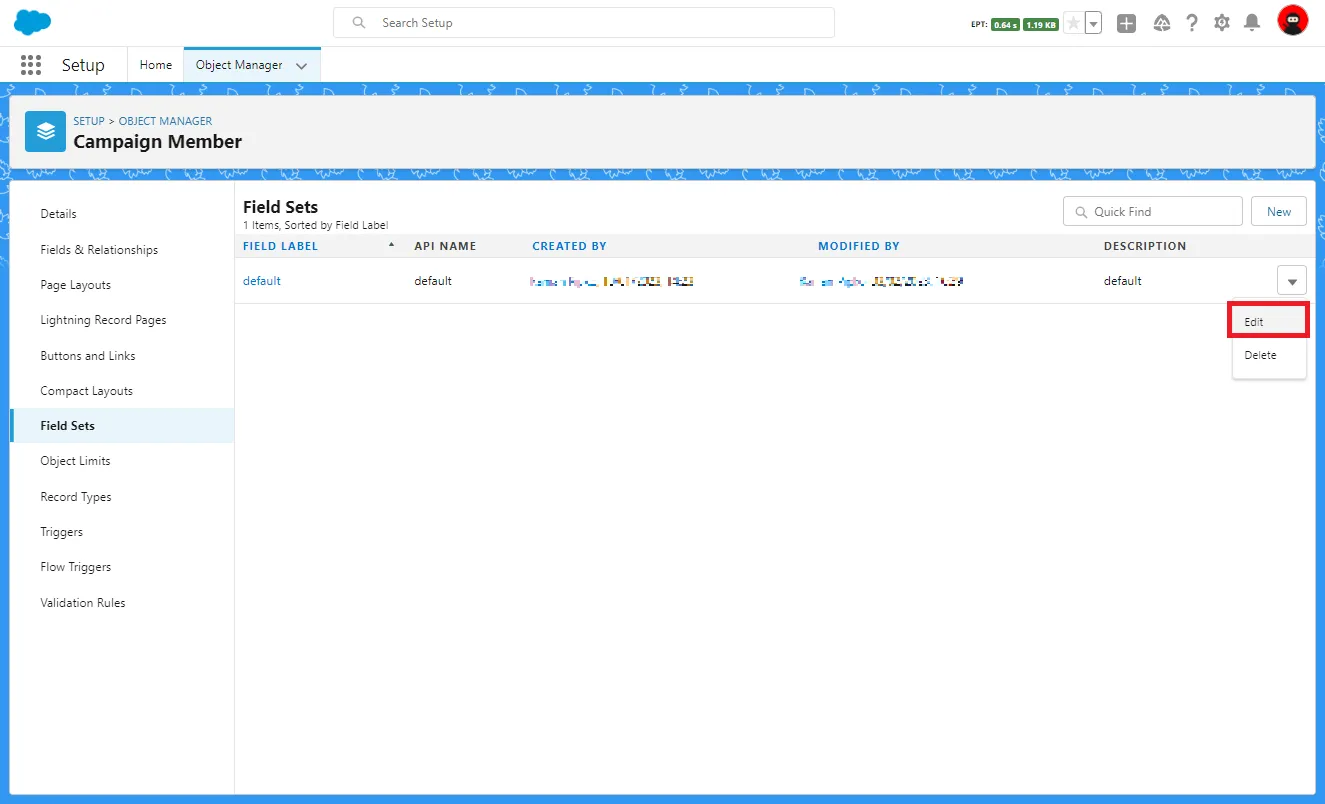
When complete, click Save.
-
Click the down arrow icon next to the field set you created and select Edit.
-
Drag the Status field to the layout of the form to add the Status field to the field set.
-
Click Save.
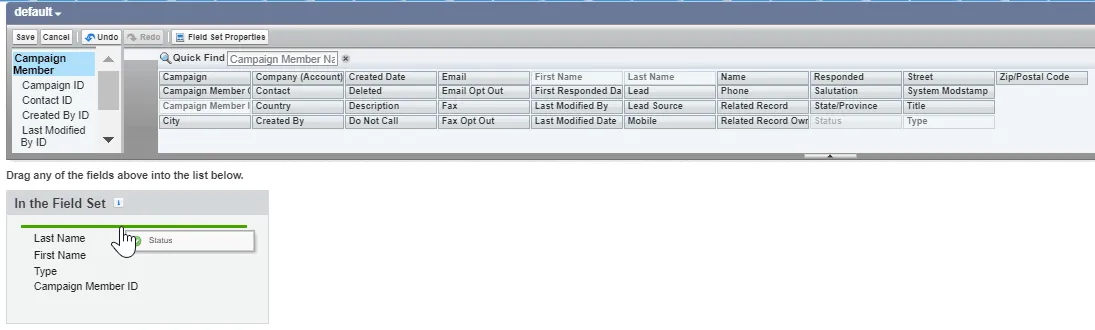
The Status field is required for operation of the InCountry Related List Single component for the Campaign Member object.
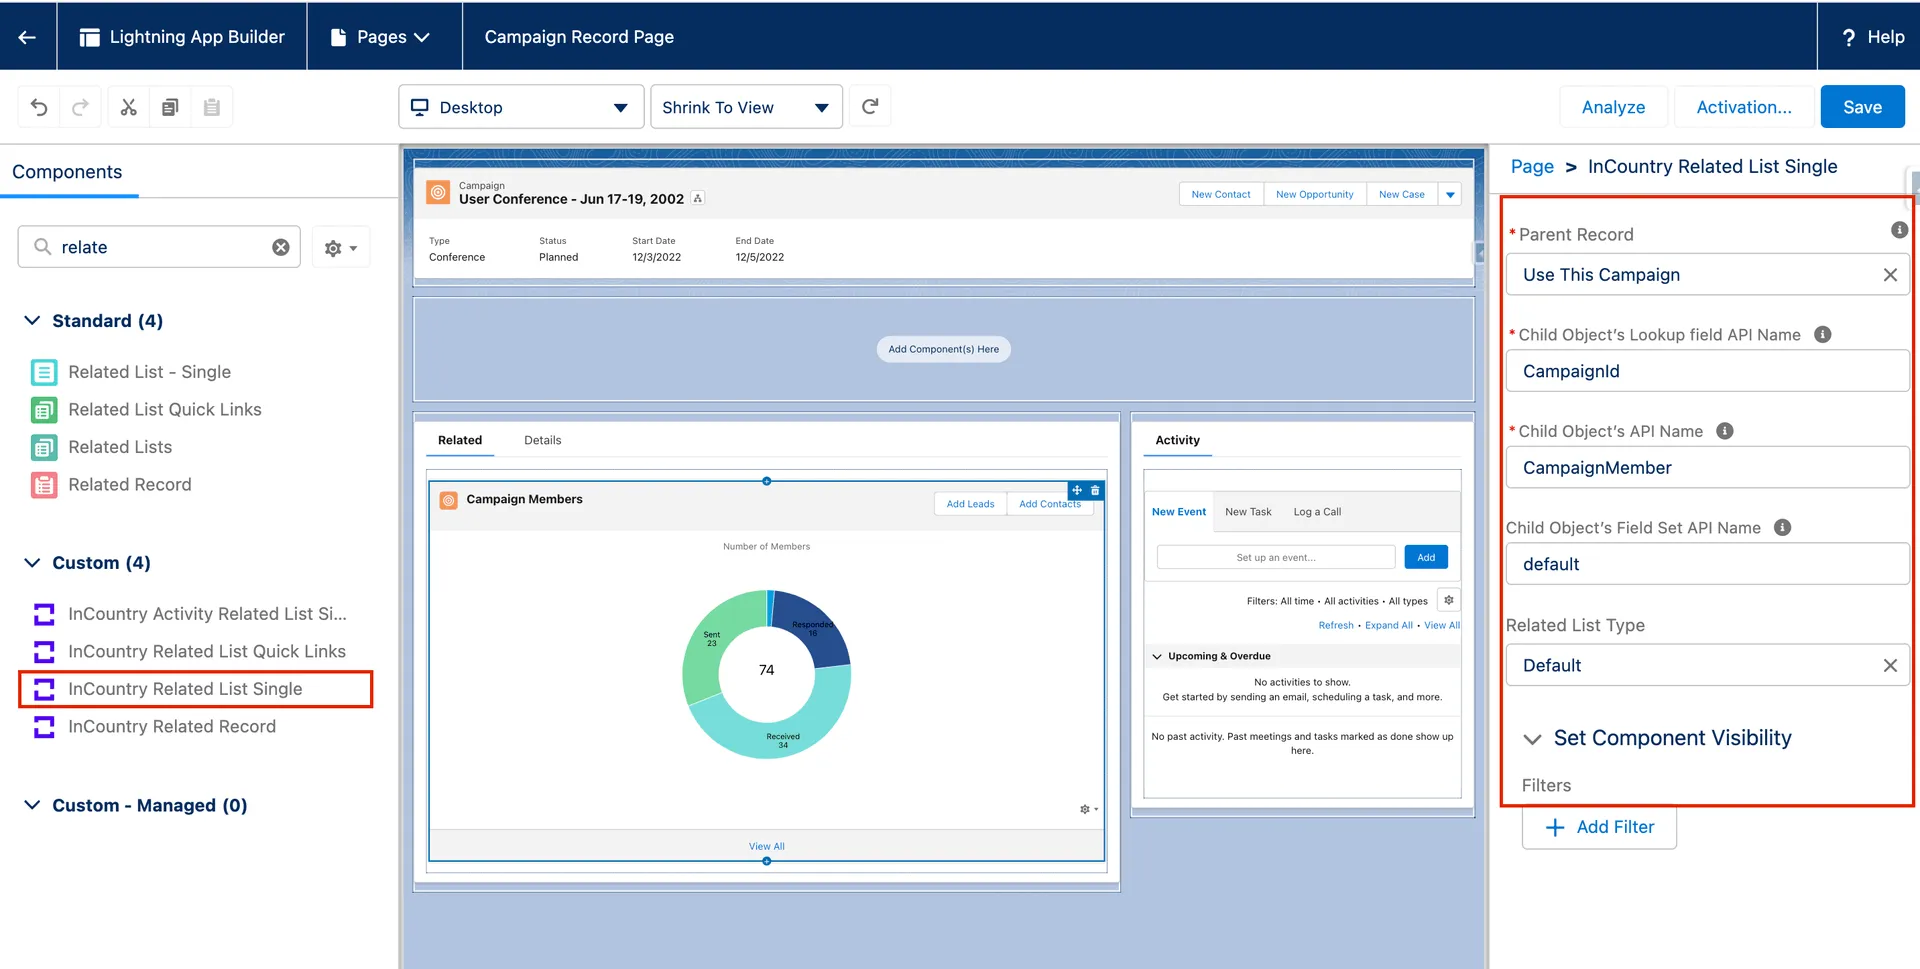
Adding the InCountry Related List Single component for the Campaign Member object
-
In Lightning App Builder, drag the component to the layout.
-
Select the component to open the settings in the right part of the screen.
-
In the Child Object’s Lookup field API Name box, enter
CampaignID. -
In the Child Object’s API Name box, enter
CampaignMember. -
In the Child Object’s Field Set API name box, enter the API name of the field set you created.
-
Select the related list type:
-
Default - display a default related list type.
-
Basic List - display as a list of records.
-
Tile - display as a tile of records.
-
-
In the Set Component Visibility expand block, click + Add Filter. Define the filtration criteria for the component visibility on the layout according to your needs.
-
Activate the page layout.
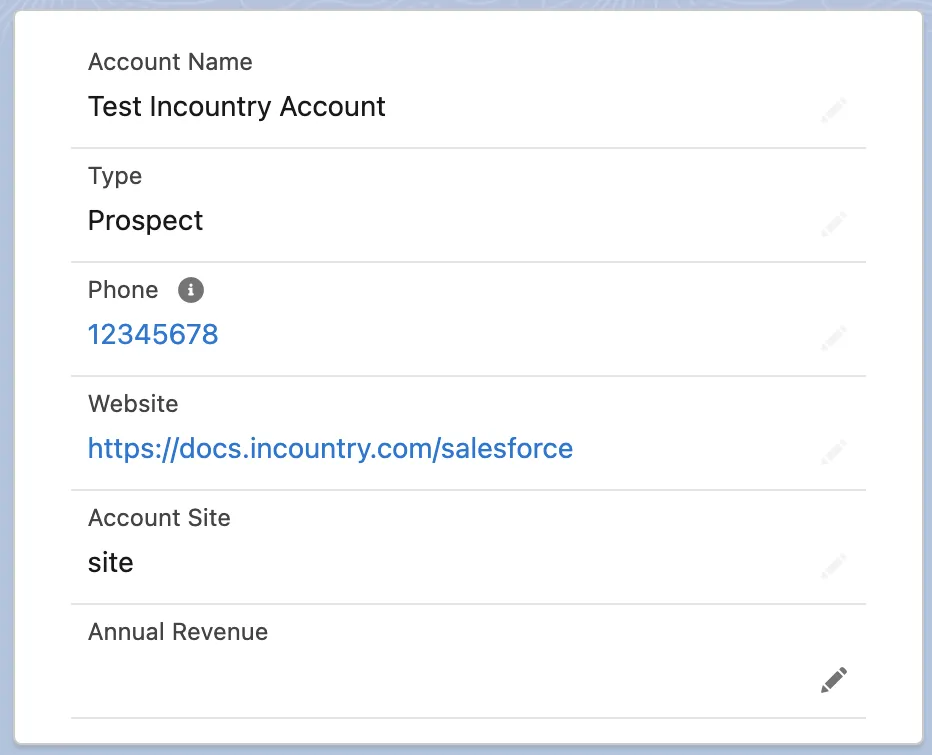
InCountry Related Record
Description
The InCountry Related Record component is a replacement for the native Salesforce component - Related Record. It displays the details of a related record, including the details of a parent record.
When needed
Display the records related to a particular record. For example, If you are looking at a contact, you can see a related Account record for this contact.
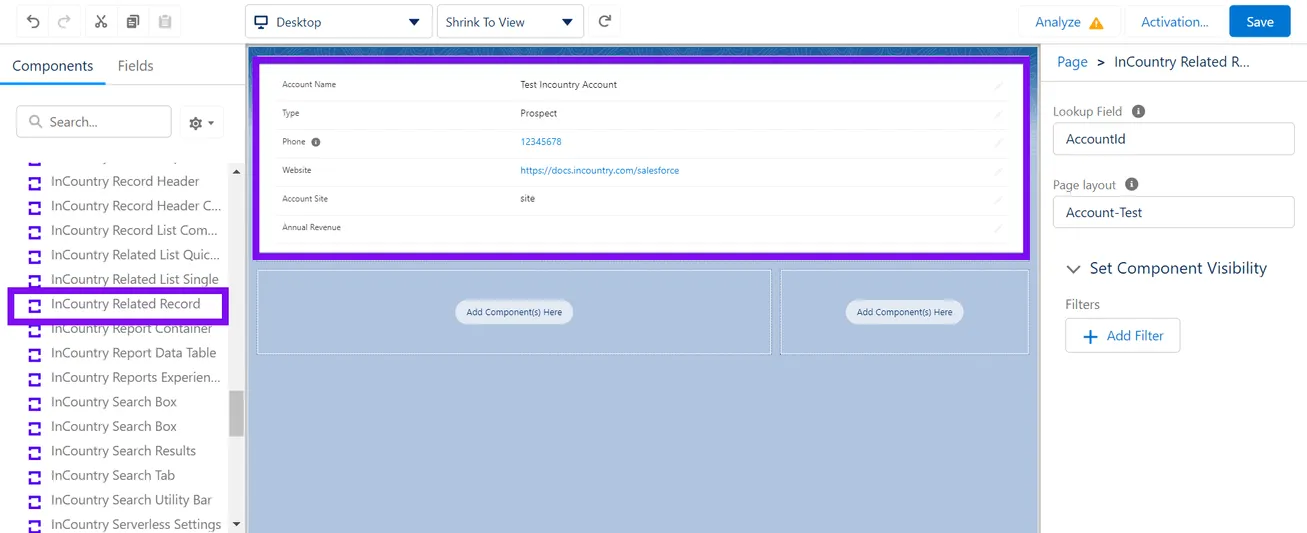
Configuring the InCountry Related Record component
-
In Lightning App Builder, drag the component to the layout.
-
Select the component to open the settings in the right part of the screen.
-
In the Lookup Field box, enter the API Name of the lookup field.
-
In the Page layout box, enter the object’s layout name in the following format (
ObjectApiName-LayoutApiName). -
In the Set Component Visibility expand block, click + Add Filter. Define the filtration criteria for the component visibility on the layout according to your needs.
-
Activate the page layout.
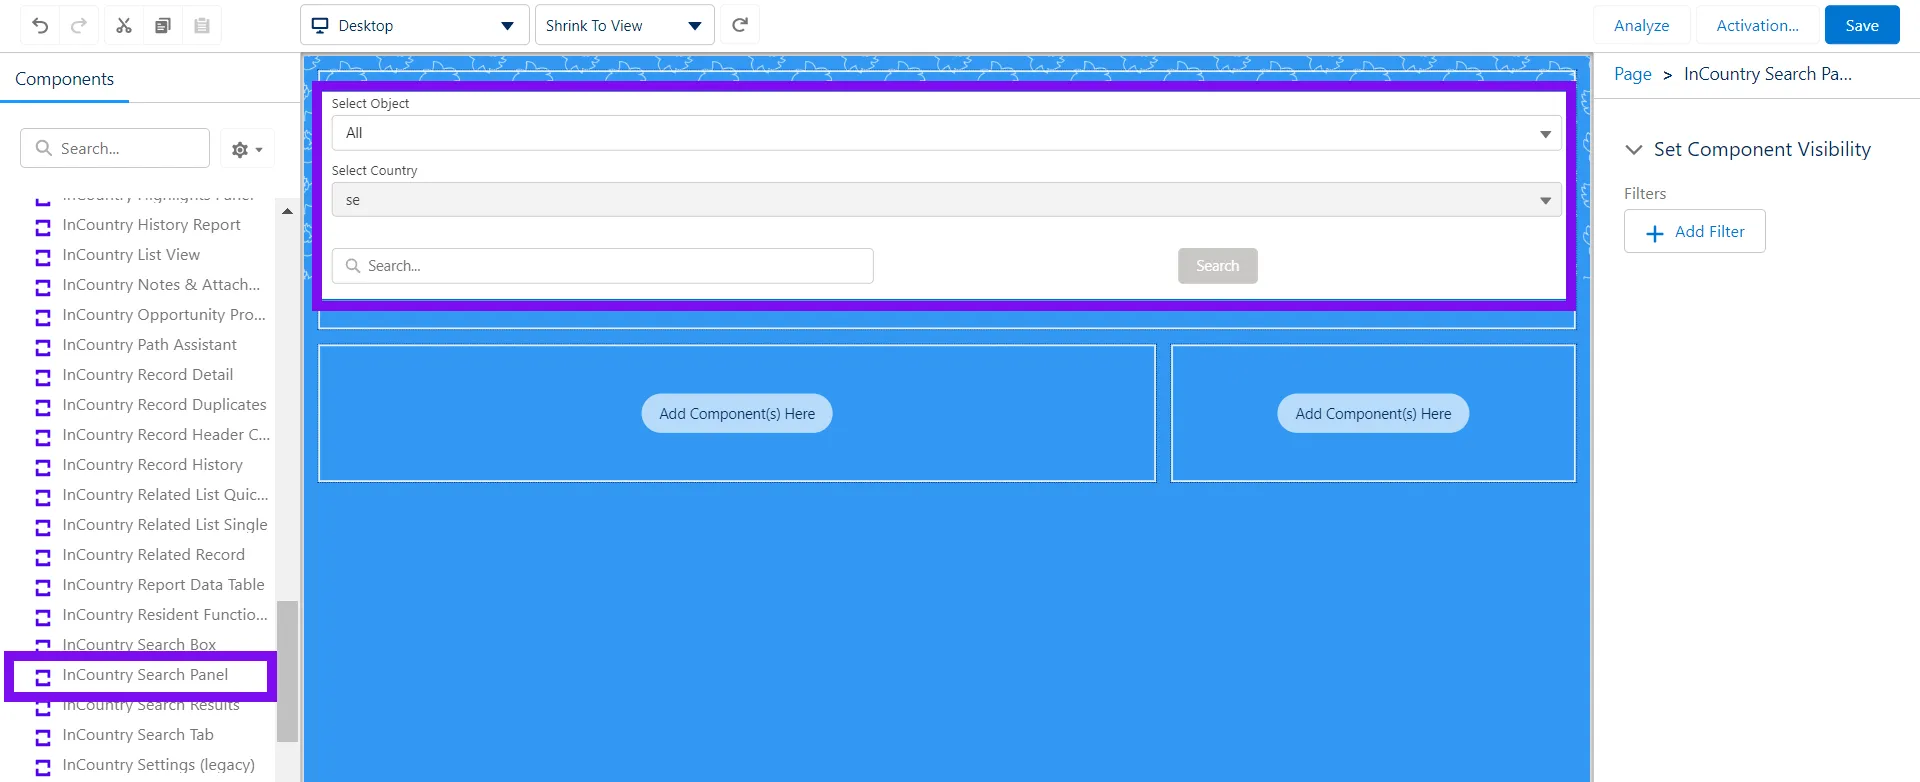
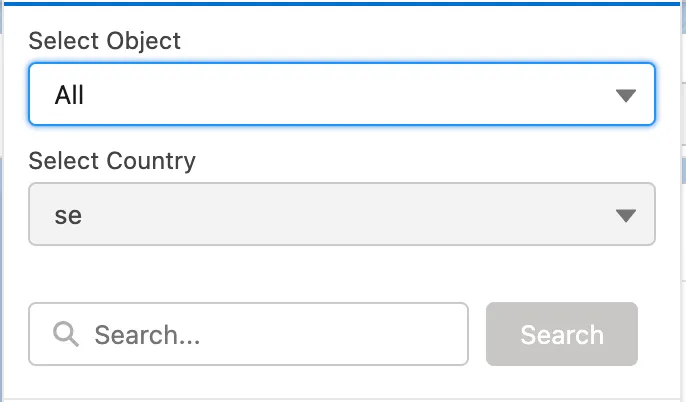
InCountry Search Panel
Description
The InCountry Search Panel component renders a search panel to look up records stored on the InCountry platform.
When needed
Display a search panel to look up records stored on the InCountry platform.
Configuring the InCountry Search Panel component
-
In Lightning App Builder, drag the component to the layout.
-
Select the component to open the settings in the right part of the screen.
-
In the Set Component Visibility expand block, click + Add Filter. Define the filtration criteria for the component visibility on the layout according to your needs.
-
Activate the page layout.
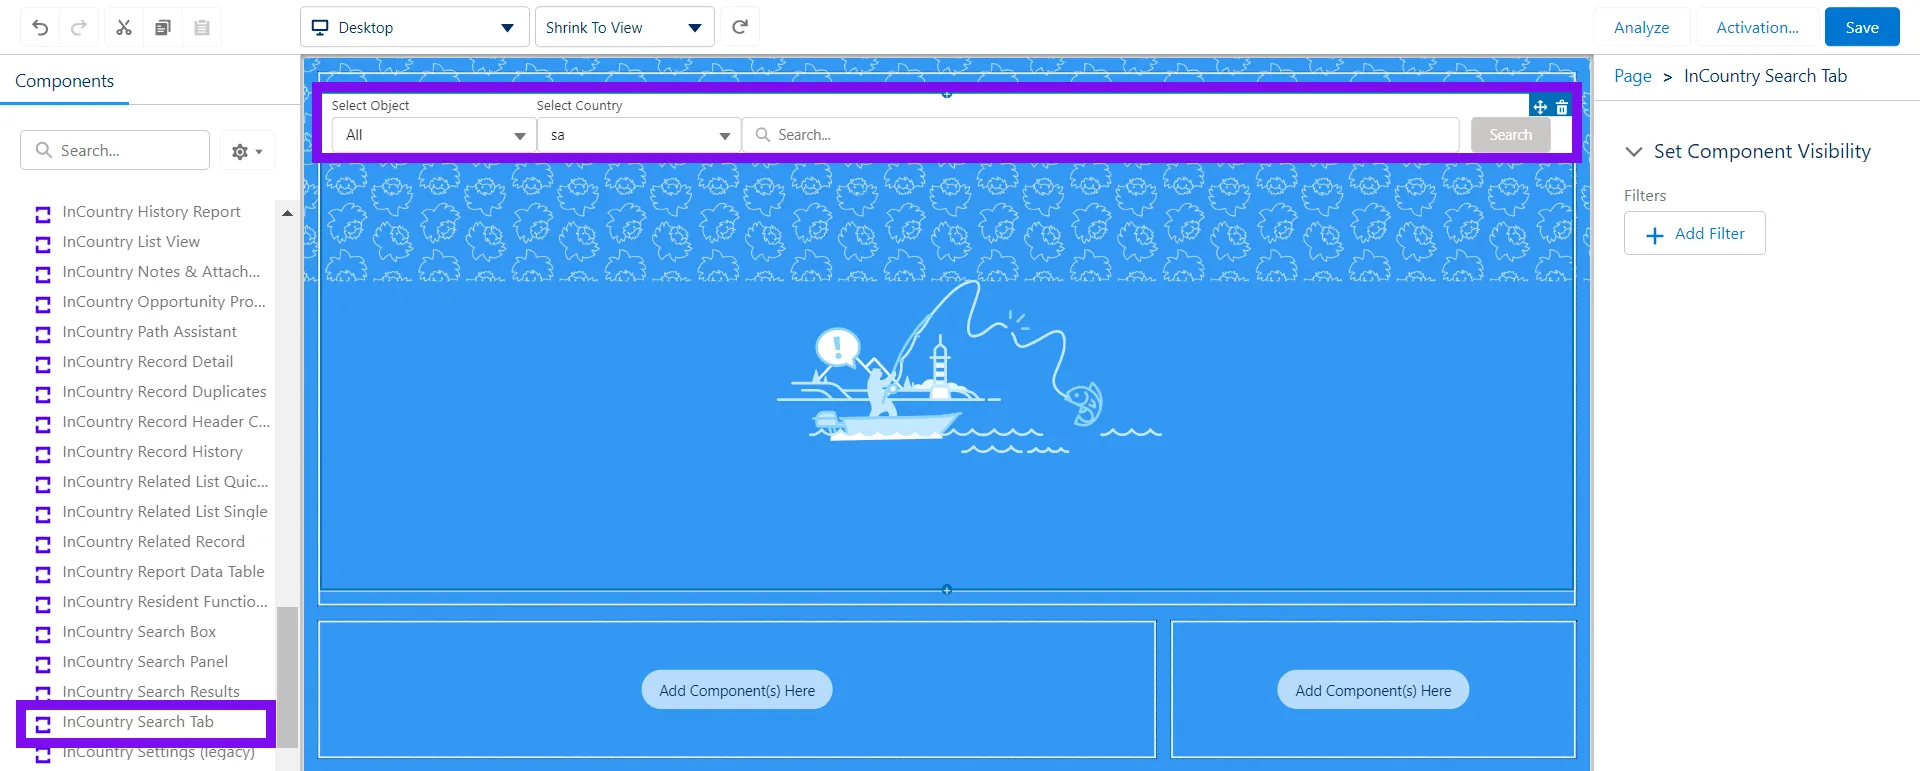
InCountry Search Tab
Description
The InCountry Search Tab component renders a tab to look up records stored on the InCountry platform.

The InCountry Search Tab component is used as a container for the InCountry Search Box and InCountry Search Results components. You need to place both components into this container. Without adding the InCountry Search Results component, no search results are displayed in the InCountry Search Tab component.
When needed
Perform record lookup across the InCountry platform.
Configuring the InCountry Search Tab component
-
In Lightning App Builder, drag the component to the layout.
-
Select the component to open the settings in the right part of the screen.
-
In the Set Component Visibility expand block, click + Add Filter. Define the filtration criteria for the component visibility on the layout according to your needs.
-
Activate the page layout.
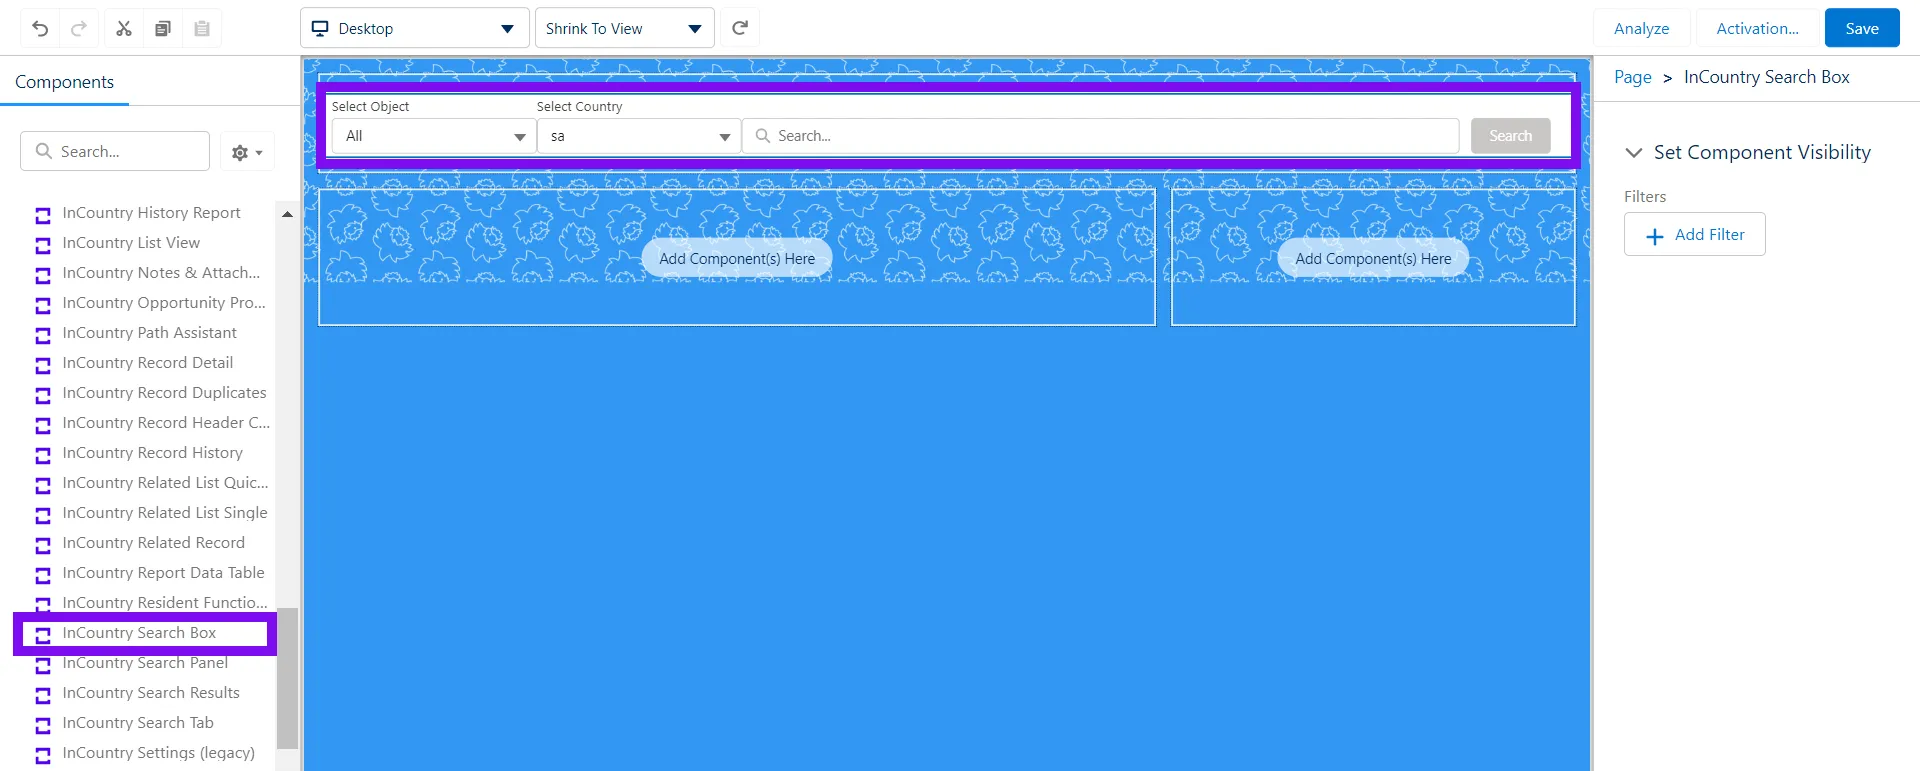
InCountry Search Box
Description
This component allows you to search records on the InCountry platform. The results are shown in the InCountry Search Results component.
The InCountry Search Box component cannot be used without the InCountry Search Results component, otherwise search results are not displayed.
When needed
Look up regulated records stored on the InCountry platform.
Configuring the InCountry Search Box component
-
In Lightning App Builder, drag the component to the layout.
-
Select the component to open the settings in the right part of the screen.
-
In the Set Component Visibility expand block, click + Add Filter. Define the filtration criteria for the component visibility on the layout according to your needs.
-
Activate the page layout.
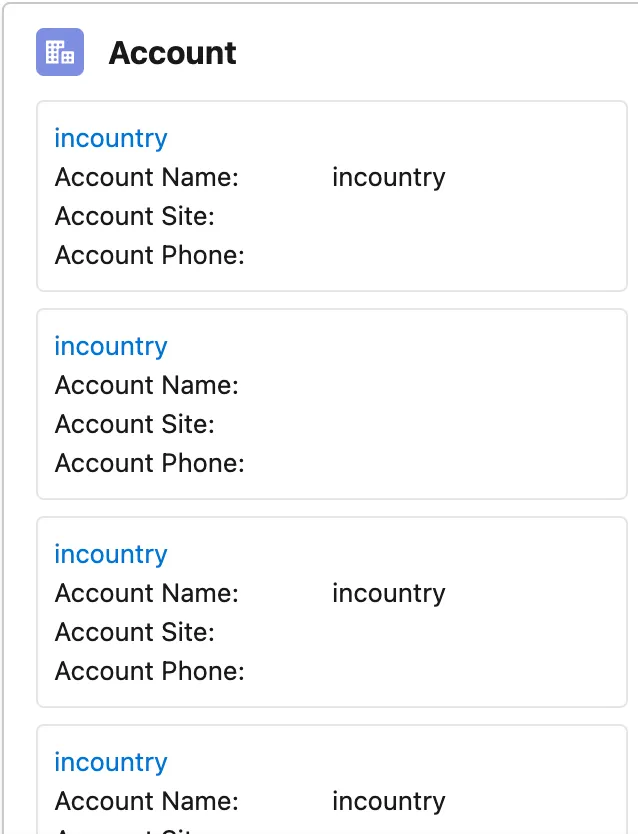
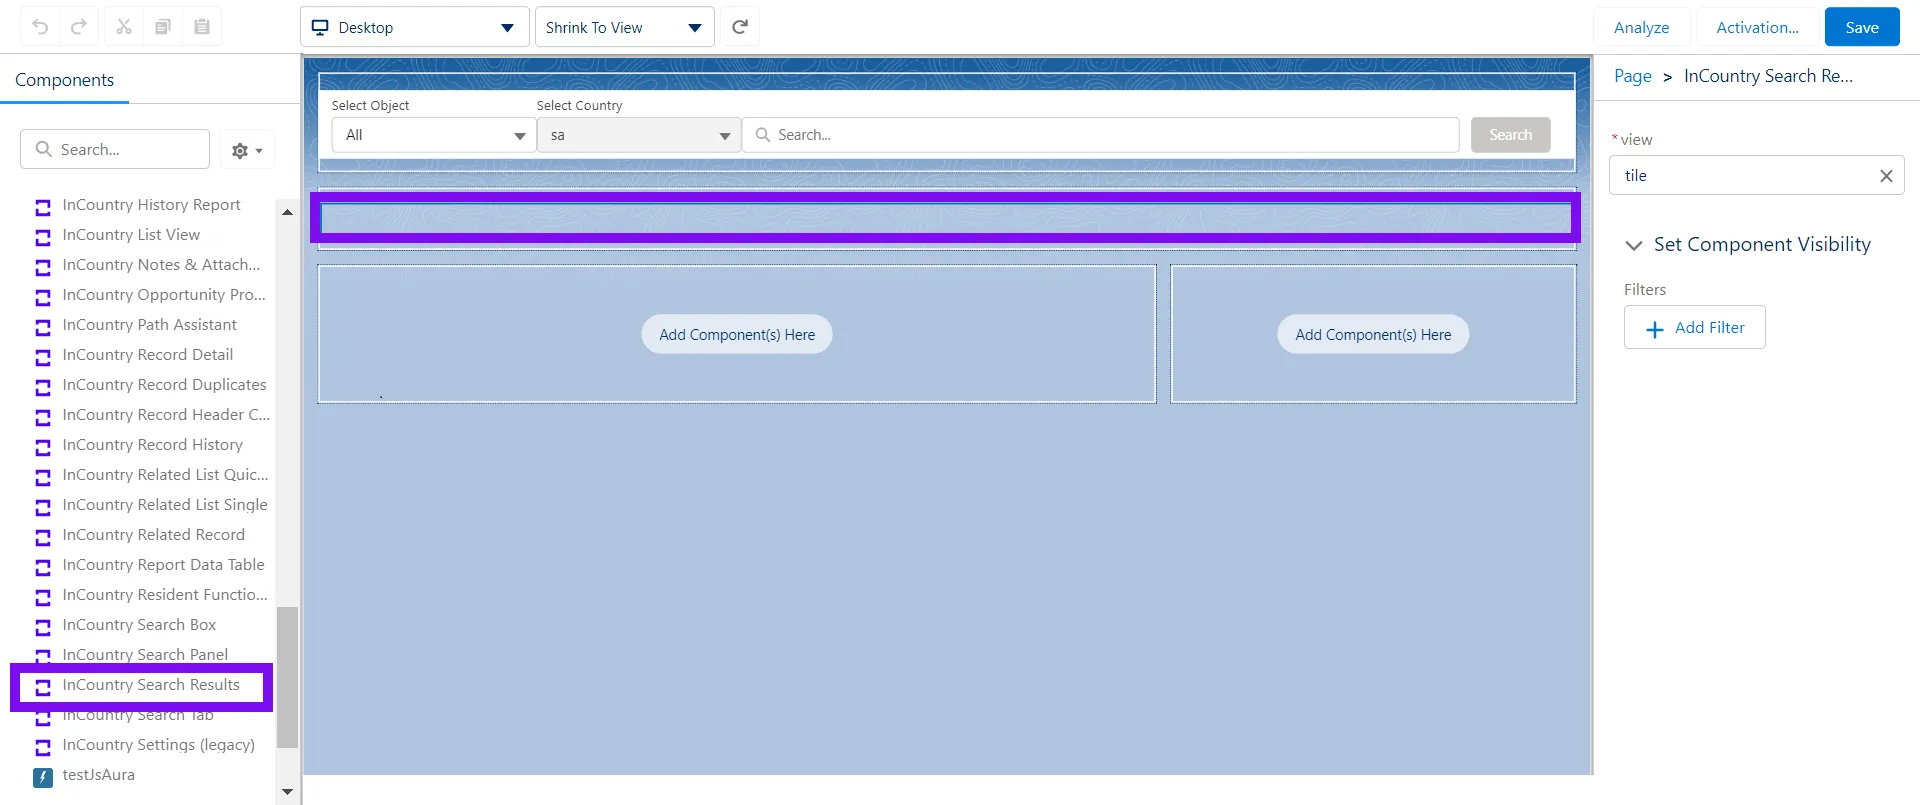
InCountry Search Results
Description
This component renders search results of the regulated records stored on the InCountry platform.
The InCountry Search Results component cannot be used without the InCountry Search Box component, otherwise search results are not be displayed.
When needed
Display search results of the regulated records stored on the InCountry platform.
Configuring the InCountry Search Results component
-
In Lightning App Builder, drag the component to the layout.
-
Select the component to open the settings in the right part of the screen.
-
Select the view to render search results:
-
Table - display results in a table.
-
Tile - display results as a tile.
-
-
In the Set Component Visibility expand block, click + Add Filter. Define the filtration criteria for the component visibility on the layout according to your needs.
-
Activate the page layout.
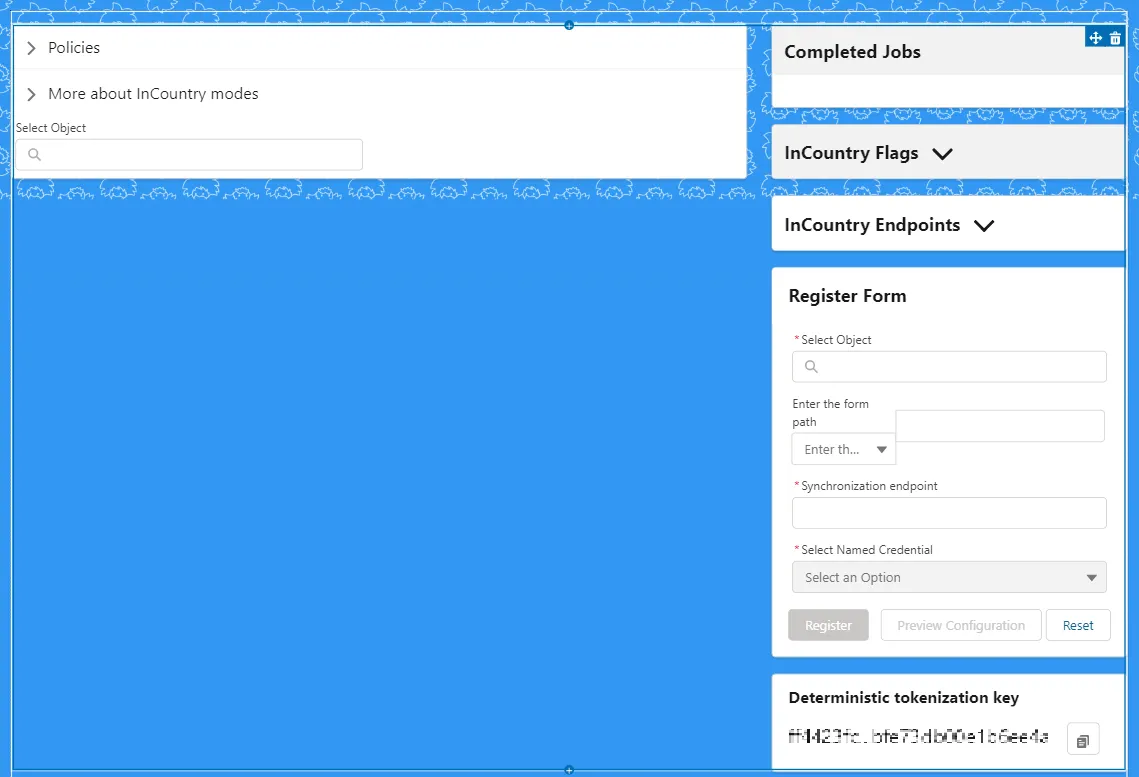
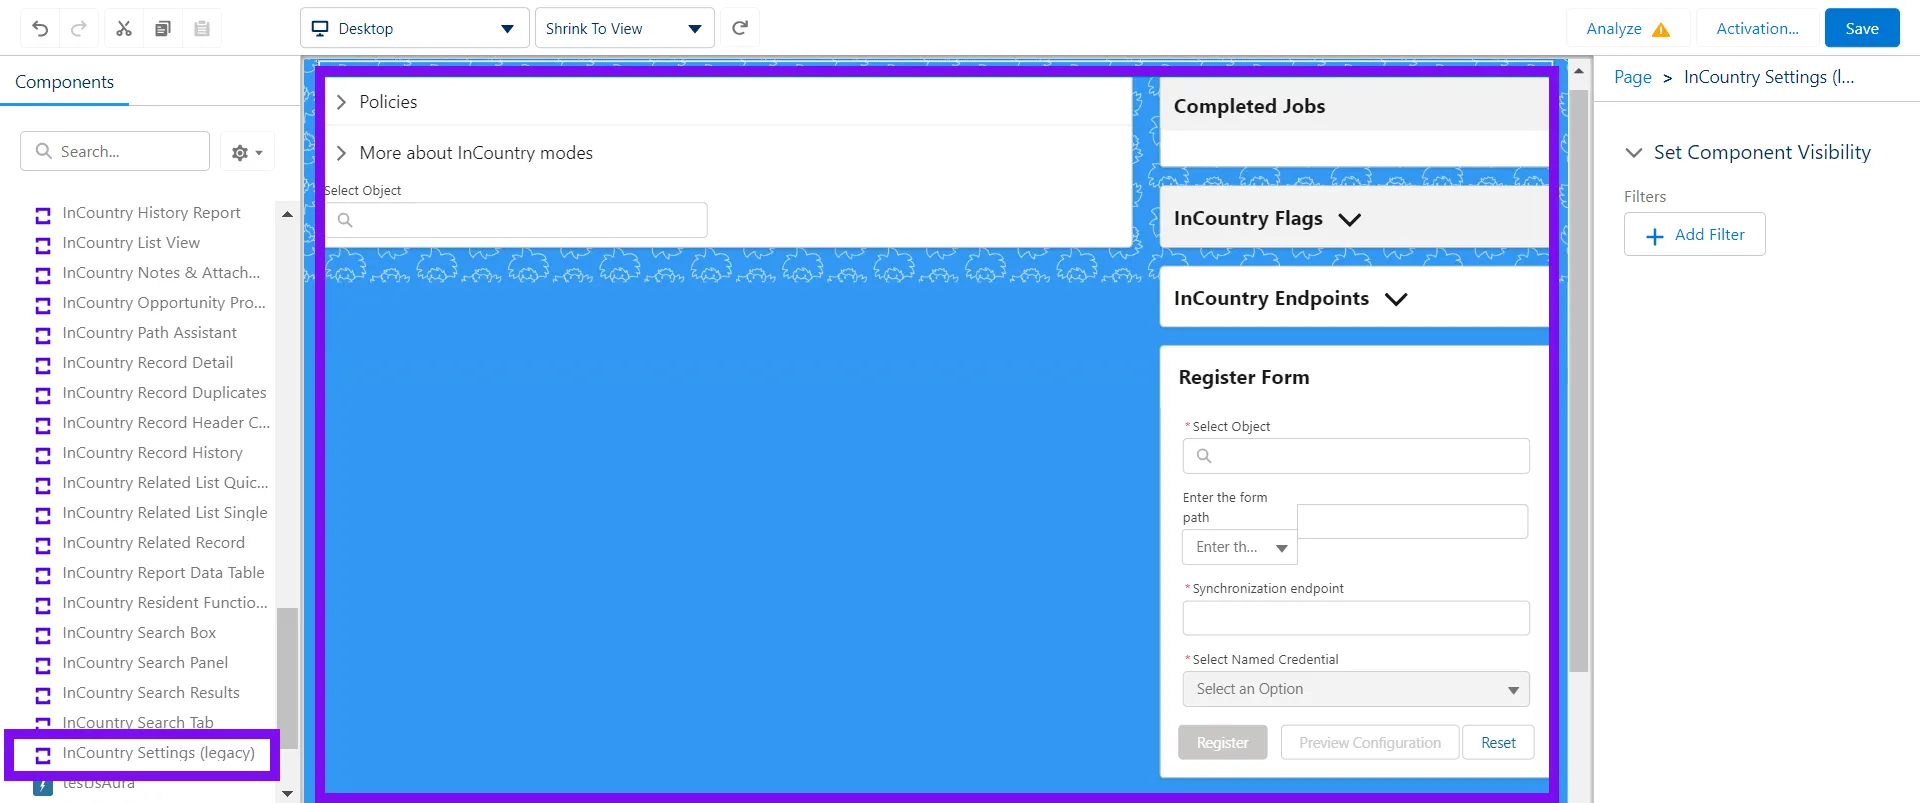
InCountry Settings (legacy)
Description
The InCountry Settings (legacy) component renders the configuration section to manage data regulation policies and protected fields in the InCountry Data Residency for Salesforce package.
When needed
Display the configuration section to manage data regulation policies and protected fields.
Configuring the InCountry Settings (legacy) component
-
In Lightning App Builder, drag the component to the layout.
-
Select the component to open the settings in the right part of the screen.
-
In the Set Component Visibility expand block, click + Add Filter. Define the filtration criteria for the component visibility on the layout according to your needs.
-
Activate the page layout.
InCountry Email Message (Redacted/Restricted model)
When you use the redaction or restriction data regulation policies, redacted data is stored in Salesforce. This can cause problems when communicating with contacts or leads by email. The package provides the Email Message component that allows you to send emails with redacted values that will be unredacted by Email Gateway.
Prerequisites
Configure the Email Gateway which can accept requests from Salesforce.
- Create an Email Gateway on the InCountry Portal. As the result, you will get credentials to integrate with Email Gateway.
Configuring the Email message component
Before configuring the Email Message component, please register an email gateway within the same environment and country which your Salesforce service is attributed to.
To enable the email processing by Email Gateway, you need to perform the following steps:
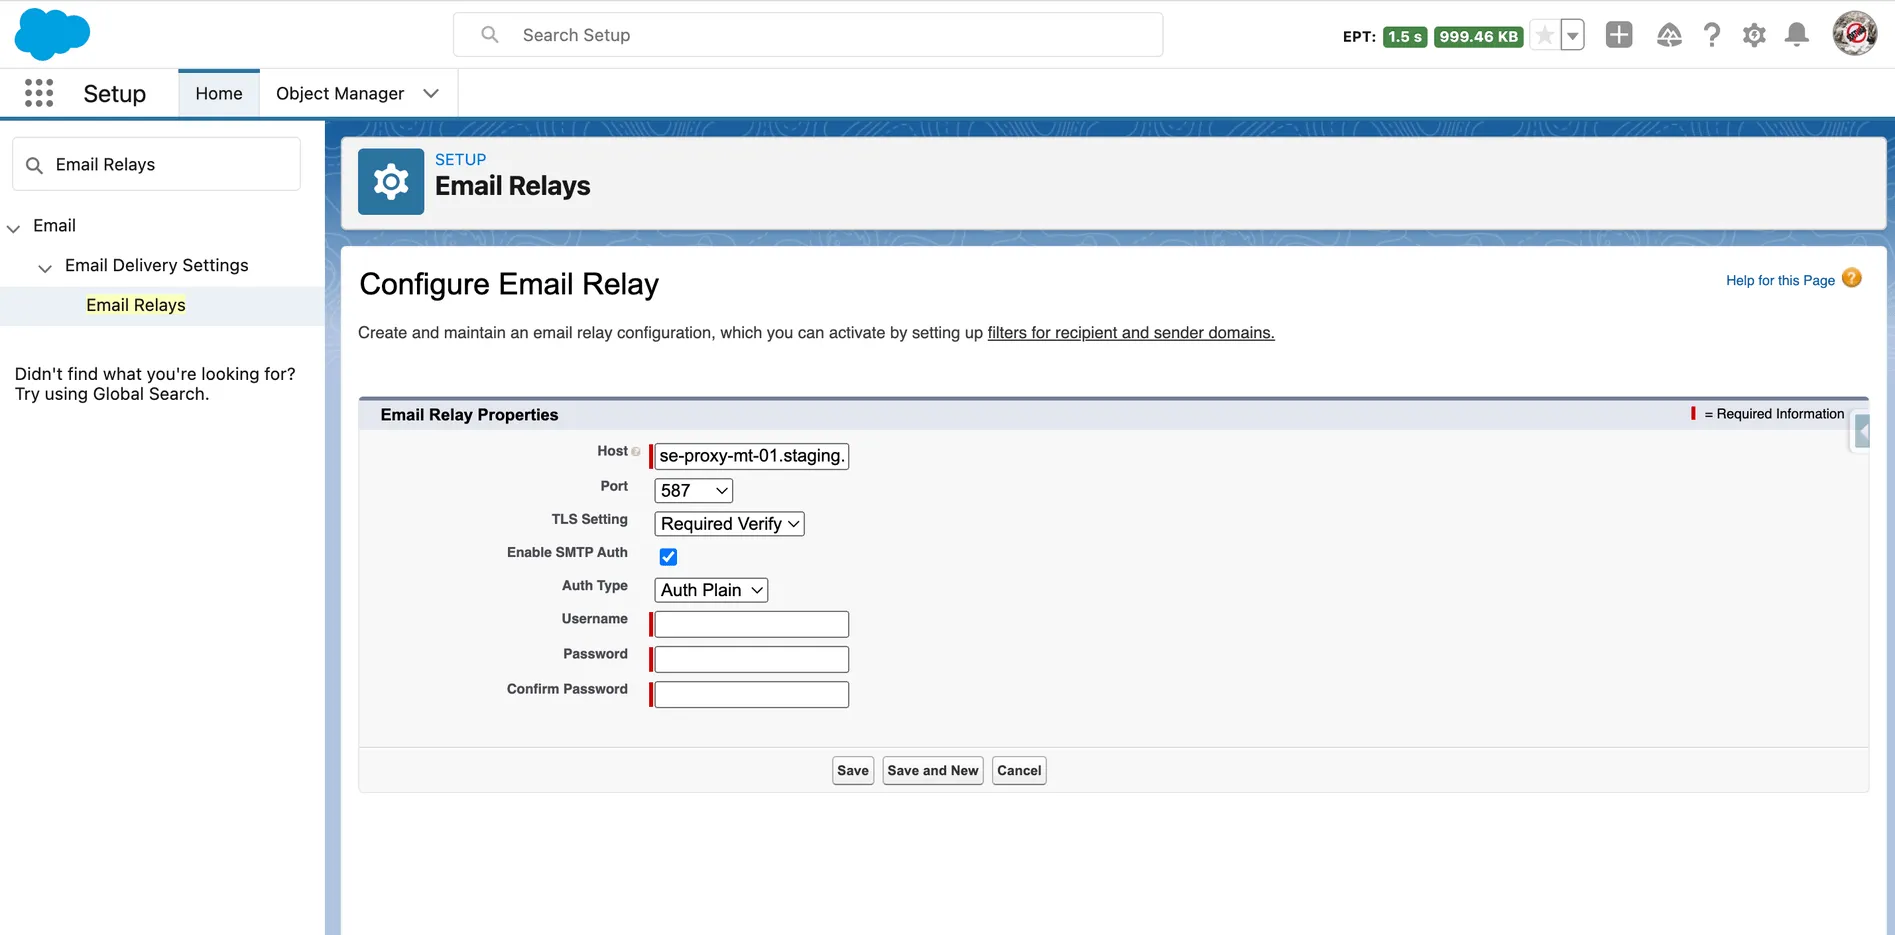
Creating an email relay
You need to set up an email relay for Salesforce-generated emails by configuring Salesforce to automatically route emails through your company’s SMTP server. If your company sends emails from more than one email domain, you can configure an email relay for each domain.
-
From Setup, select Email, then select Email Delivery Settings, finally, click Email Relays.
-
On the list with email relays, click Create Email Relay.
-
Configure the email relay as follows:
-
Host - enter the address of the Border host you received when creating a Border configuration (for example, (
se-proxy-mt-01.staging.incountry.io)). -
Port - specify the SMTP port as
587. -
TLS Setting - select the
Required Verifyoption. -
Enable SMTP Auth - check the box to enable SMTP authentication.
-
Auth Type - select the
Auth Plainoption. -
Username - enter the Client ID that you received on the InCountry Portal after registering an email gateway.
-
Password - enter the Client Secret that you received on the InCountry Portal after registering an email gateway.
-
Confirm Password - re-enter the Client Secret.
-
-
Click Save.
Creating organization-wide SMTP addresses
When sending emails from Salesforce, you can select your own email address or the organization-wide email address from which the email will be sent (the From field).
-
From Setup, select Email, then click Organization-Wide Addresses.
-
Click Add.
-
Fill out the following fields:
-
Display Name - specify the name explaining who an email is sent from.
-
Email Address - specify the email address which the letter will be sent from.
-
-
Choose the user profile for this email address.
-
Click Save.
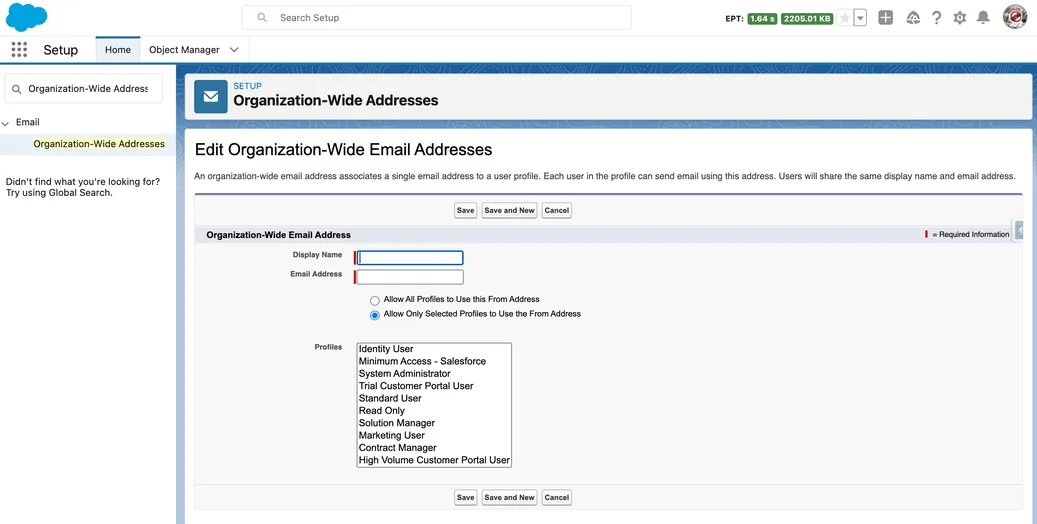
Upon completion of this step, a verification email will be delivered to your mailbox.
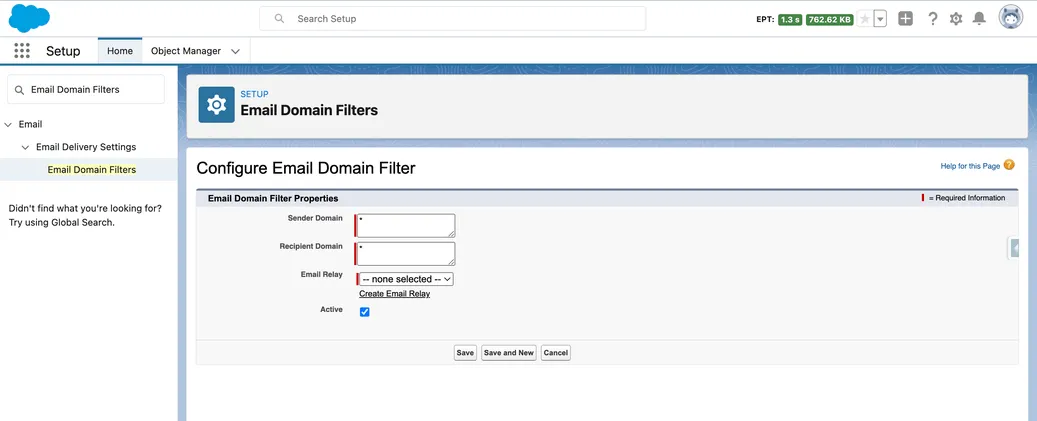
Creating an email domain filter
An email domain filter determines whether an email relay is restricted to specific domains. You can create multiple domain filters and set their priority order. An email domain filter must be set up for email relay to work.
-
From Setup, select Email, then select Email Delivery Settings, finally, click Email Domain Filters.
-
Click Create Email Domain Filter.
-
Enter the following information:
-
Sender Domain - leave it empty (leave the * (asterisk) sign as-is).
-
Recipient Domain - leave it empty (leave the * (asterisk) sign as-is).
-
Email Relay - select the email relay that you have created.
-
Active - check the box to activate the email domain filter.
-
-
Click Save.
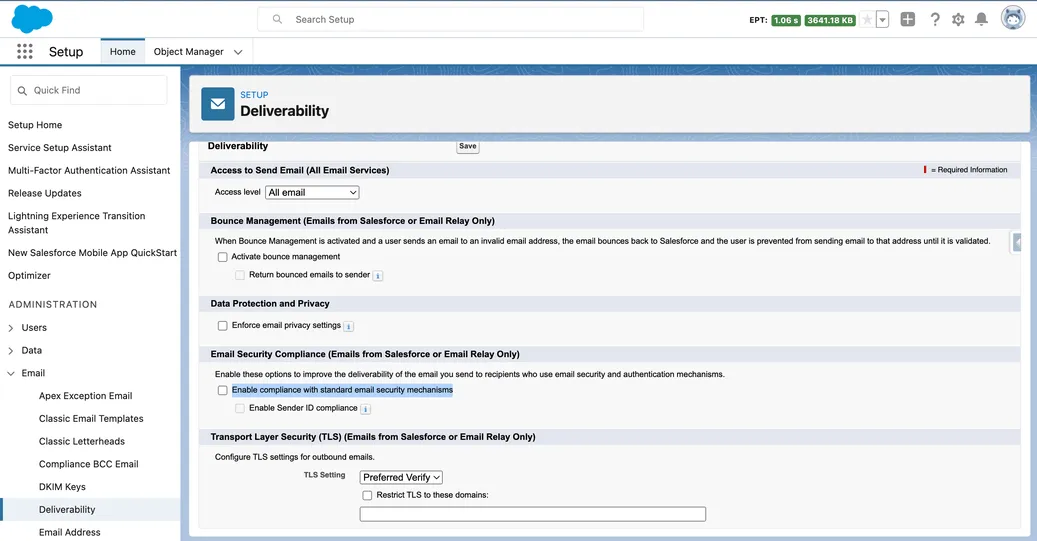
Configuring email deliverability
When you send emails from Salesforce, you would like to deliver emails to your recipients as coming from your domain instead of https://salesforce.com. The latter can cause problems in email deliverability and increase the chances of your emails being marked as spam. This is why you need to disable the Email Security Compliance feature.
-
From Setup, select Email, then click Deliverability.
-
Clear the Activate bounce management box.
-
Clear the Enable compliance with standard email security mechanisms box.
-
Click Save.
InCountry Email Message (Legacy Replicated model)
The InCountry Data Residency for Salesforce package provides the Email component supporting the data compliance when sending emails from Salesforce.
Configuring the Email Message component
To configure the Email message component for the replicated model, you need to perform the following steps:
Creating a data regulation policy
-
On the menu, select Settings.
-
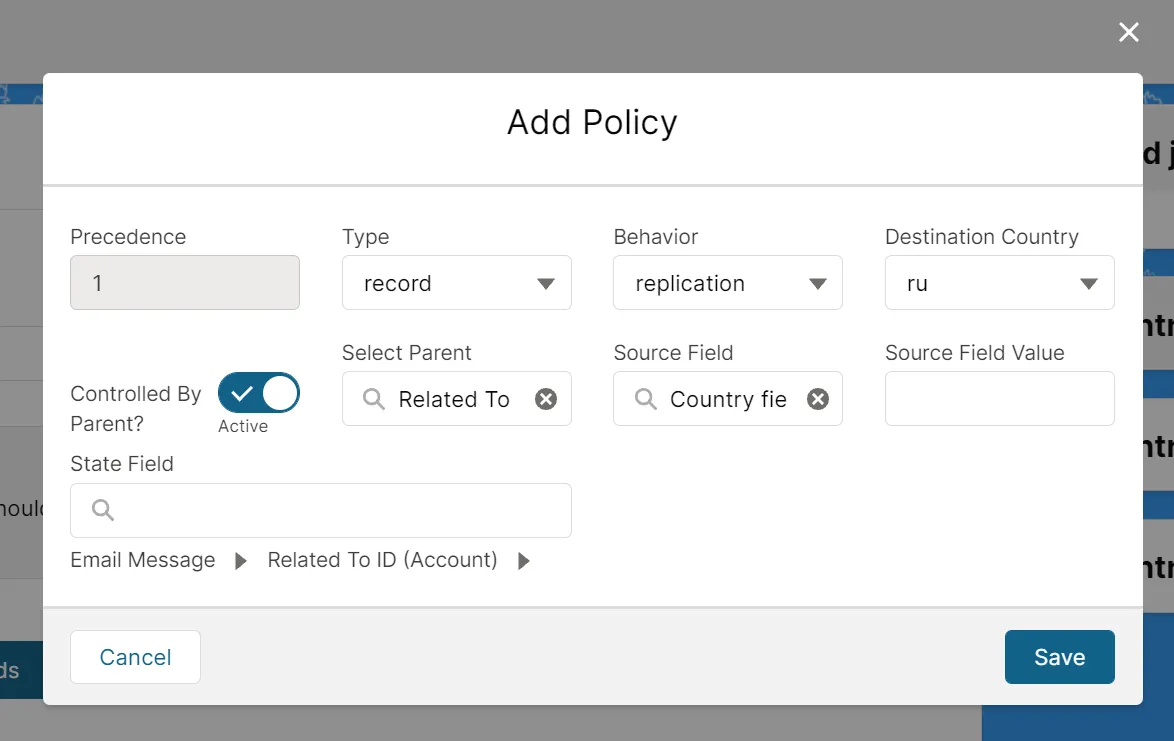
In the Select Object box, select the Email Message object and click Add Policy. The Add Policy form opens.
-
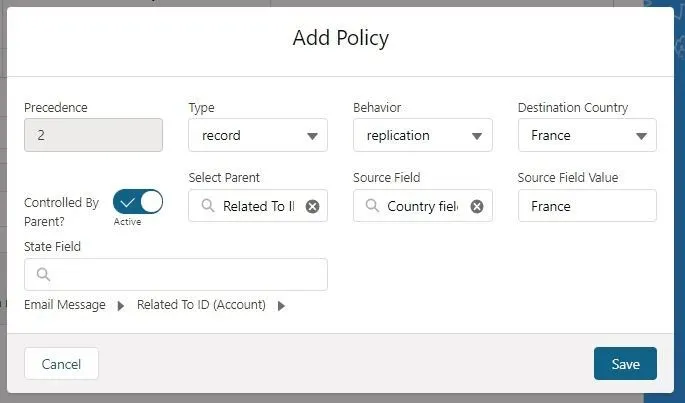
In the Type box, select
record. The data regulation policy will be applied to Salesforce objects of the record type. This means, that each email message (as a record) will be saved to the country of origin based on the country attribution. -
In the Behavior box, select Replication.
-
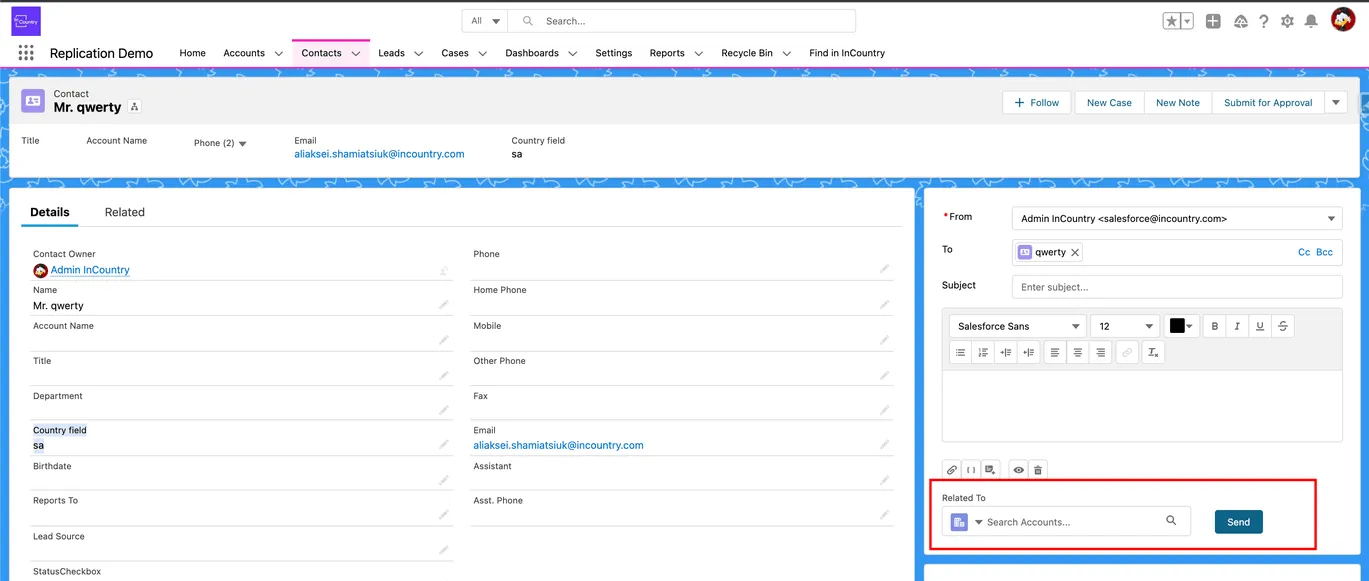
In the Destination Country box, select the country for storing and processing the regulated data according to the select data regulation model. The following steps will customize the Related To field shown below:
-
Move the Controlled By Parent toggle right to enable the inheritance of configuration from the parent object.
-
In the Select Parent box, enter
Related To ID (Account).notePlease note that the User, Lead, and Contact objects are not supported by the Related To field. When you create a regulation policy for these objects, start entering and choose from the drop-down list Related To ID (Account) or any other Salesforce object that has the same field that the required object (User, Lead, or Contact) includes.
-
In the Source Field box, enter the name of the field which stores the country value. For example: Country field.
-
In the Source Field Value box, enter the name of the country as you specify it while creating records related to the Email Message object. The value stored within the field will be saved to the country you select in the Destination Country box. This configuration option is available at the record level only.
-
Save the data regulation policy.
Adding the InCountry Apex trigger
The InCountry Apex trigger allows you to set automated deletion of email messages from the InCountry platform, when they are deleted from Salesforce. To add the InCountry Apex trigger, follow the steps below:
-
Open the Developer Console.
-
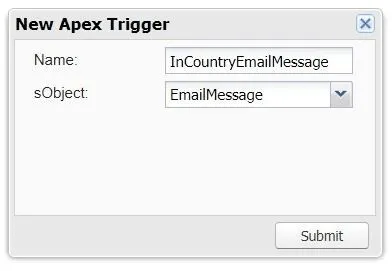
From the File menu, select New, then click Apex Trigger.
-
Populate the trigger name and select the respective sObject. The name must be InCountryEmailMessage.
-
Click Submit.
-
Replace the trigger body with the code below.
trigger InCountryEmailMessage on EmailMessage (before delete, after delete) {
    SObjectType triggerType = Trigger.isDelete ? Trigger.old.getSObjectType() : Trigger.new.getSObjectType();

    if (Trigger.isDelete && !InCountryReplicationTriggerHandler.disableTrigger && !InCountryReplicationTriggerHandler.alreadyExecuted(triggerType)) {

        InCountryReplicationTriggerHandler handler = new InCountryReplicationTriggerHandler(triggerType.getDescribe().getName());
        if (Trigger.isBefore) {
            handler.handleBeforeDeleteEmailMessage();
        } else {
            handler.handleAfterDeleteEmailMessage();
            InCountryReplicationTriggerHandler.registerExecution(triggerType);
        }
    }
}
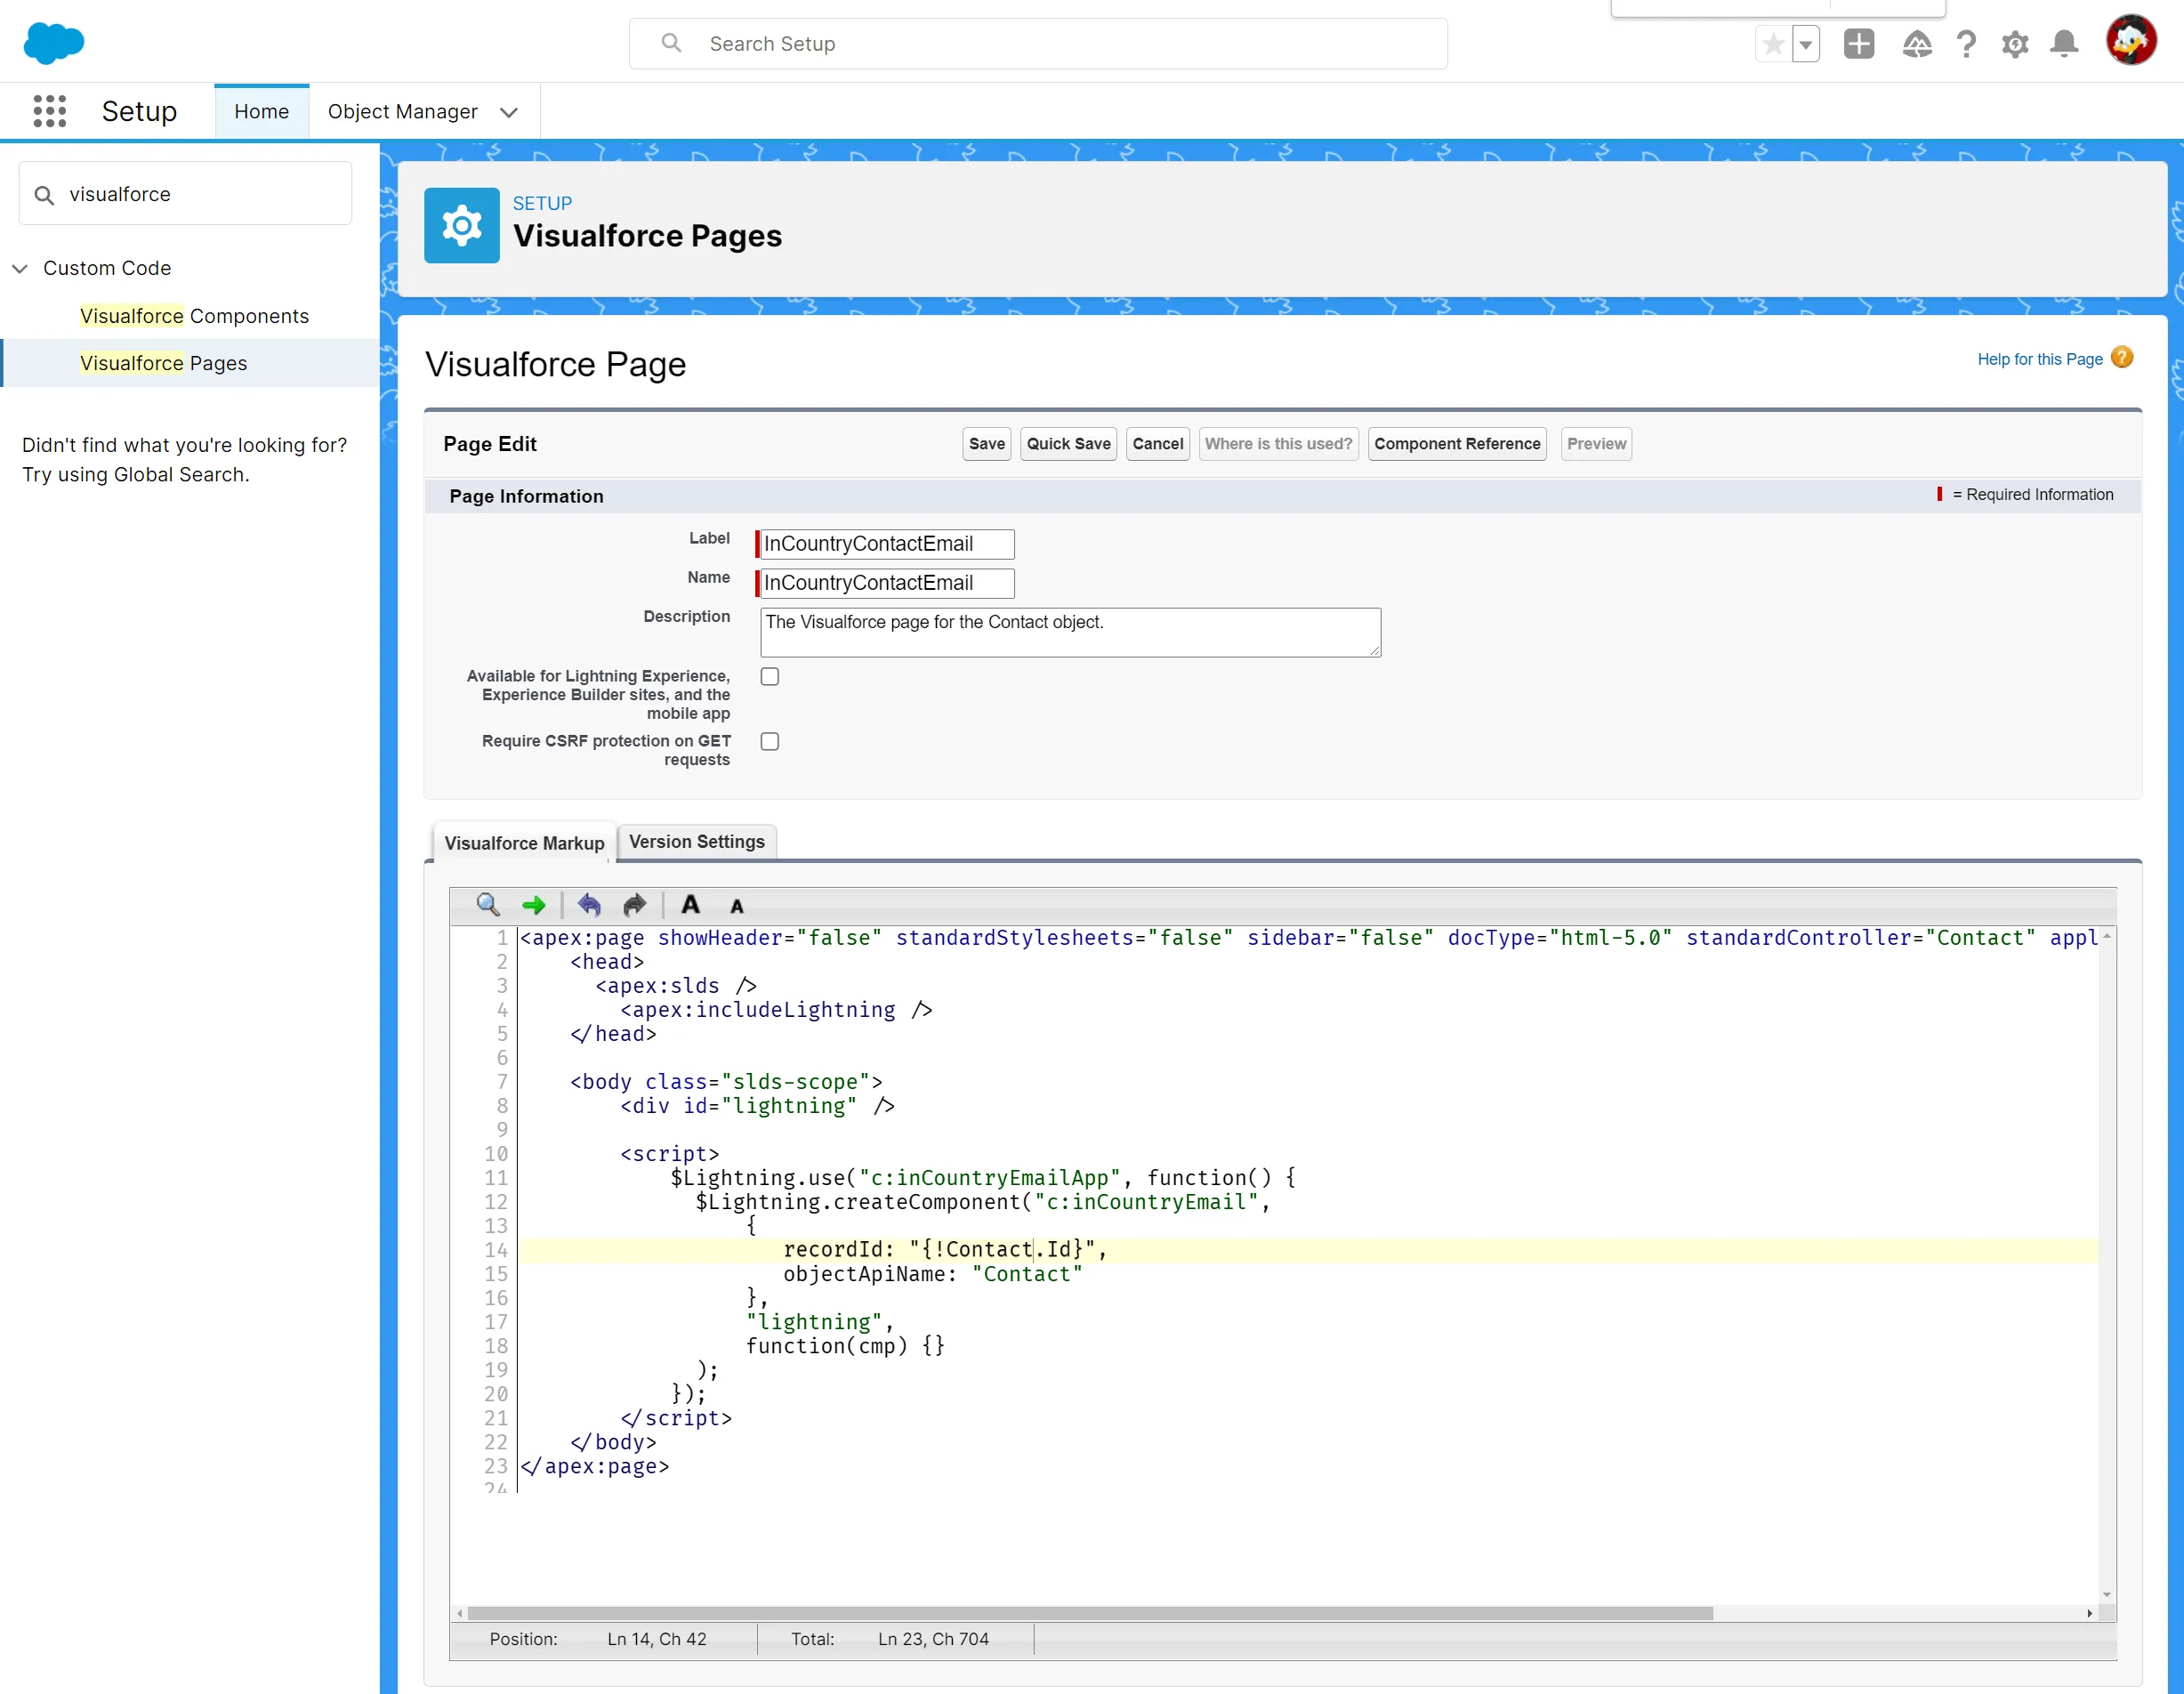
Creating a Visualforce page with the Email Message component
Please follow these instructions if you use Salesforce Classic.
-
Navigate to Setup.
-
On the sidebar, select Custom Code, then select Visualforce Pages.
-
Click New.
-
On the Visualforce Page page, specify the following information:
-
Label - enter the page label.
-
Name - enter the page name.
-
Description - enter the description of the page.
-
Visualforce Markup - add the following Apex code of the Email Message component:
<apex:page showHeader="false" standardStylesheets="false" sidebar="false" docType="html-5.0" standardController="Account" applyBodyTag="False" applyHtmlTag="False"><head><apex:slds /><apex:includeLightning /></head><body class="slds-scope"><div id="lightning" /><script>$Lightning.use("c:inCountryEmailApp", function() {$Lightning.createComponent("c:inCountryEmail",{recordId: "{!Account.Id}",objectApiName: "Account"},"lightning",function(cmp) {});});</script></body></apex:page> -
-
Click Save.
noteThe code snippet above is valid for the Account object. To make it valid for any other Salesforce object, enter the appropriate Salesforce object name in the following parts:
-
standardController="Account" -
recordId: "{!Account.Id}" -
objectApiName: "Account"
-
-
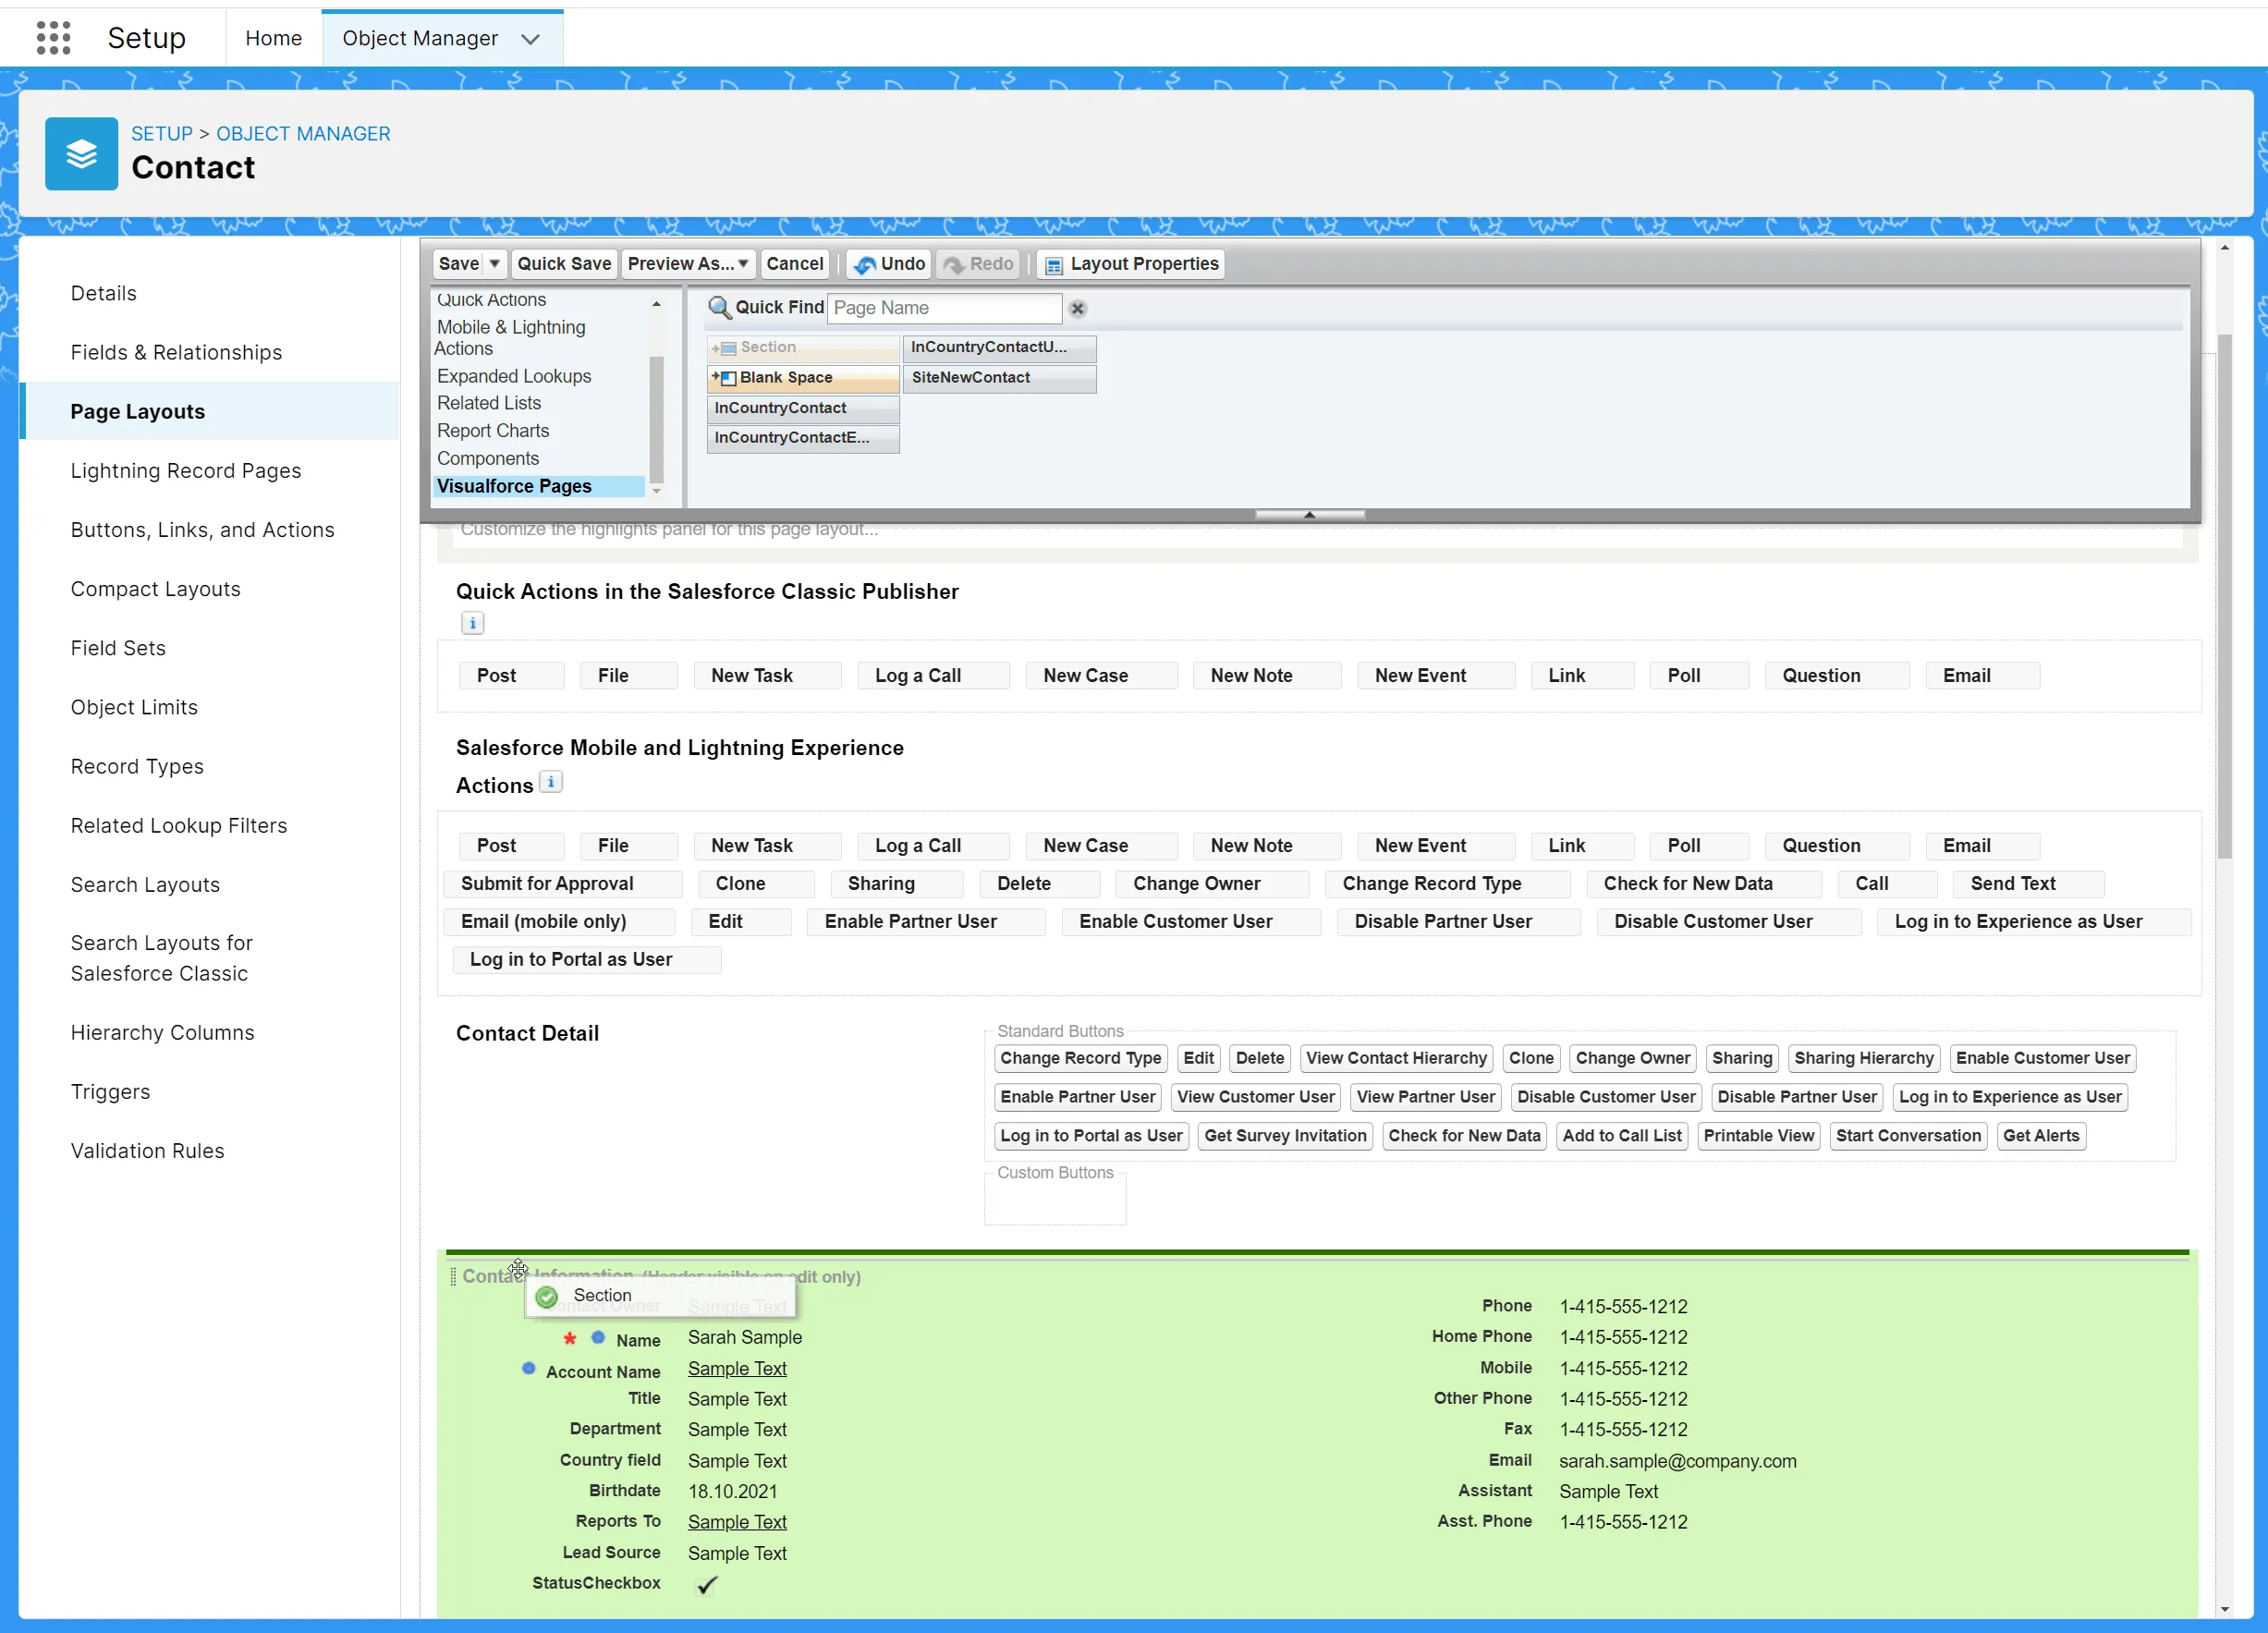
Once you have saved the page, you need to add it to the Flexipage layout. Navigate to Setup.
-
On the sidebar, select Objects and Fields, then select Object Manager.
-
On the Object Manager page, locate the Salesforce object which you want to add the Email Message page for and select this object.
-
On the sidebar, select Page Layouts.
-
Add a new section.
-
Select Visuaforce Pages.
-
Locate the newly added Visualforce page with the Email Message component.
-
Drag the Visualforce Page to the new section.
-
Click the Properties icon.
-
In the Visualforce Page Properties form, enter the height in pixels (by default, use 550 px) and check the box to show the scrollbar.
-
Click OK.

Adding the Email Message component to the page layout
Please follow these instructions if you use Salesforce Lightning.
-
Open the list for a specific object and select a specific record.
-
Click Setup, then select Edit Page.
-
On the Lightning App Builder page, add a new tab. Select
Customand enter a custom label. -
Click Done.
-
Select the newly added tab on the page layout.
-
Drag the
InCountryEmailcomponent to the tab. -
Click Save.
-
Click Activation and activate the modified page.