InCountry Data Residency for Salesforce - FAQ
This page contains answers to the frequently asked questions about the InCountry Data Residency for Salesforce package.
Can I regulate the order of executing data regulation policies for a Salesforce object?
Yes, in the replication data regulation model you can regulate the order of executing data regulation policies at the record level. For the details on this functionality, please check our documentation.
Can the InCountry Data Residency for Salesforce package have a significant impact on any of my organization’s existing API limits?
Below you can find details on the consumption of Salesforce resources during the execution of specific actions within the package. The numbers within the table are approximate, so we recommend that you measure the actual consumption on your Salesforce in the UAT environment before installing the package on production instances.
All the numbers displayed in this table may vary per host and depends on the amount of data stored in your Salesforce, as well as configuration parameters and fields.
| Action | Transaction # | SOQL | SOQL Rows | Callouts within Salesforce | External callouts | DML | DML Rows |
|---|---|---|---|---|---|---|---|
| User creates a record | 1 | 3 | 3 | ||||
| 2 | 2 | 11 | 1 | 1 | 1 | ||
| 3 | 5 | 13 | 1 | ||||
| 4 | 2 | 13 | 1 | ||||
| 5 | 0 | 13 | 1 | ||||
| Total | 13 | 53 | 0 | 4 | 1 | 1 | |
| User updates a record | 1 | 3 | 3 | ||||
| 2 | 2 | 11 | 1 | 1 | 1 | ||
| 3 | 5 | 13 | 1 | ||||
| 4 | 2 | 13 | 1 | ||||
| 5 | 0 | 13 | 1 | ||||
| Total | 12 | 53 | 0 | 4 | 1 | 1 | |
| User deletes a record | 1 | 3 | 15 | ||||
| 2 | 9 | 1 | |||||
| Total | 3 | 24 | 0 | 1 | 0 | 0 |
| Action | Transaction # | SOQL | SOQL Rows | Callouts within Salesforce | External callouts externa | DML | DML Rows |
|---|---|---|---|---|---|---|---|
| User views a record in the Record Details view | 1 | 6 | 60 | ||||
| 2 | 4 | 61 | |||||
| 3 | 0 | 5 | |||||
| 4 | 4 | 61 | |||||
| Total | 18 | 187 | 0 | 0 | 0 | 0 | |
| User updates a record in the Record Details view | Total | 2 | 61 | 0 | 0 | 0 | 0 |
| User views a record on the record header block | 1 | 6 | 60 | ||||
| 2 | 1 | 0 | |||||
| 3 | 0 | 5 | |||||
| 4 | 2 | 61 | |||||
| 5 | 0 | ||||||
| 6 | 1 | ||||||
| Total | 9 | 187 | 1 | 0 | 0 | 0 | |
| User deletes a record on the record header block | 1 | 1 | |||||
| 2 | 4 | 61 | 1 | 1 | |||
| 3 | 1 | ||||||
| Total | 4 | 61 | 1 | 1 | 1 | 1 | |
| User views records in the Records List view | 1 | 1 | 1 | ||||
| 2 | 6 | 60 | |||||
| 3 | 1 | 1 | |||||
| 4 | 5 | ||||||
| 5 | 2 | 1 | |||||
| 6 | 1 | ||||||
| 7 | 0 | ||||||
| 8 | 1 | ||||||
| 9 | 0 | ||||||
| 10 | 2 | 159 | |||||
| 11 | 0 | ||||||
| 12 | 1 | ||||||
| Total | 12 | 227 | 1 | 0 | 0 | 0 | |
| User scrolls records in the Records List view | Total | 8 | 89 | 0 | 0 | 0 | 0 |
| User updates a filter in the Records List view | 1 | 2 | 56 | 2 | |||
| 2 | 0 | ||||||
| 3 | 2 | 2 | 3 | 3 | |||
| Total | 4 | 58 | 2 | 0 | 3 | 3 | |
| User creates a new list view in the Records List view | Total | 1 | 1 | 2 | 0 | 0 | 0 |
| User exports a CSV file in the Records List view | Total | 8 | 60 | 0 | 0 | 0 | 0 |
| User views attachments stored on the InCountry platform | 1 | 8 | 60 | ||||
| 2 | 1 | 1 | |||||
| 3 | 3 | 58 | |||||
| Total | 12 | 119 | 0 | 0 | 0 | 0 | |
| System checks record duplicates on the Record Duplicates page | Total | 1 | 6 | 0 | 1 | 0 | 0 |
| Uses views related records on the Related Record page | 1 | 9 | 106 | ||||
| 2 | 9 | 108 | |||||
| 3 | 8 | 53 | |||||
| 4 | 5 | ||||||
| 5 | 8 | 61 | |||||
| Total | 34 | 333 | 0 | 0 | 0 | 0 | |
| User views the settings of the package | 1 | 1 | |||||
| 2 | 5 | ||||||
| 3 | 2 | ||||||
| 4 | 1 | ||||||
| Total | 1 | 7 | 1 | 0 | 0 | 0 | |
| Administrator adds a new object policy on the Settings page | 1 | 1 | |||||
| 2 | 1 | ||||||
| 3 | 1 | 9 | 1 | 1 | |||
| Total | 3 | 9 | 0 | 0 | 1 | 1 | |
| Administrator adds a new PII field on the Settings page | 1 | 5 | 1 | 1 | |||
| 2 | 1 | ||||||
| 3 | 1 | 1 | |||||
| Total | 2 | 6 | 0 | 0 | 1 | 1 | |
| Administrator updates the InCountry flag on the Settings page | 1 | 1 | 2 | ||||
| 2 | 5 | ||||||
| Total | 0 | 6 | 2 | 0 | 0 | 0 | |
| User creates a new InCountry Endpoint on the Settings page | Total | 0 | 0 | 4 | 0 | 0 | 0 |
| User views the reports list on the InCountry Reports page | Total | 1 | 2 | 0 | 0 | 0 | 0 |
| User views a particular report on the InCountry Reports page | 1 | 1 | 1 | ||||
| 2 | 1 | 2 | |||||
| 3 | 1 | ||||||
| 4 | 0 | ||||||
| 5 | 3 | 60 | |||||
| Total | 5 | 64 | 0 | 0 | 0 | 0 | |
| User views Activity Details on record header block and in the Activity Details component | 1 | 2 | 2 | ||||
| 2 | 0 | 129 | |||||
| 3 | 2 | 2 | |||||
| 4 | 0 | 53 | |||||
| 5 | 5 | ||||||
| 6 | 8 | 61 | |||||
| 7 | 2 | 2 | |||||
| 8 | 3 | ||||||
| Total | 14 | 254 | 3 | 0 | 0 | 0 |
How do I make the InCountry Data Residency package work with the Salesforce Community user licenses?
The InCountry Data Residency package supports the generic Salesforce user licenses, as well as Salesforce Community user licenses. For some license types, you may need to make slight modifications to your Salesforce configuration.
Instead of using the default InCountry User permission set, you need to apply the InCountry Community User permission set that supports the Salesforce Community user licenses. Several license types are not supported by the InCountry permission sets.
The following table shows the appropriate permission set to use with specific Salesforce user licenses. If the permission set does not support a specific license type, you can use a proposed workaround.
All the information contained in this section is applicable to Salesforce’s Winter ’22 release only.
| User License / Profile | InCountry User permission set | InCountry Community User permission set | Workaround |
|---|---|---|---|
| Partner Community Login / Partner Community Login User | ❌ | ❌ | Workaround for external users:
|
| Customer Community Login / Customer Community Login User | ❌ | ✔️ | |
| Customer Community / Customer Community User | ❌ | ✔️ | |
| Customer Community Plus / Customer Community Plus User | ❌ | ❌ | |
| Customer Community Plus Login / Customer Community Plus Login User | ❌ | ❌ | |
| Customer Portal Manager Custom / Customer Portal Manager Custom | ❌ | ❌ | Workaround for external users:
|
| Customer Portal Manager Standard | ❌ | ❌ | |
| External Apps Login / External Apps Login User | ❌ | ✔️ | |
| External Identity / External Identity User | ❌ | ✔️ | |
| Partner Community / Partner Community User | ❌ | ✔️ | Workaround for external users:
|
| Silver Partner / Silver Partner User | ❌ | ❌ | |
| Gold Partner / Gold Partner User | ❌ | ❌ | |
| High Volume Customer Portal / High Volume Customer Portal User | ❌ | ✔️ | |
| Company Communities / Company Communities User | ✔️ | ✔️ | |
| Force.com - Free / Force.com - Free User | ❌ | ✔️ | |
| Force.com - App Subscription / Force.com - App Subscription User | ✔️ | ✔️ | |
| Partner App Subscription / Partner App Subscription User | ✔️ | ✔️ | |
| Salesforce Platform / Standard Platform User | ✔️ | ✔️ | |
| Work.com Only / Work.com Only User | ❌ | ✔️ | |
| Salesforce / Minimum Access - Salesforce | ✔️ | ✔️ | |
| Salesforce / ReadOnly | ✔️ | ✔️ | |
| Salesforce / Marketing User | ✔️ | ✔️ | |
| Cross Org Data Proxy / Cross Org Data Proxy User | ✔️ | ✔️ | |
| Identity / Identity User | ✔️ | ✔️ |
How do I add and configure the Name, First Name, and Last Name as protected fields?
The fields First Name and Last Name are added as standard protected fields. For the details on configuration of protected fields, please check our documentation.
To add the First Name and Last Name fields, please follow the next steps:
-
On the menu, select Settings.
-
Select the Salesforce object which the First Name and Last Name fields you want to add.
-
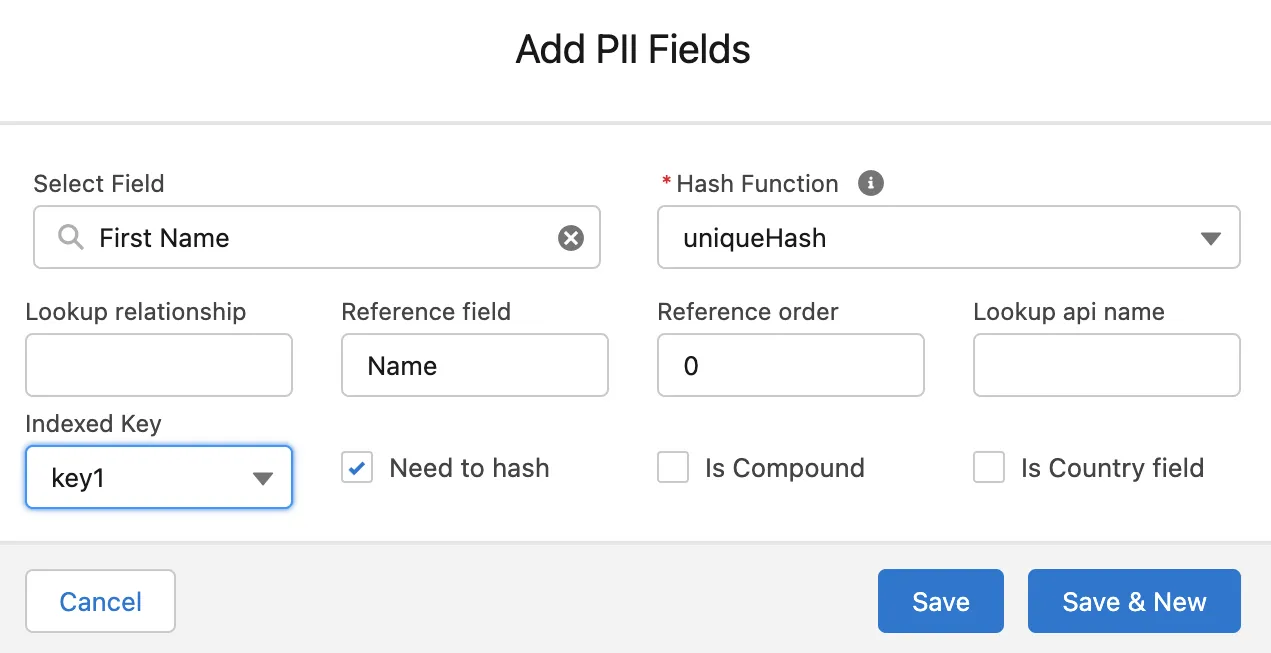
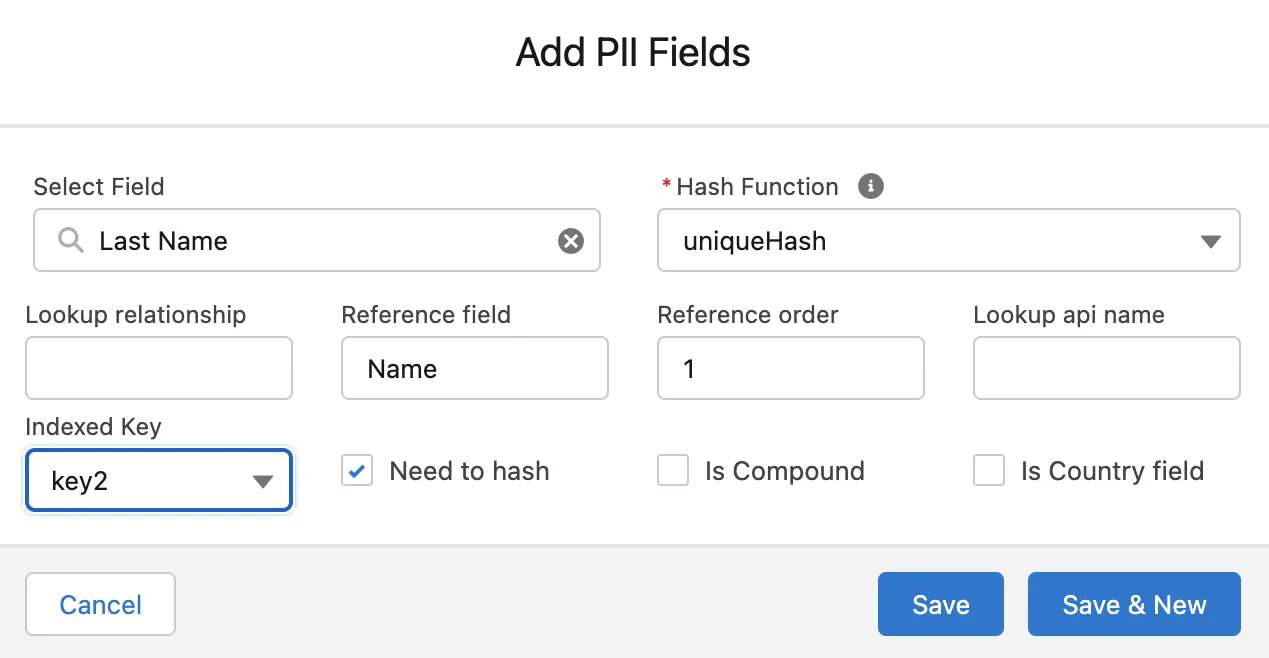
Click Add Field. In the Add PII Fields form, define the configuration as follows:
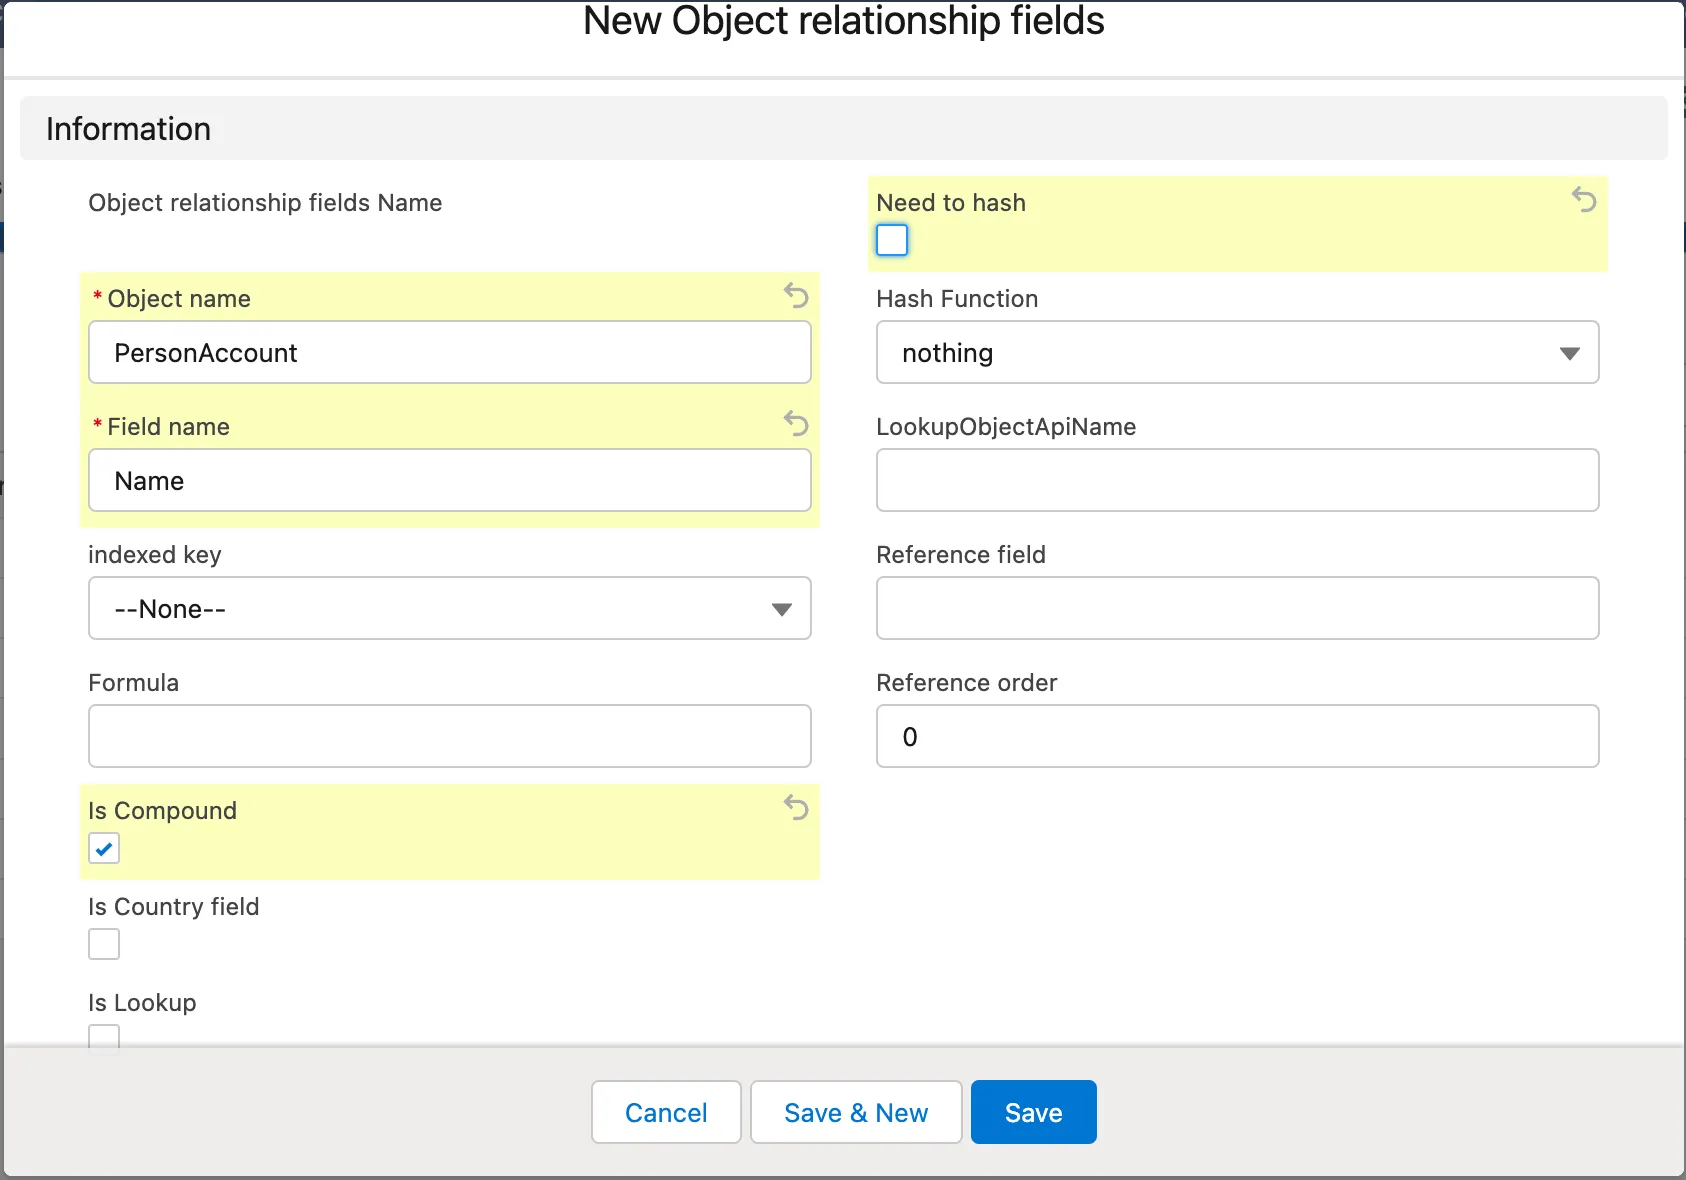
To add the Name field, please follow the next steps:
-
From the App launcher, select Object relationship fields.

-
Click New.
-
In the Object name box, enter the name of the Salesforce object.
-
In the Field name, enter
Name. -
Check the Is Compound box to indicate that the field is comprised of multiple fields.
-
Check the Need to hash box to enable the hashing of the protected field. By default, it is enabled automatically.
-
When complete, click Save.

The fields should be created in the following order: First Name, Last Name, and Name.
Can I use Salesforce Connect to localize and distribute regulated data in Salesforce?
Technically, yes. You can use Salesforce Connect to read and write data from the remote data store located in a country different from the one where your Salesforce instance resides. The main limitation of Salesforce Connect is that it works with external objects only, which makes it impossible to localize information of standard and custom Salesforce objects. Considering this Salesforce Connect cannot be used as a full-fledged data residency solution as it does not support localization of standard and custom Salesforce objects, which makes the entire solution useless for data compliance purposes.
| Parameter | InCountry Data Residency | Salesforce Connect |
|---|---|---|
| Infrastructure | ||
| Storage development | Already available | Design and development by Customer |
| Management | InCountry | Customer |
| Storage security | InCountry | Customer |
| Maintenance & update | InCountry | Customer |
| Operations on regulated data | ||
| Read | ✔️ | ✔️ |
| Write | ✔️ | ✔️ |
| Update | ✔️ | ✔️ |
| Automatic data backup | ✔️ | ❌ (Customer needs to implement data backup) |
| Automatic system failover | ✔️ | ❌ (Customer needs to implement system failover) |
| Supported data regulation models | ||
| Redaction | ✔️ | ❌ (data always goes through Salesforce backend) |
| Restriction | ✔️ | ✔️ |
| Replication | ✔️ | ❌ |
| Search capabilities | ||
| Search options | Out-of-the-box search | Implement search for each external object |
| Fuzzy search | ✔️ | ✔️ |
| Supported Salesforce objects | ||
| Standard objects | ✔️ some Salesforce objects may be locked for third-party packages | ❌ |
| Custom objects | ✔️ | ❌ |
| External objects | ❌ | ✔️ |
| Data communication and connection | ||
| OData application development and support | Not needed | Required |
| Country support | 90+ countries | Support for each country is added individually |
| Data connection | No limits | 20,000 connection limits |
| Maximal number of external records | No limits | Limited (inappropriate for complex integrations due to connection limits) |
| Geo IP detection | ✔️ | ❌ |
How do I track the current hashing status for protected fields of the record?
The InCountry Data Residency for Salesforce package allows you to track the current hashing status for the record’s protected fields. This may be required when the record is being synchronized between Salesforce and the InCountry platform for some time. The field indicates the current hashing status on the record’s detail page.
Prerequisites
-
You need to create a custom field of the checklist type (for example, name it as
Hashing in Progress). -
Add this custom field to the Salesforce object page.
-
Ensure that an Apex trigger is configured for the current Salesforce object.
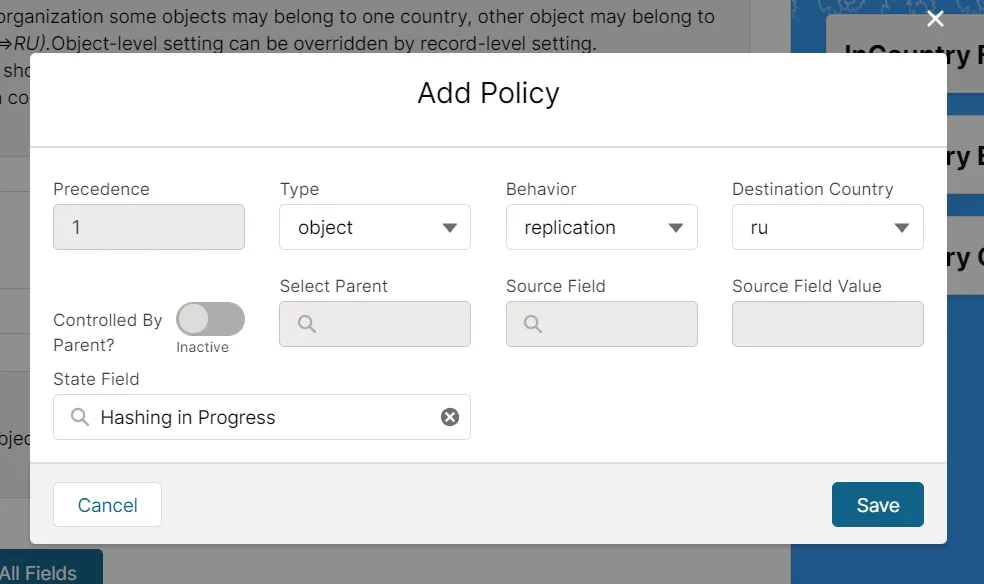
Creating a data regulation policy for the Salesforce object
-
On the Settings tab, click Add Policy.
-
In the Add Policy form, specify the following information:
-
Type - select object or record.
-
Behavior - select the data regulation model.
-
Destination Country - select the country for storing data records.
-
State Field - select the field of the checklist type that you have added.
-
-
When complete, click Save.
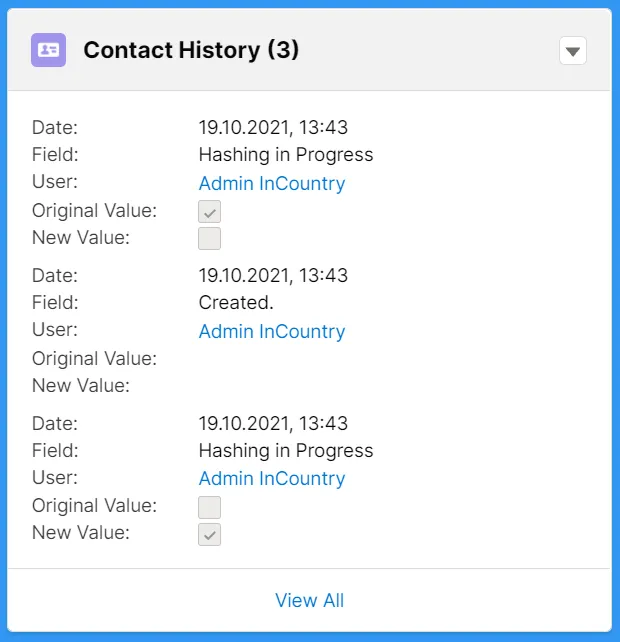
You can also add the {Object} History component to the Salesforce object’s page.
Tracking the hashing status for protected fields
Create a new record for which you created a data regulation policy.
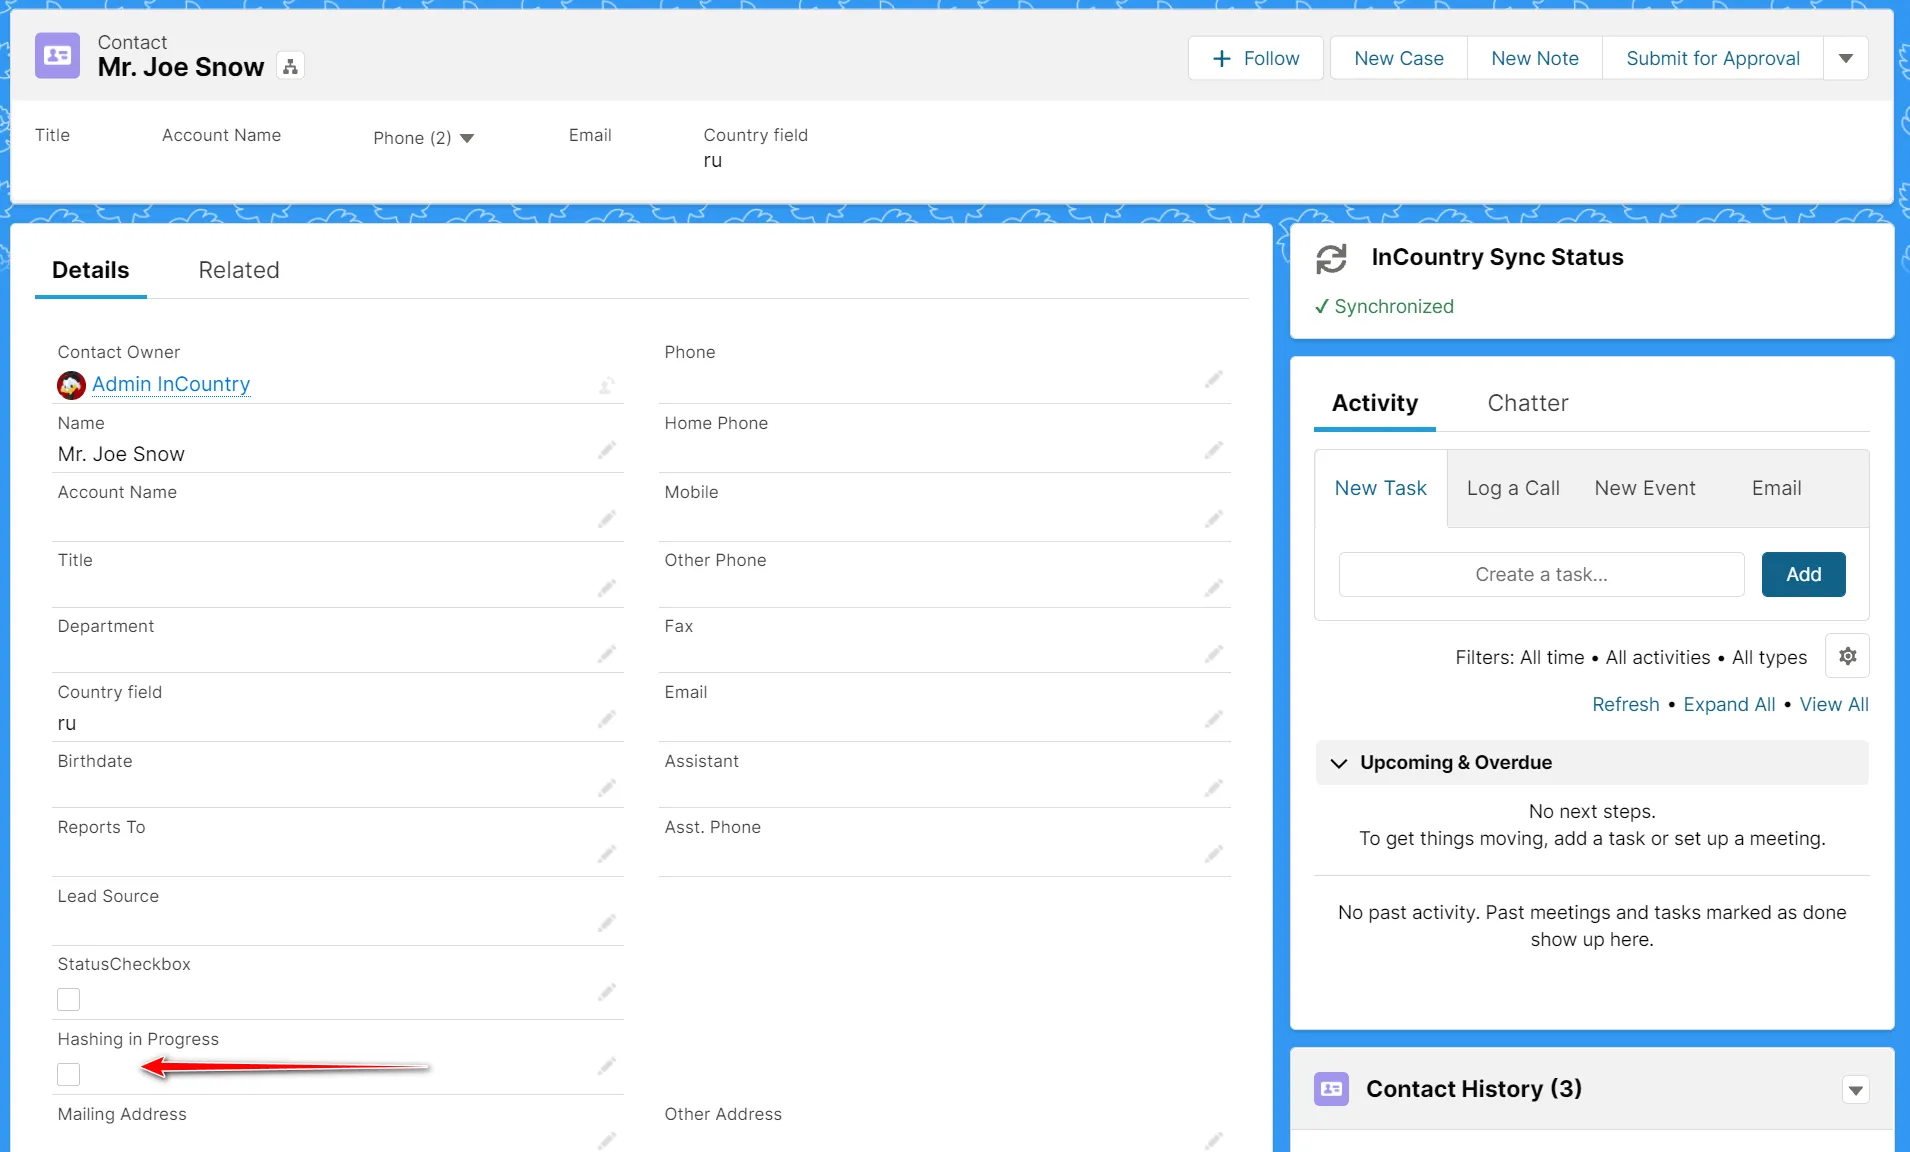
While the package hashes the record’s regulated data fields, this box is shown as checked. Once the hashing is finished the box is cleared. In the {Object} History block, you can view the current hashing status of the record and how it changes.
What features are supported in Salesforce Mobile?
This information applies only to the legacy replication data regulation model.
| Feature | Support | Clarification |
|---|---|---|
| Configuration of the package | Not supported | The Settings pages is not adapted for the mobile form factor. |
| Reading Salesforce records | Supported | |
| Creating Salesforce records | Partially supported (minor UI issue) | Not supported for the Opportunity object. |
| Updating Salesforce records | Supported | |
| Deleting Salesforce records | Supported | |
| CRUD-operations on records via API | Supported | CRUD API operations are handled by Apex trigger running on the Salesforce application server. |
| Mobile-specific quick actions | Not supported | |
| Chatter for Mobile | Not supported | |
| InCountry-specific search | Not supported | The Find in InCountry page is not adapted for the mobile form factor. |
How do I disable the field-level security for the pre-commit phase of record creation/update?
This information applies only to the legacy replication data regulation model.
-
Grant the edit access to the regulated field if the pre-commit phase must be executed with the User context.
-
Add a statiс flag into the
InCountryTriggerHandlerclass that will allow the skipping of theisUpdateable()check when necessary.
The following line of code should be added prior to the SDK call execution:
testIncountry1.InCountryReplicationTriggerHandler.skipIsUpdateableCheck = true;
As the result, your program code should be similar to the following one:
testInCountry1.InCountryReplicationTriggerHandler handler = new testInCountry1.InCountryReplicationTriggerHandler(objectType.getDescribe().getName());
testIncountry1.InCountryReplicationTriggerHandler .skipIsUpdateableCheck = true;
handler.handleBeforeInsert();
How do I add the button to create new records in the Related Items block?
-
From Setup, click Objects and Fields, then select Object Manager.
-
Select the Salesforce object for which you want to add the button to create new records.
-
On the sidebar, select Page Layouts.
-
Open the object layout.
-
Within the list of elements, select Related Lists.
-
In the Related List Properties form, select Buttons.
-
Check the New box.
-
Click OK.
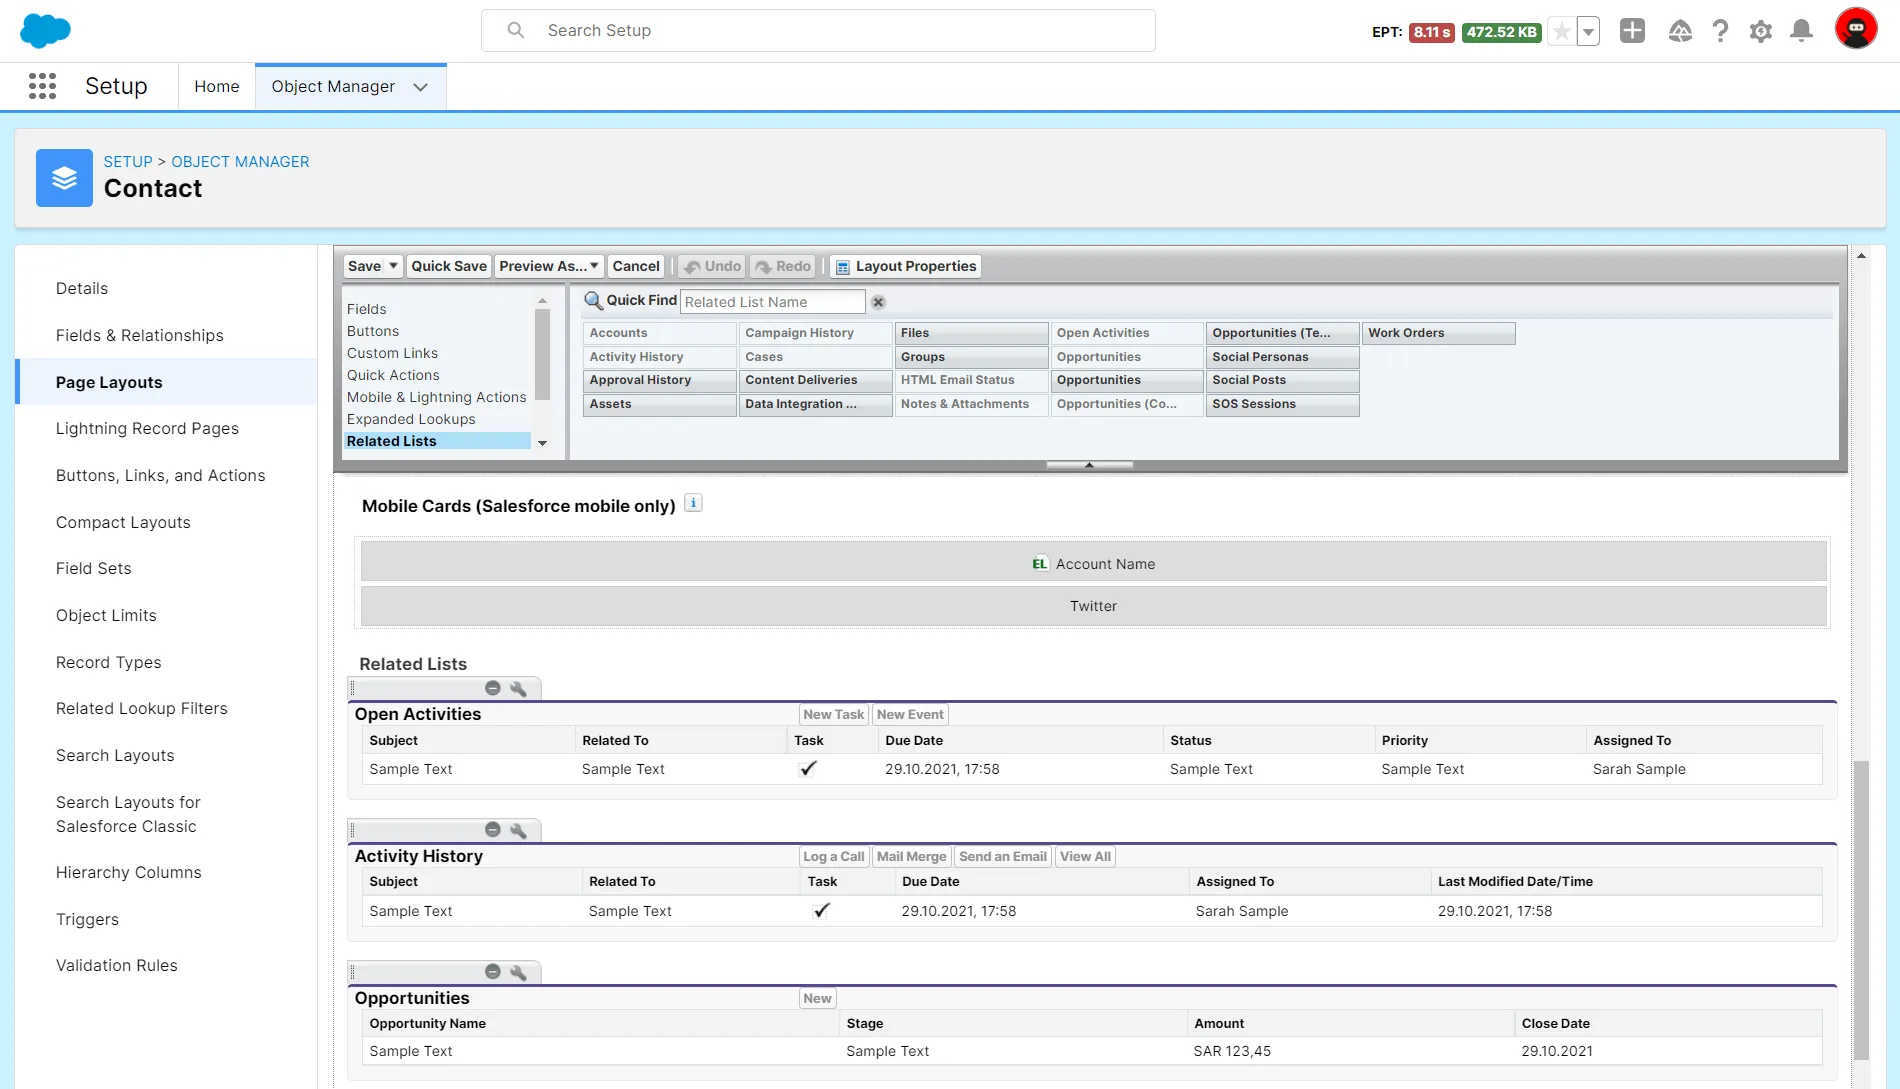
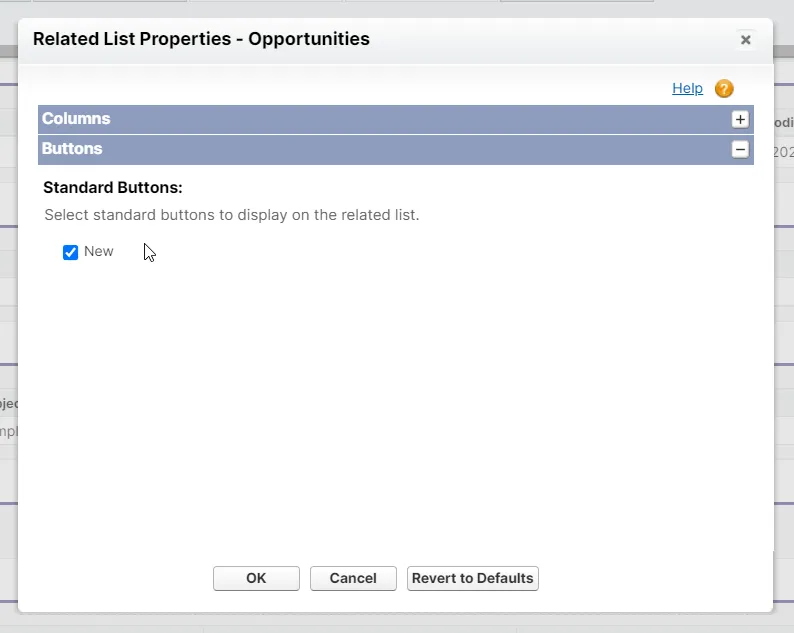
If the user has no permissions to create new records, the New button is not displayed in the Related Items block.
How do I synchronize attachments added to tasks and events via standard UI between Salesforce and the InCountry platform?
Below you can find details on how to add attachments to tasks and events and synchronize them with the InCountry platform.
Currently, there is a known Salesforce issue with the trigger on the Attachment object that is not fired when a file is attached through standard user interface and that’s why attachments are not synchronized with the InCountry platform. The same trigger is fired if you attach a file to the event via Apex or adding an attachment to another Salesforce entity (Contact, Case, Account etc.).
As a workaround, you can create a custom Visualforce page with the Upload file button. Using this component, attachments are successfully uploaded and synchronized with the InCountry platform.
Below is an example of a VisualForce page:
<apex:page id="AttachmentUploader" standardController="Task" extensions="AttachmentUploadController">
    <apex:form enctype="multipart/form-data">
        <apex:pageBlock title="Upload a Attachment">
            <apex:pageMessages />

            <apex:pageBlockButtons location="bottom">
                <apex:commandButton action="{!upload}" value="Save"/>
            </apex:pageBlockButtons>

            <apex:pageBlockSection showHeader="false" columns="1" id="block1">
                <apex:pageBlockSectionItem >
                    <apex:outputLabel value="File" for="file"/>
                    <apex:inputFile value="{!attachmentBody}" fileName="{!attachmentName}" id="file"/>
                </apex:pageBlockSectionItem>
            </apex:pageBlockSection>
        </apex:pageBlock>
    </apex:form>
</apex:page>
And a controller:
public with sharing class AttachmentUploadController {
    public String parentId {get;set;}
    public Blob attachmentBody {get; set;}
    public String attachmentName {get; set;}

    public AttachmentUploadController(ApexPages.StandardController controller) {
        this.parentId = ApexPages.CurrentPage().getparameters().get('id');
    }

    public PageReference upload() {
        Attachment attachment = new Attachment();
        attachment.name = attachmentName;
        attachment.OwnerId = UserInfo.getUserId();
        attachment.body = attachmentBody;
        attachment.parentID = this.parentId;
        try {
            insert attachment;
        } catch (DMLException e) {
            ApexPages.addMessage(new ApexPages.message(ApexPages.severity.ERROR,'Error uploading attachment'));
            return null;
        }

        ApexPages.addMessage(new ApexPages.message(ApexPages.severity.INFO,'Attachment uploaded successfully'));
        return null;
    }
}
How do I map regulated data stored on the InCountry platform to non-regulated data stored in the Salesforce database?
To combine regulated data stored on the InCountry platform with non-regulated data stored in the Salesforce database, you need to do the following.
-
Using REST API or SDK, query regulated data from the InCountry platform.
-
Query non-regulated data from the Salesforce database.
-
Use the
profile_keyfield of regulated data records to map non-regulated data records against Salesforce record ids. The value in theprofile_keyfield stores the Salesforce record id.
What are advantages and disadvantages of data regulation models?
Replication
Advantages relative to the Restriction/Redaction models
-
Since regulated data is also stored in the Salesforce cloud database, the data can be viewed with standard Lightning Web components.
-
All existing list view and detail pages will work as-is (with the included InCountry Poller component).
-
All reports and dashboards will work as-is since they are reading data directly from the Salesforce cloud database.
-
Data aggregated in Tableau or Einstein Analytics will continue to work as-is since raw data is read directly from the Salesforce cloud database.
-
-
All external integrations through the Salesforce API that create, update, or delete records can be handled with trigger-based calls to synchronize data to the InCountry platform. Therefore, no InCountry Border gateways are required to address these ingress points.
-
Incoming integrations that extract data from Salesforce (i.e., a marketing or e-commerce system that reads Contact or Leads data from the CRM) will continue to work as-is since it can read regulated data directly from the Salesforce cloud.
Disadvantages relative to the Restriction/Redaction models
- If there is a requirement that regulated data is stored inside the country of origin ONLY, then this model will not be sufficient for compliance.
Restriction
Advantages relative to the Replication model
- Satisfies the compliance needs to store regulated data only inside the country of origin while allowing the flexibility to perform processing and enables viewing outside the country.
Disadvantages relative to the Replication model
-
All list view and detail pages will require InCountry custom components to fetch data from the InCountry platform, standard pages with the InCountry poller component can no longer be used.
-
All reports and dashboards will require modifications to fetch regulated data from the InCountry platform to display it in grids or graphical widgets.
The data loading delays may be minimal if regulated data fields like first name, last name, and phone number are not used in these aggregate reports.
- All process builders, workflows, and triggers that reference regulated data will require incorporation of the InCountry Apex SDK to retrieve regulated data fields if they are used in conditionals or update regulated data fields if they are the workflow outputs.
The data loading delays may be minimal if regulated data fields like first name, last name, and phone number are not used as inputs/outputs in these processes.
Advantages relative to the Redaction model
-
All server-side processing can be performed using triggers and the InCountry Apex SDK. In the Redaction model, ALL server-side processing that references regulated data must be re-implemented as resident functions.
-
Much simpler from a business perspective than the Redaction model since a customer service or customer support group from another country can still view regulated data in the Salesforce interface. (For example, a call center based in the Philippines can view regulated data on customers who are citizens of China when assisting with support calls.)
-
Omnichannel customer support and engagement integrations are still possible since regulated data like email addresses and phone numbers can be passed to 3rd party tools.
Redaction
Advantages relative to the Restriction model
- Compliant with the most stringent interpretation of data residency legislation.
Disadvantages relative to the Restriction model
-
All process builders, workflows, and triggers that reference regulated data must be re-written as resident functions and invoked by a Salesforce trigger. Currently, these resident functions can be written in Javascript only with additional language support in the InCountry roadmap.
-
All reports/dashboards that include sorting or grouping based on regulated data fields need to incorporate resident functions to perform these aggregations on the server-side, which adds latency to the rendering of Salesforce pages.
-
All external integrations using the Salesforce API must use the InCountry Border gateway to apply redaction rules to regulated data in incoming data payloads and apply unredaction rules to the hashed data in response payloads.
-
No server-side ‘big data’ analytics can be performed on regulated data since it is not permitted to leave the country of origin.
-
Omni-channel communication integrations are difficult since the key information (i.e. email address for email marketing or phone number for SMS marketing/engagement) is typically classified as regulated and therefore cannot leave the country. If there are third-party tools that are used for this communication, then these must also be brought into the scope of a holistic data residency solution.
Can the package retry synchronization of regulated data records in case of intermittent connection issues?
The package provides functionality allowing you to resynchronize records between Salesforce and the InCountry platform upon intermittent unavailability of the InCountry platform.
How does it work?
When a user tries to create/update a record and the InCountry Point-of-Presence is temporarily inaccessible, a user can define a re-synchronization to a specific number of times.
Where can a user set it?
-
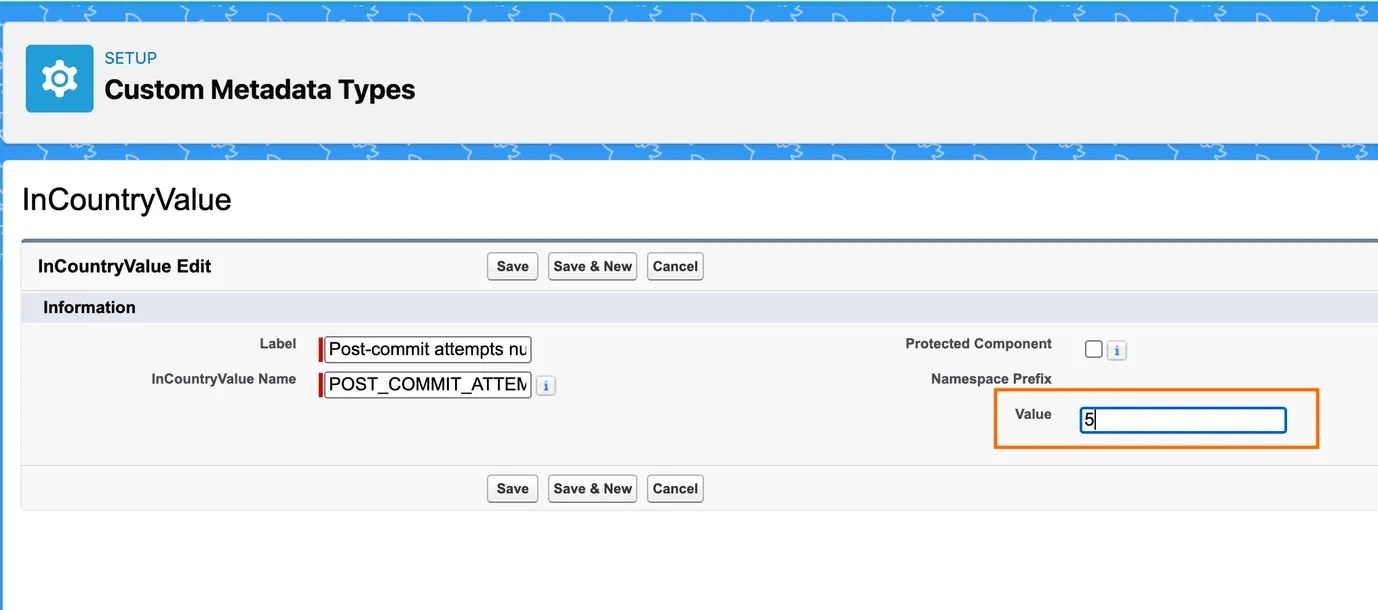
From Setup, click Custom Metadata Types. On the opened list with metadata types, select InCountryValue__mdt and then select POST_COMMIT_ATTEMPTS_NUMBER
-
Click Edit
-
In the Value box, enter the number of attempts the package will attempt to synchronize a record to the InCountry platform. By default, this value is set to 0.
Attempts to synchronize regulated data records are performed sequentially. Upon a failed request, the package performs another request until success or until attempts are not exceeded. No timeout between attempts is used.
Where can a Salesforce administrator check it?
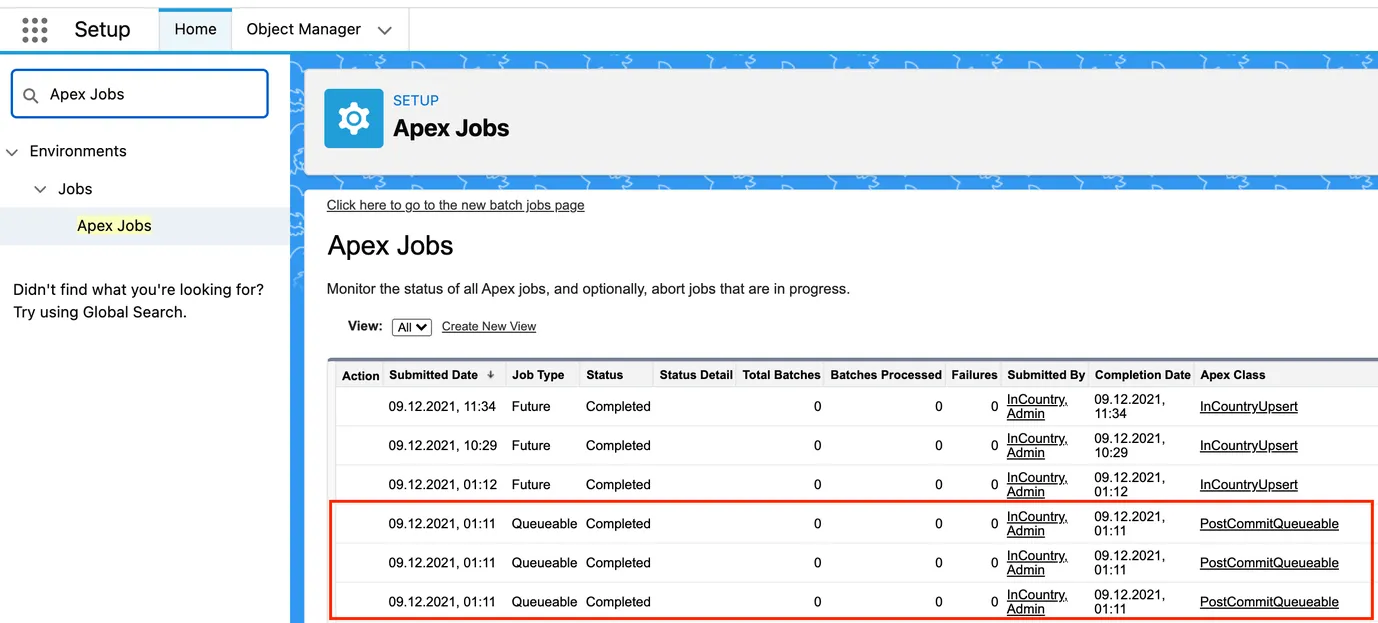
- From Setup, click Apex Jobs.
In this section, a Salesforce administrator can view the Queueable Job Type details with the PostCommitQueueable Apex class.
How does the data loss prevention mechanism for UI work?
The InCountry Data Residency for Salesforce package can help prevent data loss in the event of connectivity issues while creating or updating records.
When a user attempts to create or update a record and the InCountry Point-of-Presence becomes temporarily inaccessible, the following actions occur:
-
The user receives a notification via a toast message indicating a connectivity issue, while the record create/update window remains open with the saved data.
-
An automatic rollback process is initiated, returning the data to its original state before the operation was attempted.
How do I identify what reports, dashboards, and process automations may be affected by the package?
To perform the impact analysis, you need to use the following capabilities:
-
Salesforce native feature: Help and Training Community
-
Salesforce dependency API: Find Referenced Metadata Using Salesforce Dependency API. SalesforceCodex
Execute the SOQL/API query, as follows:
1. Execute the following query and take the field Id from the results of its execution:
SELECT Id,DeveloperName,TableEnumOrId from CustomField
2. Fetch field dependencies using the Metadata Dependency API query:
Select MetadataComponentId, MetadataComponentName, RefMetadataComponentName, RefMetadataComponentId,MetadataComponentType from MetadataComponentDependency where RefMetadataComponentId='00N3h00000IOfZsEAL'
As the result, you will get the following information:
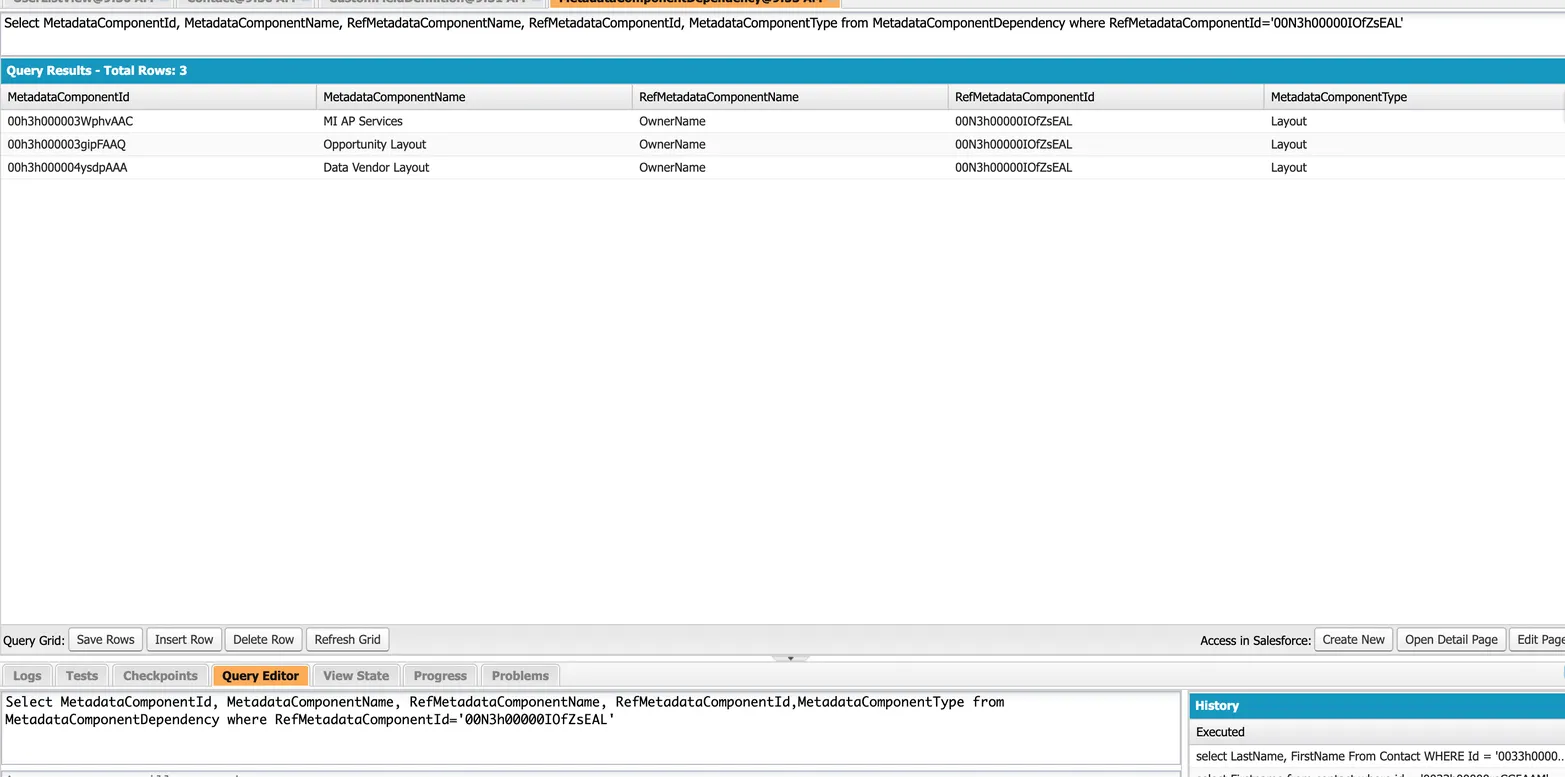
Metadata Dependency API is a beta feature in Salesforce that is not generally available.
What is the purpose of resetting the encryption key used in the InCountry endpoint configuration?
You need to reset the encryption key if a certificate or a password is changed.
The encryption key is used to generate JWS token which encrypts and decrypts the result of the findIds method. This method is used for the following:
-
List View when retrieving PII values for a filter
-
Utility Bar Search
-
Lookup
If the encryption key is unavailable, the above-mentioned functionality will not work.
How do I regulate calculated fields on the Quote object?
To regulate the Total Price, Subtotal, Grand Total and Discount fields on the Quote object, you need to use the Resident functions feature.
To regulate calculated fields on the Quote object, you need to do the following:
-
In the left part of the menu, locate the icon showing available apps and click it.
-
Start entering
InCountry Resident Functions. -
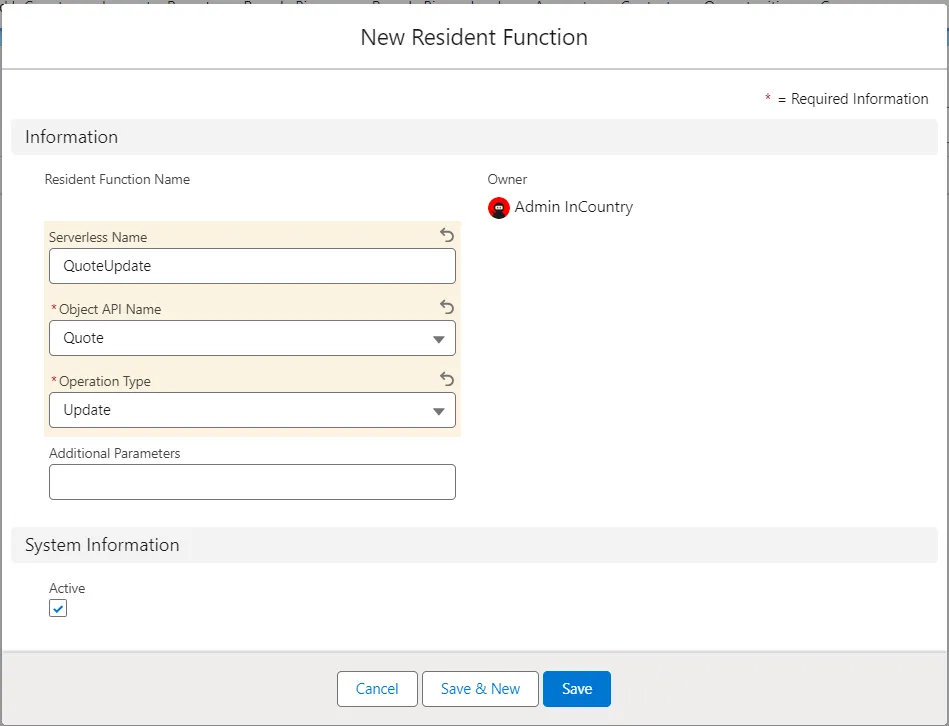
Create InCountry Resident Functions:
-
for the QuoteLineItem update operation:
-
for the QuoteLineItem delete operation:
-
for Quote:
-
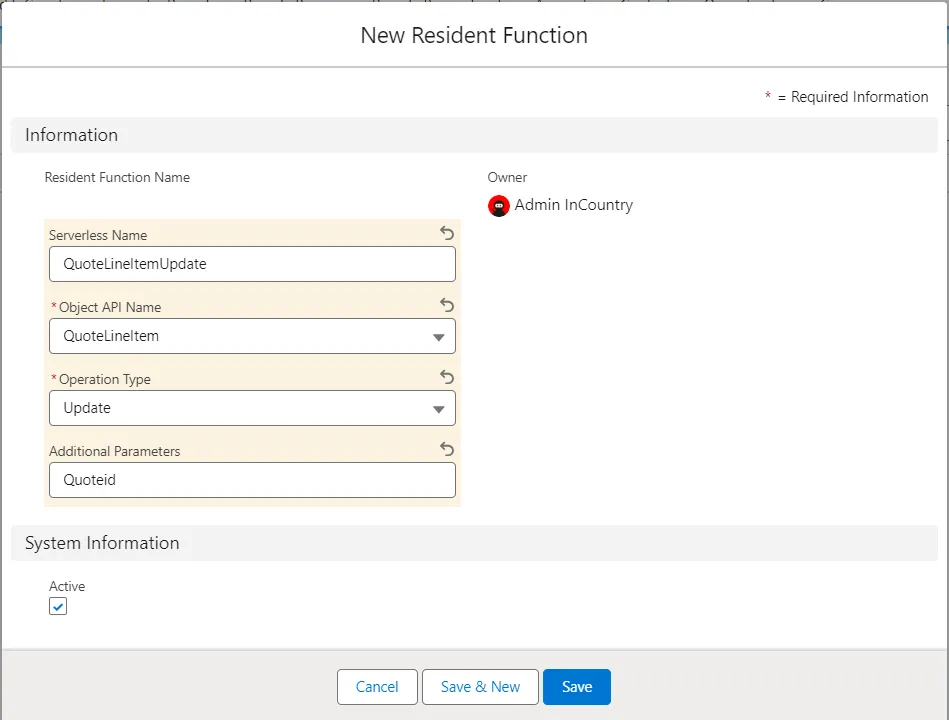

For the QuoteLineItem update operation, add the QuoteId field and all non-regulated fields that used in calculation. To calculate the GrandTotal field, please regulate the Tax and ShippingHandling fields.
If Total Price, Subtotal, Grand Total or Discount are not regulated, user will see values from the Salesforce database.
JS Code examples:
-
QuoteLineItem (update operation):
module.exports.handler = async function(storage, country, params, modules) {const result = {data: null,success: false,error: false,errorMsg: null};const setError = (msg) => {result.errorMsg = `${msg}`;result.error = true;result.success = false;};const quoteLineItemRaw = await storage.findOne(country, {profileKey: params.id});if (!quoteLineItemRaw) {setError(`Couldn't find record by profileKey = ${params.id}`);return result;}try {const quoteLineItemRecord = quoteLineItemRaw.record;const quoteLineItemRecordBody = JSON.parse(quoteLineItemRaw.record.body);const unitPrice = params.UnitPrice ? parseFloat(+params.UnitPrice) : quoteLineItemRecordBody.UnitPrice ?parseFloat(+quoteLineItemRecordBody.UnitPrice) : 0;const discount = params.Discount ? parseFloat(+params.Discount / 100) : quoteLineItemRecordBody.Discount ?parseFloat(+quoteLineItemRecordBody.Discount / 100) : 0;const quantity = params.Quantity ? parseFloat(+params.Quantity) : quoteLineItemRecordBody.Quantity ?parseFloat(+quoteLineItemRecordBody.Quantity) : 0;const subtotal = unitPrice * quantity;const totalPrice = discount && discount > 0 ? subtotal - (subtotal * discount) : subtotal;if (!quoteLineItemRecordBody.UnitPrice) {quoteLineItemRecordBody.UnitPrice = unitPrice;}if (!quoteLineItemRecordBody.Discount) {quoteLineItemRecordBody.Discount = (discount * 100);}if (subtotal) {quoteLineItemRecordBody.Subtotal = subtotal;}if (totalPrice) {quoteLineItemRecordBody.TotalPrice = totalPrice;}const quoteRaw = await storage.findOne(country, {profileKey: params.QuoteId});quoteLineItemRecord.body = JSON.stringify(quoteLineItemRecordBody);quoteLineItemRecord.recordKey = params.id;quoteLineItemRecord.profileKey = params.id;quoteLineItemRecord.parentKey = params.QuoteId;await storage.write(country, quoteLineItemRecord);const relatedQuoteLineItems = await storage.find(country, {parentKey: params.QuoteId});if (relatedQuoteLineItems?.records?.length) {let quoteTotalPrice = 0;const subTotalPrice = relatedQuoteLineItems.records.reduce((acc, record) => {const quoteLineItem = JSON.parse(record.body);const subTotalPrice = (+(quoteLineItem.Subtotal || 0));quoteTotalPrice += (+(quoteLineItem.TotalPrice) || 0);return acc + subTotalPrice;}, 0);const quoteRecord = quoteRaw.record;const quoteRecordBody = JSON.parse(quoteRecord.body);quoteRecordBody.Subtotal = subTotalPrice;quoteRecordBody.TotalPrice = quoteTotalPrice;quoteRecordBody.GrandTotal = (quoteTotalPrice + (+(quoteRecordBody.Tax || 0)) + (+(quoteRecordBody.ShippingHandling || 0)));quoteRecordBody.Discount = (((subTotalPrice - quoteTotalPrice) / subTotalPrice) * 100);quoteRecord.body = JSON.stringify(quoteRecordBody);await storage.write(country, quoteRecord);result.success = true;}} catch (error) {setError(error)}return result;} -
QuoteLineItem (delete operation):
module.exports.handler = async function(storage, country, params, modules) {const result = {data: null,success: false,error: false,errorMsg: null};const setError = (msg) => {result.errorMsg = `${msg}`;result.error = true;result.success = false;};const quoteLineItemRaw = await storage.findOne(country, {profileKey: params.id});if (!quoteLineItemRaw) {setError(`Couldn’t find record by profileKey = ${params.id}`);return result;}try {const quoteRaw = await storage.findOne(country, {profileKey: params.QuoteId});const relatedQuoteLineItems = await storage.find(country, {parentKey: params.QuoteId});let quoteTotalPrice = 0;let subTotalPrice = 0;if (relatedQuoteLineItems?.records?.length) {subTotalPrice = relatedQuoteLineItems.records.reduce((acc, record) => {const quoteLineItem = JSON.parse(record.body);const subTotalPrice = (+(quoteLineItem.Subtotal || 0));quoteTotalPrice += (+(quoteLineItem.TotalPrice) || 0);return acc + subTotalPrice;}, 0);}const quoteRecord = quoteRaw.record;const quoteRecordBody = JSON.parse(quoteRecord.body);quoteRecordBody.Subtotal = subTotalPrice;quoteRecordBody.TotalPrice = quoteTotalPrice;quoteRecordBody.GrandTotal = (quoteTotalPrice + (+(quoteRecordBody.Tax || 0)) + (+(quoteRecordBody.ShippingHandling || 0)));quoteRecordBody.Discount = (((subTotalPrice - quoteTotalPrice) / subTotalPrice) * 100);quoteRecord.body = JSON.stringify(quoteRecordBody);await storage.write(country, quoteRecord);result.success = true;} catch (error) {setError(error)}return result;} -
Quote (update operation)
module.exports.handler = async function(storage, country, params, modules) {const result = {data: null,success: false,error: false,errorMsg: null};const setError = (msg) => {result.errorMsg = `${msg}`;result.error = true;result.success = false;};try {const quoteRaw = await storage.findOne(country, {profileKey: params.id});if (!quoteRaw) {throw new Error(`Couldn’t find record by profileKey = ${params.id}`);}const relatedQuoteLineItems = await storage.find(country, {parentKey: params.id});let quoteTotalPrice = 0;let subTotalPrice = 0;if (relatedQuoteLineItems?.records?.length) {subTotalPrice = relatedQuoteLineItems.records.reduce((acc, record) => {const quoteLineItem = JSON.parse(record.body);const subTotalPrice = (+(quoteLineItem.Subtotal || 0));quoteTotalPrice += (+(quoteLineItem.TotalPrice) || 0);return acc + subTotalPrice;}, 0);}const quoteRecord = quoteRaw.record;const quoteRecordBody = JSON.parse(quoteRecord.body);quoteRecordBody.Subtotal = subTotalPrice;quoteRecordBody.TotalPrice = quoteTotalPrice;quoteRecordBody.GrandTotal = (quoteTotalPrice +(+(quoteRecordBody.Tax || 0)) +(+(quoteRecordBody.ShippingHandling || 0)));quoteRecordBody.Discount = (((subTotalPrice - quoteTotalPrice) / subTotalPrice) * 100);quoteRecord.body = JSON.stringify(quoteRecordBody);await storage.write(country, quoteRecord);result.success = true;} catch (error) {setError(error)}return result;}
How do I configure Opportunity Products and related objects?
To configure regulated Opportunity Products and related objects, you need to perform the following steps:
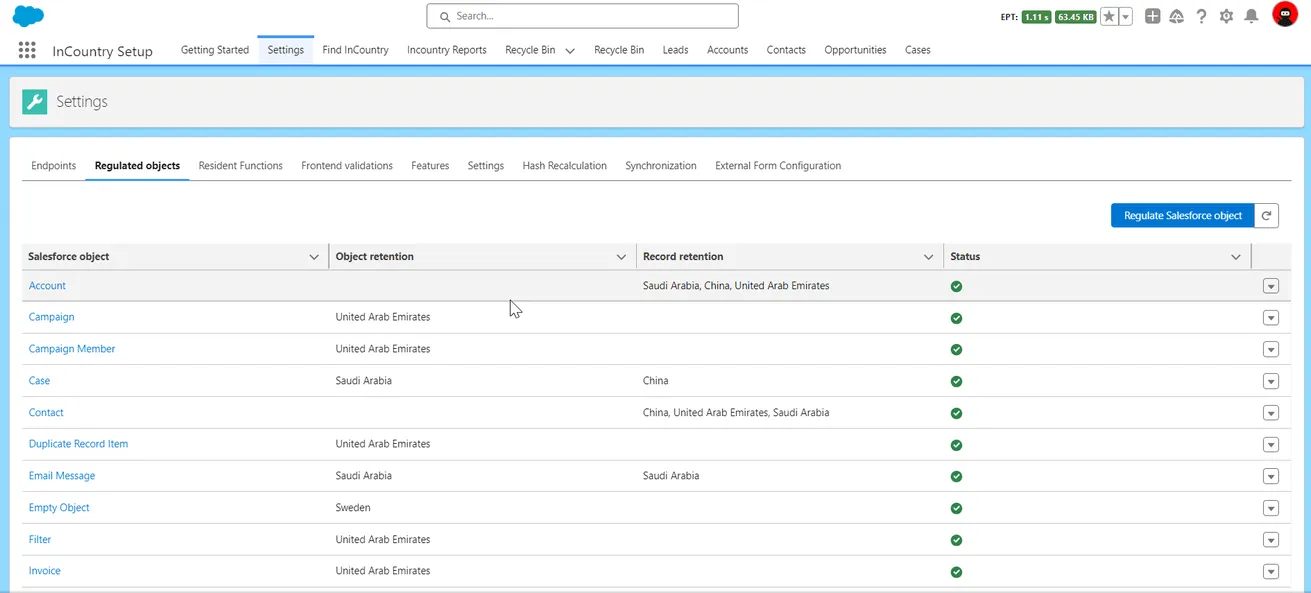
-
On the menu, select Settings and then select the Regulated objects tab. Add Salesforce object, policy and PII fields for the objects you want to regulate (Opportunity, Product, Pricebook, PricebookEntry, OpportunityLineItem (Opportunity Product)).
-
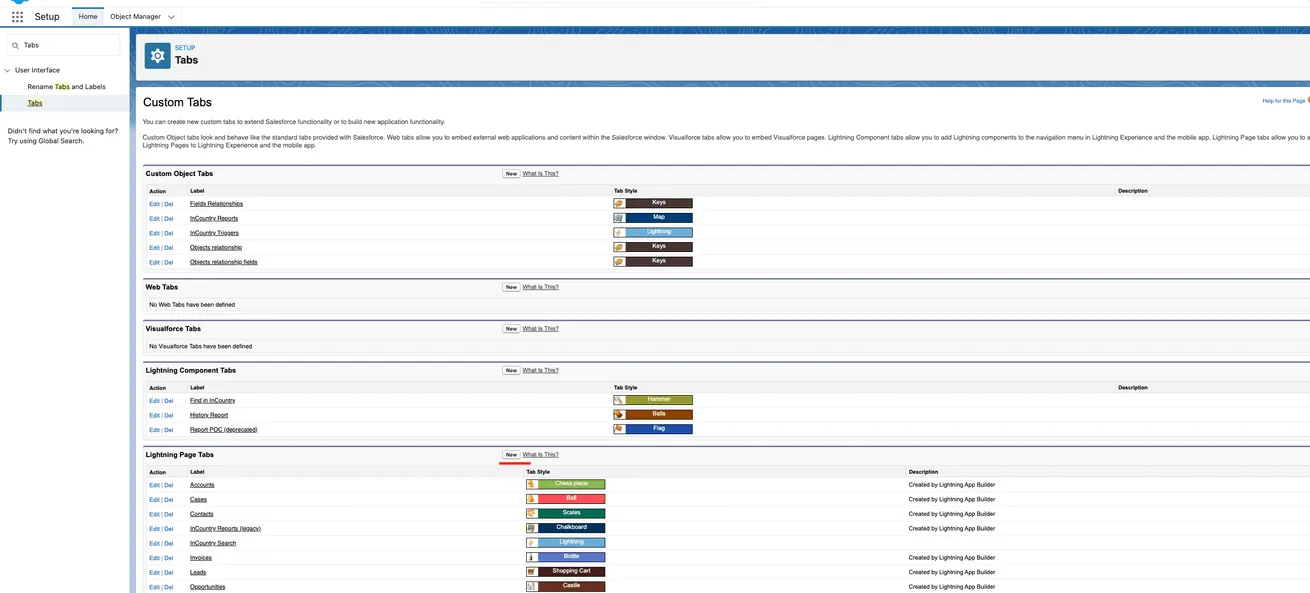
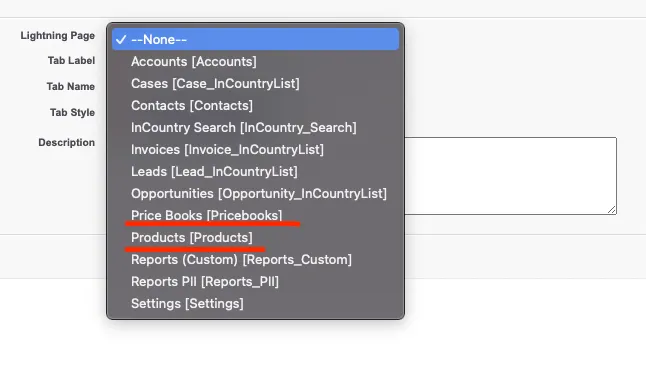
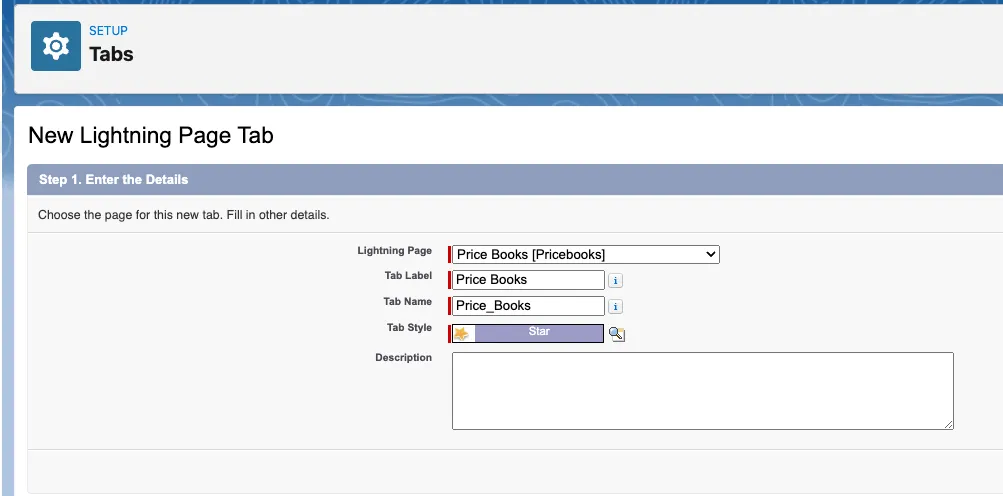
Create custom tabs for the Price Book and Product objects:
-
From Setup, click Tabs.
-
In the Lightning Page Tabs section, click New.
-
Choose Products for the Product object tab, and Price Books for the Pricebook tab.
-
Populate required fields and click Save.
-
-
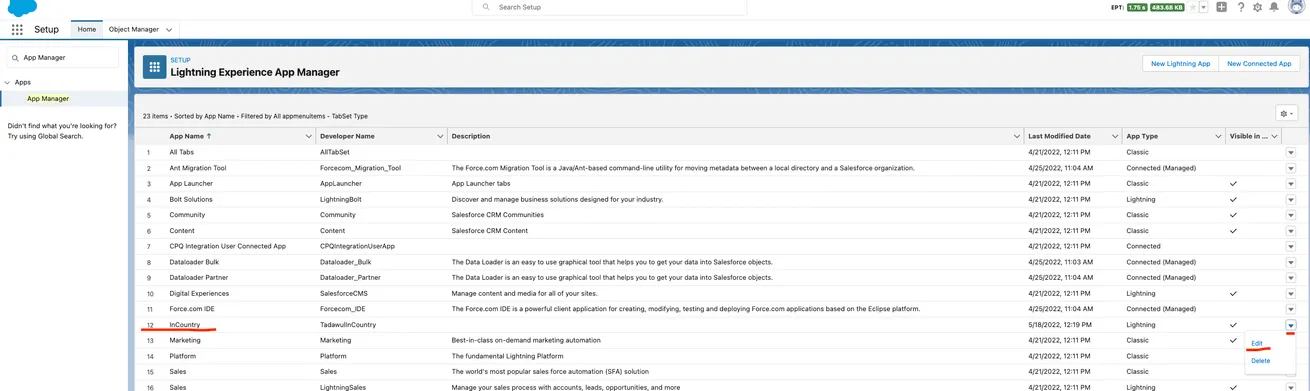
Add the created tabs to the InCountry Application:
-
From Setup, click App Manager.
-
On the Lightning Experience App Manager page, locate InCountry.
-
Click the down arrow icon to open the context menu.
-
In the context menu, click Edit.
-
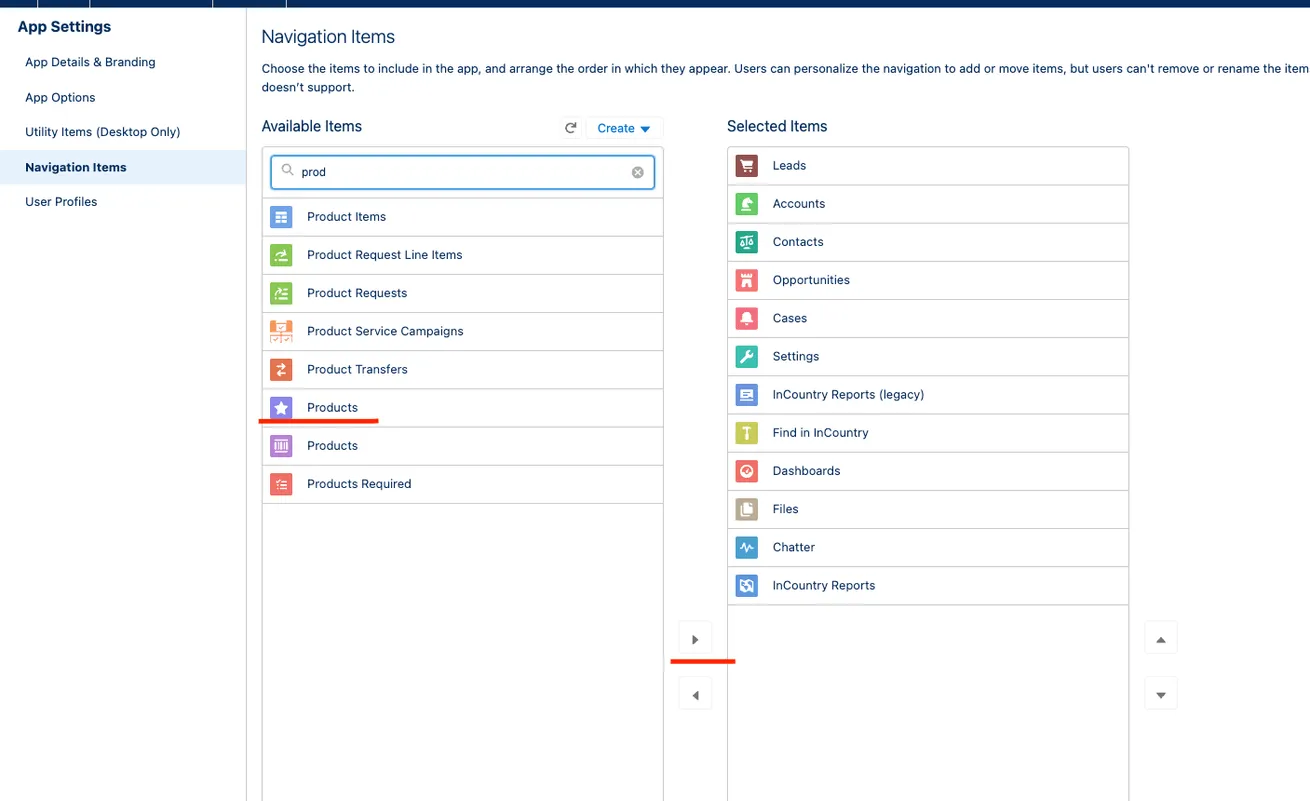
Click Navigation Items, select the previously created tabs and move them to the Selected Items section.
-
Click Save.
-
-
On the menu, select Settings and then select the Settings tab. Add the settings for Price Book, Price Book Entry, Product, Opportunity and Opportunity Products. For correct operation, all settings must be for the same country in case all these records are related).
-
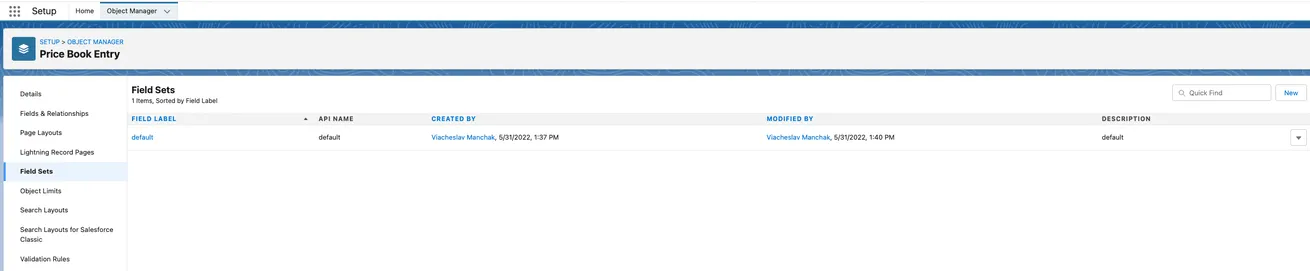
Add a new field set.
-
From Setup, select Object Manager, then select Price Book Entry object.
-
Select Field Sets and create a new field set with the default name. Add the fields you want to see on the related list on the Product object.
-
-
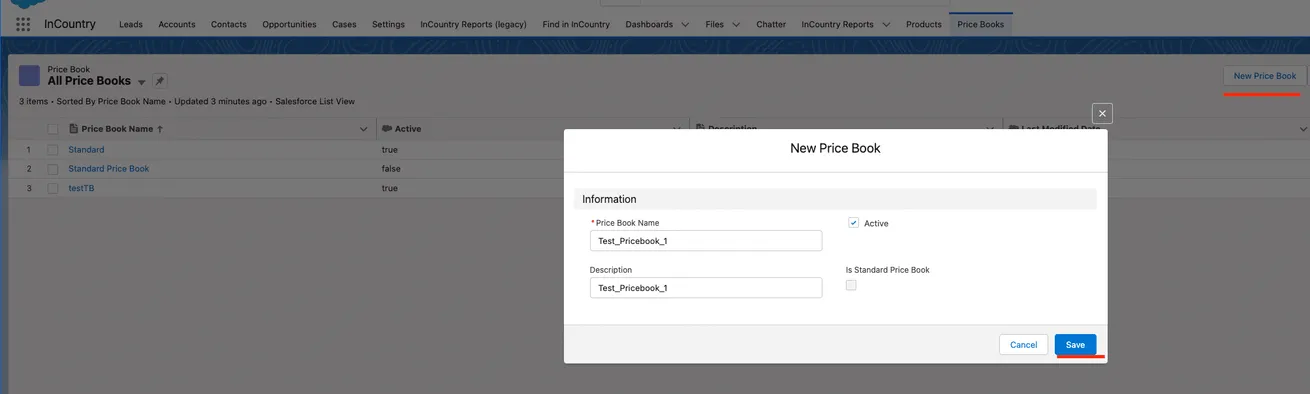
Go to the created Price Books tab (now you can see it on the InCountry app tab or find it via App Launcher) and create a New Price Book record:
-
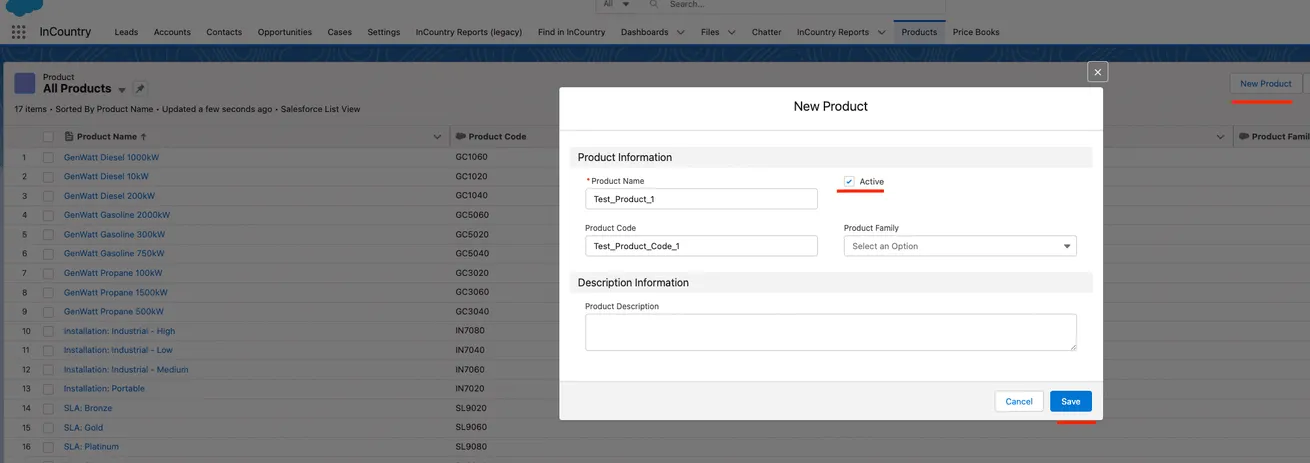
Go to the created Product tab (now you can see it in InCountry app Tab or find it via App Launcher) and create a New Product record:
-
Go to the Related tab on the newly created Product. Click Add standard Price, complete all required fields, and save the record. After that, you will be able to add custom Price Books entries to this product.
-
Now you can add a custom Price Book record, click Add Price Book, complete the required values and click Next.
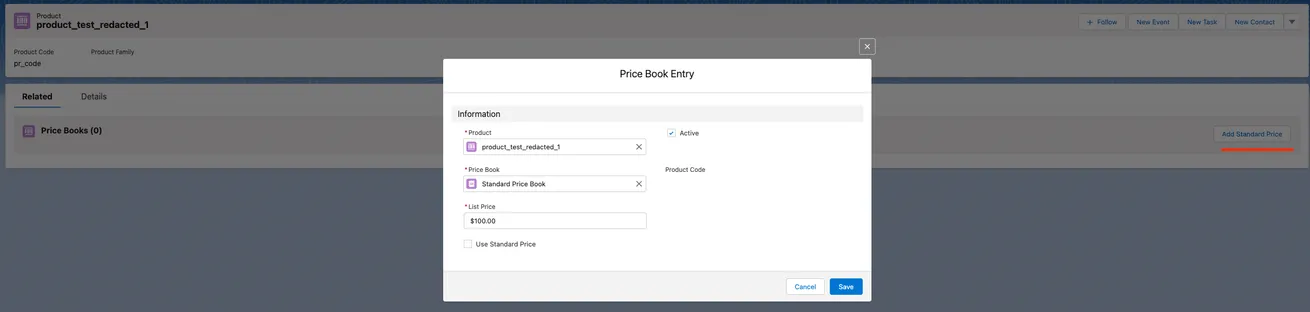

Then, complete all required fields to create a Price Book Entry record and click Save.
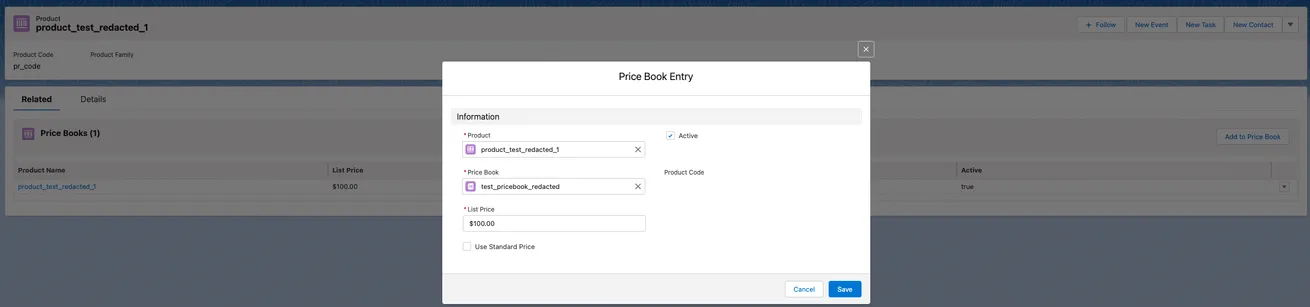
The Sales Price or Quantity number fields can be hashed only by the defaultNumber or fixed hash functions.
Quantity on the Opportunity Product (OpportunityLineItem) object field can not be saved to the Salesforce database with 0 value, so if you used the defaultNumber hash function for this field, it will be saved to the Salesforce database with value 1.
Add at least one regulated field for each object that can be modified by the user from UI.
The Products (InCountry Opportunity Products) component is placed on the Opportunity layout by default. If you want to use it in other places, click Edit Page and move InCountry Opportunity Products to the section you want.
Also, you can use InCountry Related List Singe to set up the Products component. To use InCountry Related List Singe and the View All view (via the button under related list single), you need to perform the following steps:
-
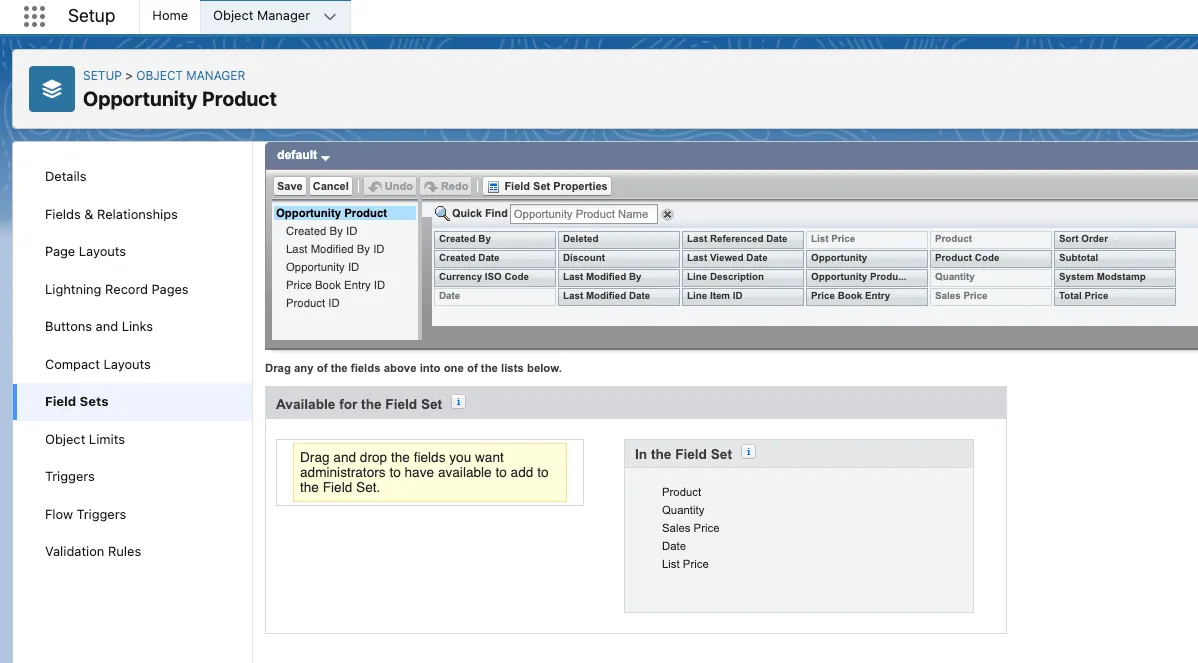
Since Salesforce UI API currently doesn't support the OpportunityLineItem object, you must create Field Set for Opportunity Products (OpportunityLineItem) to set the fields you want to display on the table:
-
From Setup, select Object Manager, then select Opportunity Product (OpportunityLineItem).
-
In the Fields Sets section, create a new Fields Set named
default. -
Add the Products column as a first column, other columns and order does not matter.
-
Click Save.
-
-
On the Opportunity Record detail page, click Edit Page.
-
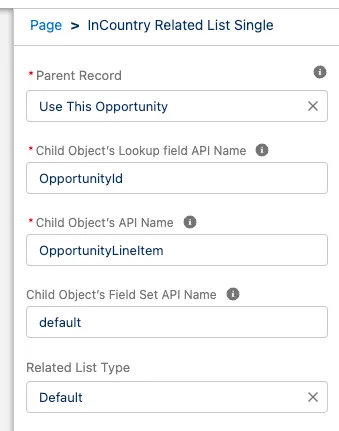
Locate InCountry Related List Single and move it to the layout.
-
Fill in the required fields:
After that, you should see the Products component:
Now you can work with products on the Opportunity detail page.
-
Next to the Products related list, click the down arrow icon.
-
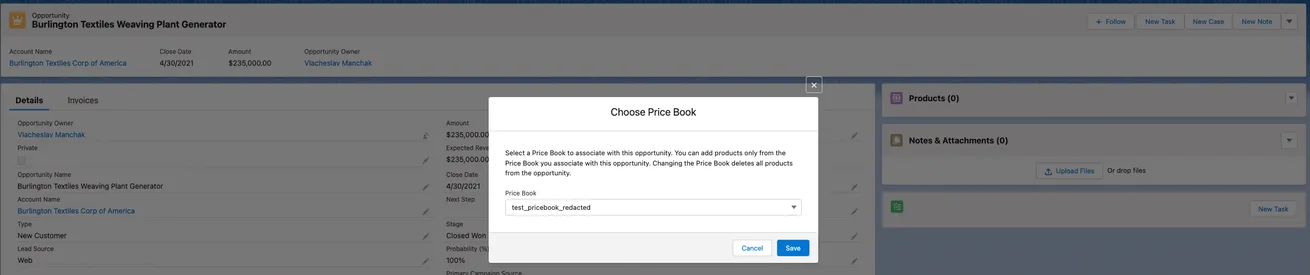
Click Add Products or Choose Price Book. If there is no related Price Book record to this Opportunity, the Choose Price Book form will open anyway.
-
Select the Price Book record and click Save. After that, you can add the Product records to this Opportunity.
-
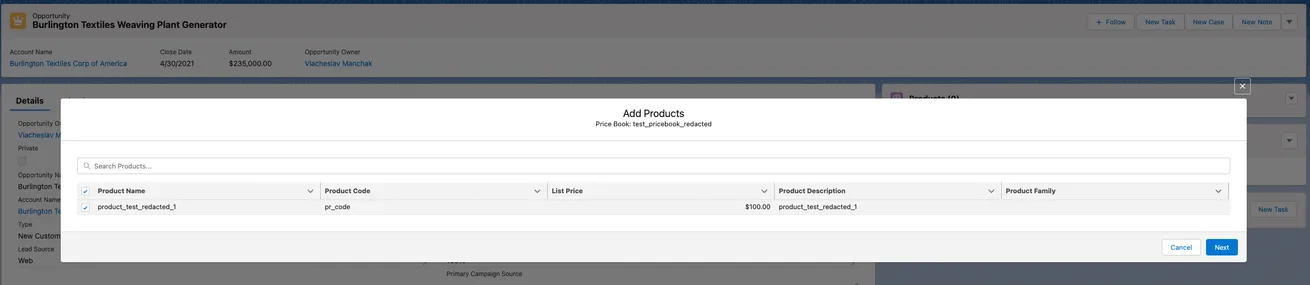
Click Add Products and select the products you want to relate to this Opportunity.
-
Click Next.
-
Edit the Products data and click Save.


How do I configure the Object’s Related List for Community?
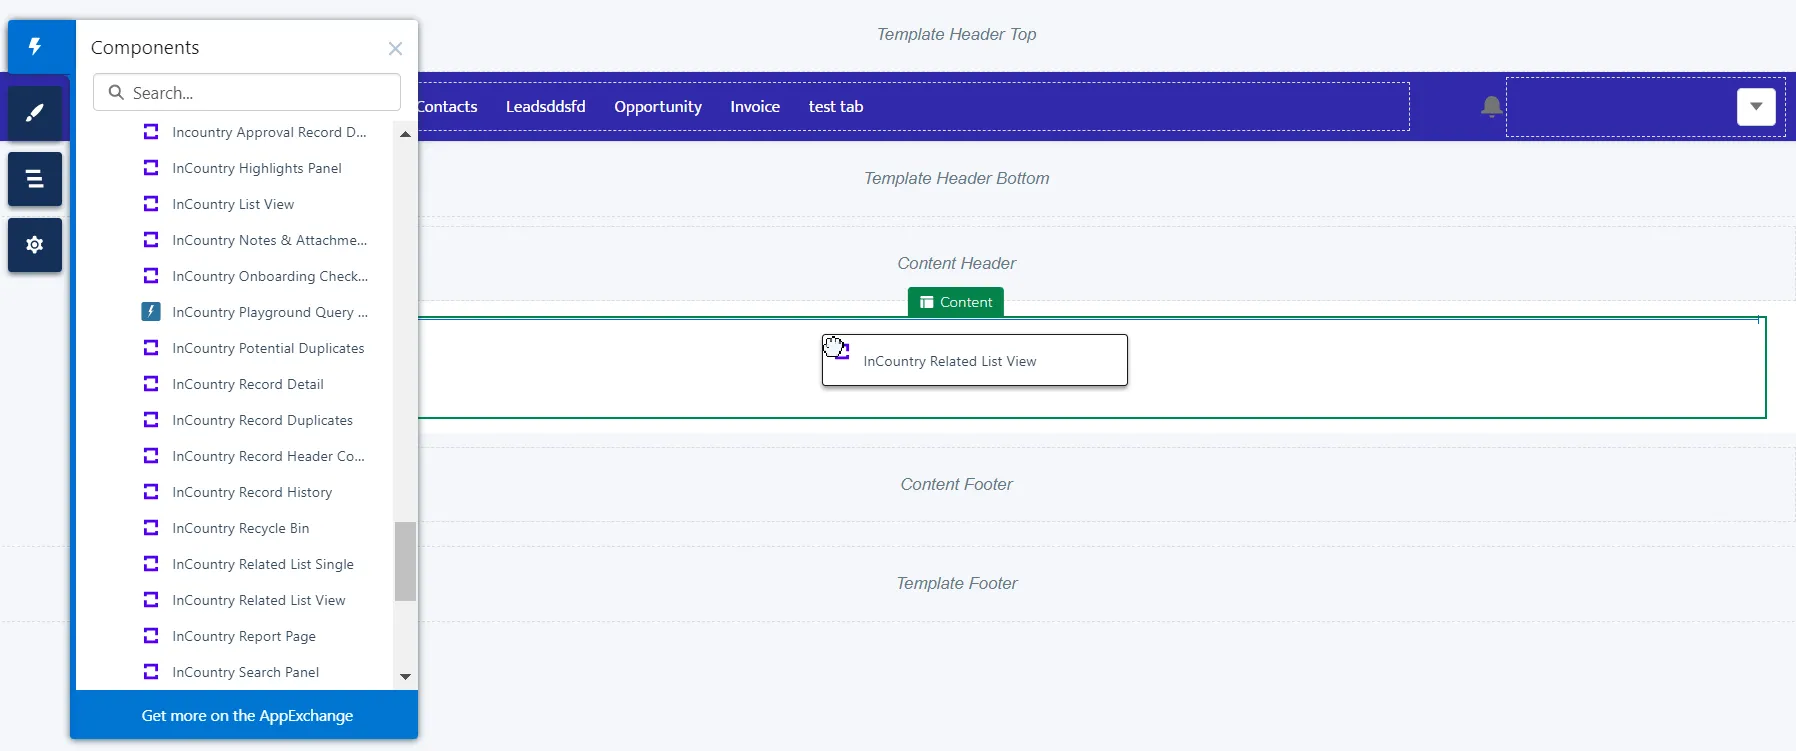
To use the View All lists in Salesforce Experience Cloud, we need to create a new Object Related List page.
-
From Setup, click Channels, then click Digital Experiences, and select All Sites.
-
On the All Sites page, click Builder for the required site.
-
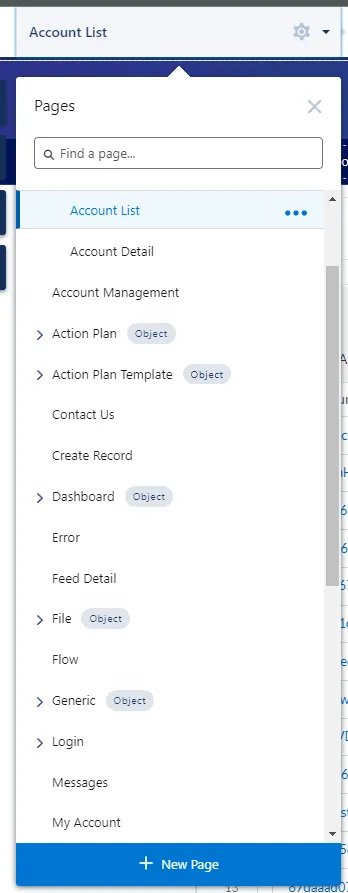
Click on the Pages menu located on the left panel, and at the end of the list, click + New Page.
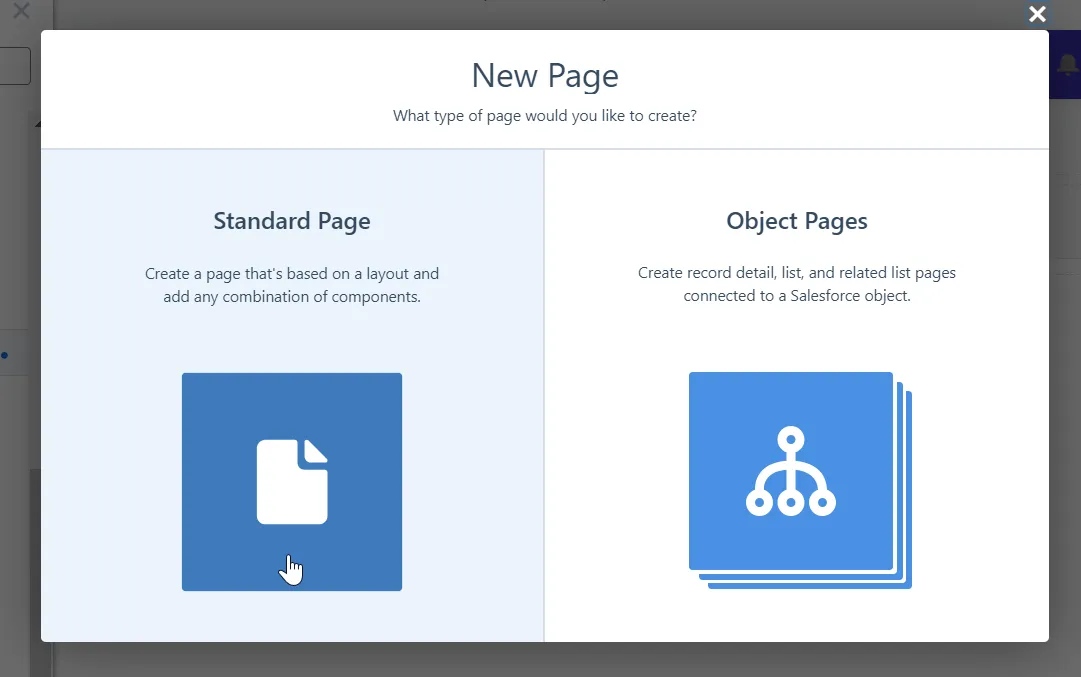
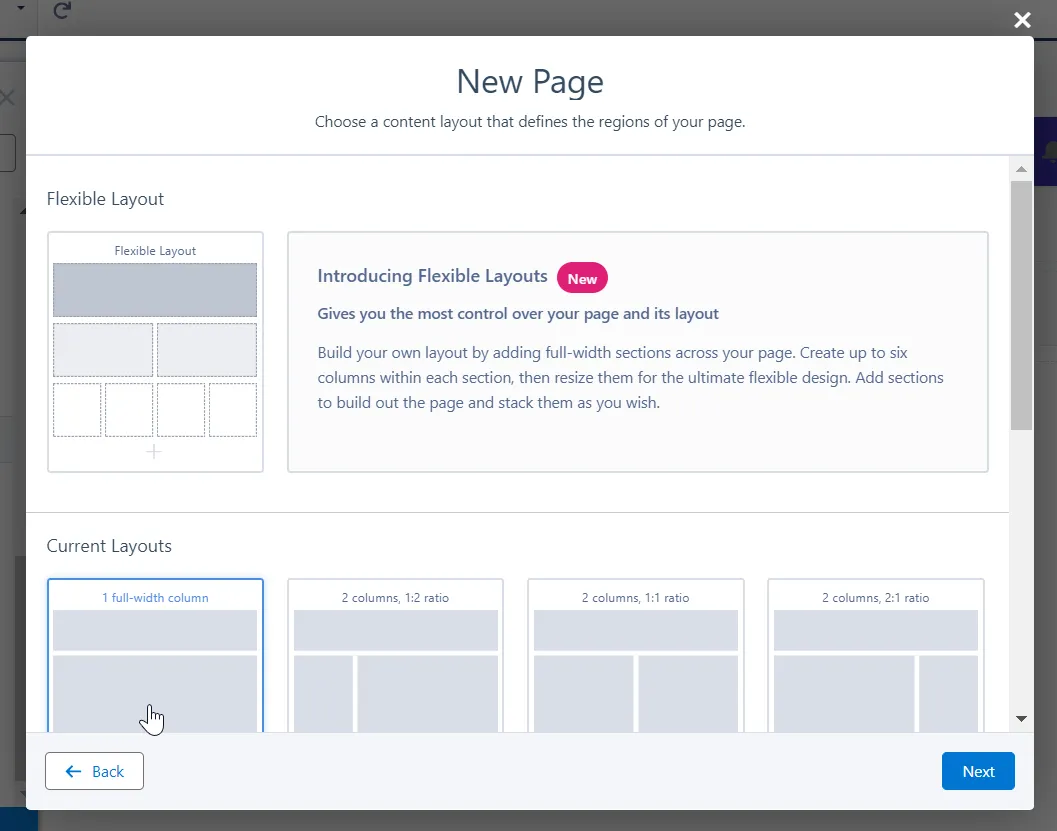
-
In the New Page form, select Standard Page, and then select 1-full width column layout.
-
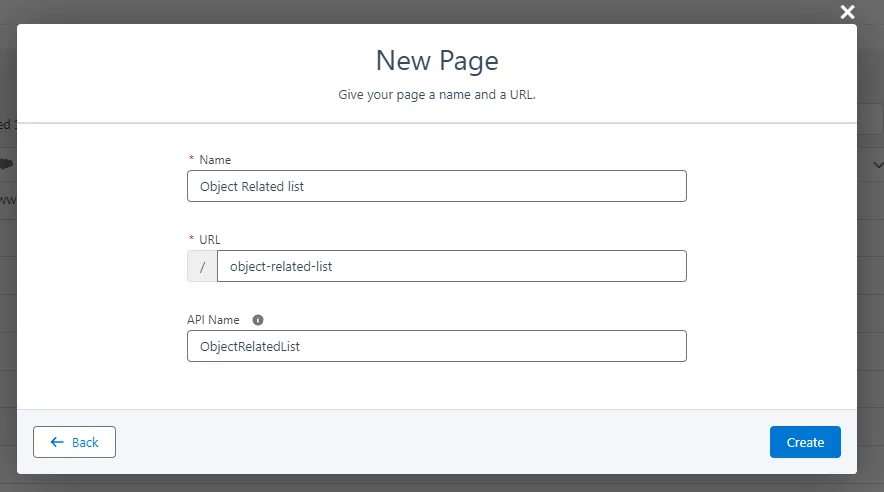
In the New Page form, fill out the following information:
-
Name -
Object Related list; -
URL -
object-related-list; -
API Name -
ObjectRelatedList;
-
-
Click Create.
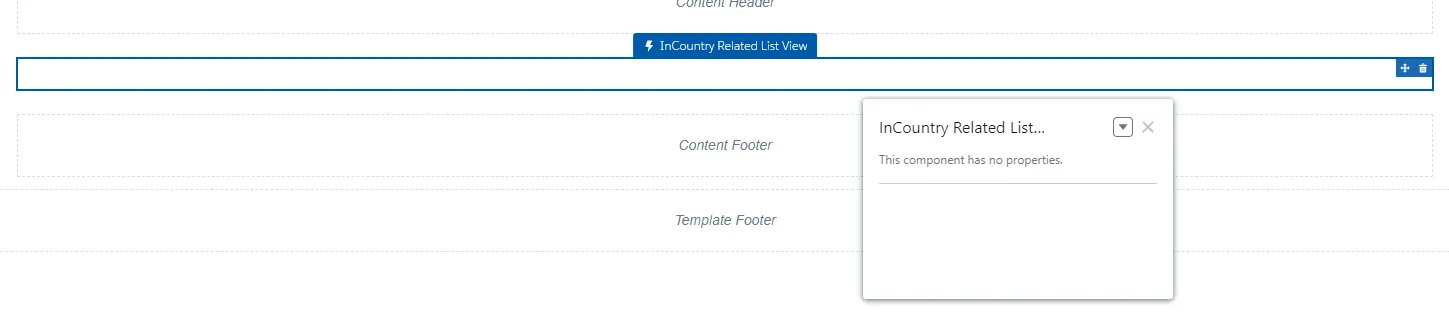
-
In Lightning App Builder, drag and drop the InCountry Related List View component to the Content area;
-
Publish your site.
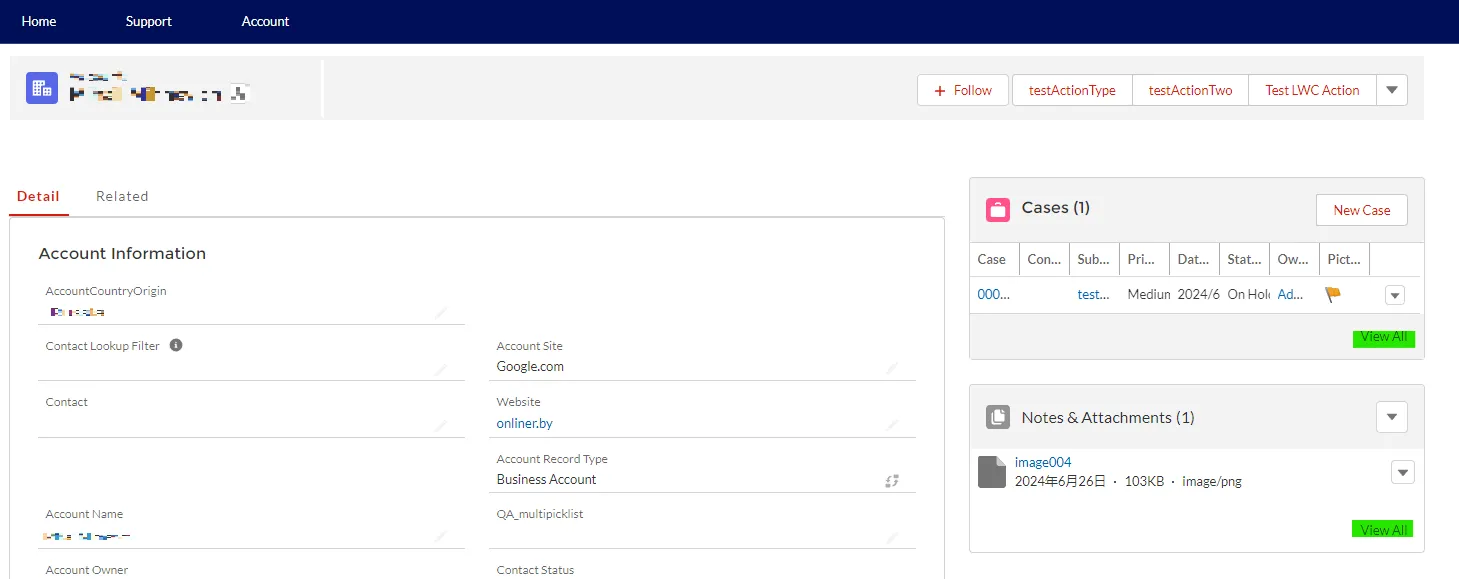
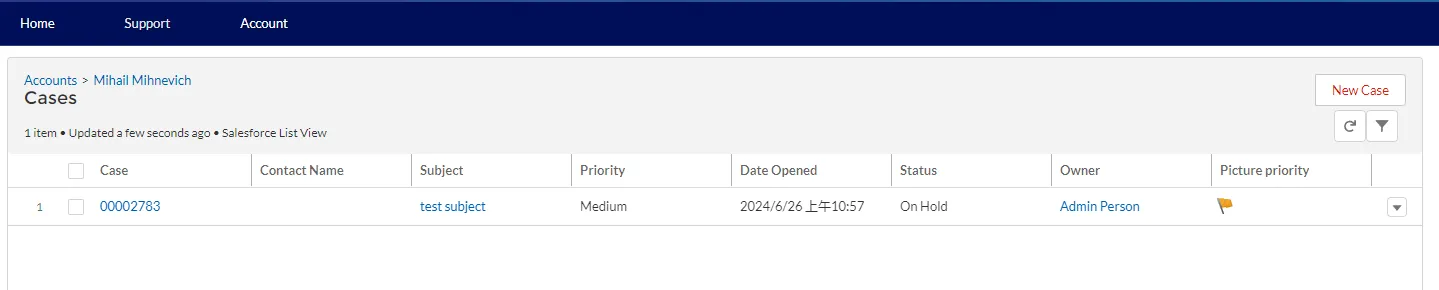
After that, when you click on the View All button on the Related list, you will be redirected to the Object Related list page, and all related records will be displayed.
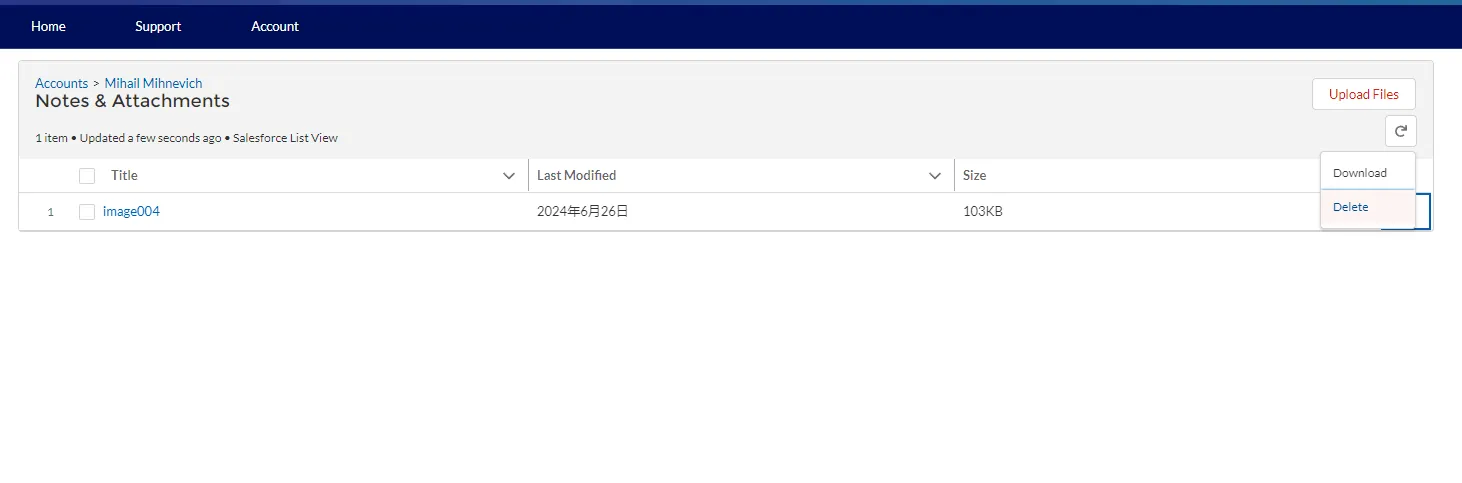
Case Related List:
Notes & Attachments Related List: