Sales Engagement
Actions
Sales Engagement Actions are tools within Salesforce that automate and streamline prospect outreach by managing multi-touch communication sequences (called "cadences") across email, phone, LinkedIn, and other channels. This guide describes the core Sales Engagement Actions available in Salesforce platform. It provides step-by-step instructions for using each action and what results to expect. The content covers actions available on individual record pages, in list views, and within the Sales Engagement component.
Prerequisites
To display Cadence actions (Add to Cadence, Cadence Target Assignee, Adjust Step Timing, Remove From Cadence) in the row dropdown menu for Lead, Contact, and Person Account records in List View, assign the InCountry Sales Engagement Access permission set to users.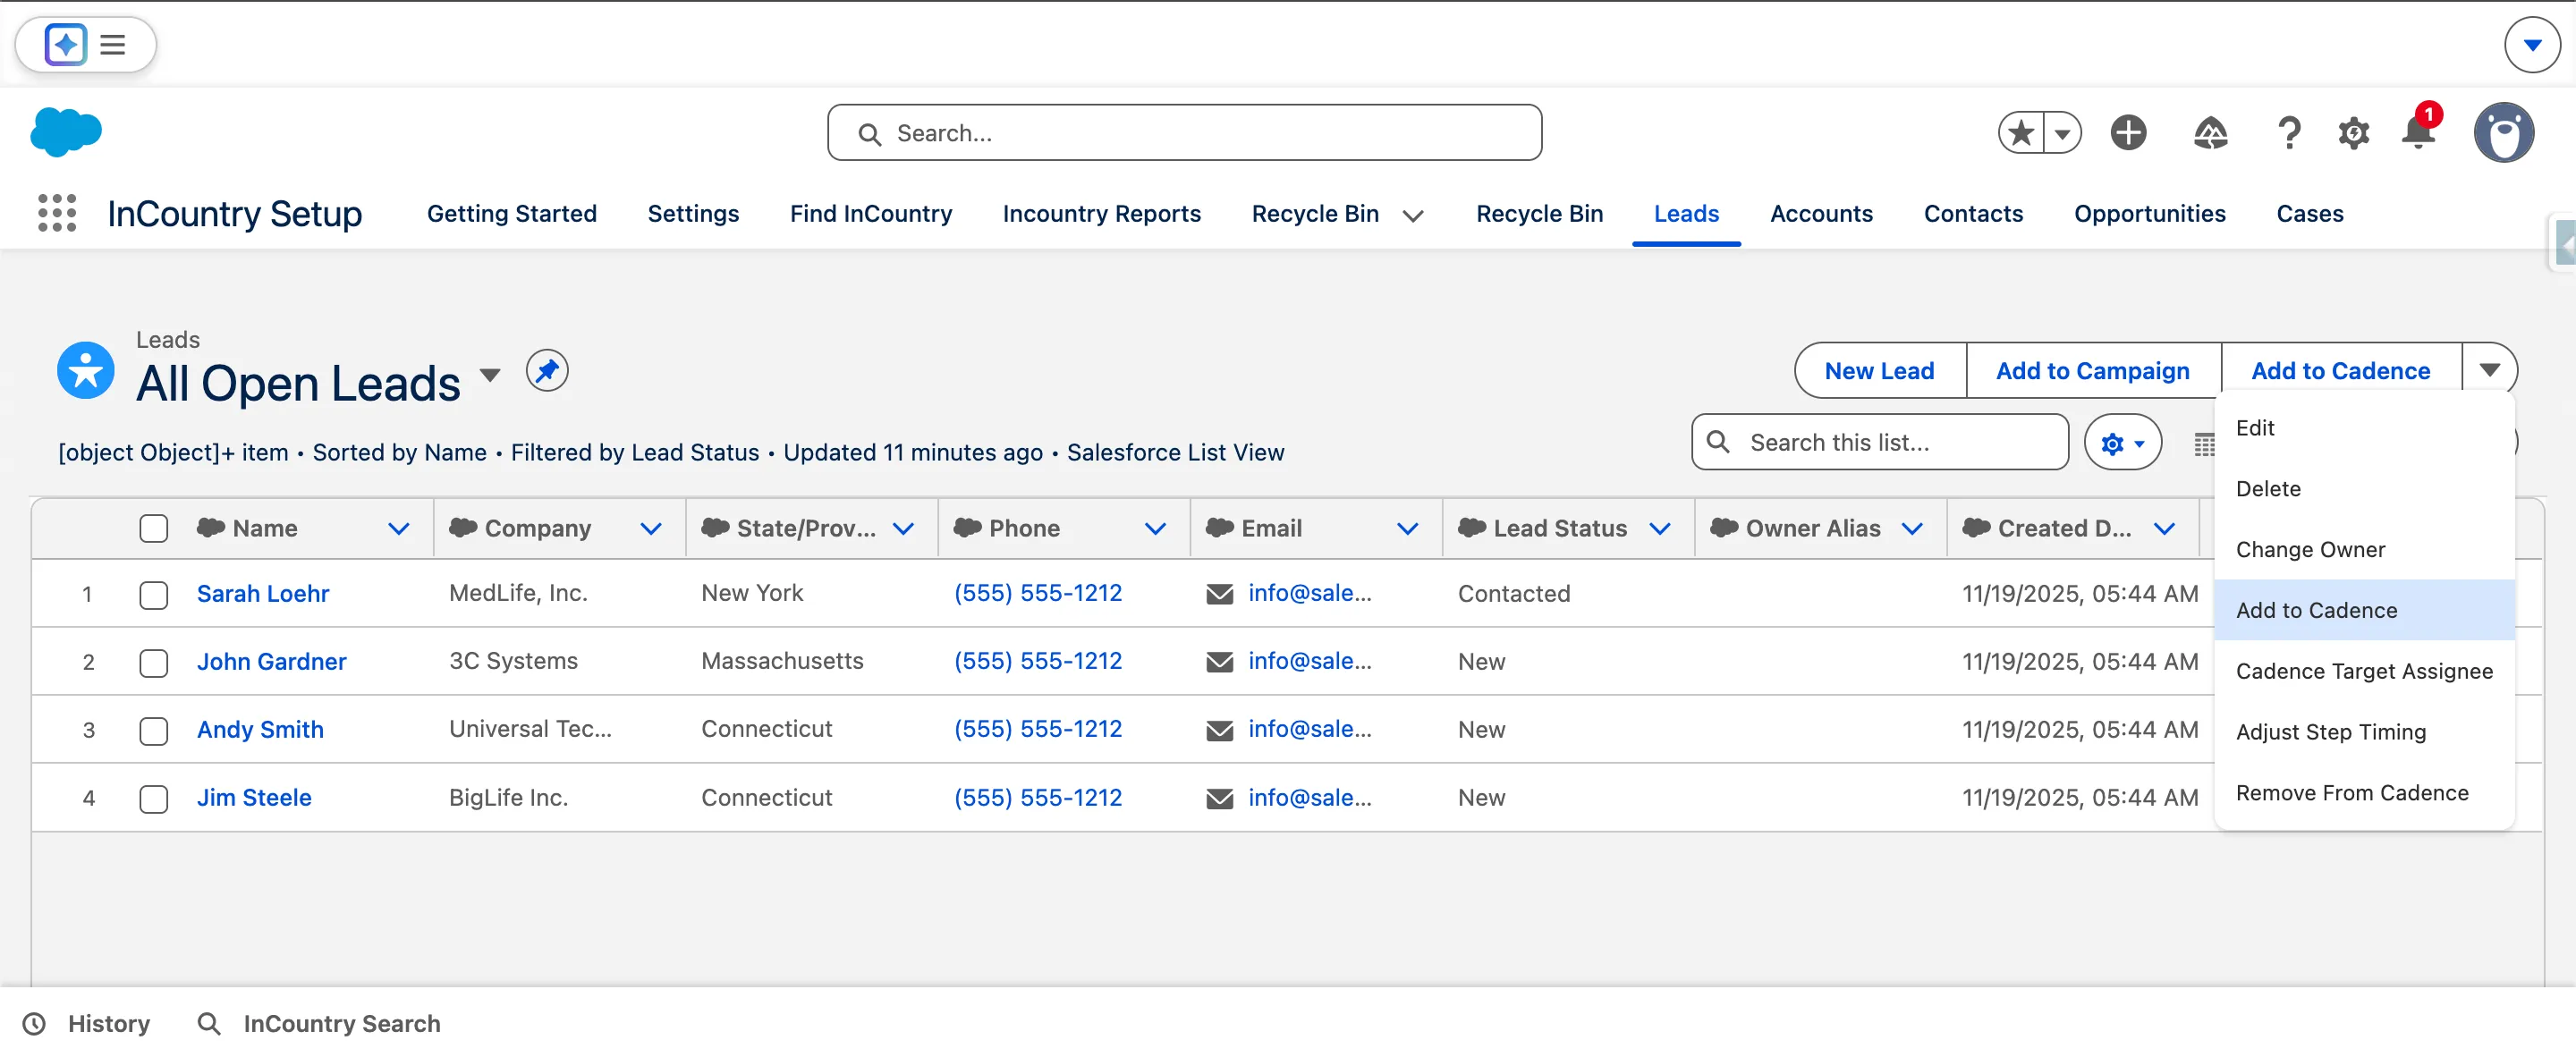
- In Salesforce Setup, go to Permission Sets.
- Open InCountry Sales Engagement Access.
- Click Manage Assignments.
- Click Add Assignments.
- Select the users who need access to Cadence actions in List View.
- Click Assign.
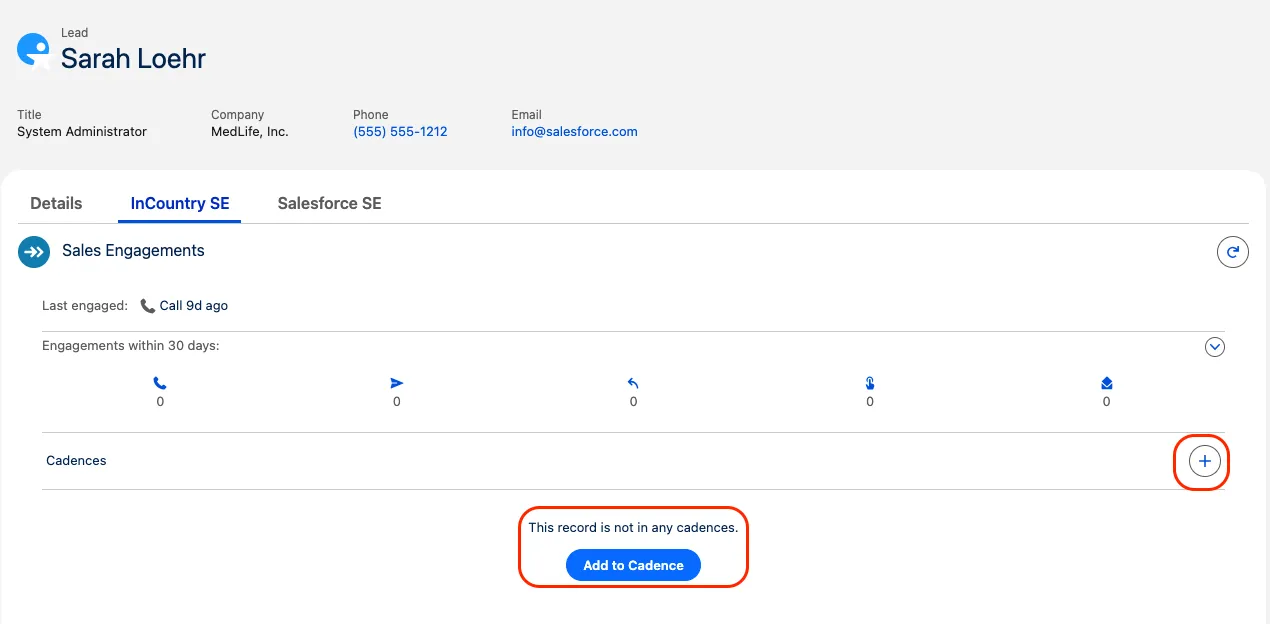
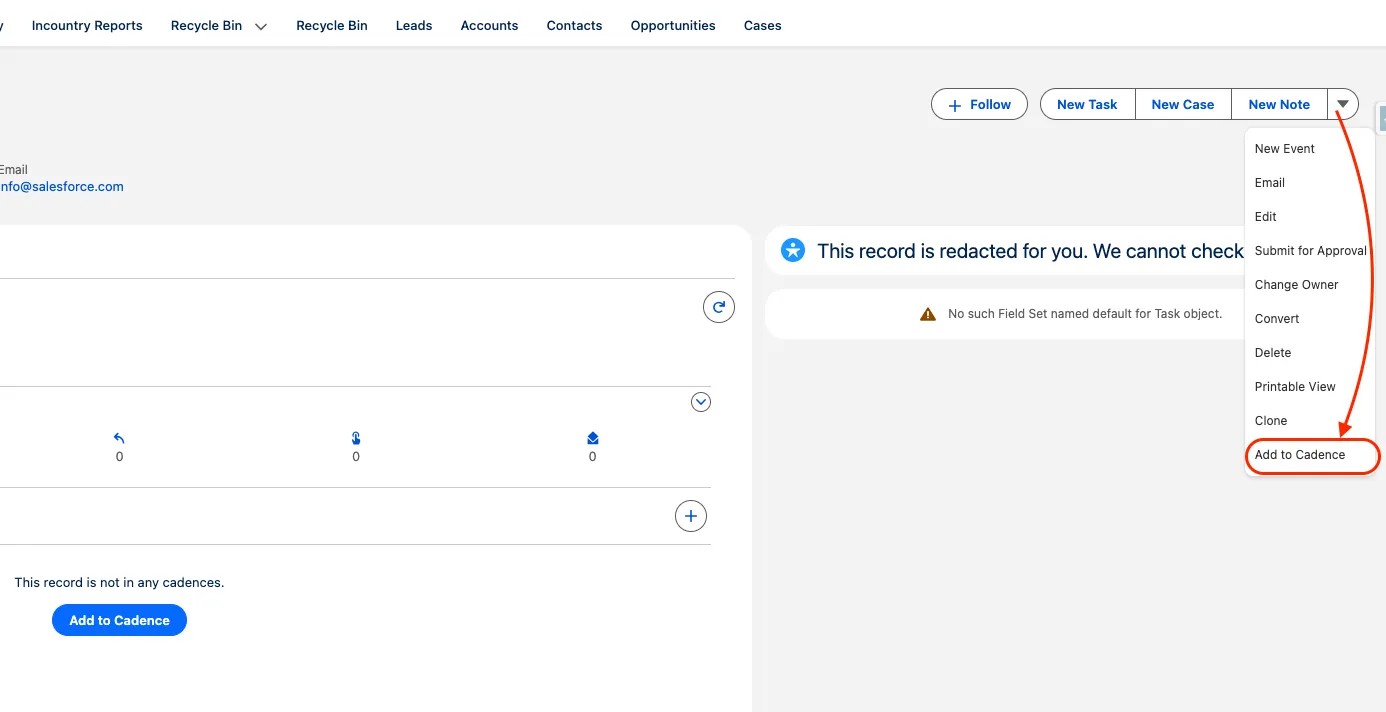
Add to Cadence Action
The "Add to Cadence" action is the primary method for launching a new prospect (the "Target") into a pre-defined sequence of outreach steps (the "Cadence"). This action adds the selected Leads, Contacts, or Person Accounts to a specific cadence, initiating automated or manual engagement workflows.
Where to Find
This action is available from multiple locations for your convenience:
-
Sales Engagement Component: On the Target's detail page (Lead, Contact, or Person Account), within the Sales Engagement section.

-
Quick Actions: On the Target's detail page header.
-
List View Actions: In the actions menu from Lead, Contact, or Person Account list views (single or multiple records).
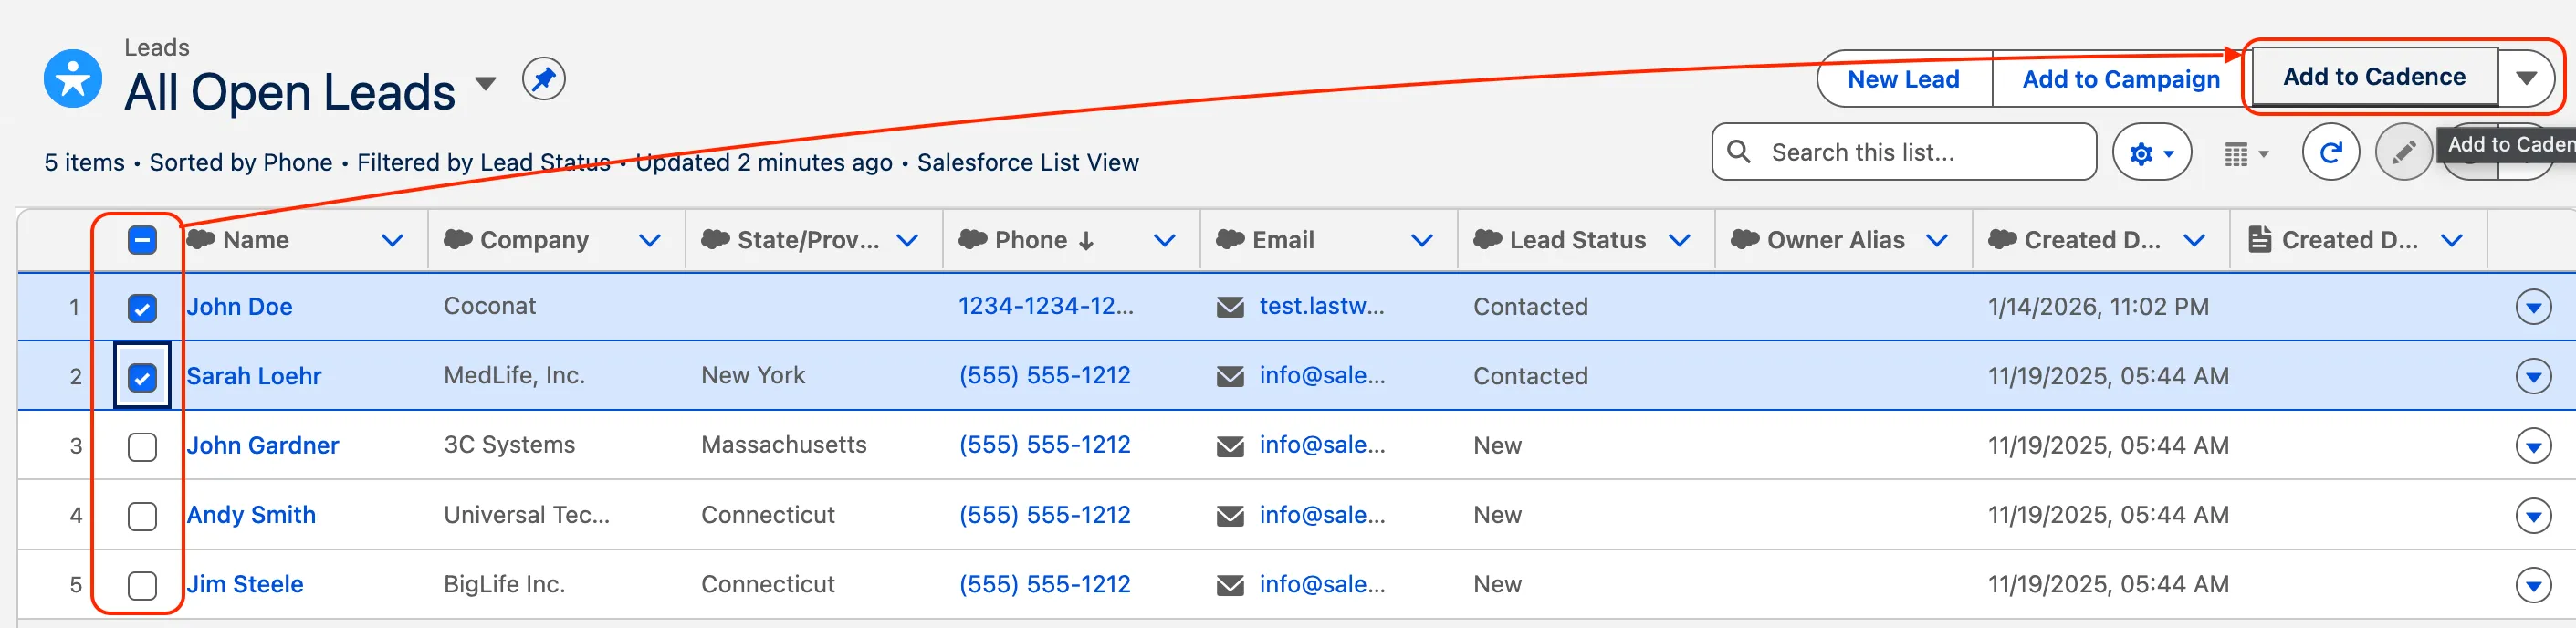
In the actions menu on List View page.

How to Use
When a user initiates the "Add to Cadence" action from any location, a modal window will appear with the following configuration steps.
Step 1: Select a Cadence
Purpose: This field determines which engagement sequence the Target will enter.
How to Use:
- A searchable list or dropdown of available, active cadences will appear.
- You can browse the list or use the search bar to locate a cadence by name.
- Click to select your desired cadence. The selected cadence name will appear in the field.
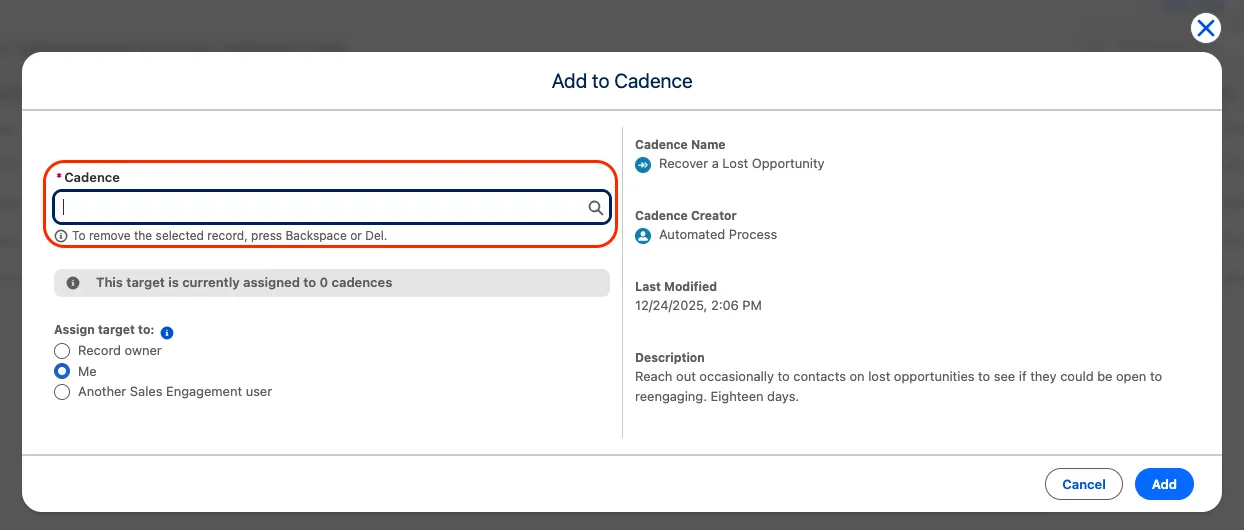
Step 2: Assign the Target
Purpose: Determine who will be responsible for executing the cadence steps.
How to Use:
Select one of the three options for "Target Assignee":
- Record Owner: The cadence steps will be assigned to the owner of the Lead/Contact/Person Account record in Salesforce.
- Me: The cadence steps will be assigned to you (the user performing the action).
- Another Sales Engagement User: Select a specific user from the lookup field that appears.
Outreach steps automatically appear in the assignee's work queue as they come due.
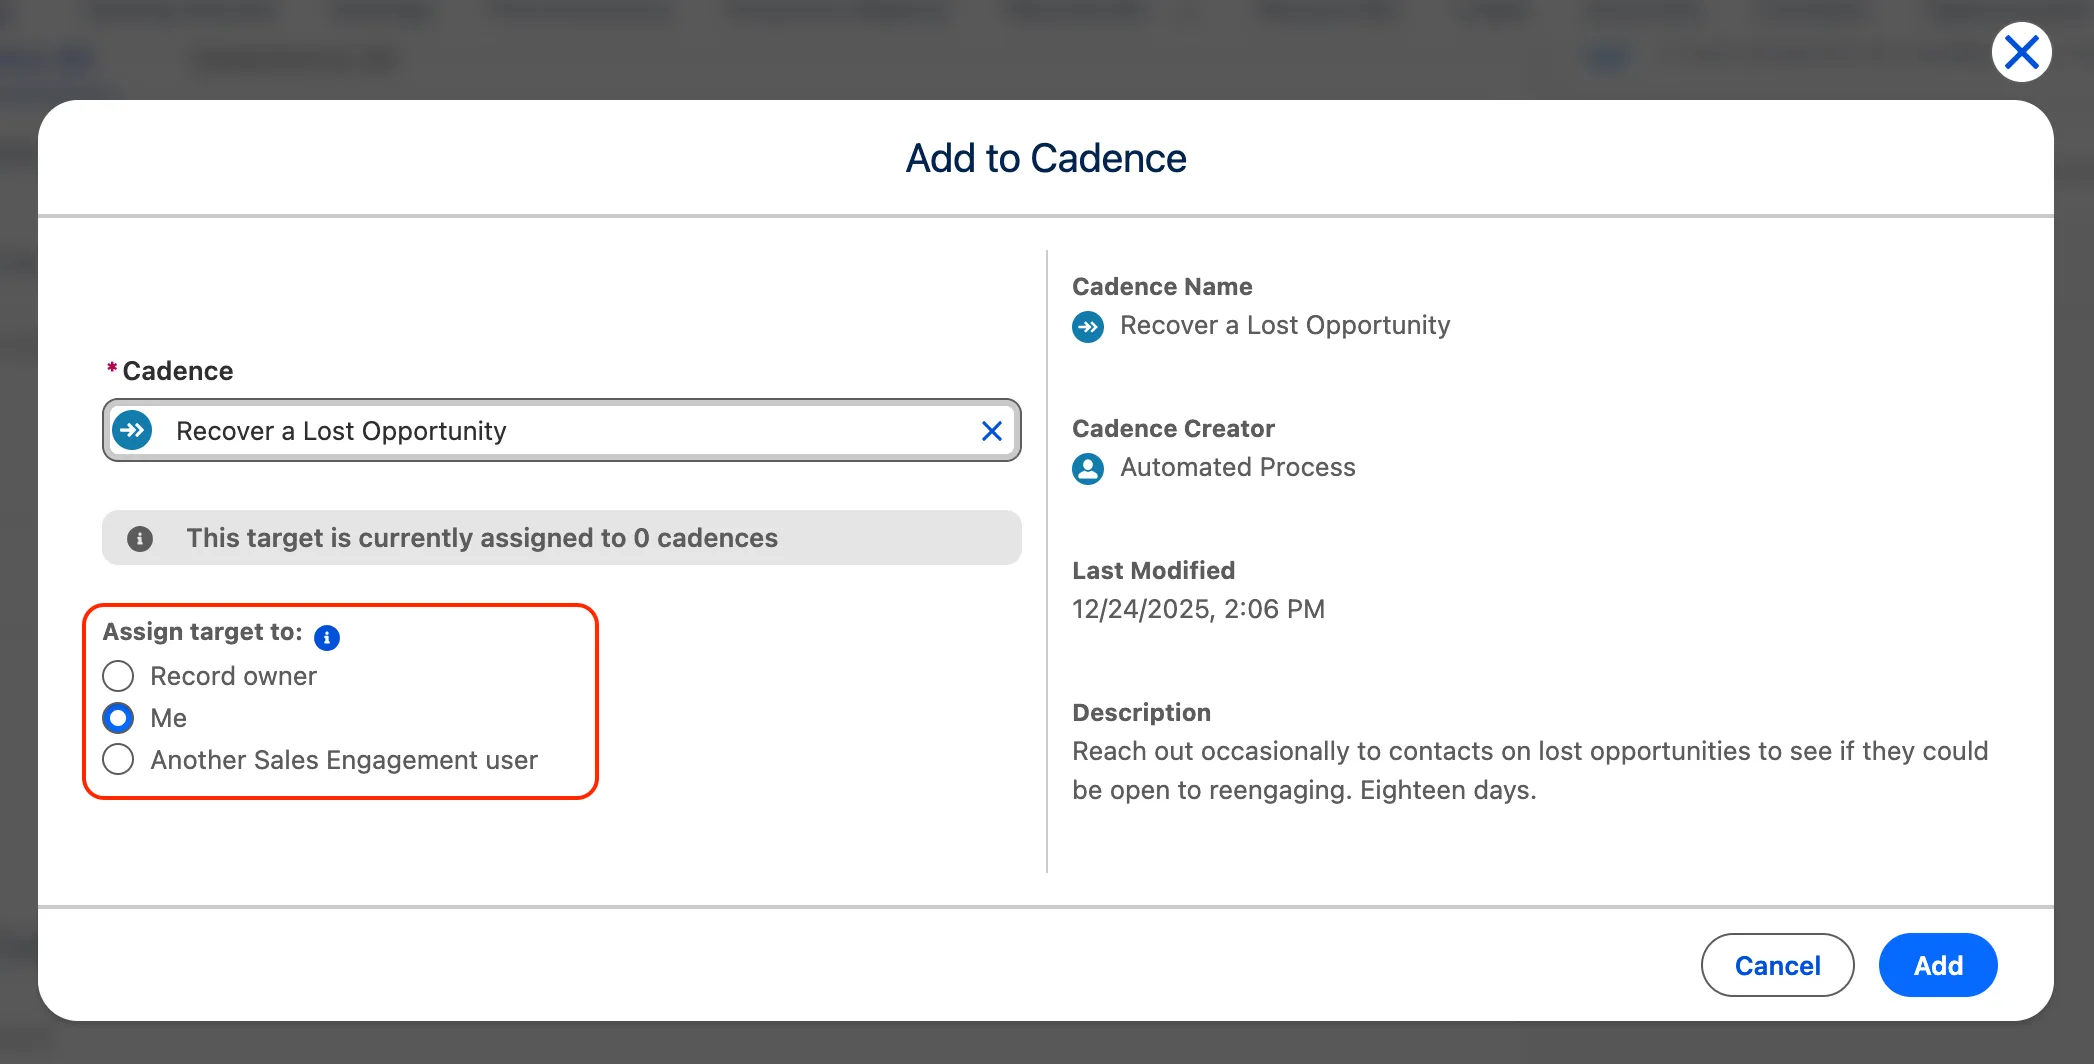
Step 3: Add to Cadence
Purpose: Finalize and execute the action.
How to Use:
- Review all your selections in the modal.
- Click the "Add" button at the bottom of the modal window.
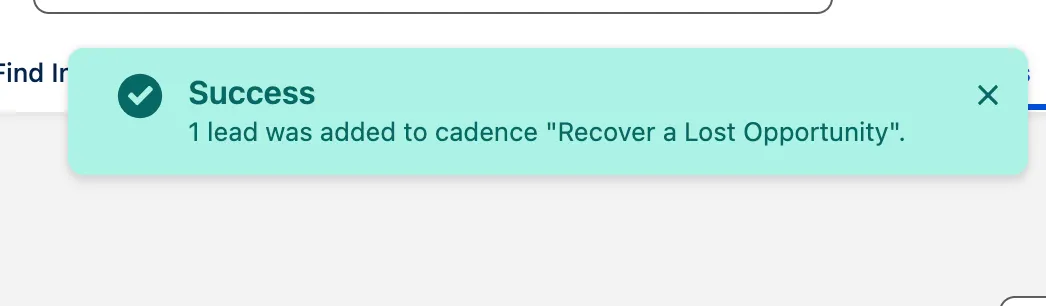
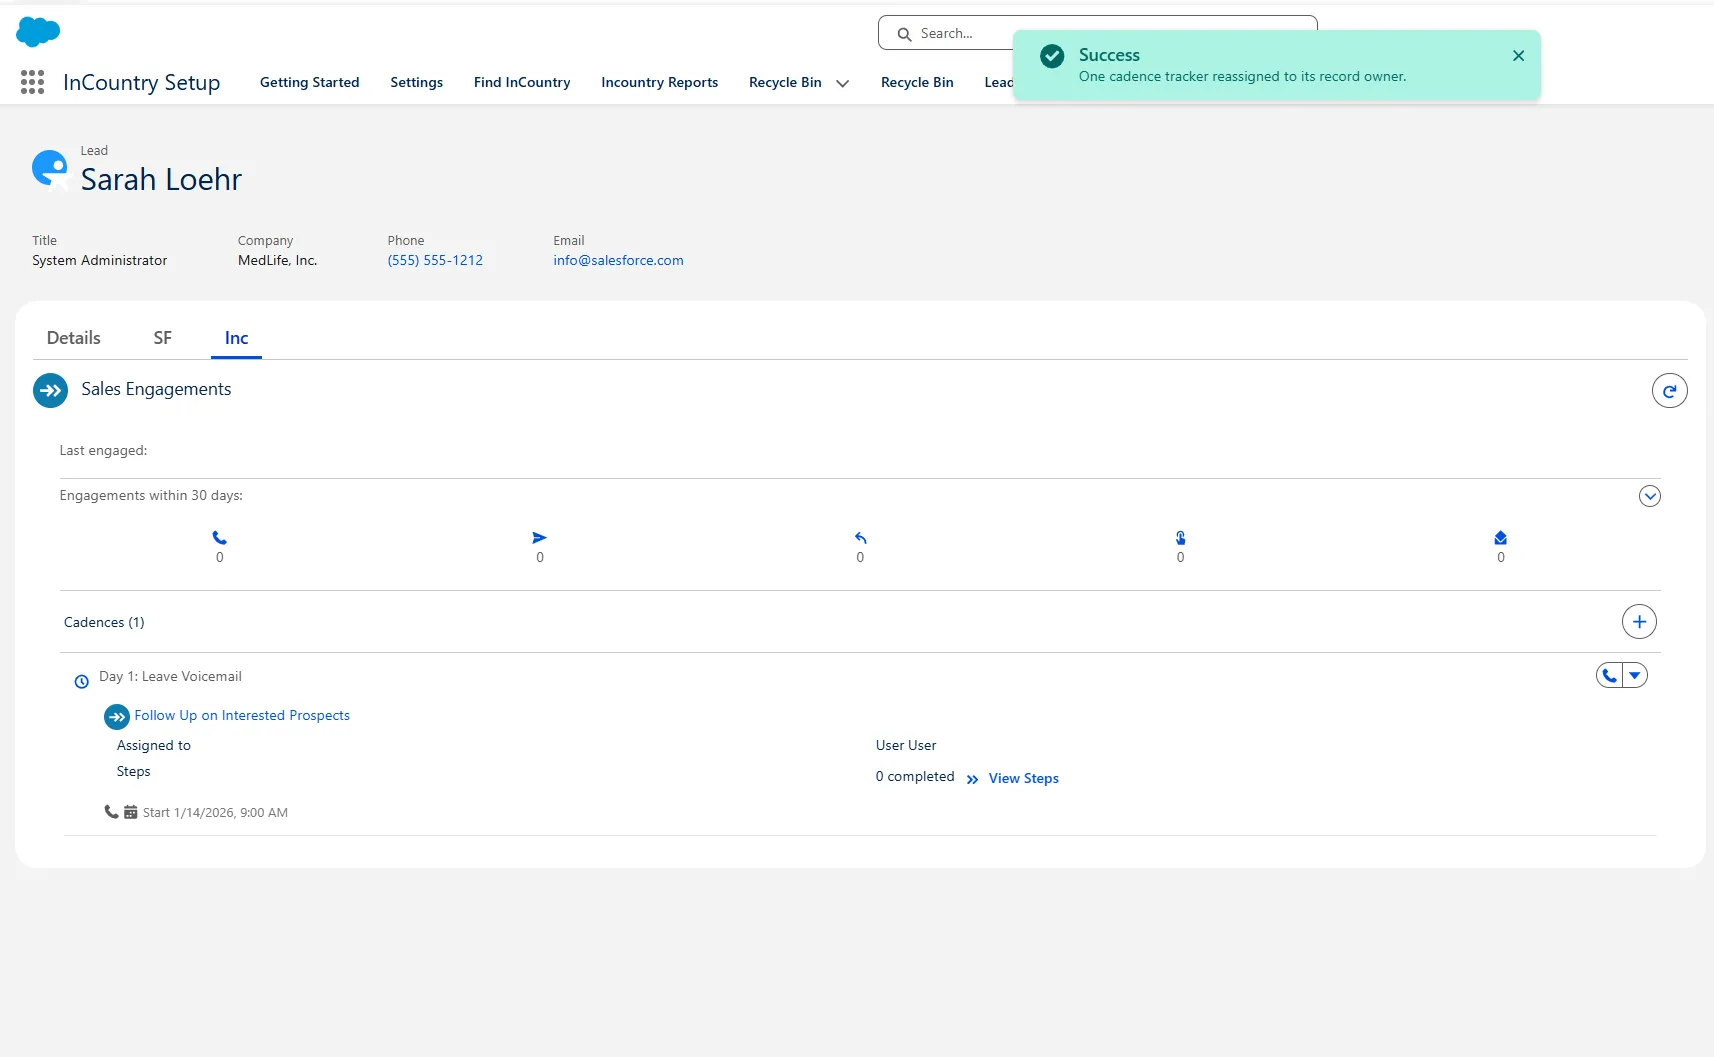
- A success notification will confirm the prospect has been added to the cadence.
Limitations and Notes:
- Maximum batch size: 200 records per batch.
- Access requirements: You can add prospects only to cadences you have permission to access.
- Classic limitation: If you lose access to a cadence, its associated records cannot be viewed in Salesforce Classic.
Change Target Assignee Action
The "Change Target Assignee" action is the primary method for launching a new prospect (the "Target") into a pre-defined sequence of outreach steps (the "Cadence"). This action adds the selected Leads, Contacts and Person Accounts to a specific cadence.
Where to Find
This action is available from multiple locations for your convenience:
- Sales Engagement Component: On the Target's detail page (Lead, Contact, or Person Account), within the Sales Engagement section.
- Quick Actions: On the Target's detail page header.
- List View Actions: In action menus from Lead, Contact, or Person Account list views.
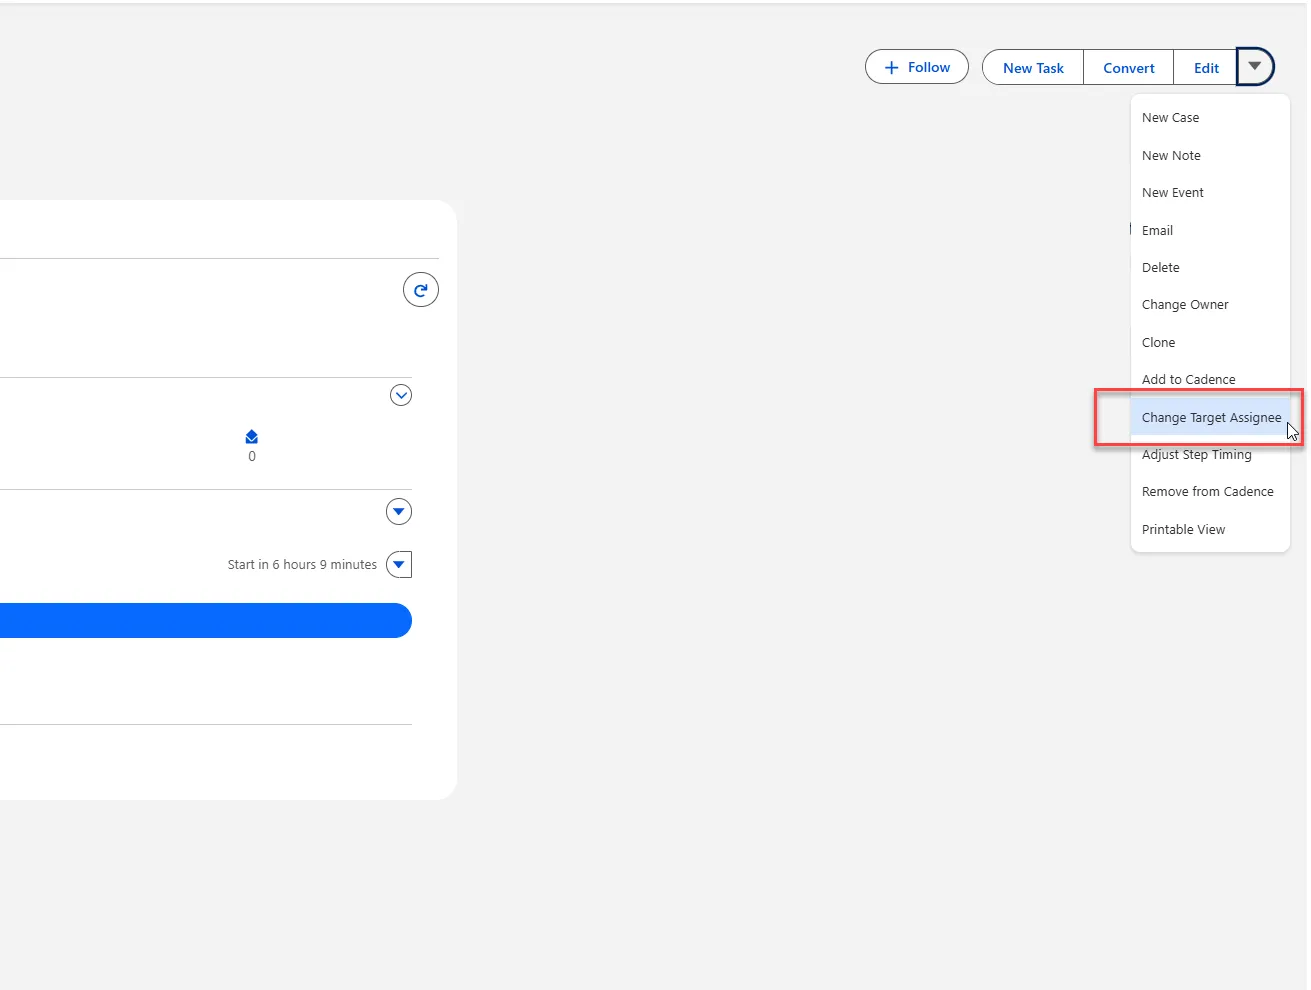

How to Use
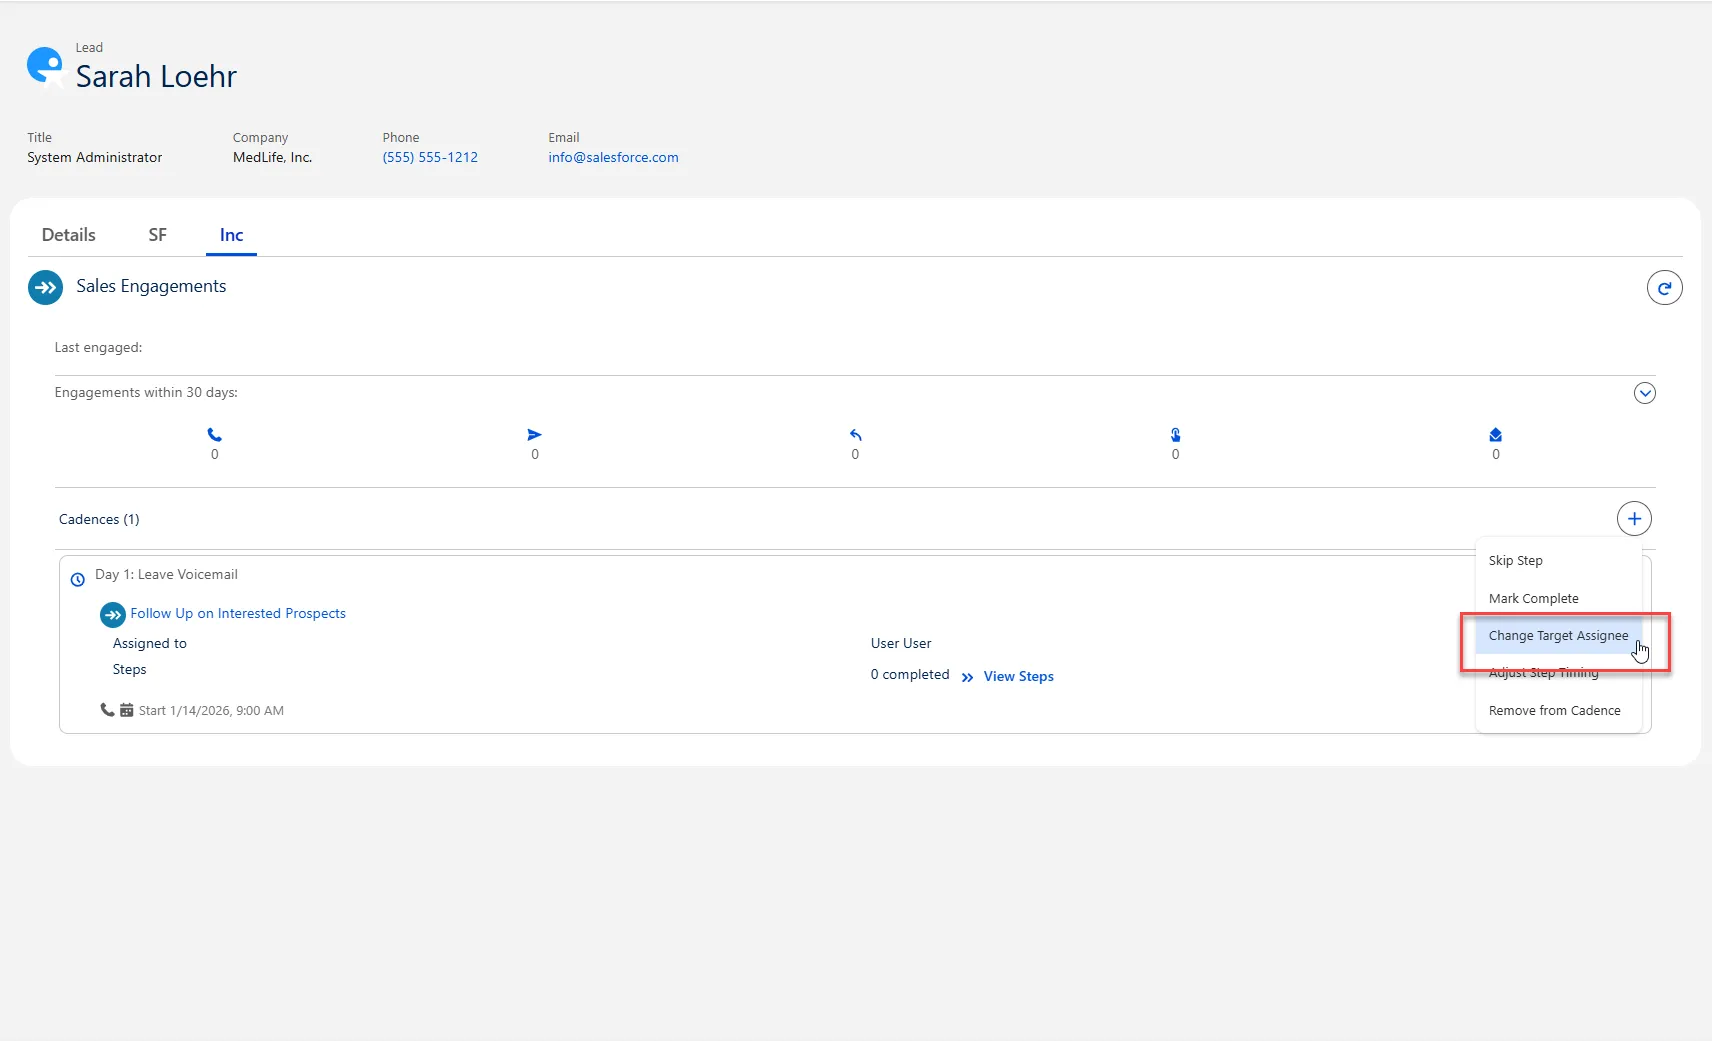
Method 1: From the Sales Engagement Component
Step 1: Navigate to the Record
- Go to the Salesforce tab for Leads, Contacts, or Person Accounts.
- Click the name of the prospect you want to engage to open their detail page.
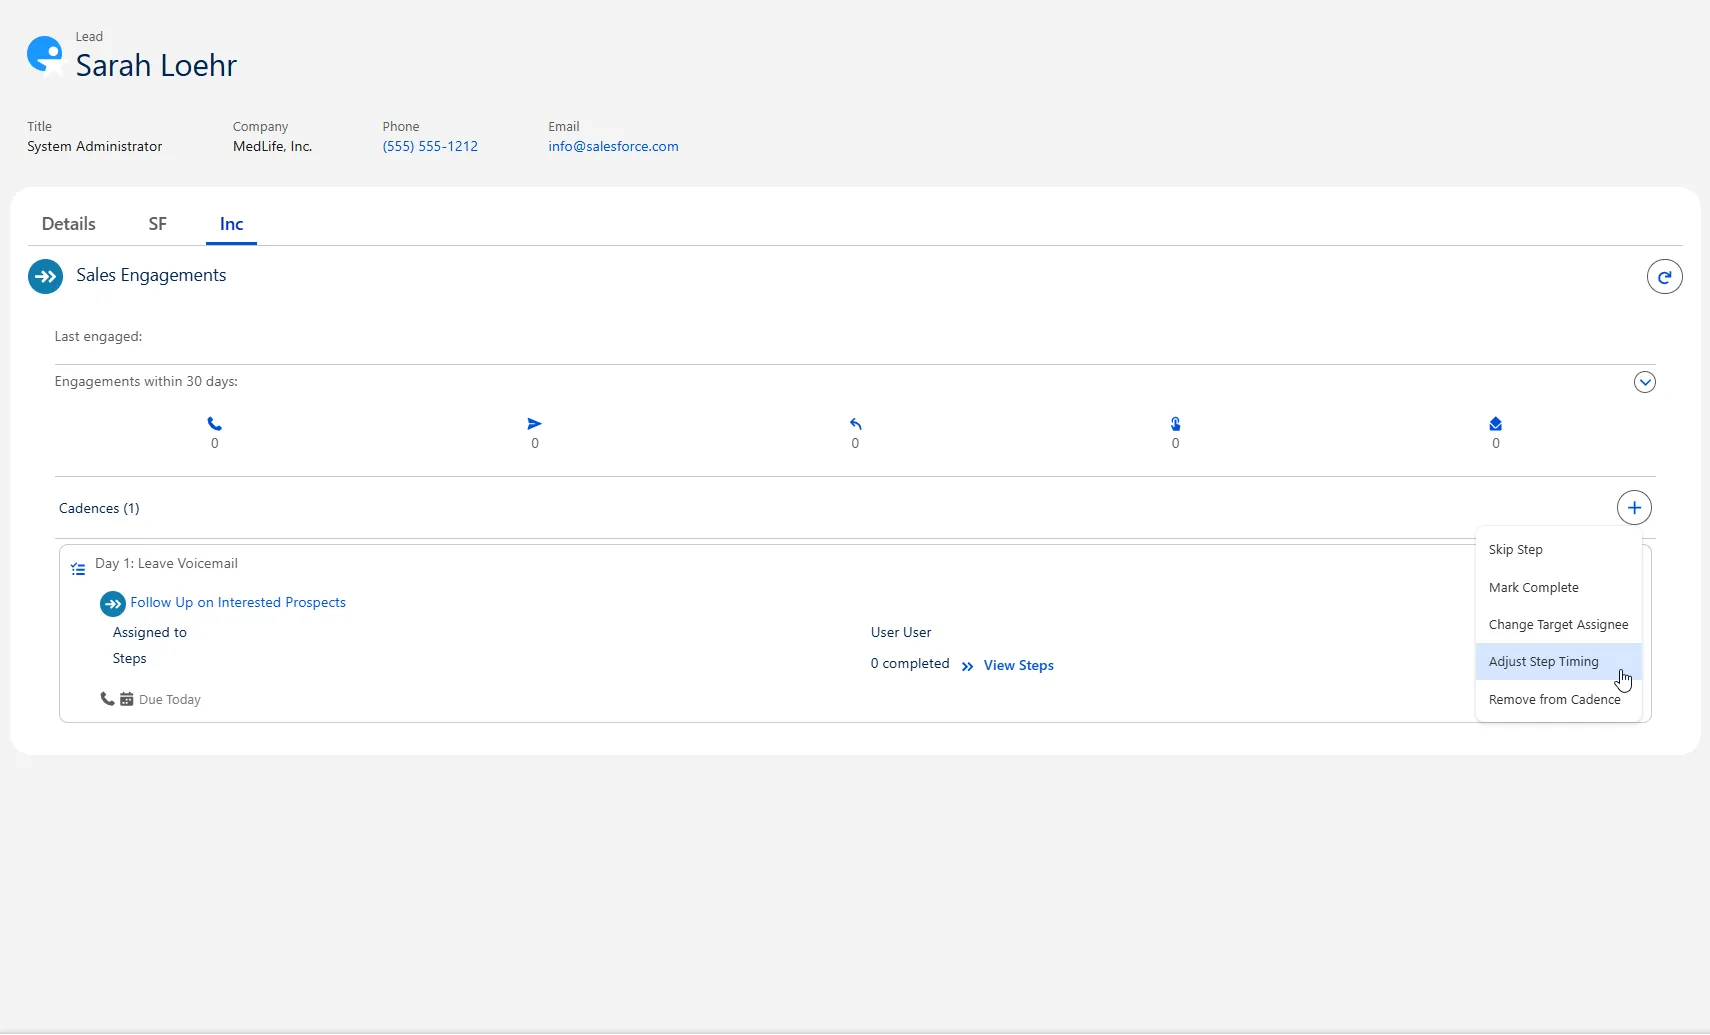
Step 2: Locate the Sales Engagement Component
- On the record's detail page, scroll to or locate the Sales Engagement component.
- Within this component, you will see a section related to cadence records. Locate the dropdown button (
▾) in the cadence section.
Step 3: Select the Action
- Click the Actions dropdown.
- From the menu that appears, select "Assign to Cadence".
Method 2: From Quick Actions
- Navigate to the Target's detail page.
- In the page header, locate the quick action buttons.
- Click the "Assign to Cadence" button.
Method 3: From List View (Single or Multiple Records)
- Go to a list view of Leads, Contacts, or Person Accounts.
- Select one or multiple records using the checkboxes.
- Click the actions dropdown at the top of the list.
- Select "Assign to Cadence" from the available options.
Configure the Target Assignment
When user initiates the "Change Target Assignee" action from any location (record detail, list view, or Sales Engagement component), a modal window will appear with the following configuration fields:
Field 1: Change the target assignee of which cadences?
- Purpose: This dropdown determines the scope of your reassignment action.
- How to Use:
- Click the dropdown arrow to view all options.
- Select one of three options:
- 'All cadences where the target is assigned to me' – Use this if you want to reassign every cadence where you are currently the owner of this specific target.
- 'All cadences for this target' – Use this to reassign the target across every single cadence they are enrolled in, regardless of current owner.
- 'A specific cadence' – Use this to reassign the target within one particular cadence only. This is the most common selection for new assignments.
Field 2: Cadence (Conditional Field)
- Purpose: This field appears ONLY when you select 'A specific cadence' in Field 1. It lets you choose exactly which cadence to work with.
- How to Use:
- Click the dropdown or lookup icon in the Cadence field.
- Search through your available cadences.
- Click to select your desired cadence. The selected cadence name will appear in the field.
Field 3: Reassign target to
- Purpose: This section determines who will become the new owner of the target within the selected cadence(s).
- How to Use:
- Select one of the three radio buttons:
- 'Record owner' – Reassigns the target to the owner of the Lead/Contact/Person Account record in Salesforce.
- 'Me' – Reassigns the target to yourself (the user performing the action).
- 'Another Sales Engagement user' – Opens an additional lookup field where you can search for and select a specific user.
- Select one of the three radio buttons:
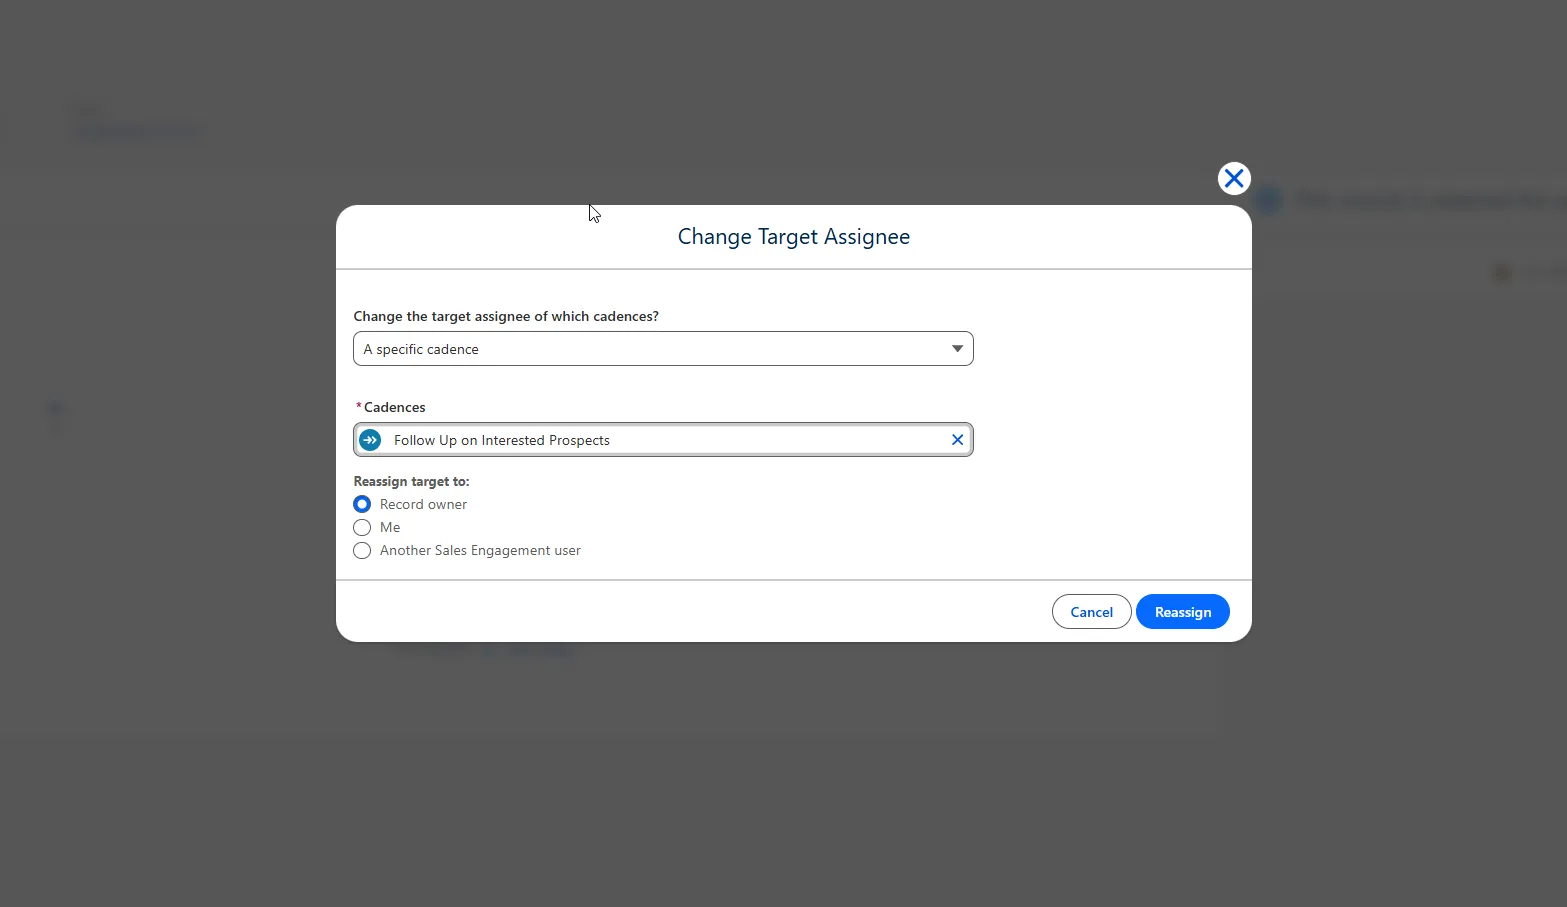
Complete the Target Assignment
After configuring all three fields click the "Reassign" button at the bottom of the modal window to confirm and execute the action. You will immediately see a success toast notification confirming the target has been reassigned. The system will then automatically redirect you to the Target's detail page (the Lead, Contact, or Person Account record you were working on).
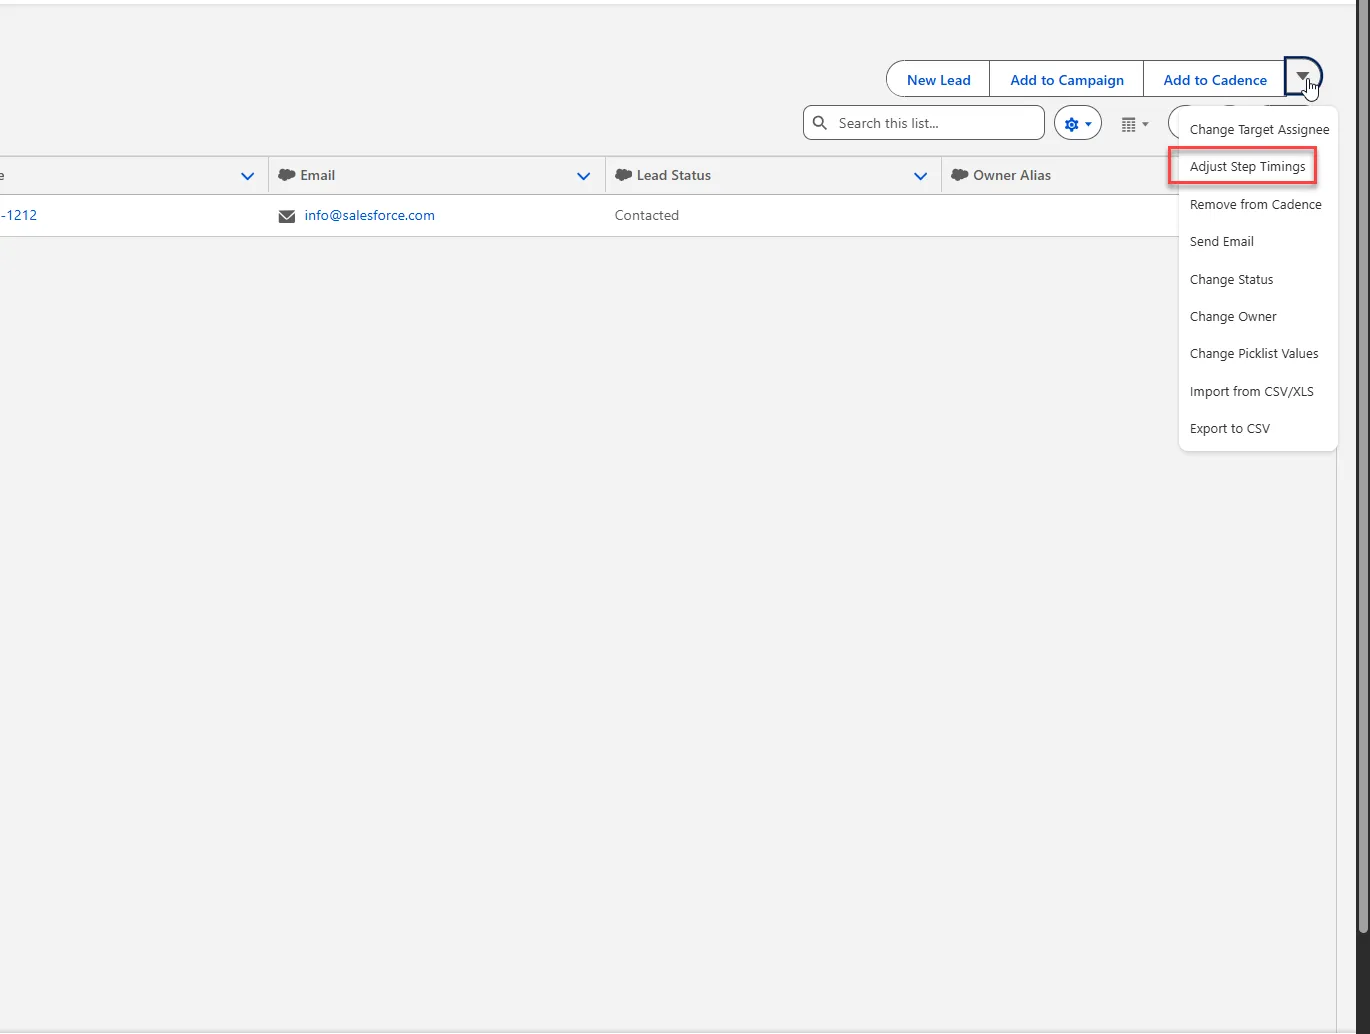
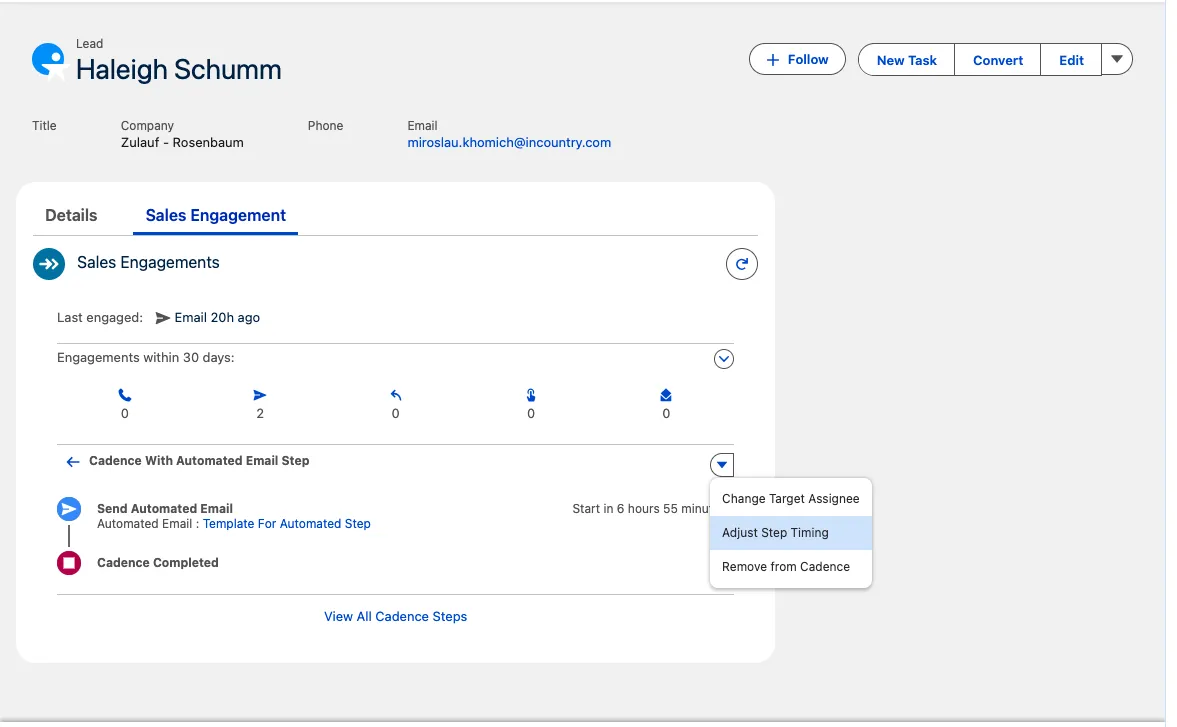
Adjust Step Timing Action
The "Adjust Step Timing" action allows you to modify the schedule of upcoming steps within a cadence for a specific prospect (Target). This action lets accelerate, delay, or pause the next outreach step based on current sales situation.
Where to Find
This action is available from multiple locations for your convenience:
- Sales Engagement Component: On the Target's detail page (Lead, Contact, or Person Account), within the Sales Engagement section.
- Quick Actions: On the Target's detail page header.
- List View Actions: In action menus from Lead, Contact, or Person Account list views.
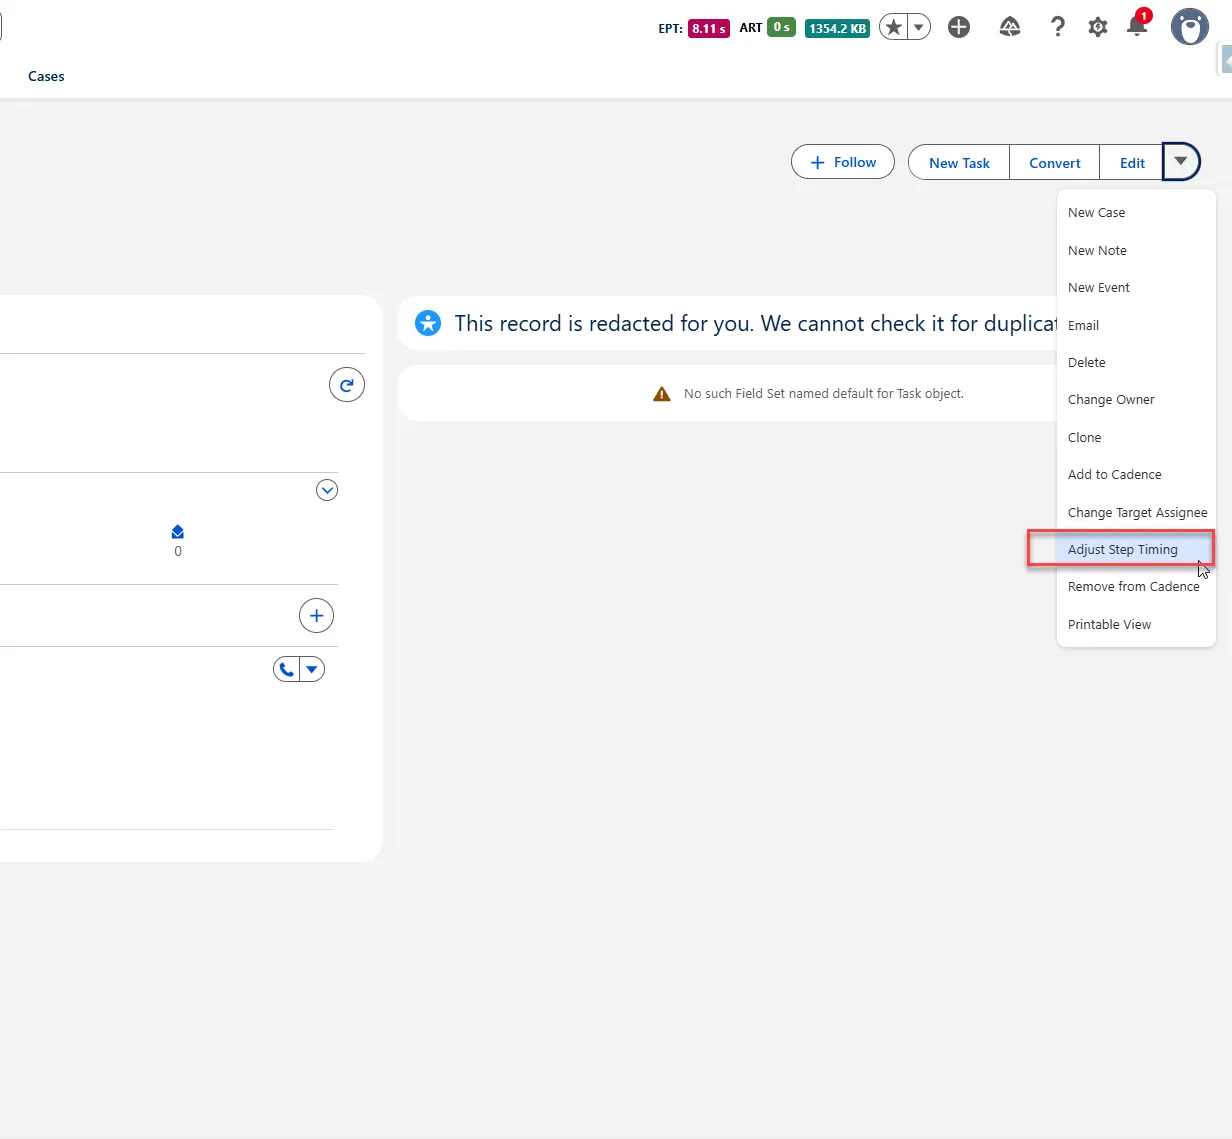
How to Use
Method 1: From the Sales Engagement Component
Step 1: Navigate to the Record
- Go to the Salesforce tab for Leads, Contacts, or Person Accounts.
- Click the name of the prospect you want to adjust timing for.
Step 2: Locate the Sales Engagement Component
- On the record's detail page, locate the Sales Engagement component.
- Look for the dropdown button (
▾) within the cadence section.
Step 3: Select the Action
- Click the Actions dropdown.
- From the menu that appears, select "Adjust Step Timing".
Method 2: From Quick Actions
- Navigate to the Target's detail page.
- Look in the page header for quick action buttons.
- Click the "Adjust Step Timing" button.
Method 3: From List View (Single or Multiple Records)
- Go to a list view of Leads, Contacts, or Person Accounts.
- Select one or multiple records using the checkboxes.
- Click the actions dropdown at the top of the list.
- Select "Adjust Step Timing" from the available options.
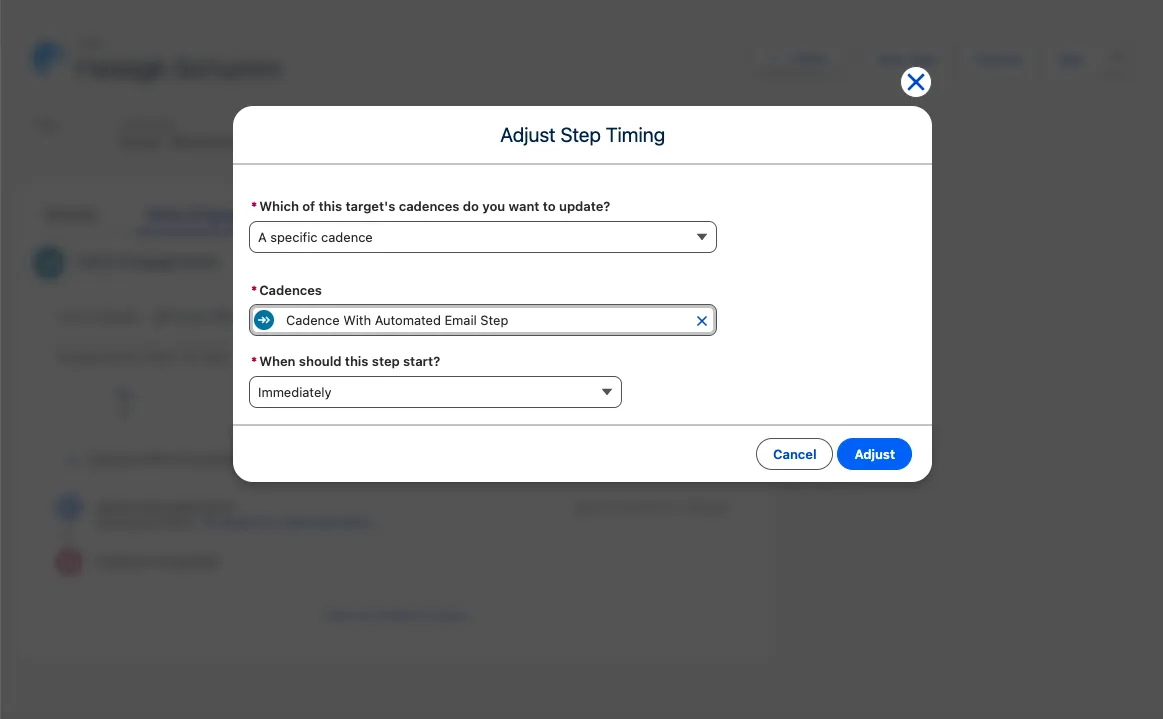
Configure the Timing Adjustment
When users initiates the "Adjust Step Timing" action from any location, a modal window will appear with the following configuration fields:
Field 1: Which of this target's cadences do you want to update?
- Purpose: This dropdown determines the scope of your timing adjustment.
- How to Use:
- Click the dropdown arrow to view all options.
- Select one of three options:
- 'All cadences where the target is assigned to me' – Use this if you want to adjust timing for every cadence where you are currently the owner of this specific target.
- 'All cadences for this target' – Use this to adjust timing across every single cadence the target is enrolled in, regardless of current owner.
- 'A specific cadence' – Use this to adjust timing within one particular cadence only. This is the most common selection.
Field 2: Cadence (Conditional Field)
- Purpose: This field appears ONLY when you select 'A specific cadence' in Field 1. It lets you choose exactly which cadence to update.
- How to Use:
- Click the dropdown or lookup icon in the Cadence field.
- Search through your available cadences.
- Click to select your desired cadence. The selected cadence name will appear in the field.
Field 3: When should this step start?
- Purpose: This dropdown determines the new timing for the next scheduled step
- How to Use:
- Click the dropdown arrow to view all timing options.
- Select one of the predefined options:
- "Immediately" – The next step will start right away.
- "1 Hour" – The next step will start in 1 hour.
- "2 Hours" – The next step will start in 2 hours.
- "4 Hours" – The next step will start in 4 hours.
- "Delay until Tomorrow" – The next step will start at the beginning of the next business day.
- "In 3 Days" – The next step will start in 3 days.
- "In 1 Week" – The next step will start in 7 days.
- "Pause Indefinitely" – The cadence will be paused with no scheduled restart.
- Custom range – Opens additional fields to specify exact date and time.
Complete the Timing Adjustment
After configuring all three fields click the "Adjust" button at the bottom of the modal window to confirm and execute the timing change. You will immediately see a success toast notification confirming the step timing has been adjusted. The system will then automatically redirect you to the Target's detail page.
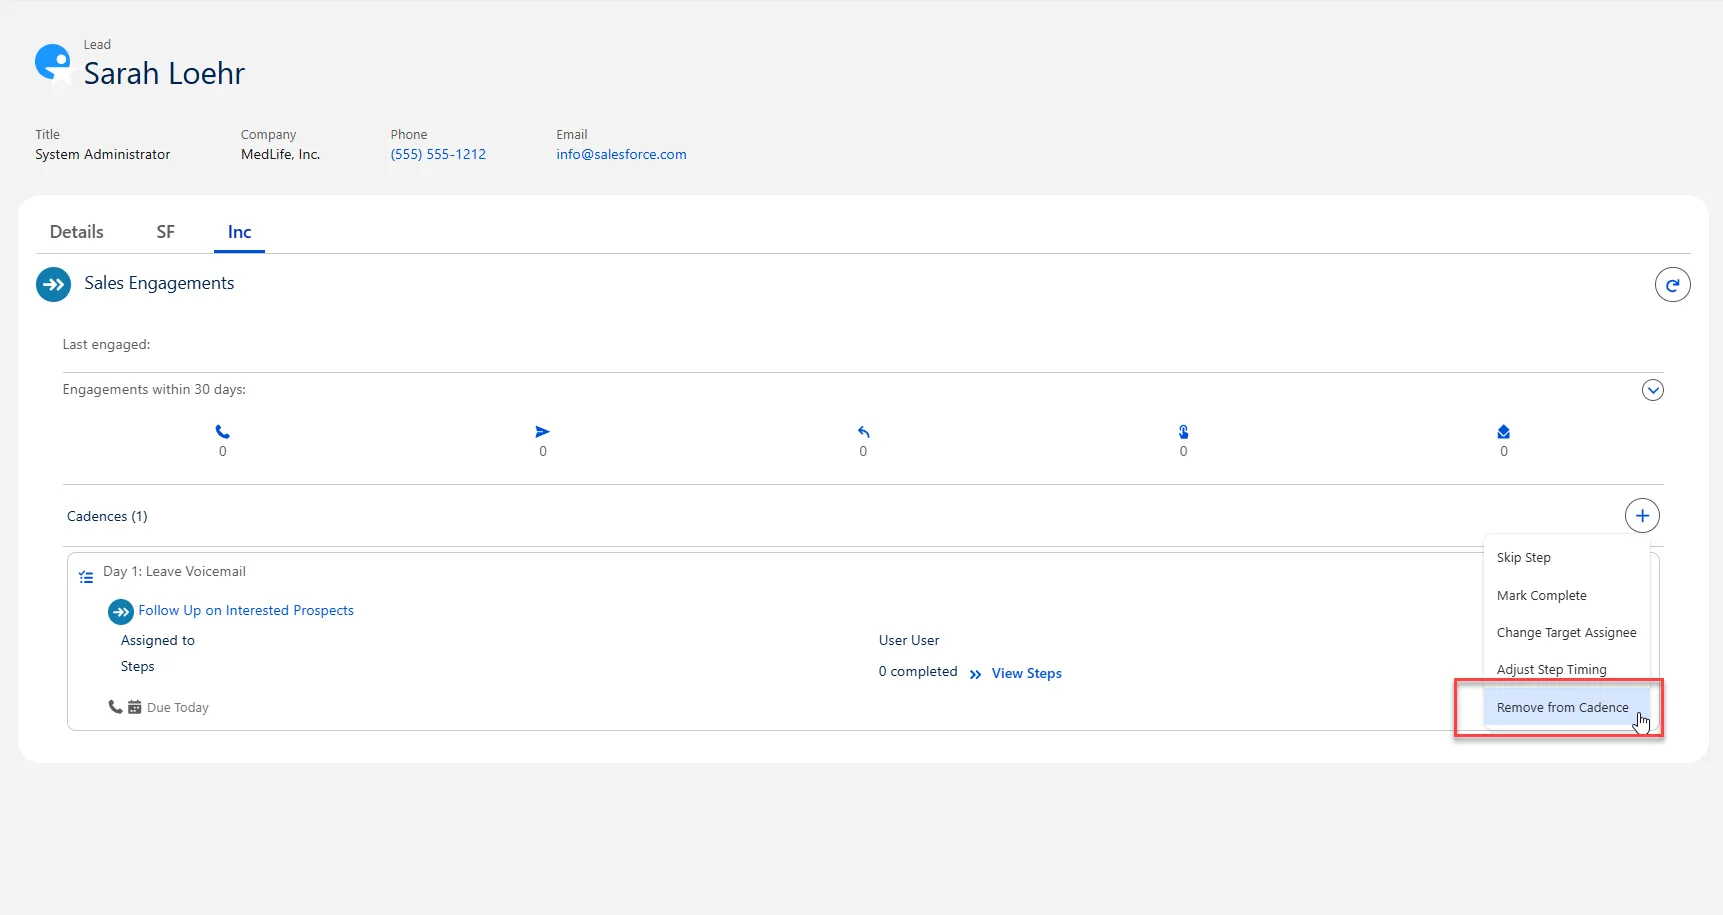
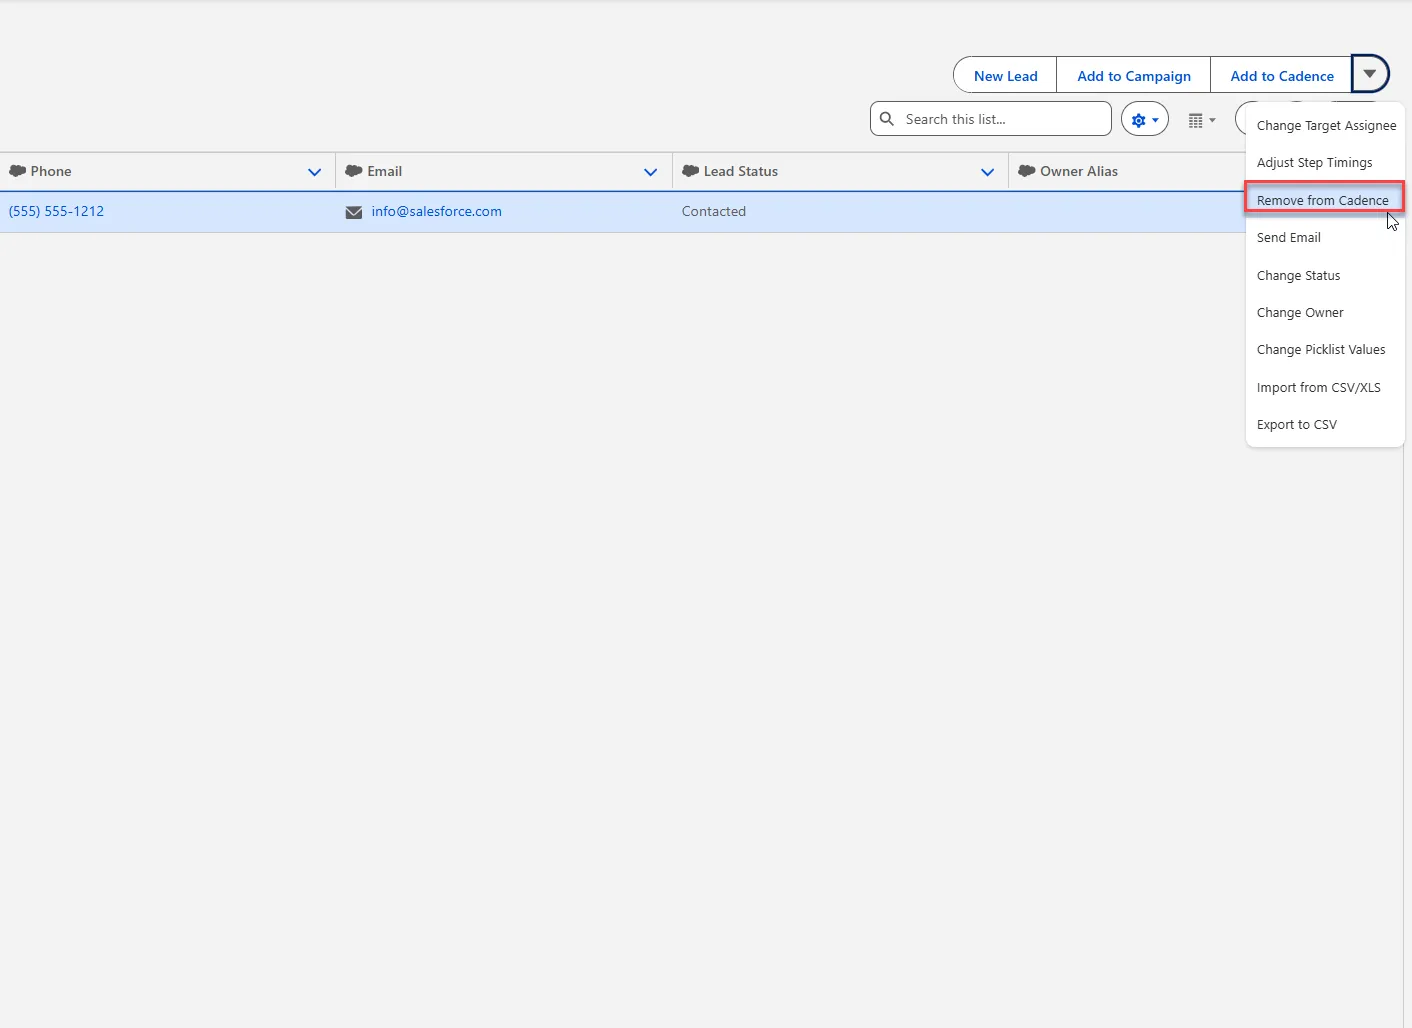
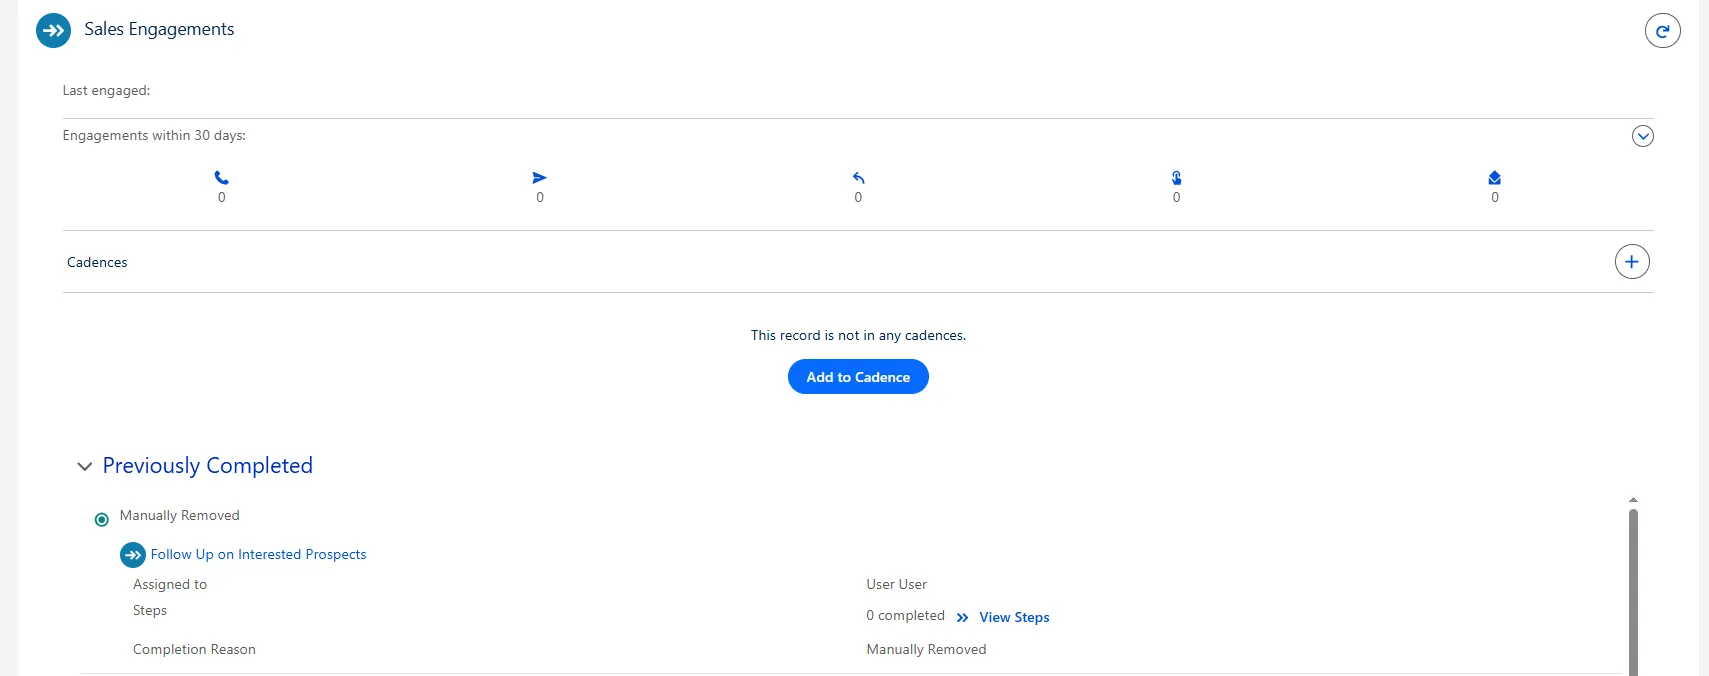
Remove from Cadence Action
The "Remove from Cadence" action allows you to remove a prospect (Target) from one or multiple cadences. This action stops all future automated outreach steps and effectively ends the cadence engagement for the selected prospect(s). The disposition field allows you to categorize why the prospect was removed.
Where to Find
This action is available from multiple locations for your convenience:
- Sales Engagement Component: On the Target's detail page (Lead, Contact, or Person Account), within the Sales Engagement section.
- Quick Actions: On the Target's detail page header.
- List View Actions: In action menus from Lead, Contact, or Person Account list views.

How to Use
Method 1: From the Sales Engagement Component
Step 1: Navigate to the Record
- Go to the Salesforce tab for Leads, Contacts, or Person Accounts.
- Click the name of the prospect you want to remove from cadence(s).
Step 2: Locate the Sales Engagement Component
- On the record's detail page, locate the Sales Engagement component.
- Look for the dropdown button (
▾) within the cadence section.
Step 3: Select the Action
- Click the Actions dropdown.
- From the menu that appears, select "Remove from Cadence".
Method 2: From Quick Actions
- Navigate to the Target's detail page.
- Look in the page header for quick action buttons.
- Click the "Remove from Cadence" button.
Method 3: From List View (Single or Multiple Records)
- Go to a list view of Leads, Contacts, or Person Accounts.
- Select one or multiple records using the checkboxes.
- Click the actions dropdown at the top of the list.
- Select "Remove from Cadence" from the available options.
Configure the Removal
When you initiate the "Remove from Cadence" action from any location, a modal window will appear with the following configuration fields:
Field 1: Which of this target's cadences do you want to update?
- Purpose: This dropdown determines the scope of your removal action.
- How to Use:
- Click the dropdown arrow to view all options.
- Select one of three options:
- 'All cadences where the target is assigned to me' – Use this if you want to remove the target from every cadence where you are currently the owner.
- 'All cadences for this target' – Use this to remove the target from every single cadence they are enrolled in, regardless of current owner.
- 'A specific cadence' – Use this to remove the target from one particular cadence only. This is the most common selection.
Field 2: Cadence (Conditional Field)
- Purpose: This field appears ONLY when you select 'A specific cadence' in Field 1. It lets you choose exactly which cadence to remove the target from
- How to Use:
- Click the dropdown or lookup icon in the Cadence field.
- Search through your available cadences.
- Click to select the specific cadence. The selected cadence name will appear in the field.
Field 3: Disposition
- Purpose: This dropdown allows you to categorize why the target is being removed from the cadence(s). This information is valuable for reporting and understanding cadence performance.
Complete the Removal
After configuring all three fields click the "Remove" button at the bottom of the modal window to confirm and execute the removal. You will immediately see a success toast notification confirming the target has been removed from the cadence(s).

Edit Disposition Action
The "Edit Disposition" action allows you to modify the disposition value for previously completed cadence steps. This is used to update or correct the categorization of why a prospect exited a cadence after the fact, ensuring accurate reporting and historical data.
Where to Find
This action is only available in one specific location within the Sales Engagement interface:
Sales Engagement Component: On the Target's detail page (Lead, Contact, or Person Account), within the Sales Engagement component's "Previously Completed" section.
How to Use
Step 1: Navigate to the Record
- Go to the Salesforce tab for Leads, Contacts, or Person Accounts.
- Click the name of the prospect whose cadence history you want to update.
Step 2: Locate the Sales Engagement Component
- On the record's detail page, scroll to or locate the Sales Engagement component.
- Look for the "Previously Completed" card section within the component.
Step 3: Expand the Previously Completed Card
- Click the "Previously Completed" card header or expansion arrow to expand the section.
- This will reveal the list of completed cadences and their details.
Step 4: Access Individual Step Details
- Within the expanded section, locate the specific completed cadence entry you want to edit.
- Click the "viewing steps" link associated with that cadence entry.
- This will display detailed step history for that particular cadence.
Step 5: Open the Action Menu
- Next to the step details, look for an actions icon.
- Click the actions icon to open the context menu.
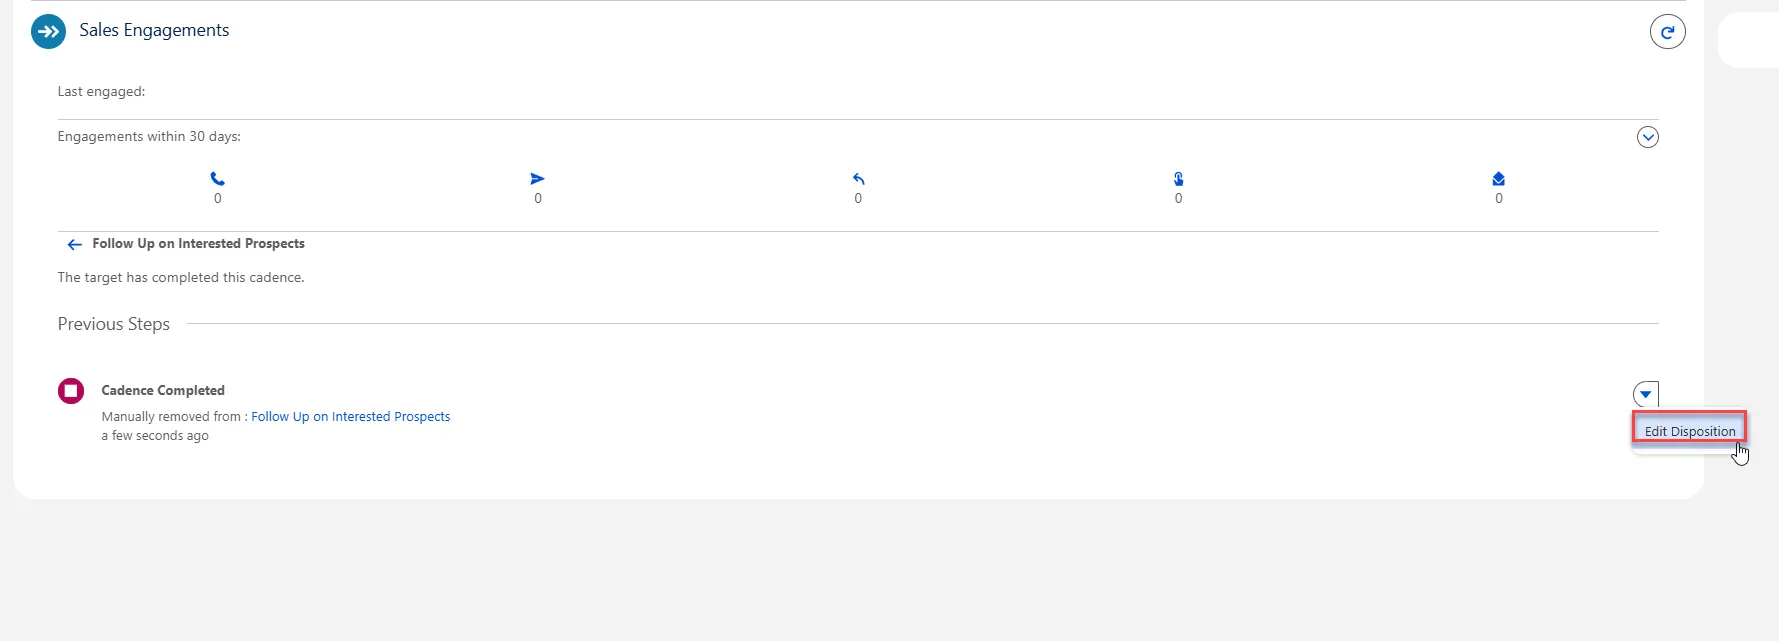
Step 6: Select the Edit Action
- From the context menu that appears, select "Edit Disposition".
- A modal window will open for you to make your changes.
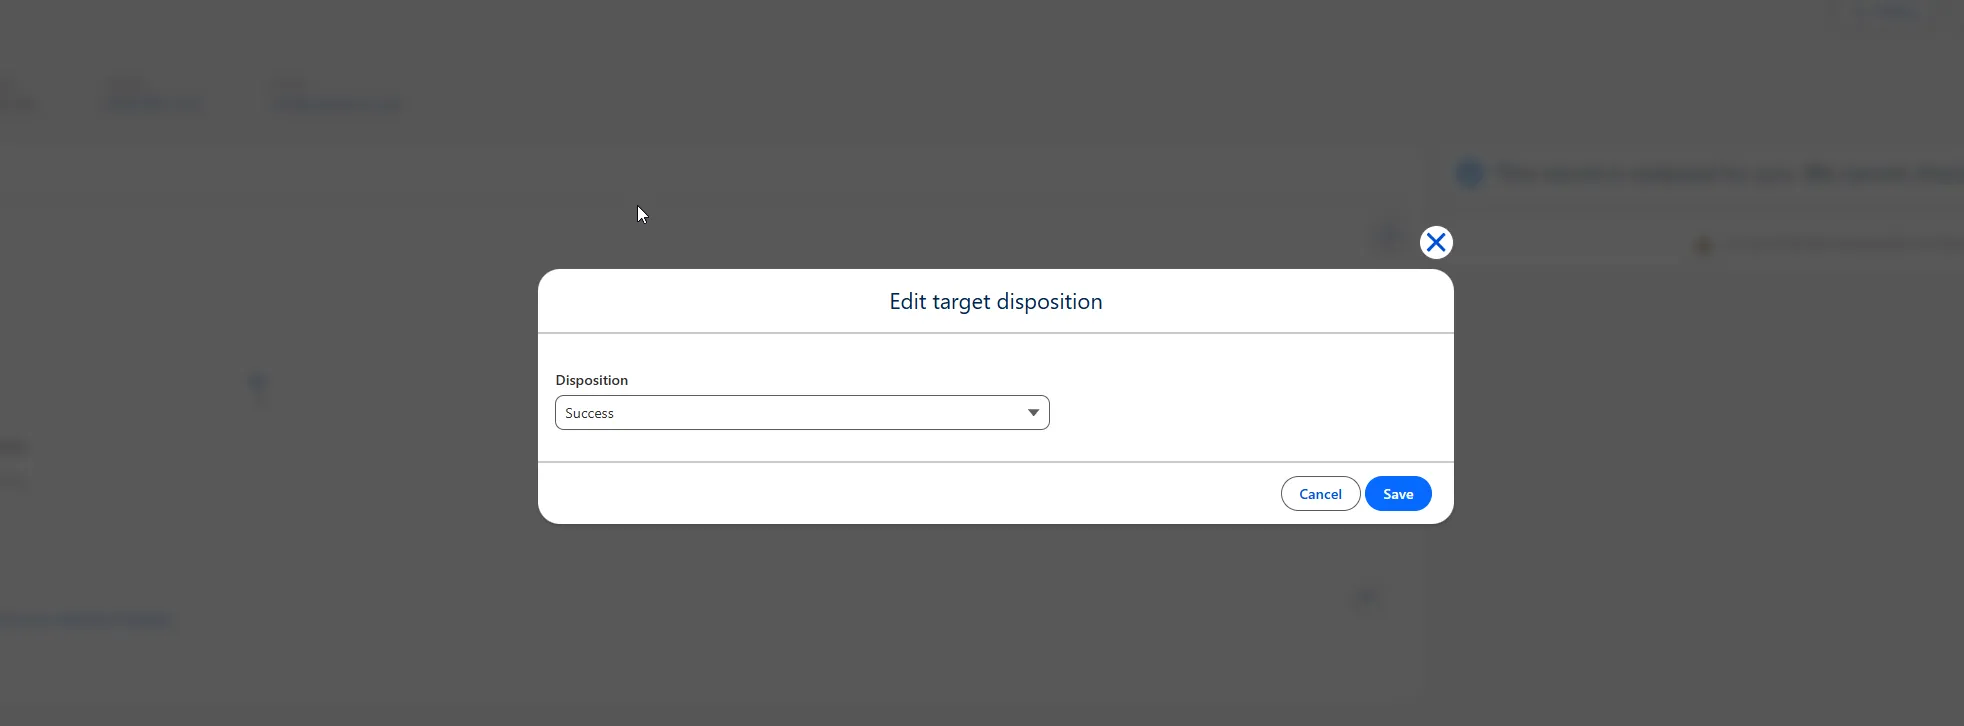
Configure the Disposition Edit
When you initiate the "Edit Disposition" action, a simple modal window will appear with one configuration field:
Field: Disposition
- Purpose: This dropdown allows you to update or correct the disposition value for the previously completed cadence step. This ensures historical accuracy in your reporting and analytics.
Complete the Disposition Edit
After selecting the new disposition value the "Save" button at the bottom of the modal window to confirm and update the disposition. You will see a success toast notification confirming the disposition has been updated.
Sales Engagement – Step Types
Sales Engagement step types define how prospects are engaged within a cadence. This guide describes the core step types available in the InCountry Sales Engagement component and provides step-by-step instructions for how each step behaves and how to complete it.
Automated Email Step
Automated Email steps send pre-configured emails to targets automatically as part of a cadence, without any manual action from the user once the cadence is started.
Where This Step Is Configured
In the Cadence Builder, as a step of type Automated Email.
How It Works
- Open the Record page (Lead, Contact, or Person Account) with the InCountry Sales Engagement component.
- Click Add to Cadence.
- Select a cadence that contains an Automated Email step.
- After the target is enrolled, the Automated Email step will be completed automatically after the specified time has elapsed according to the cadence configuration.
- Optionally, you can accelerate execution using Adjust Step Timing:
- Click Adjust Step Timing.
- In When should this step start?, select Immediately.
- The step will start right away and be processed automatically.
- Click Adjust Step Timing.
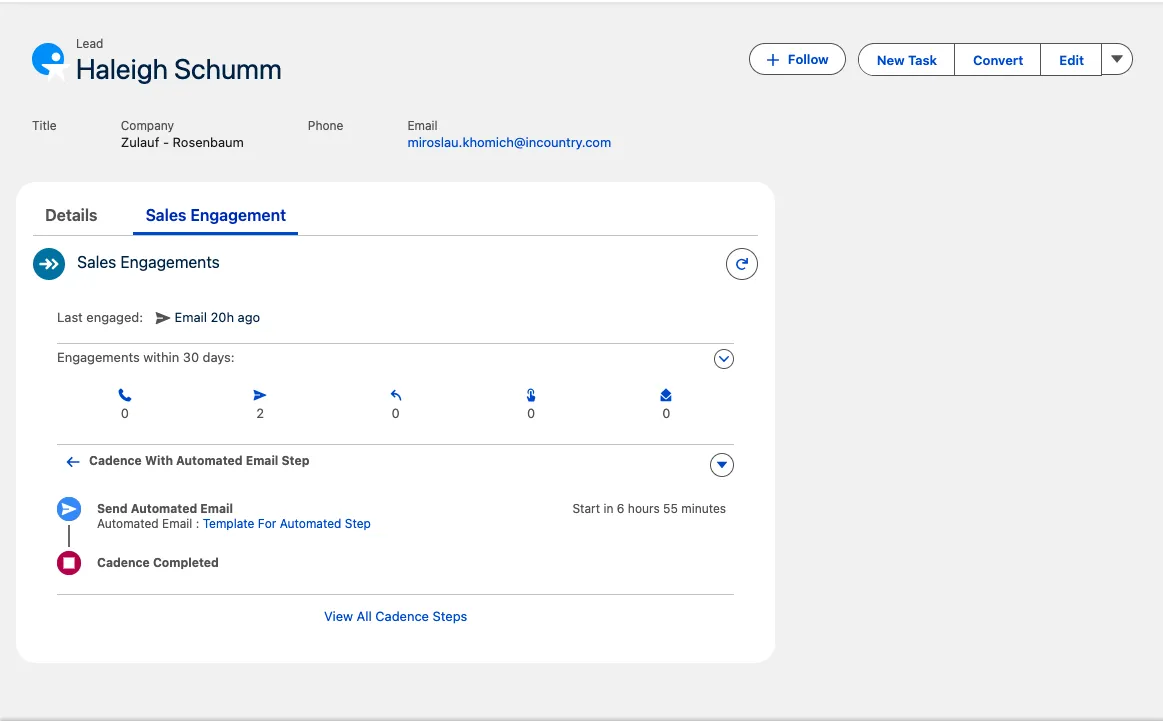

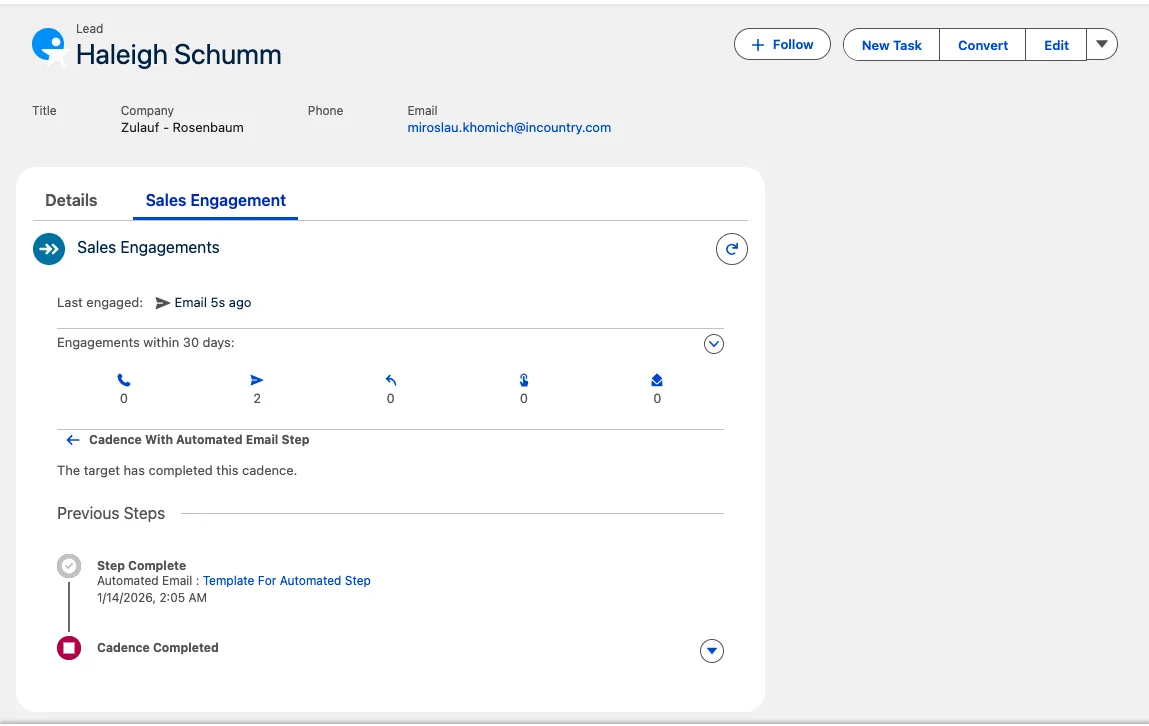
Results & Behavior
- The email is sent automatically using the template and schedule defined in the cadence step.
- No manual user interaction is required once the target is in the cadence, unless timing is manually adjusted.
- The step is marked Completed when the email has been sent.
Manual Email Step
Manual Email steps require a user to review and send an email from a pre-configured template as part of the cadence.
Where This Step Is Configured
In the Cadence Builder, as a step of type Manual Email.
How It Works
- Open the Record page (Lead, Contact, or Person Account) with the InCountry Sales Engagement component.
- Click Add to Cadence.
- Select a cadence that contains a Manual Email step.
- When the Manual Email step becomes due, click Send Email in the cadence actions.
- Once Send Email is pressed, the email component is displayed with:
- Subject and Body automatically prefilled with values from the Email Template configured in the cadence Manual Email step.
- Subject and Body automatically prefilled with values from the Email Template configured in the cadence Manual Email step.
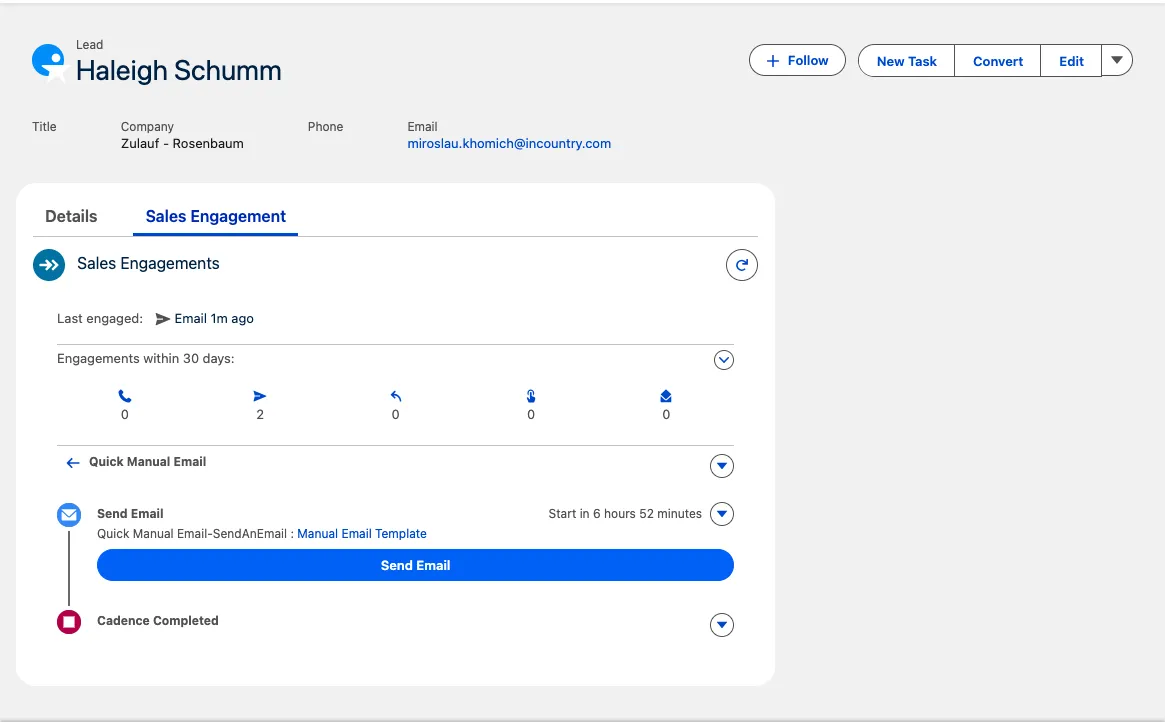

Sending the Email
- In the From field, select the email address that you added when
InCountry Email Message (Redacted/Restricted model). - The cadence target will be automatically filled in the To field.
- Optionally, adjust Subject and Body if allowed by your configuration.
- Click Send to send the email and complete the step.
Results & Behavior
- A single outbound email is sent to the target using the configured template.
- The cadence step is marked Completed once the email is successfully sent.
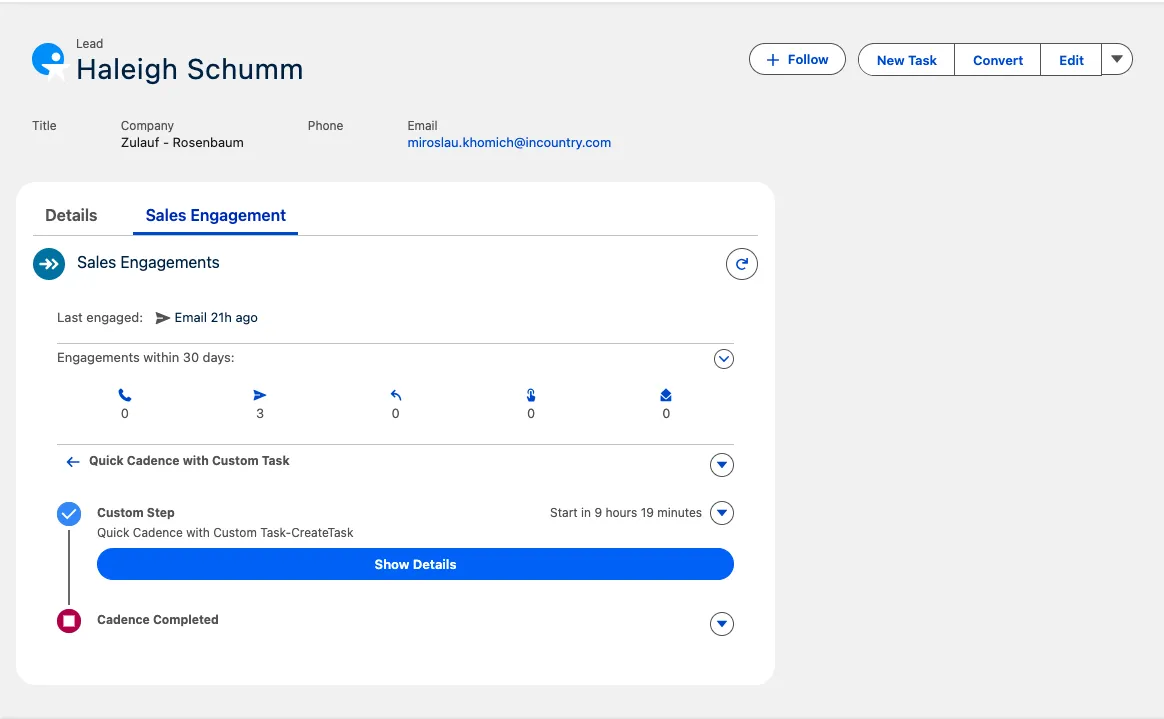
Custom Task Step
Custom Task steps create a Salesforce Task for the user to complete a non-email, non-call activity (for example: LinkedIn touch, research task, follow-up reminder) as part of the cadence.
Where This Step Is Configured
In the Cadence Builder, as a step of type Custom Task.
How It Works
- Open the Record page (Lead, Contact, or Person Account) with the InCountry Sales Engagement component.
- Click Add to Cadence.
- Select a cadence that contains a Custom Task step.
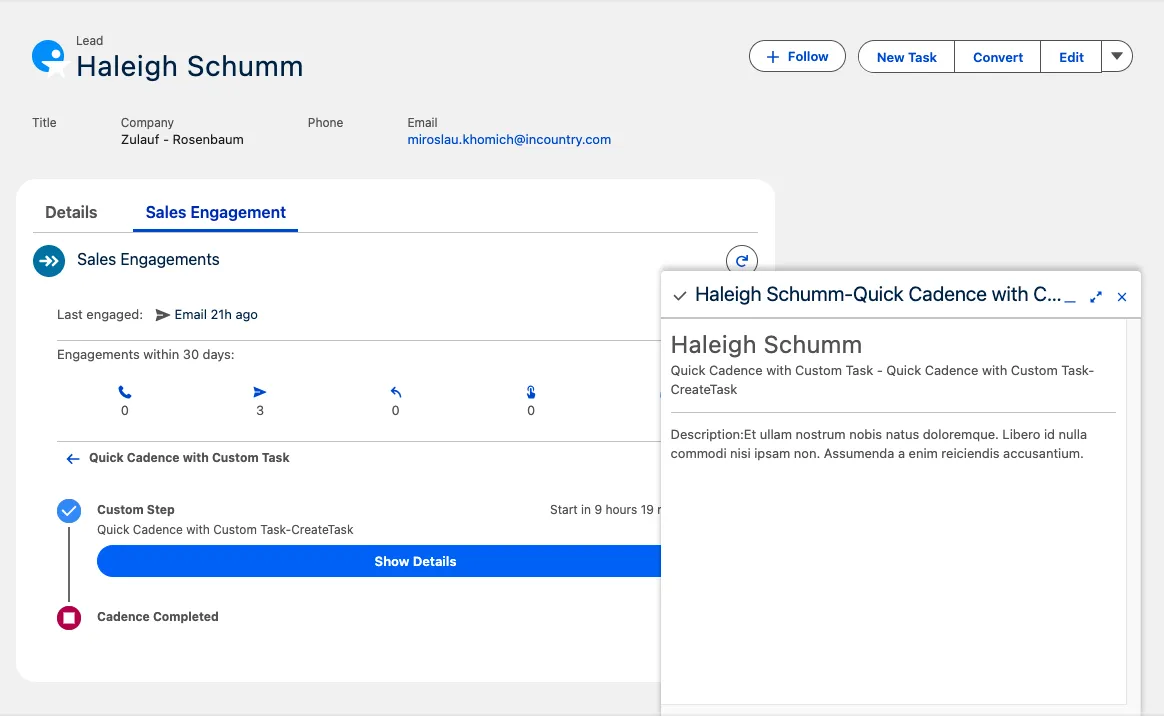
- When the Custom Task step becomes due, click Show Details in the cadence actions.
- The Custom Task step component is displayed, showing details configured in the cadence.
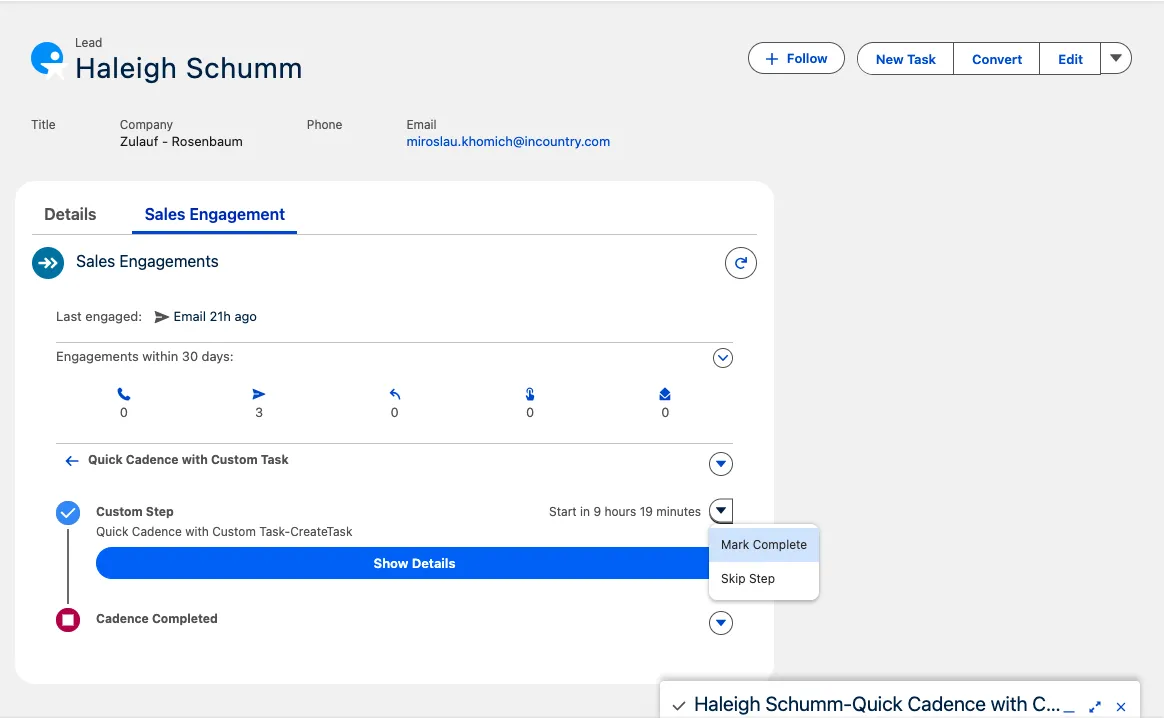
Completing the Step
-
From the cadence actions, choose one of the following:
- Mark Complete – marks the step as done and creates a Salesforce Task record.
- Skip Step – skips this step without creating a Task (depending on configuration).
-
When Mark Complete is selected, a Task record is created and associated with the target.
Results & Behavior
- A Salesforce Task is created when the step is marked complete.
- The cadence moves the target to the next step according to the cadence design.
Call Step
Call steps guide the user through making a phone call as part of the cadence and capture call outcomes as Salesforce Tasks.
Where This Step Is Configured
In the Cadence Builder, as a step of type Call.
How It Works
- Open the Record page (Lead, Contact, or Person Account) with the InCountry Sales Engagement component.
- Click Add to Cadence.
- Select a cadence that contains a Call step.
- When the Call step becomes due, click Take Action in the cadence actions.
- The Call Step component opens.
- If a Call Script is configured for this cadence step, an additional Call Script component is displayed with script text and guidance.

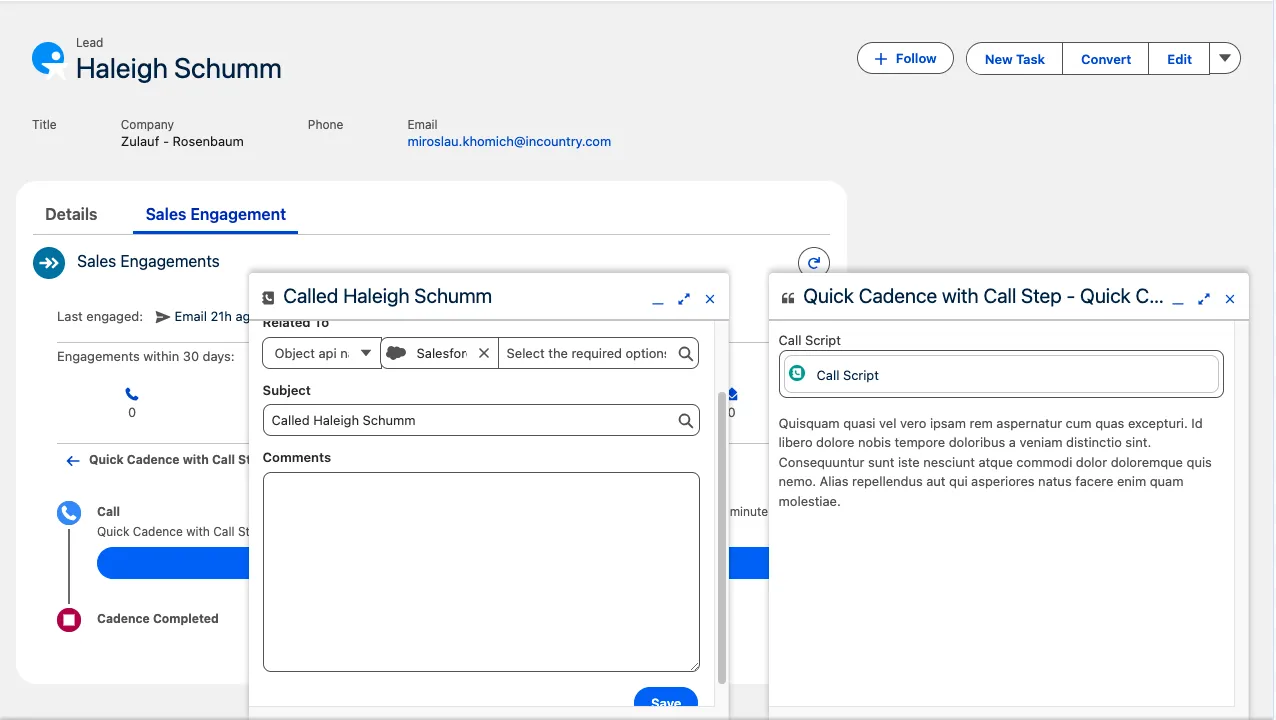
Completing the Call Step
- Use the Call Step component to perform the call and capture required details (for example: outcome, notes, disposition) as configured.
- Click Save on the Call Step component.
- Saving will:
- Create a Task record capturing the call details.
- Mark the Call step as Completed in the cadence.
Results & Behavior
- A Salesforce Task is created for the call and linked to the target record.
- The cadence progresses the target to the next step according to the cadence configuration.