REST API CRUD Requests
You can use the REST API to build apps for taking advantage of data residency services provided by InCountry. This page documents the REST resources provided by the InCountry Data Residency-as-a-Service (DRaaS), along with the expected HTTP response codes and sample requests.
InCountry REST API is a set of RESTful methods that allow you to create, update, query and delete regulated data from the InCountry Data Residency-as-a-Service (DRaaS). It simplifies data communication and lets you quickly build applications with data localization capabilities.
The data flow diagram is shown below:
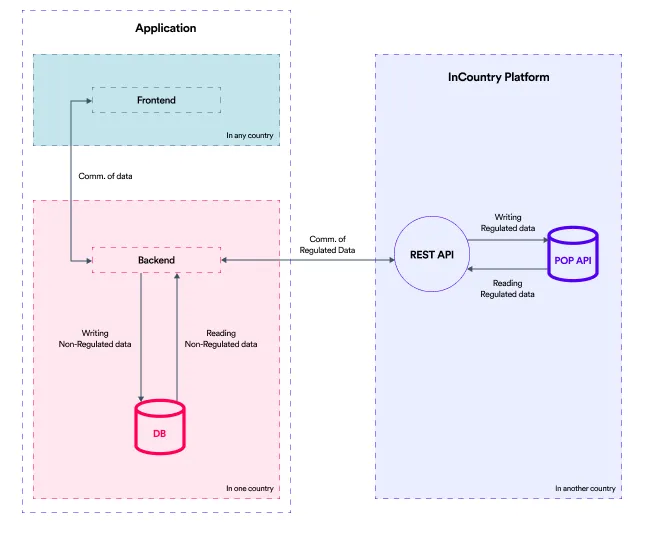
You can make CRUD requests through REST API to access regulated data stored on the InCountry platform.
Executing calls from the frontend (browser) requires an additional layer of authorization checks to ensure that the current user is allowed to perform the requested operation on the specified resources. For more details, please 📃 refer to the documentation.
All integrations with the InCountry DRaaS platform require a TLS handshake with the SNI (Server Name Indication) extension enabled. Please make sure that your TLS client is configured accordingly!
Prerequisites
-
Create a new REST API service.
-
Create Data Schema.
For this guide, assume a schema named
Usersis defined as follows:id: Primary Keyfirst_name: Stringlast_name: Stringemail: Stringphone: Stringyearly_spending: Integerdeals_ratio: Decimalis_active: Booleanlast_login: Date&Timelast_operation: Datenotification_time: Time -
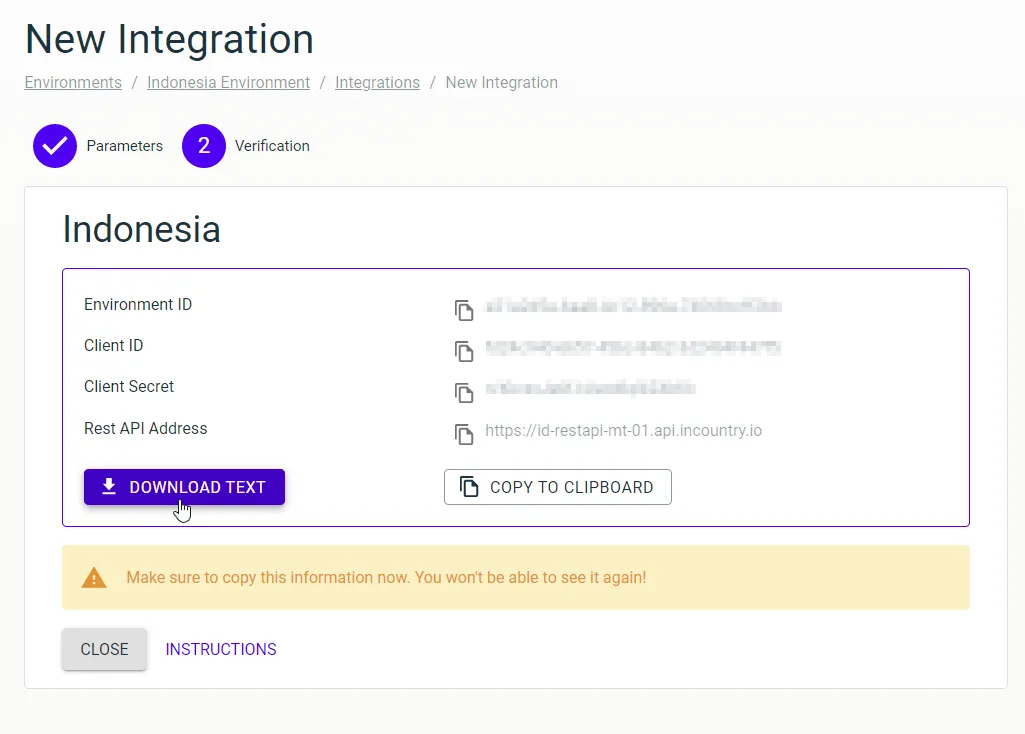
Copy details of the REST API integration, as follows:
-
Environment ID
-
Client ID
-
Client Secret
-
REST API address

-
-
Get an access token to authenticate in REST API
Beginning now, consider that we have a schema named "users" with the indexed fields: first_name, last_name, and passport.
Creating a New Record
POST /api/models/{schemaName}
Let's say we want to add a new user. To create a record send a POST request to /api/models/{schemaName} path.
Request body
Please see the example of the request body structure.
Example
{
  "id": "user1_primary_key",
  "first_name": "John",
  "last_name": "Smith",
  "email": "john.smith@mail.com",
  "phone": "25534512",
  "yearly_spending": 24000,
  "deals_ratio": 3.5,
  "is_active": true,
  "last_login": "2022-04-03T12:00:13.300Z",
  "last_operation": "2023-07-17",
  "notification_time": "11:30:00",
  "expires_at": "2027-04-07T07:15:44.393Z"
}
Here, we are creating a new user.
cURL request
curl --location --globoff 'https://{restApiURLAddress}/api/models/users' \
--header 'Authorization: Bearer {ACCESS_TOKEN}' \
--header 'Content-Type: application/json' \
--data '{
  "id": "user1_primary_key",
  "first_name": "John",
  "last_name": "Smith",
  "email": "john.smith@mail.com",
  "phone": "25534512",
  "yearly_spending": 24000,
  "deals_ratio": 3.5,
  "is_active": true,
  "last_login": "2022-04-03T12:00:13.300Z",
  "last_operation": "2023-07-17",
  "notification_time": "11:30:00",
  "expires_at": "2027-04-07T07:15:44.393Z"
}'
Pay attention that every record must have a unique record_key across the environment (within the same environment_id). It serves as a primary key, enabling you to access, modify, or delete your record.
Responses
STATUS 201 - application/json A record has been created successfully. Returns a record key and record details similar to the data you submitted within the request.
Example
{
  "id": "user1_primary_key",
  "first_name": "John",
  "last_name": "Smith",
  "email": "john.smith@mail.com",
  "phone": "25534512",
  "yearly_spending": 24000,
  "deals_ratio": 3.5,
  "is_active": true,
  "last_login": "2022-04-03T12:00:13.300Z",
  "last_operation": "2023-07-17",
  "notification_time": "11:30:00",
  "created_at": <creation date>,
  "updated_at": <creation date>
}
STATUS 400 - application/json An invalid record has been provided.
STATUS 401 - Access is denied.
STATUS 409 - InCountry Vault for the country is not available.
STATUS 415 - An unsupported request content type.
STATUS 422 - Validation of input parameters has failed.
STATUS 429 - The number of allowed requests has been exceeded.
STATUS 5** - Server error.
Redaction Handling in Create and Update Operations
When a record is created or updated, the system may return redacted values in the response, as governed by the Coarse Grained Access - Access Policies. Redaction can be explicitly configured for Create and Update operations by enabling the Write and Read actions and setting the valueType to redacted within the policy definition.
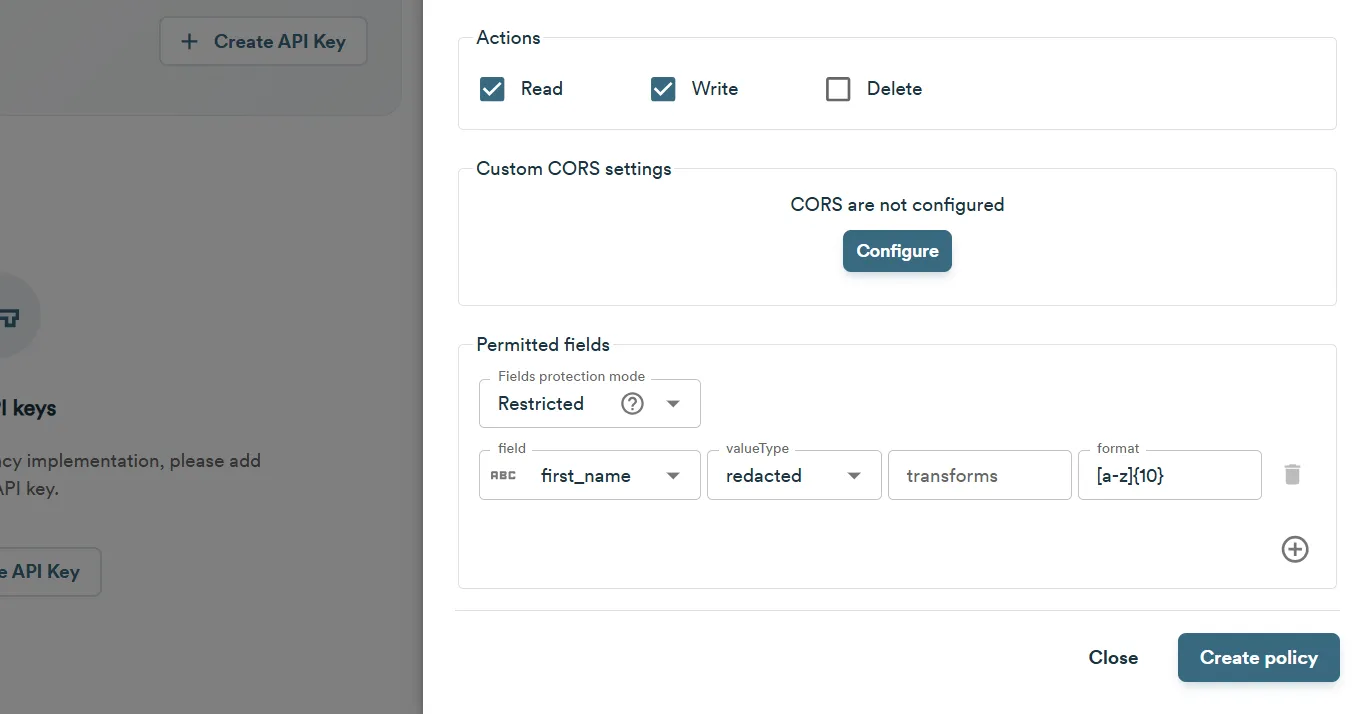
A redaction template must be specified in the format field. This template defines the structure and appearance of the redacted value. The redacted value is persisted and remains unchanged unless the original value is modified.
The template uses the format: <constant_text>[alphabet]{totalChars}<constant_text>.
The [alphabet]{totalChars} portion defines a randomly generated string of the specified length using characters from the given set.
For example:
-
[a-z]{10}generates a 10-character lowercase string (e.g.,xkqwejzvmt). -
[a-z]{10}@gmail.comgenerates a 10-character lowercase string followed by @gmail.com (e.g.,xkqwejzvmt@gmail.com).
Creating Multiple Records
POST /api/models/{schemaName}/batch
There is a way to create multiple record in one request.
Please see the example of the request structure.
Example
[
  {
      "id": "user1_primary_key",
      "first_name": "John",
      "last_name": "Smith",
      "email": "john.smith@mail.com",
      "phone": "25534512",
      "yearly_spending": 24000,
      "deals_ratio": 3.5,
      "isActive": true,
      "last_login": "2022-04-03T12:00:13.300Z",
      "last_operation": "2023-07-17",
      "notification_time": "11:30:00",
      "expires_at": "2027-04-07T07:15:44.393Z"
    },
    {
      "id": "user2_primary_key",
      "first_name": "Jack",
      "last_name": "Doe",
      "email": "jack.doe@mail.com",
      "phone": "31345623",
      "yearly_spending": 67000,
      "deals_ratio": 4.5,
      "is_active": true,
      "last_login": "2023-07-17T14:30:13.500Z",
      "last_operation": "2022-08-18",
      "notification_time": "10:30:00",
      "expires_at": "2026-02-07T07:15:44.393Z"
    }
  ]
Now we're adding 2 more users to InCountry Storage.
cURL request
curl --location --globoff 'https://{restApiURLAddress}/api/models/users/batch' \
--header 'Authorization: Bearer {ACCESS_TOKEN}' \
--header 'Content-Type: application/json' \
--data '{
  "country": "se",
[
  {
      "id": "user1_primary_key",
      "first_name": "John",
      "last_name": "Smith",
      "email": "john.smith@mail.com",
      "phone": "25534512",
      "yearly_spending": 24000,
      "deals_ratio": 3.5,
      "is_active": true,
      "last_login": "2022-04-03T12:00:13.300Z",
      "last_operation": "2023-07-17",
      "notification_time": "11:30:00",
      "expires_at": "2027-04-07T07:15:44.393Z",
    },
    {
      "id": "user2_primary_key",
      "first_name": "Jack",
      "last_name": "Doe",
      "email": "jack.doe@mail.com",
      "phone": "31345623",
      "yearly_spending": 67000,
      "deals_ratio": 4.5,
      "is_active": true,
      "last_login": "2023-07-17T14:30:13.500Z",
      "last_operation": "2022-08-18",
      "notification_time": "10:30:00",
      "expires_at": "2026-02-07T07:15:44.393Z",
    }
  ]
There is a limit for the number of records in one batch, which is set to 100.
Responses
STATUS 201 - application/json Records have been created successfully. Returns record keys and record details similar to data you're submitting within the request payload.
Example
[
  {
    "id": "user1_primary_key",
    "first_name": "John",
    "last_name": "Smith",
    "email": "john.smith@mail.com",
    "phone": "25534512",
    "yearly_spending": 24000,
    "deals_ratio": 3.5,
    "is_active": true,
    "last_login": "2022-04-03T12:00:13.300Z",
    "last_operation": "2023-07-17",
    "notification_time": "11:30:00",
    "created_at": <creation date>,
    "updated_at": <creation date>
  },
  {
    "id": "user2_primary_key",
    "first_name": "Jack",
    "last_name": "Doe",
    "email": "jack.doe@mail.com",
    "phone": "31345623",
    "yearly_spending": 67000,
    "deals_ratio": 4.5,
    "is_active": true,
    "last_login": "2023-07-17T14:30:13.500Z",
    "last_operation": "2022-08-18",
    "notification_time": "10:30:00",
    "created_at": <creation date>,
    "updated_at": <creation date>
  }
]
STATUS 400 - application/json Invalid records have been provided.
STATUS 401 - Access is denied.
STATUS 409 - InCountry Vault for the country is not available.
STATUS 415 - An unsupported request content type.
STATUS 422 - Records cannot be processed.
STATUS 429 - The number of allowed requests has been exceeded.
STATUS 5** - Server error.
Updating Multiple Records
POST /api/models/{schemaName}/batch/update
Also, it is possible to update several records at once using this endpoint.
The structure of the request is identical to the request to create multiple records; if there are records in the country with the specified record primary leys, they will be updated rather than new ones added.
Example
[
  {
      "id": "user1_primary_key",
      "first_name": "John",
      "last_name": "Smith",
      "email": "john.smith.new@mail.com",
      "phone": "25534512",
      "yearly_spending": 24000,
      "deals_ratio": 3.4,
      "isActive": true,
      "last_login": "2022-04-03T12:00:13.300Z",
      "last_operation": "2024-07-17",
      "notification_time": "11:30:00",
      "expires_at": "2027-04-07T07:15:44.393Z"
    },
    {
      "id": "user2_primary_key",
      "first_name": "Jack",
      "last_name": "Doe",
      "email": "jack.doe.new@mail.com",
      "phone": "31345623",
      "yearly_spending": 67000,
      "deals_ratio": 4.6,
      "is_active": true,
      "last_login": "2023-07-17T14:30:13.500Z",
      "last_operation": "2024-08-18",
      "notification_time": "10:30:00",
      "expires_at": "2026-02-07T07:15:44.393Z"
    }
  ]
Now we're updating these users in InCountry Storage.
cURL request
curl --location --globoff 'https://{restApiURLAddress}/api/models/users/batch/update' \
--header 'Authorization: Bearer {ACCESS_TOKEN}' \
--header 'Content-Type: application/json' \
--data '{
  "country": "se",
[
  {
      "id": "user1_primary_key",
      "first_name": "John",
      "last_name": "Smith",
      "email": "john.smith.new@mail.com",
      "phone": "25534512",
      "yearly_spending": 24000,
      "deals_ratio": 3.4,
      "is_active": true,
      "last_login": "2022-04-03T12:00:13.300Z",
      "last_operation": "2024-07-17",
      "notification_time": "11:30:00",
      "expires_at": "2027-04-07T07:15:44.393Z",
    },
    {
      "id": "user2_primary_key",
      "first_name": "Jack",
      "last_name": "Doe",
      "email": "jack.doe.new@mail.com",
      "phone": "31345623",
      "yearly_spending": 67000,
      "deals_ratio": 4.6,
      "is_active": true,
      "last_login": "2023-07-17T14:30:13.500Z",
      "last_operation": "2024-08-18",
      "notification_time": "10:30:00",
      "expires_at": "2026-02-07T07:15:44.393Z",
    }
  ]
Responses
STATUS 201 - application/json Records have been created successfully. Returns record keys and record details similar to data you're submitting within the request payload.
Example
[
  {
    "id": "user1_primary_key",
    "first_name": "John",
    "last_name": "Smith",
    "email": "john.smith.new@mail.com",
    "phone": "25534512",
    "yearly_spending": 24000,
    "deals_ratio": 3.5,
    "is_active": true,
    "last_login": "2022-04-03T12:00:13.300Z",
    "last_operation": "2023-07-17",
    "notification_time": "11:30:00",
    "created_at": <creation date>,
    "updated_at": <creation date>
  },
  {
    "id": "user2_primary_key",
    "first_name": "Jack",
    "last_name": "Doe",
    "email": "jack.doe.new@mail.com",
    "phone": "31345623",
    "yearly_spending": 67000,
    "deals_ratio": 4.6,
    "is_active": true,
    "last_login": "2023-07-17T14:30:13.500Z",
    "last_operation": "2022-08-18",
    "notification_time": "10:30:00",
    "created_at": <creation date>,
    "updated_at": <creation date>
  }
]
STATUS 400 - application/json Invalid records have been provided.
STATUS 401 - Access is denied.
STATUS 409 - InCountry Vault for the country is not available.
STATUS 415 - An unsupported request content type.
STATUS 422 - Records cannot be processed.
STATUS 429 - The number of allowed requests has been exceeded.
STATUS 5** - Server error.
While updating, as well as while creating, there is a limit for the number of records in one batch, which is set to 100.
On update, it is possible to customize the request: you can pass the field search_key by which records will be updated and specify which fields to return in the response by specifying return_keys.
For example, the following request will update records whose first_name is equal to John, setting deals_ratio to 3.9 and return only first_name and deals_ratio in the response:
curl --location --globoff 'https://{restApiURLAddress}/api/models/users/batch/update' \
--header 'Authorization: Bearer {ACCESS_TOKEN}' \
--header 'Content-Type: application/json' \
--data '{
  "country": "se",
  "search_key": "first_name",
  "return_keys": ["first_name", "deals_ratio"],
  "records": [
  {
      "first_name": "John",
      "deals_ratio": 3.9,
    }
  ]
}'
Response:
[
  {
    "first_name": "John",
    "deals_ratio": 3.9
  }
]
Duplicating a Single Record
POST /api/models/{schemaName}/clone
This request can duplicate a record as-is or modify the duplicated record on the fly.
Request body
Please review the example of the request body structure. It includes a section for specifying filters to identify duplicate records and another section for specifying the values for updating a record.
Example
{
  "filter": {
    "first_name": "John"
  },
  "update_with": {
    "id": "primary_key_for_a_new_user",
    "email": "anotheremailvalue@mail.com"
  }
}
cURL request
curl --location --globoff 'https://{restApiURLAddress}/api/models/users/clone' \
--header 'Authorization: Bearer {ACCESS_TOKEN}' \
--header 'Content-Type: application/json' \
--data '{
  "filter": {
    "first_name": "John",
  },
  "update_with": {
    "id": "primary_key_for_a_new_user",
    "email": "anotheremailvalue@mail.com"
  }
}'
Responses
STATUS 201 - The record has been duplicated successfully.
STATUS 400 - Invalid input parameters have been provided for record lookup or duplication.
STATUS 401 - Access is denied.
STATUS 403 - Partial text-match search is not enable for InCountry Vault.
STATUS 403 - No records matching the filtration criteria have been found.
STATUS 409 - InCountry Vault for the country is not supported.
STATUS 415 - An unsupported request content type.
STATUS 422 - Decryption of records matching the filtration criteria has failed.
STATUS 429 - The number of allowed requests has been exceeded.
STATUS 5** - Server error.
Searching for Records
POST /api/models/{schemaName}/find
Now that we have some records available in the Storage, let's execute a search to find some of them. There is a find endpoint that allows you to specify search criteria. Let's say we want to retrieve users with the yearly_spending field set in the range of 11000 to 30000.
Please see the example of the request structure.
Example
{
  "filter": {
      "yearly_spending": {"$gte":11000, "$lte":30000},
  },
  "options": {
      "limit": 10,
      "offset": 0
  }
}
cURL request
curl --location --globoff 'https://{restApiURLAddress}/api/models/users/find' \
--header 'Authorization: Bearer {ACCESS_TOKEN}' \
--header 'Content-Type: application/json' \
--data '{
    "filter": {
        "yearly_spending": {"$gte":60000, "$lte":90000}
    },
    "options": {
        "limit": 10,
        "offset": 0
    }
}'
Responses
STATUS 200 - The records has been found successfully.
Let the request will give us two users matching the criteria. The response will look as follows:
Example
{
  "data": [
    {
        "id": "user2_primary_key",
        "first_name": "Jack",
        "last_name": "Doe",
        "email": "jack.doe@mail.com",
        "phone": "31345623",
        "yearly_spending": 67000,
        "deals_ratio": 4.5,
        "is_active": true,
        "last_login": "2023-07-17T14:30:13.500Z",
        "last_operation": "2022-08-18",
        "notification_time": "10:30:00",
        "attachments": [],
        "created_at": "2021-03-26T11:57:45.000Z",
        "updated_at": "2021-03-26T11:57:45.000Z"
    },
    {
        "id": "user3_primary_key",
        "first_name": "Mike",
        "last_name": "Johnson",
        "email": "mike.johnson@mail.com",
        "phone": "22544444",
        "yearly_spending": 73000,
        "deals_ratio": 1.5,
        "is_active": true,
        "last_login": "2021-07-17T14:30:13.500Z",
        "last_operation": "2021-07-17",
        "notification_time": "12:30:00",
        "attachments": [],
        "created_at": "2021-03-26T11:57:45.000Z",
        "updated_at": "2021-03-26T11:57:45.000Z"
    }
  ],
  "meta": {
    "count": 2,
    "limit": 10,
    "offset": 0,
    "total": 2
  }
}
STATUS 400 - Invalid filter or options.
STATUS 401 - Access is denied.
STATUS 403 - Search by keys is not available for this storage.
STATUS 409 - InCountry Vault for the country is not available.
STATUS 415 - An unsupported request content type.
STATUS 422 - A record cannot be processed.
STATUS 429 - The number of allowed requests has been exceeded.
STATUS 5** - Server error.
You can find more information about using find endpoint in the reference.
Deleting a Specific Record
DELETE /api/models/{schemaName}/{record_key}
Now, let's delete a record. To do so, we need to use the record_key of the record we want to delete. For example, let's delete a record with the key user1_primary_key.
cURL request
curl --request DELETE \
  --url 'https://{restApiURLAddress}/api/models/users/{record_key}' \
  --header 'Authorization: Bearer {ACCESS_TOKEN}' \

  # URL EXAMPLE
  https://se-restapi-mt-01.incountry.io/api/models/users/user1_primary_key
Responses
STATUS 204 - plain The record has been successfully deleted.
STATUS 400 - Invalid query parameters have been specified.
STATUS 401 - Access is denied.
STATUS 404 - The record has not been found.
STATUS 409 - InCountry Vault for the country is not available.
STATUS 429 - The number of allowed requests has been exceeded.
STATUS 5** - Server error.
This endpoint doesn't respond with a body.
Deleting Multiple Records
POST /api/models/{schemaName}/batch/delete
Request body
| Parameters | Type | Example | Description |
|---|---|---|---|
filter | object | See the example. | Specify the criteria for deletion within the filter object. Currently only deletion by record_key is supported. |
record_key | array | See the example. | Array of record keys or its data schema mappings that are subject to removal. |
Please see the example of the request structure.
Example
{
  "filter": {
    "id": [
      "user_id_1", "user_id_2"
    ]
  }
}
cURL request
curl --request POST \
  --url 'https://{restApiURLAddress}/api/models/users/batch/delete' \
  --header 'Authorization: Bearer {ACCESS_TOKEN}' \
  --header 'Content-Type: application/json' \
  --data '{
      "filter": {
        "id": [
          "user_id_1",
          "user_id_2"
        ]
      }
Responses
STATUS 204 - plain Records have been successfully deleted.
STATUS 400 - An invalid input has been provided.
STATUS 401 - Access is denied.
STATUS 404 - No records matching filtration criteria have been found.
STATUS 409 - InCountry Vault for the country is not available.
STATUS 415 - An unsupported request content type.
STATUS 422 - An unsupported request content type.
STATUS 429 - The number of allowed requests has been exceeded.
STATUS 5** - Server error.
Attaching a File
It is possible to attach a file to a record.
Keep in mind that files cannot exist separately and should always be attached to some record. Deleting a record will result in the deletion of all the files attached to it.
Example:
curl --request POST \
  --url 'https://in-restapi-mt-01.api.incountry.io/api/models/users/in/user2_primary_key/files' \
  --header 'Authorization: Bearer ory_at_05MJ4MHOkRhW0A0wduM8Ehr_cRsk5acakP6u4dn2rFo.23THKavIs_PHKMR8W-AxaPmEq10ymWQC_fttHio_FlE' \
  --header 'Content-Type: multipart/form-data; boundary=---011000010111000001101001' \
  --header 'x-filename: expenses.pdf' \
  --form 'file=@"/documents/expenses.pdf'
In this example we attached a file expenses.pdf to a record with record_key="user2_primary_key".
In the response you will get information about attachment:
{
    "file_id": "5416a334-6ce6-4e3b-9a0d-464cb417c094",
    "filename": "expenses.pdf",
    "hash": "78701b482fc9738e26f32254bbe7d71990f5025a9b728046a280a3822cdf5cad",
    "mime_type": "application/x-sh",
    "size": 279,
    "created_at": "2021-03-26T11:36:44.000Z",
    "updated_at": "2021-03-26T11:36:44.000Z",
    "download_link": "https://in-mt-01.incountry.io/v2/storage/records/in/310459560d9e757d6e51be45a5aad862fbb81c52d72a026e75d21366ac223a40/attachments/5416a334-6ce6-4e3b-9a0d-464cb417c094"
}
The file_id field is the attachment's unique identifier and is used to access and modify the attachment.
Please see File Management for more details on how to implement file attachments CRUD operations.
Downloading an Attached File
curl --request GET \
  --url 'https://{restApiUrl}/api/models/{schemaName}/{record_key}/files/{file_id}' \
  --header 'Authorization: Bearer {ACCESS_TOKEN}'
In our case, the request will be the following:
curl --request GET \
  --url 'https://in-restapi-mt-01.api.incountry.io/api/models/users/in/user2_primary_key/files/5416a334-6ce6-4e3b-9a0d-464cb417c094' \
  --header 'Authorization: Bearer ory_at_05MJ4MHOkRhW0A0wduM8Ehr_cRsk5acakP6u4dn2rFo.23THKavIs_PHKMR8W-AxaPmEq10ymWQC_fttHio_FlE'
Please see File Management for more details on how to implement file attachments CRUD operations.
Deleting an Attached File
To delete an attachment, execute a DELETE request and specify record_key and file_id.
The request template is as follows:
curl --request DELETE \
  --url 'https://{restApiURLAddress}/api/models/{schemaName}/{id}/files/{file_id}' \
  --header 'Authorization: Bearer {ACCESS_TOKEN}' \
In our case, the request will be the following:
curl --request DELETE \
  --url 'https://in-restapi-mt-01.api.incountry.io/api/models/users/in/user2_primary_key/files/5416a334-6ce6-4e3b-9a0d-464cb417c094' \
  --header 'Authorization: Bearer ory_at_05MJ4MHOkRhW0A0wduM8Ehr_cRsk5acakP6u4dn2rFo.23THKavIs_PHKMR8W-AxaPmEq10ymWQC_fttHio_FlE'
Please see File Management for more details on how to implement file attachments CRUD operations.
Fine Grained Access
RestAPI provides an additional set of endpoints (/webapi) that can be used to implement an additional layer of authorization. It can be used to implement requests from a front-end application.
Please see the docs for details.