Overview
The Email service supports two operation modes:
- For outbound emails: the service captures such emails and identifies value placeholders that are used as references of the recipients' sensitive data. Then, it swaps these placeholders with their clear-text values by pulling them from the InCountry Vault. Once sensitive data is replaced, an email with clear-text values is routed to your SMTP server within the same country and this email is further delivered to the target recipient.
- For inbound emails: the service captures emails and redacts their values, such as: sender, subject, and email body. Then saves this sensitive data to the InCountry Vault. After this, Email service delivers redacted emails to your system, so regulated data does not even touch your servers as the email becomes fully depersonalized.
You can manage Email services, as follows:
- create new Email services
- edit the existing Email services
- delete the no longer needed Email services
- view and download logs of the specific Email service
Email Service for Outbound Emails
How It Works
Typically, your application sends an email with regulated data directly to the addressee, violating local data regulations if the application server is located in a country different from the recipient’s country of origin. Email service resides between your application that sends outbound emails and your SMTP server located in the recipient’s country of origin. Your SMTP server must be in the recipient’s country of origin so that no compliance regulations are violated. Email service captures outbound emails with regulated data placeholders, identifies them according to the pre-defined patterns, and then substitutes these placeholders with clear-text values, such as names and email addresses. Once the data is unredacted, it sends emails via a direct SMTP connection to your SMTP server that further delivers this email to target recipients.
This allows to your applications to comply with data residency regulations without modifying the underlying codebase and setting up data stores for regulated data in multiple countries.
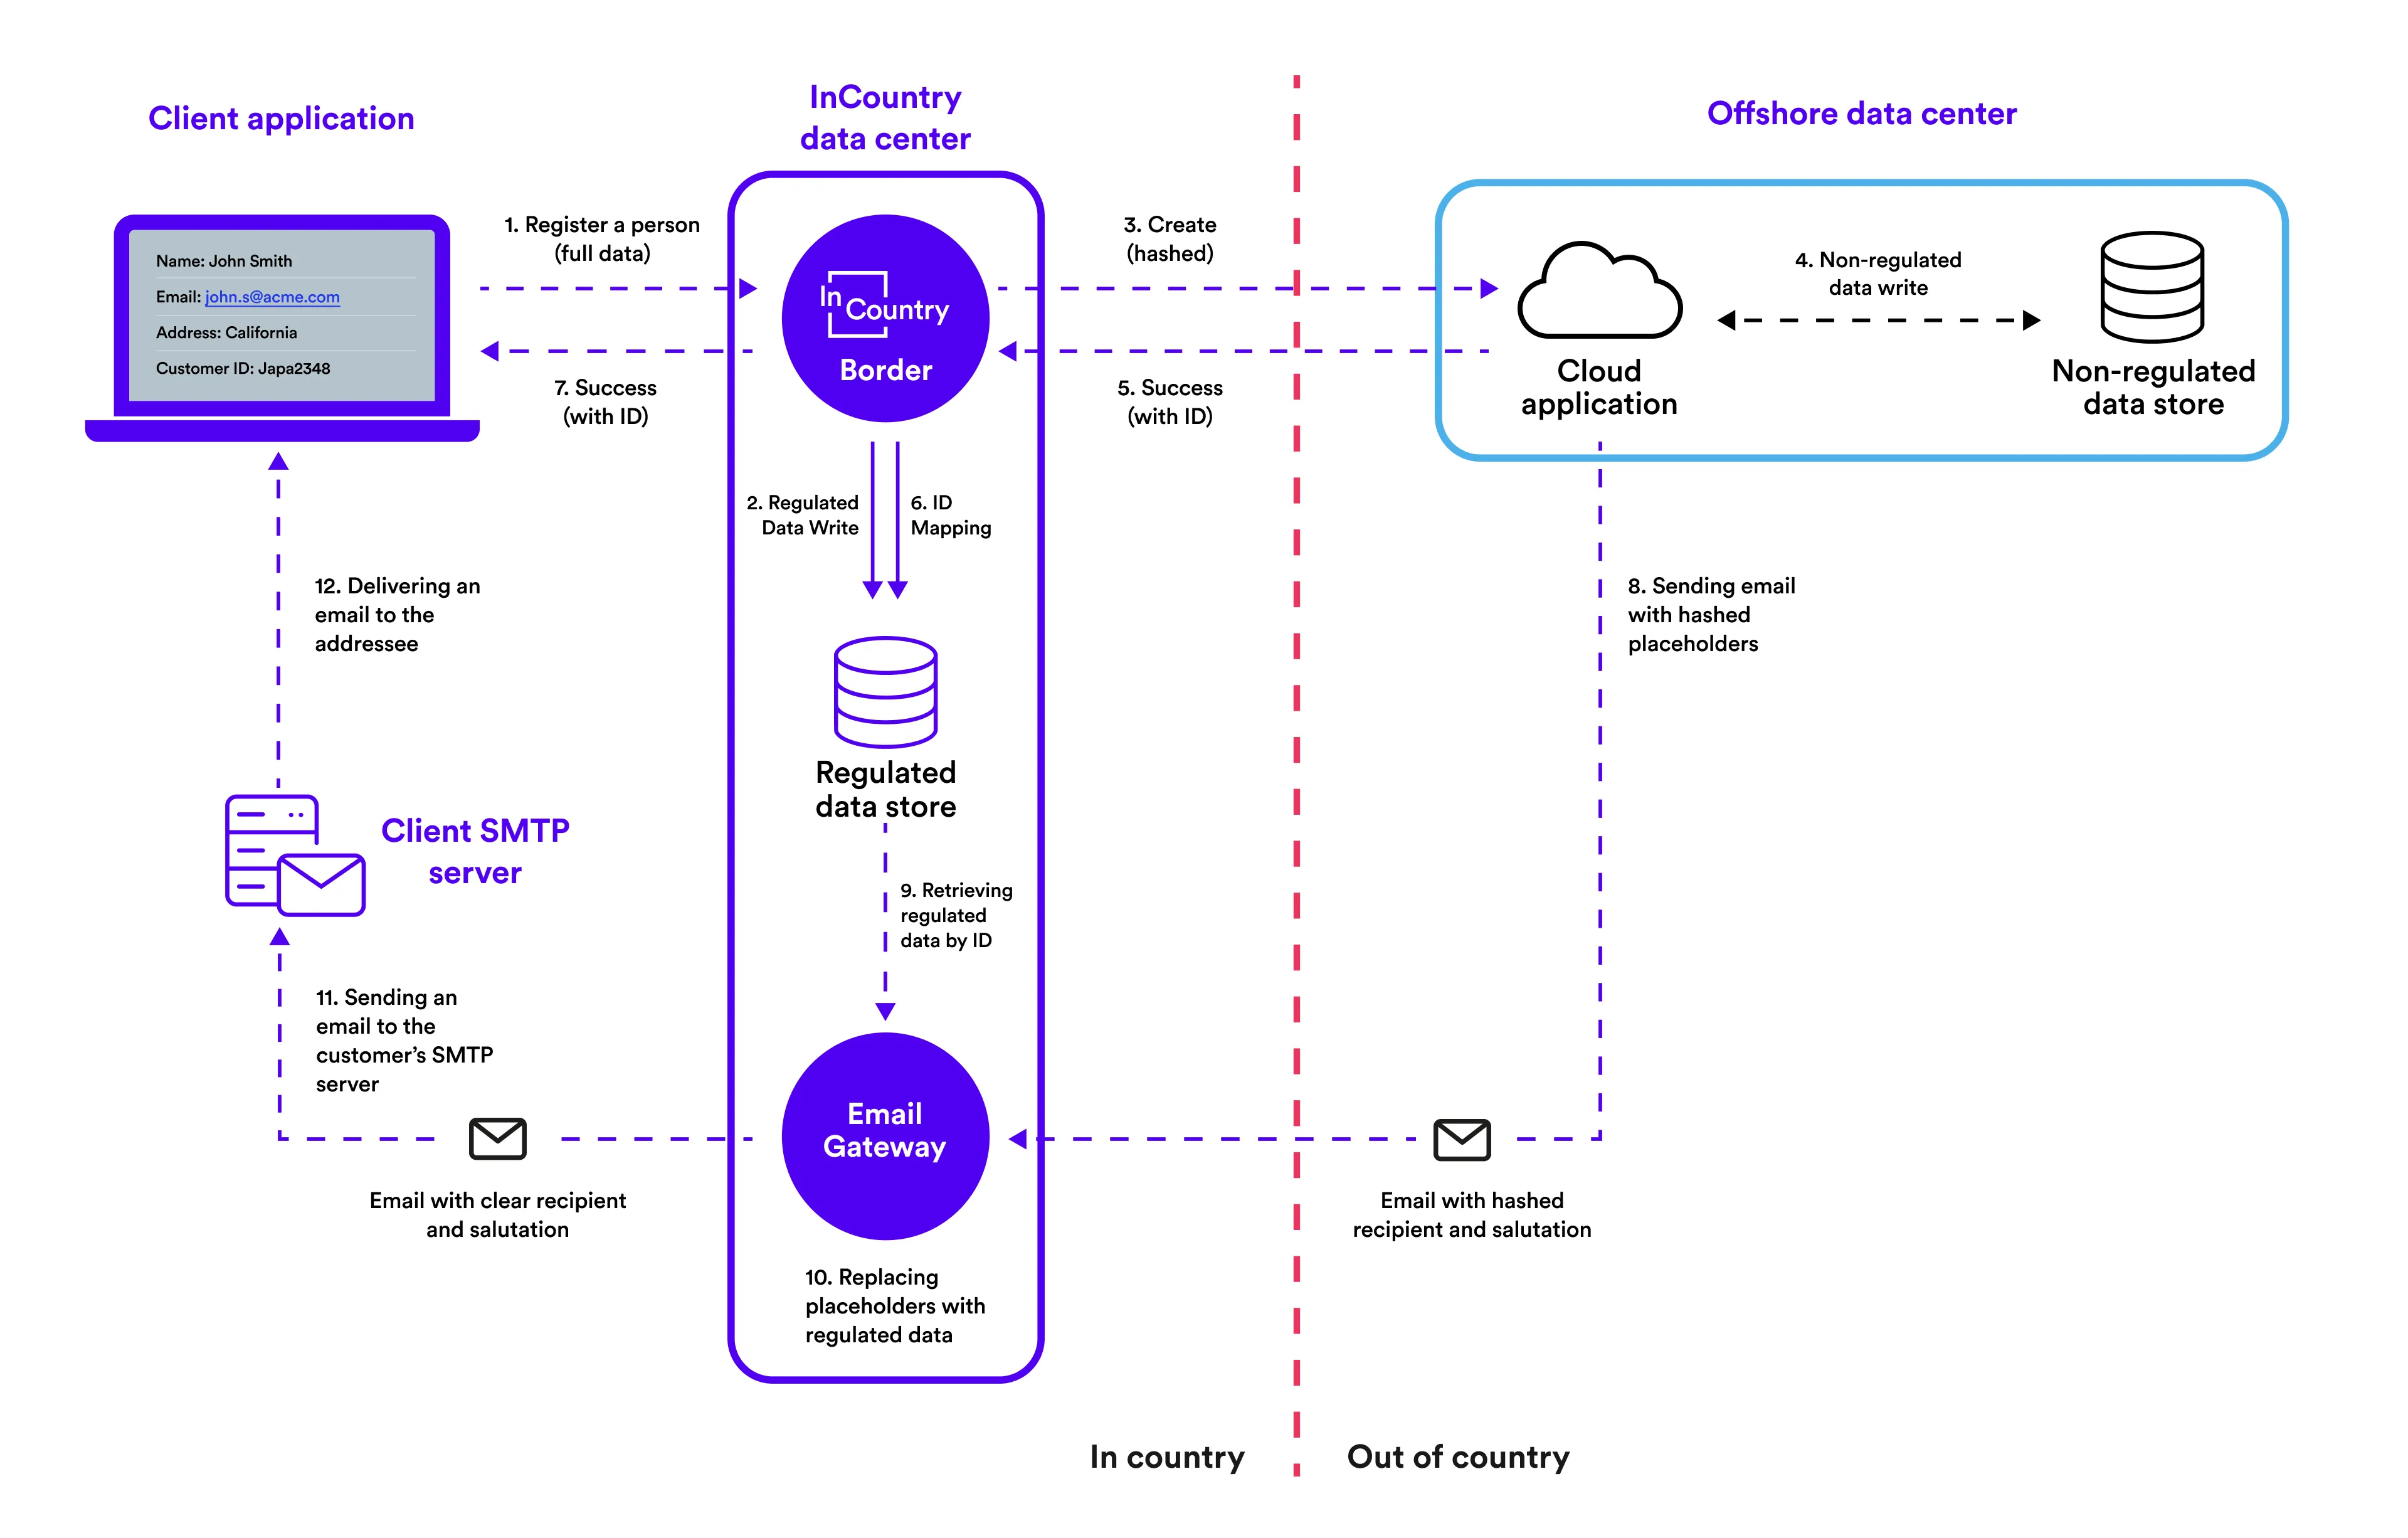
In the following diagram, you can see how Email service for outbound emails works. Here also you can see InCountry Border (Web Services) which redacts and stores records data in the InCountry platform. Then these stored records data uses InCountry Email service to unredact the outbound email from your application.
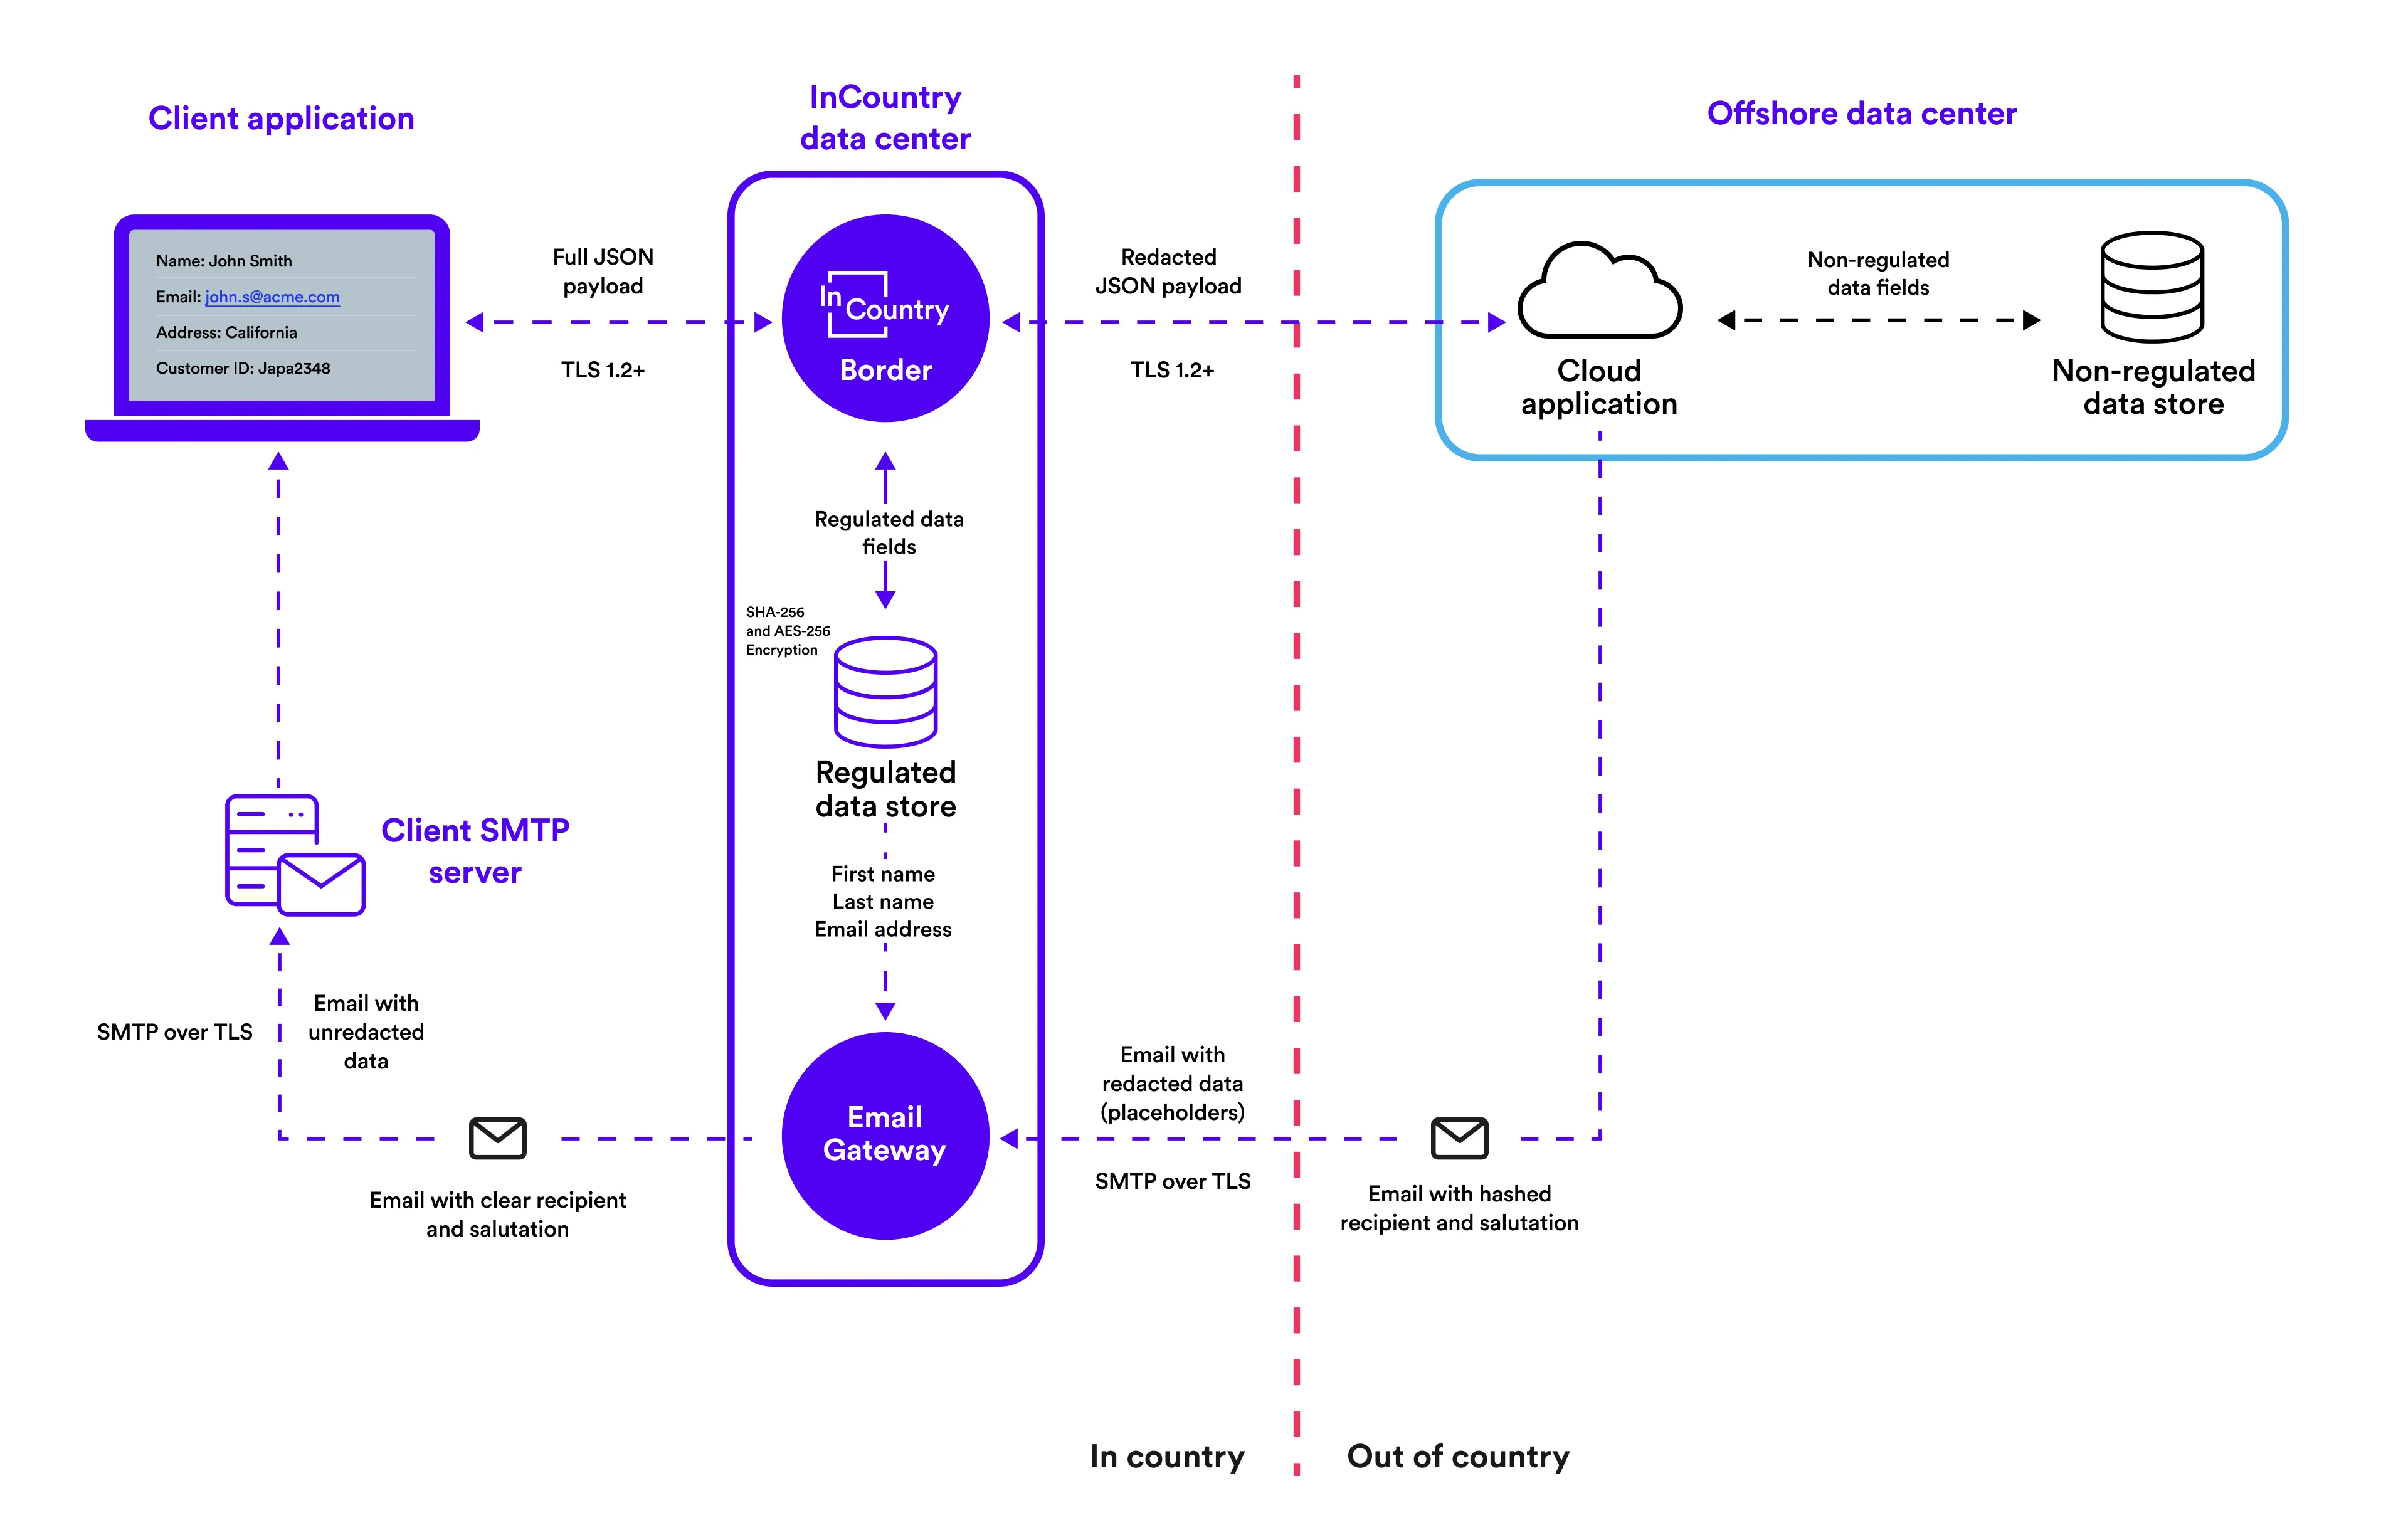
The data flow can be represented in the following way:
Requirements
Email service for outbound emails imposes requirements on emails as follows:
- Only one addressee is in the
Tofield. - The
CCandBCCfields are ignored during the email handling. - The
FromandTofields, as well as the email subject and email body, are unredacted if placeholders match the pre-defined patterns, likeemail1@pk-profile_key006jkdsa00000oLpo.aa. - The email’s subject and body can contain placeholders with redacted data that will be replaced with clear-text values upon unredaction like
%profile_key=006jkdsa00000oLpo,price%. - Emails in the HTML and plain-text formats are supported.
- Attachments within emails will be forwarded as is without any additional processing.
- The SMTP server should be available in the target country.
All integrations with the InCountry DRaaS platform require a TLS handshake with the SNI (Server Name Indication) extension enabled. Please make sure that your TLS client is configured accordingly!
Getting Started
Let's assume that you already have configured SMTP server in the target country.
1. Creating service on the Portal
To create a new Email service for outbound emails, you should go to the InCountry Portal and follow the instructions.
2. Sending emails from your application
Let's assume that you already created your record with some user data on the InCountry platform via InCountry Web Services. Your created record has ID 006jkdsa00123oLpo and has the following structure in JSON:
{
  "record_key": "<uid>",
  "body": "{\"name\": \"Jepa\", \"email\": \"jepa@gmail.com\"}",
  "profile_key": "006jkdsa00123oLpo"
}
And now you would like to email this user from your application. Your application should send this email to the InCountry Email service in the following structure:
From: no-reply@yourapp.com
To: email@pk-006jkdsa00000oLpo.ru
Subject: Hello, %profile_key=006jkdsa00000oLpo,name%!

Dear %profile_key=006jkdsa00000oLpo,name%,
Welcome to this example email. What a lovely day!
As you can see, the email body and recipient address contain special placeholders.
- Email service will replace the
Toplaceholder in the following way. First, Email service will look up the record withprofile_key=006jkdsa00123oLpoand then use theemailfield from the recordbodyfield. - For each placeholder in the email body, Email service will try to replace with a clear-text value from the record. For example,
%profile_key=006jkdsa00123oLpo,name%. In this case, Email service will look up a record withprofile_key=006jkdsa00123oLpoand then use thenamefield from the recordbodyfield.
In both situations above, Email service pulls the record's data from the InCountry platform and replaces placeholders with their actual values. Then Email service will send unredacted email (with replaced to the clear-text values placeholders) to the recipient address (from the To field) via your SMTP server, that provided in the Portal configuration from the step 1.
3. Troubleshooting
If something is not working (the recipient doesn't receive the email, etc.), you can view Email service logs on the Portal.
Email Service for Inbound Emails
How It Works
Typically, your users send emails to your mail server (for example, to your support email) with regulated data, violating local data regulations if your mail server is located in a country different from the sender's country of origin. To not violating local data regulations, you need to add your IMAP/SMTP mail server to the country of origin and put InCountry Email service in between the sender that sends inbound emails and your IMAP/SMTP server located in the sender's country of origin.
Email service via IMAP polls emails from your clients (senders) from your server that was added to the country of origin, and then redacts them. Once the data is redacted, it sends redacted emails to a mail server outside the country (e.g. support case management system, etc.) via your SMTP server.
Requirements
- The IMAP and SMTP mail server should be available in the country of origin of the data.
- Emails in the HTML and plain-text formats are supported.
- Email service removes attachments from the redacted email and stores them in InCountry Vault.
Getting Started
Let's assume that you already have configured IMAP and SMTP server in the country of origin of the data.
1. Creating service on the Portal
To create a new Email service for inbound emails, you should go to the InCountry Portal and follow the instructions.
2. Receiving and redacting emails from users
Let's assume that your client write the following email to your support address support@corp.com, and this email address is served by mail server in the country of origin. The email from user:
From: jepa@gmail.com
To: support@corp.com
Subject: Some trouble

Hello! My account is blocked and SMS with code to unblock my account doesn't come. What should I do?
Email service in the country of origin pulls this email via IMAP and starts to redact it. The redacted email looks like the following:
From: <sender email that was provided during inbound Email service configuration on the Portal>
To: <recipient email that was provided during inbound Email service configuration on the Portal>
Subject: A new email case received on <timestamp, e.g. Mon 13, 2023 15:20:05 UTC+04>

Dear support team!
A new email case was received on <timestamp> from <from:emailMasking, e.g. j*******@gmail.com>. Please check the reported issue and reply to the requestor.
Email service creates a record in the InCountry Vault with the generated record_key and profile_key that are equals to the same value. The original values from the email are stored in the body field of this record and looks like the following JSON structure:
{
  "SuppliedEmail": "<just sender's email address without a name, e.g. jepa@gmail.com>",
  "FromAddress": "<just sender's email address without a name, e.g. jepa@gmail.com>",
  "SuppliedName": "<full email from address with name, e.g. 'Jepa Doe <jepa@gmail.com>",
  "FromName": "<full email from address with name, e.g. 'Jepa Doe <jepa@gmail.com>",
  "HtmlBody": "<original html body of the email>",
  "Description": "<description of the email>",
  "TextBody": "<original text body of the email>",
  "Subject": "<original subject of the email>",
  "ToAddress": "<emails separated by ';', e.g. alice@example.com; bob@example.com>",
  "CcAddress": "<emails separated by ';'>",
  "BccAddress": "<emails separated by ';'>",
  "to0": "<email>",
  ... // to1, ..., toN
  "cc0": "<email>",
  ... // cc1, ..., ccN
  "bcc0": "<email>"
  ... // bcc1, ..., bccN
}
Also, Email service will add custom header record_key to the redacted email headers containing the record key value of the record that contains the redacted email data. Then the Email service sends redacted email to the recipient address (provided in the inbound Email service configuration on the Portal) via your configured SMTP server (also provided in the Portal configuration in the step 1). These recipient address is served by mail service (e.g. support case management system, etc.) outside the country of origin. This system receives the redacted email with record_key in its headers and can get by record_key on its fronted side the original email data via InCountry Rest API, for example.
3. Troubleshooting
If something is not working (the recipient doesn't receive the email, etc.), you can view Email service logs on the Portal.
Managing Email service through Portal
Creating a new Email service
You can create one Email service per each activated country within an environment.
-
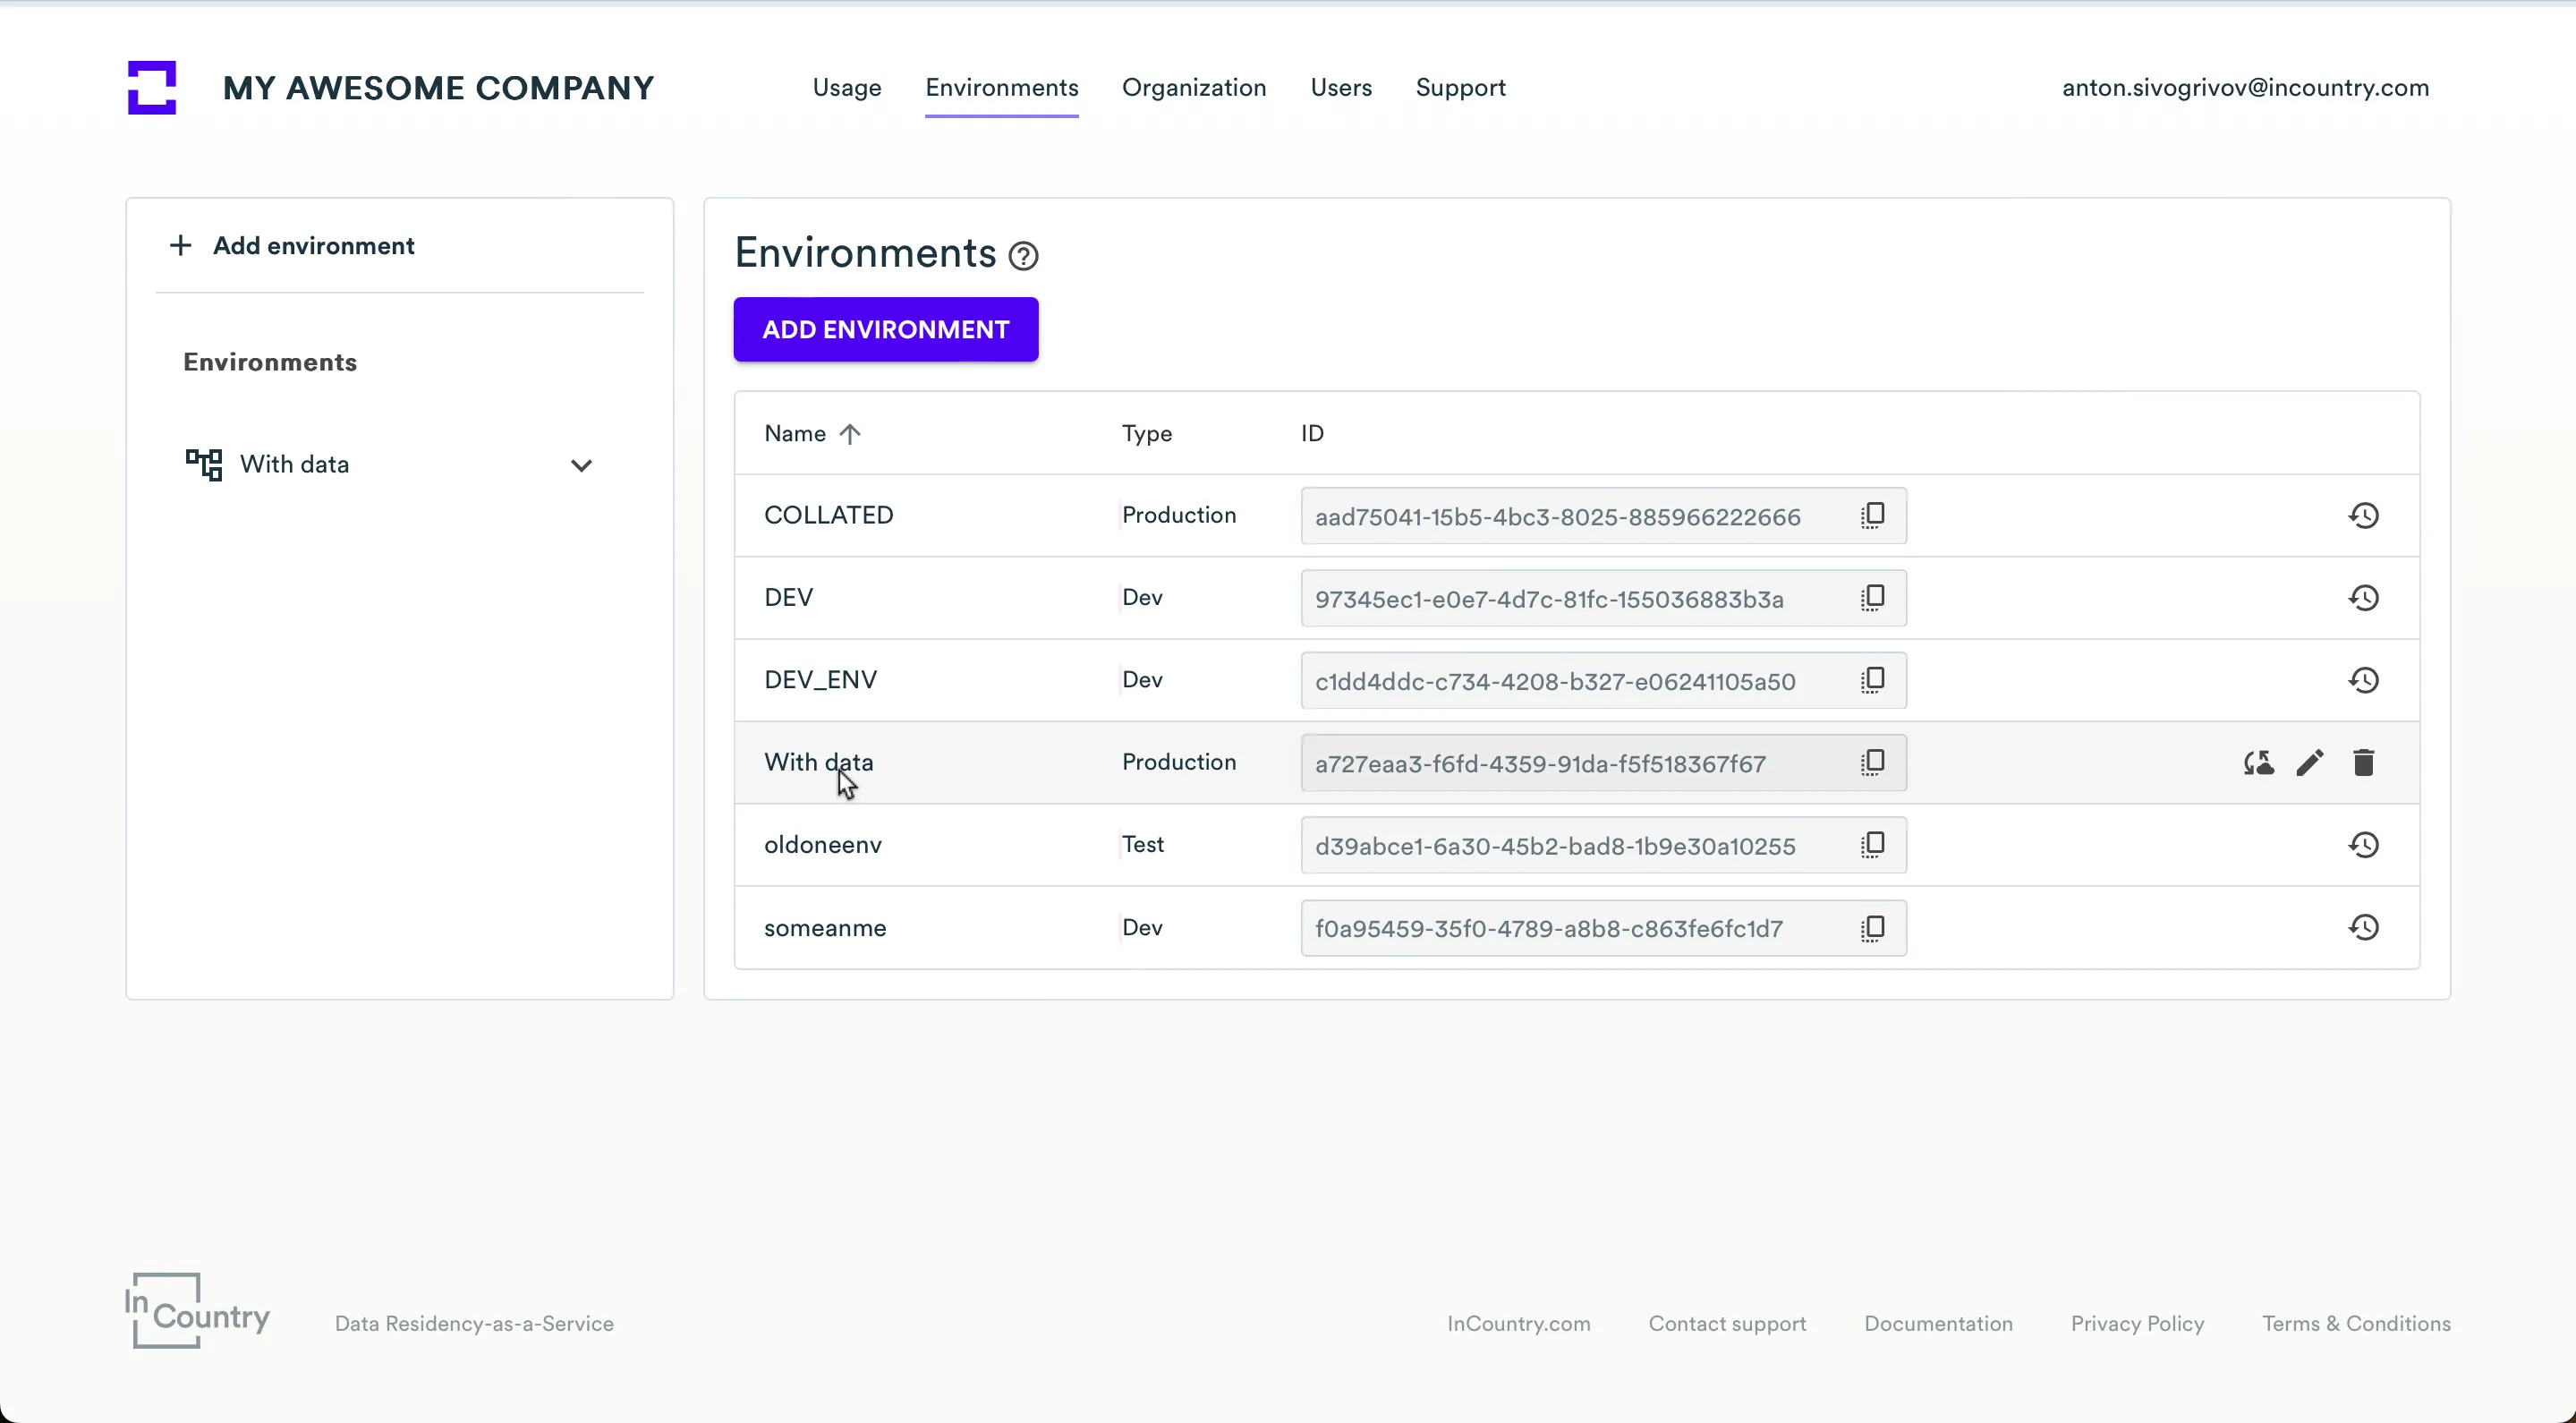
On the menu, select Environments.
-
Select the environment where you want to create the Email service.

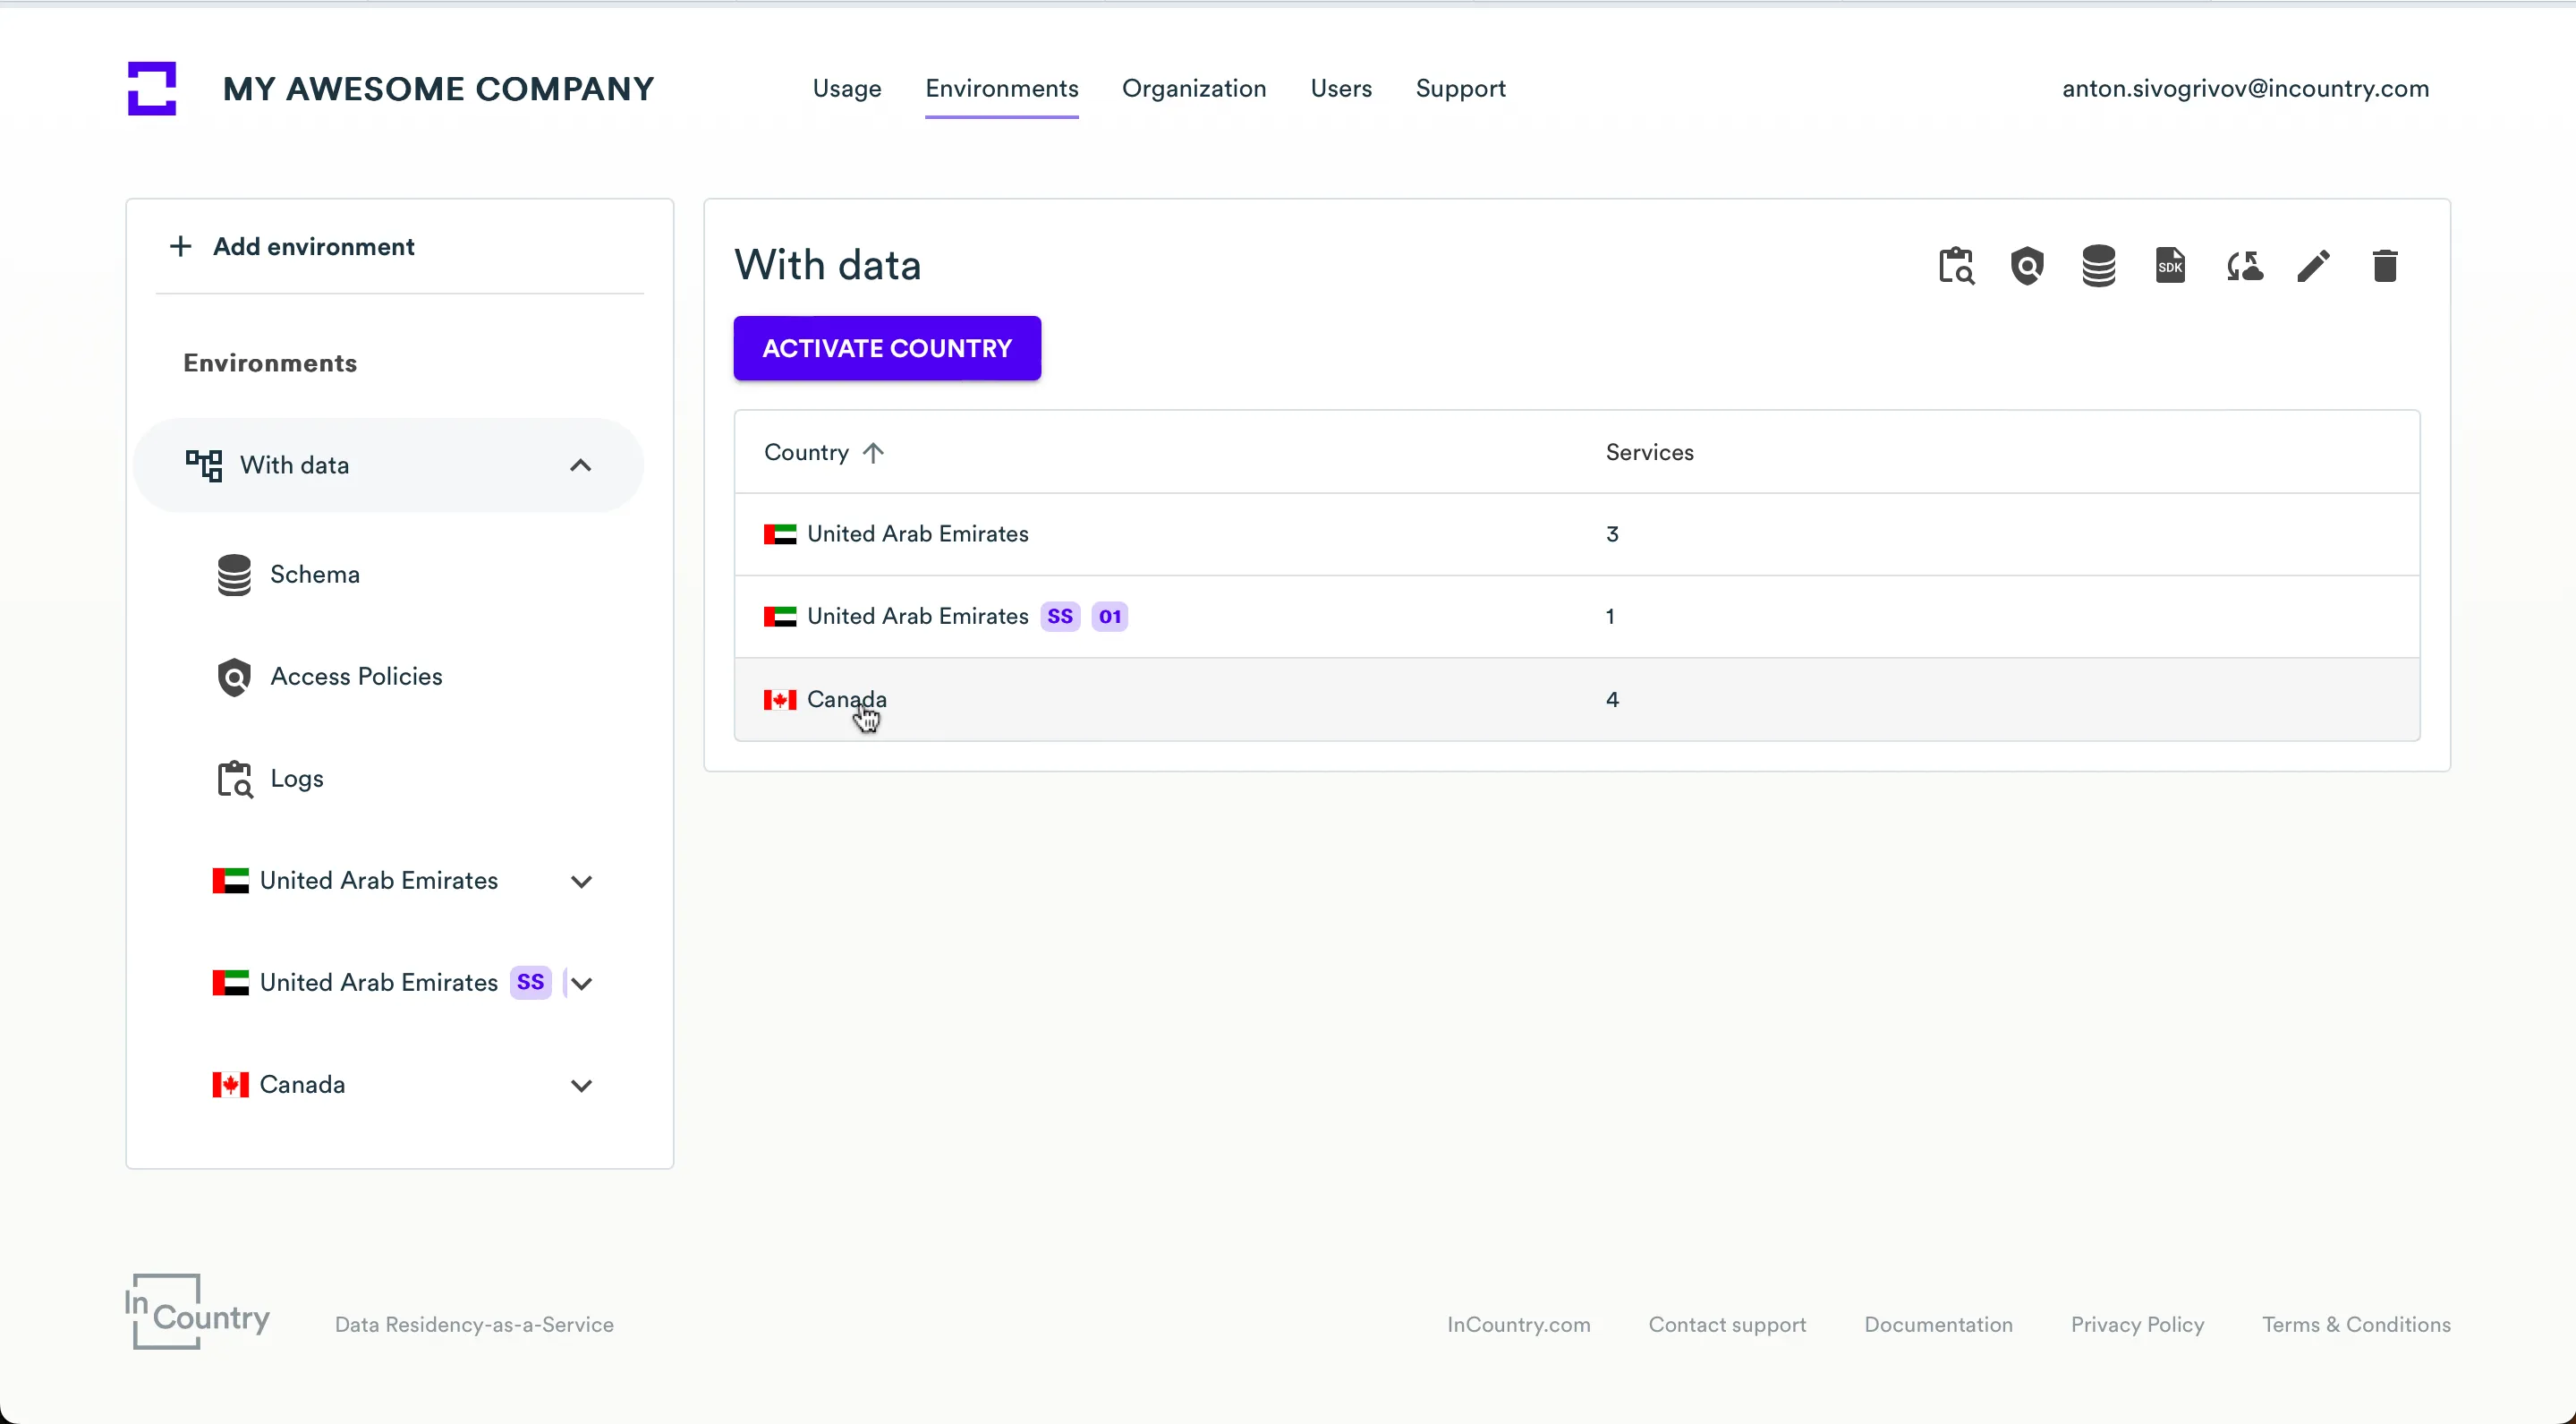
-
On the opened list with countries, select the country where you want to create the Email service.
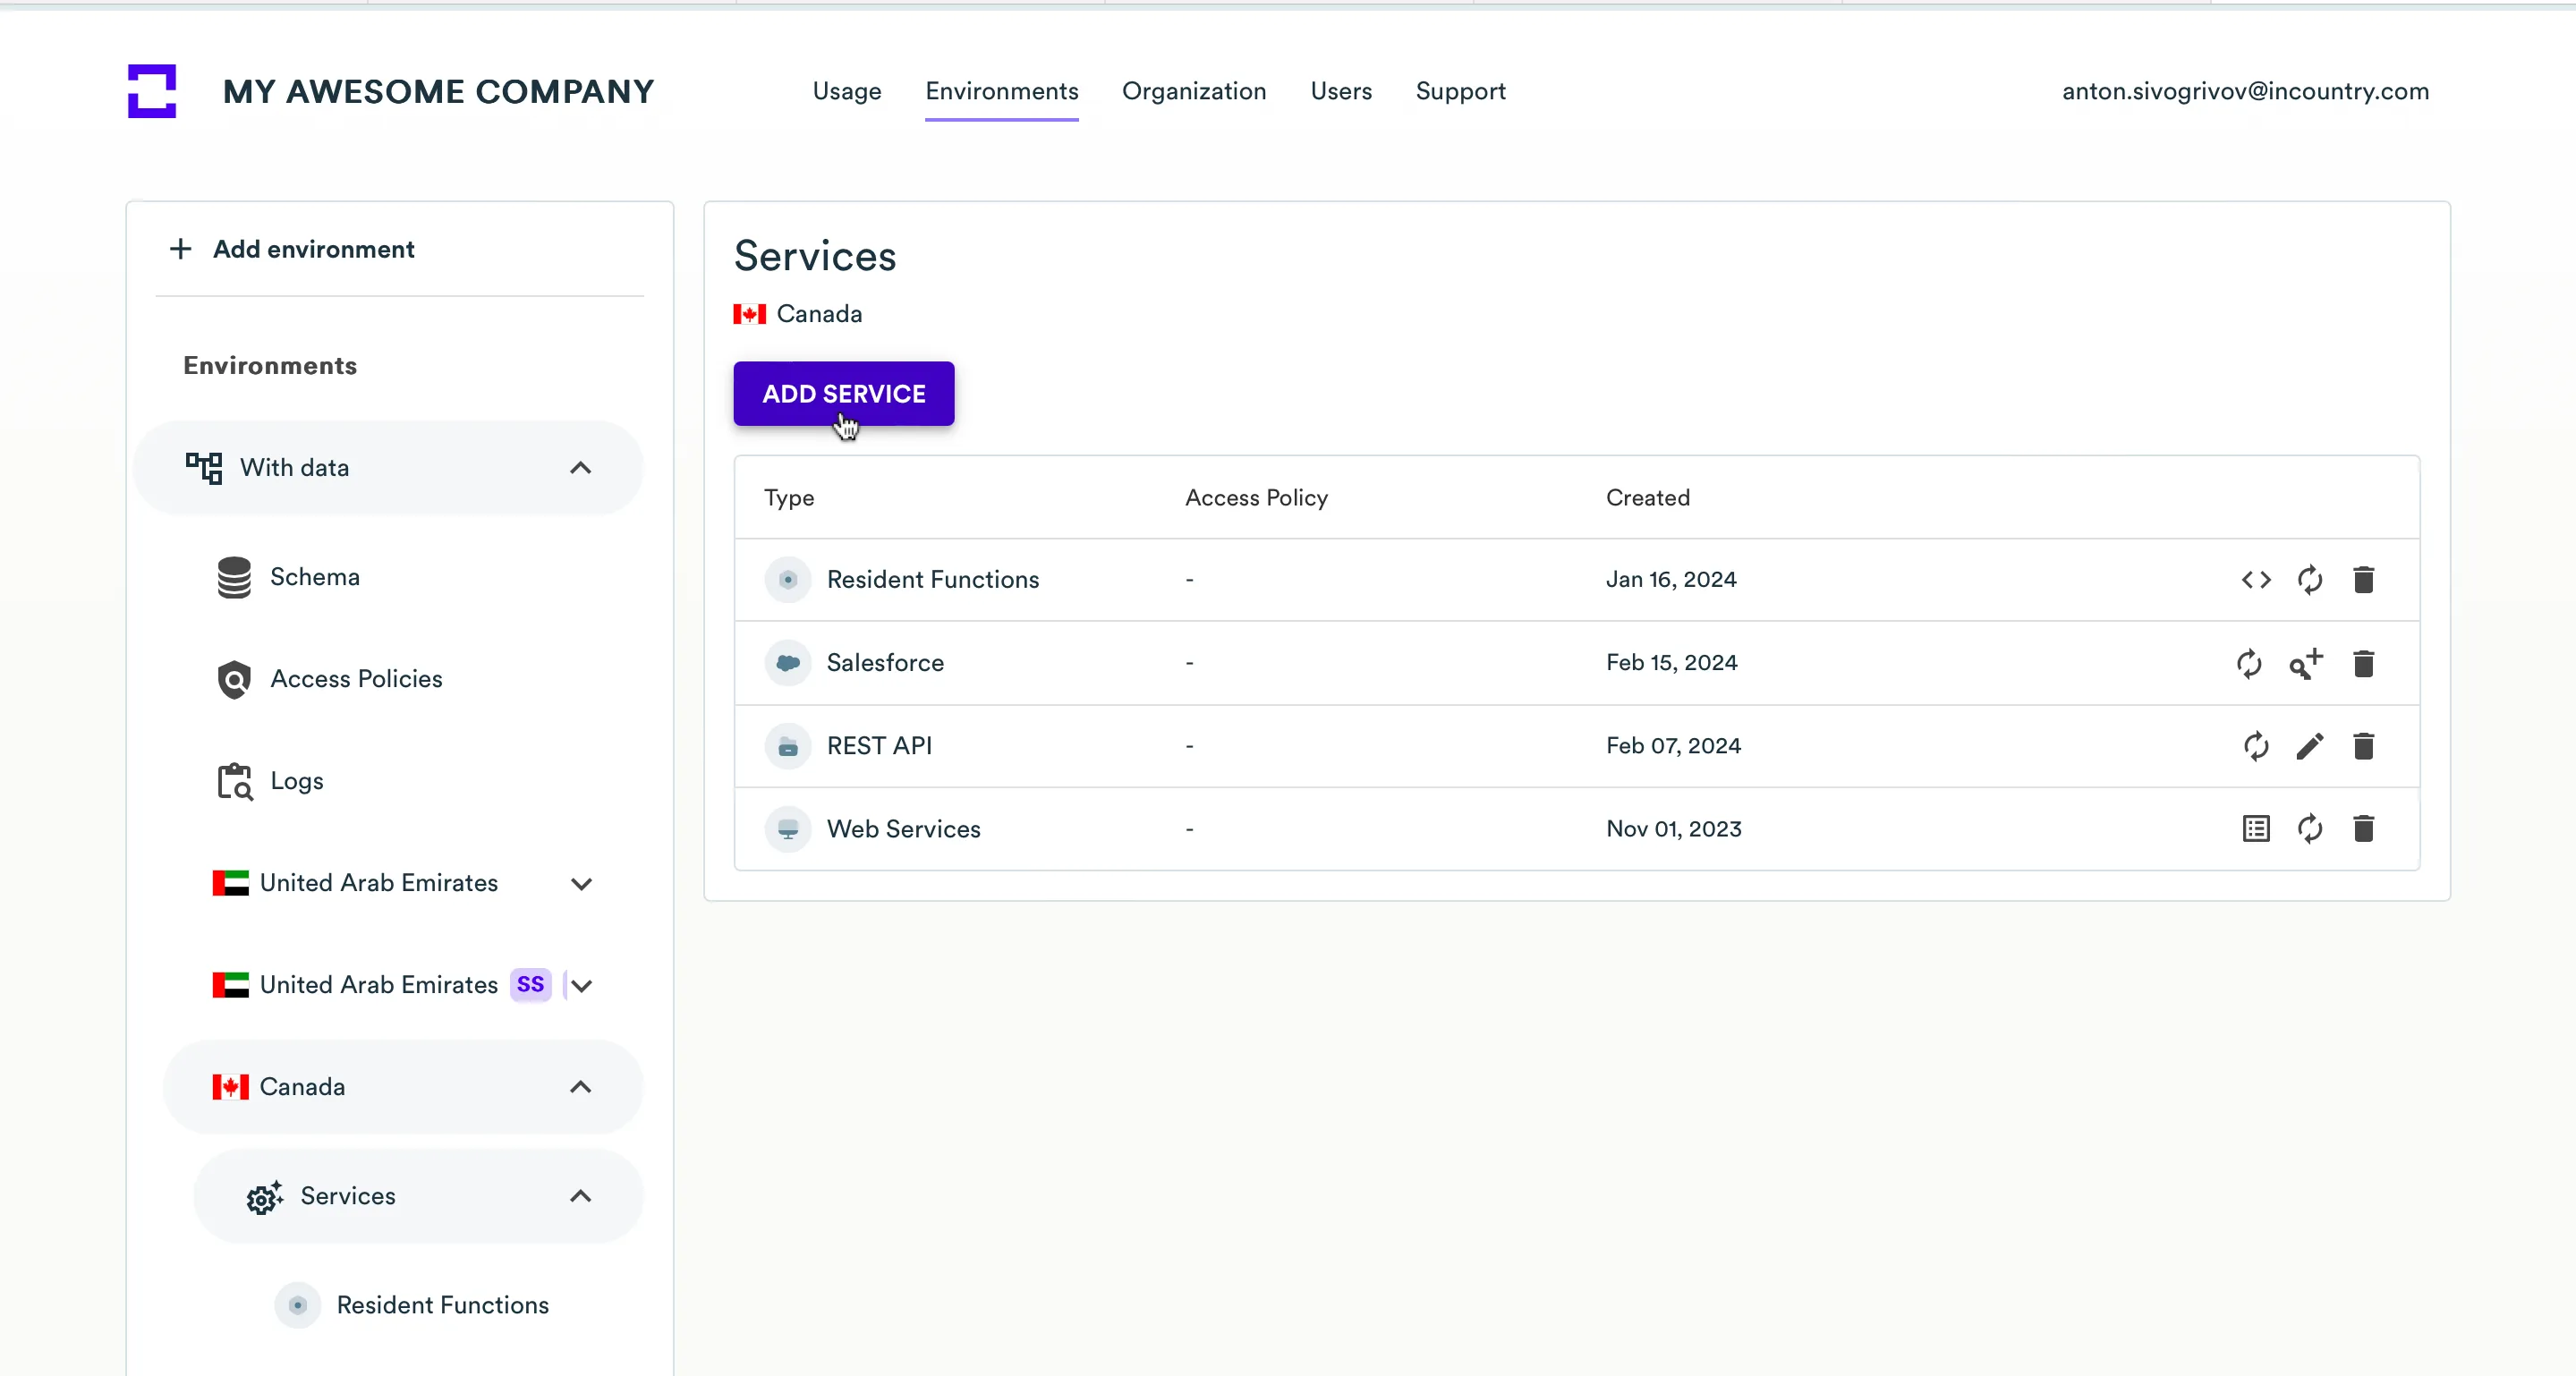
-
On the list of services, click Add service.
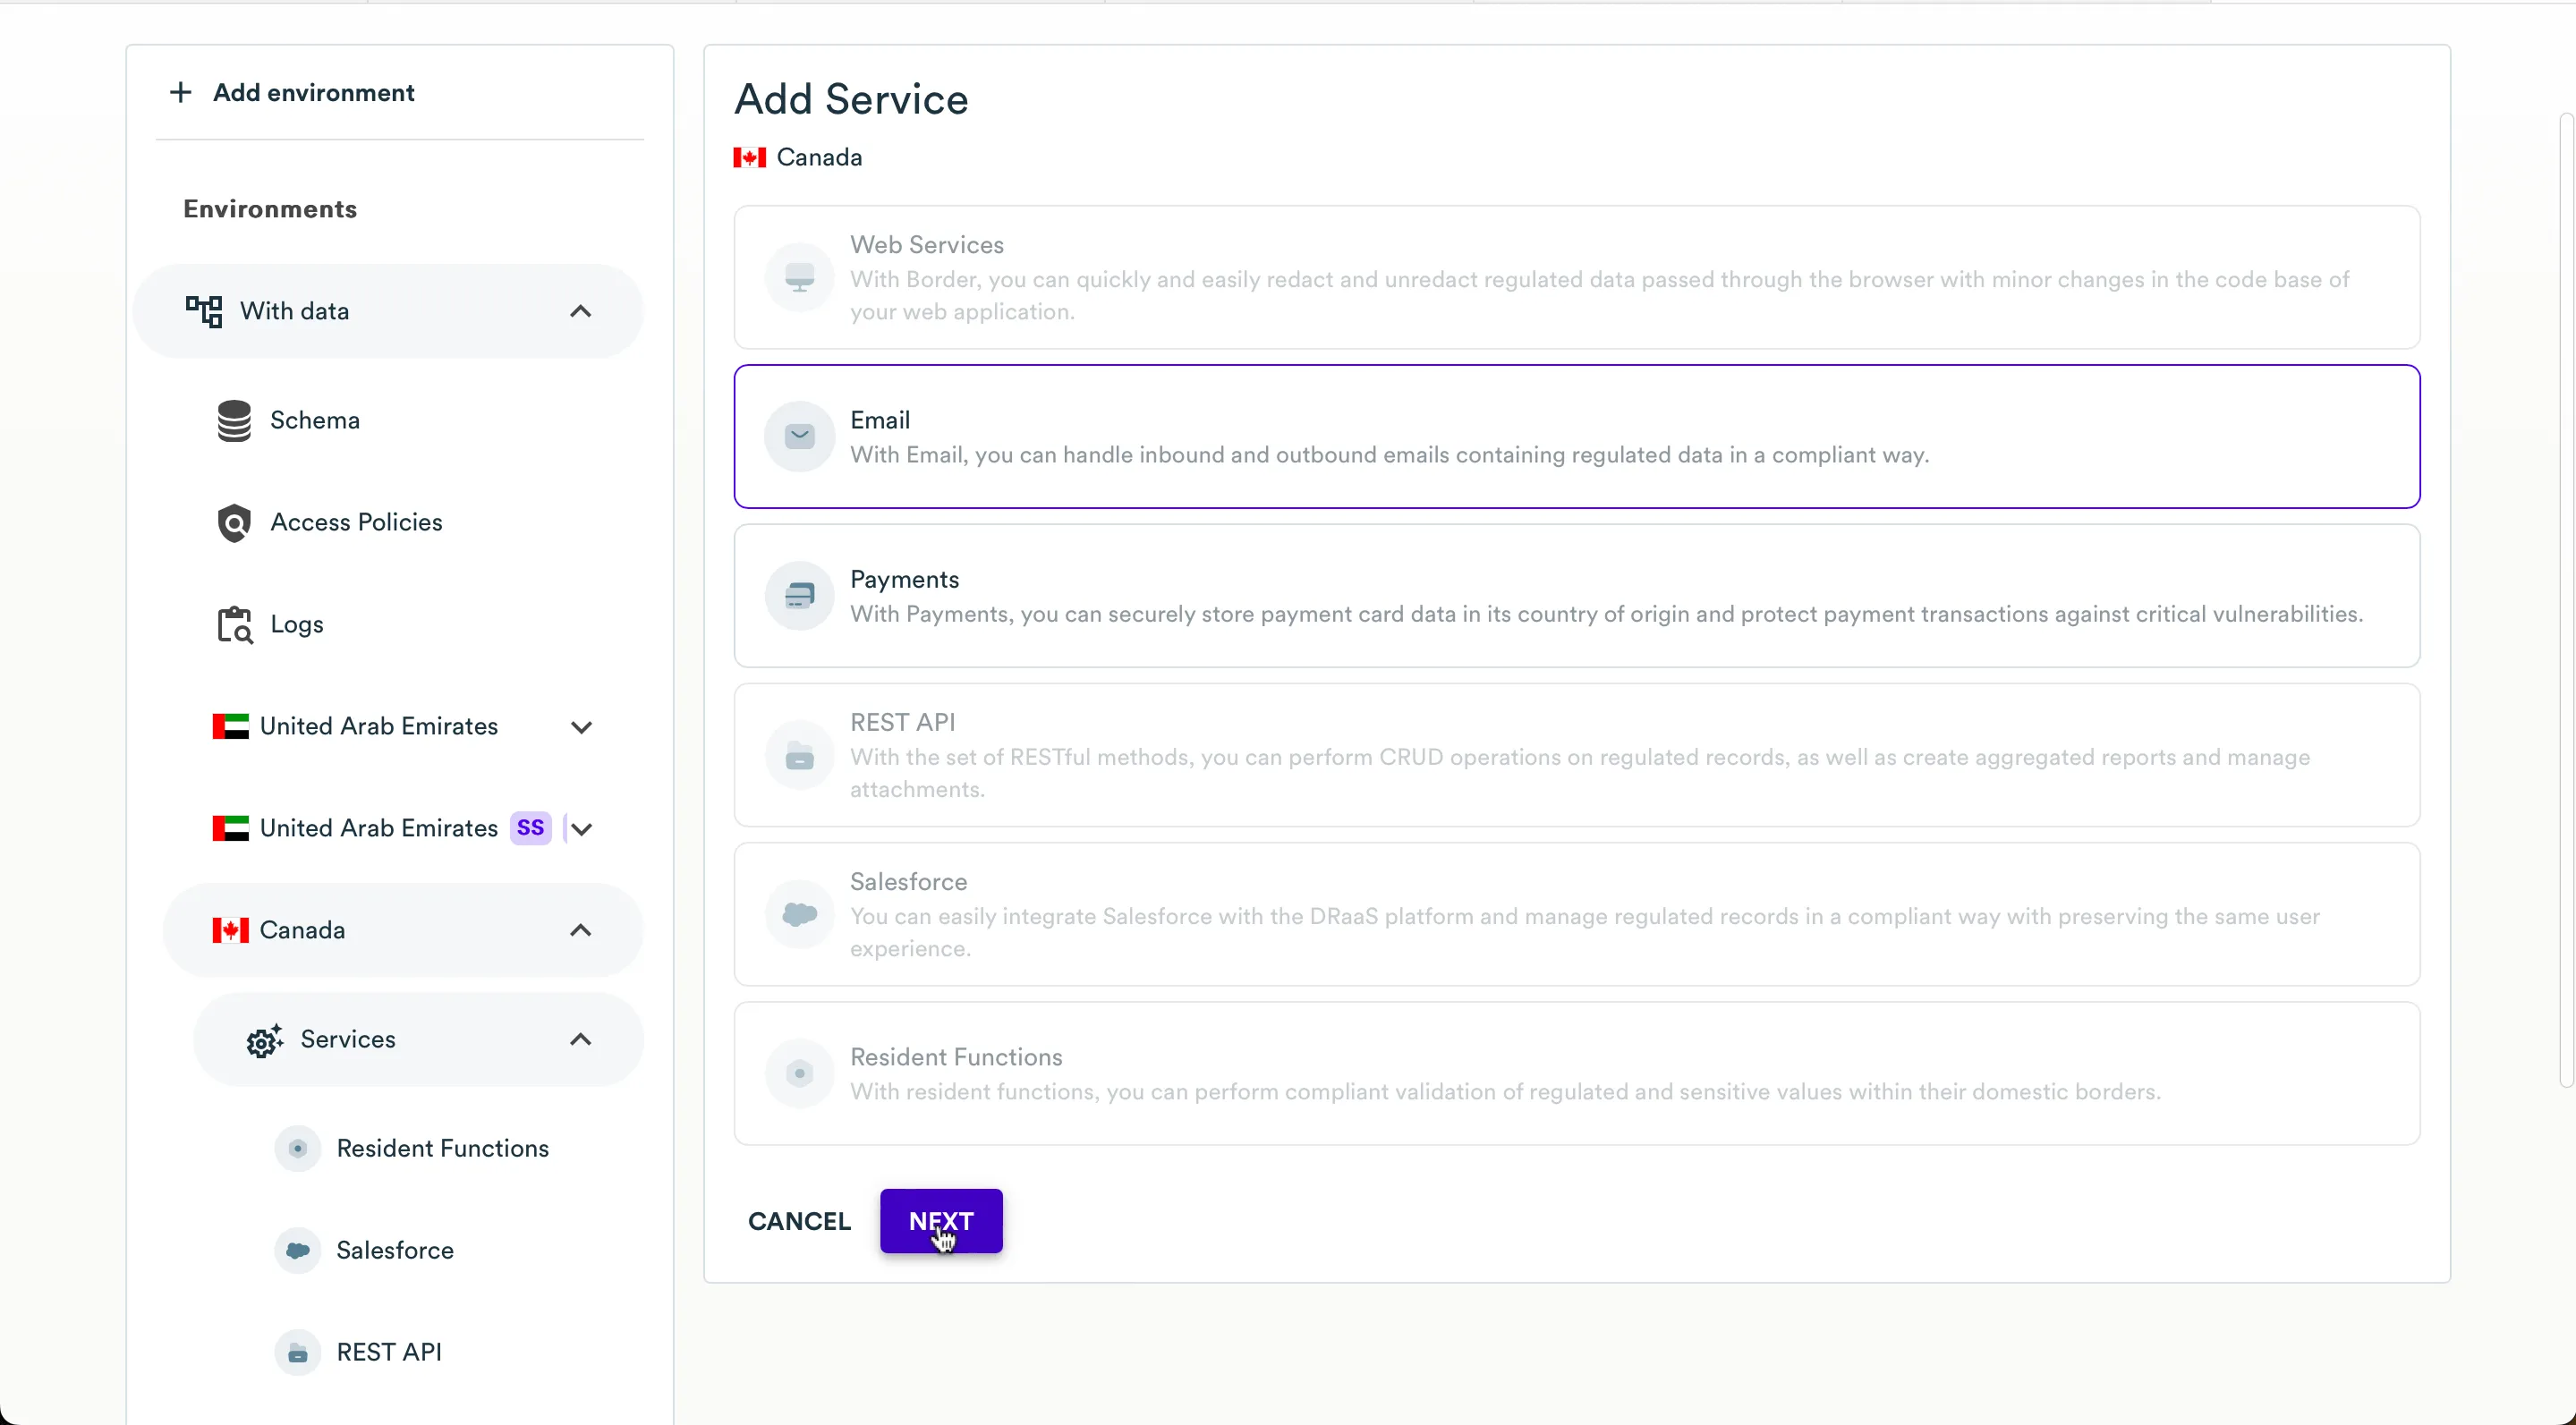
-
At the Select service step, select Email.
-
Click Next.
-
At the Email handling step, select the modes which the Email service will use:
- Inbound emails - the email gateway will redact inbound emails with clear-text sensitive values.
- Outbound emails - the email gateway will unredact outbound emails with redacted sensitive values.
-
Configure the parameters for the inbound email handling, as follows:
- IMAP server name - enter the address of the email service for the chosen mail provider, for example,
mail.google.com. - IMAP server - enter the address of the IMAP server, for example,
imap.gmail.com. - Port - enter the IMAP port to connect to the mailbox.
- Username - enter the username of the mail account for connecting through IMAP protocol.
- Password - enter the password of the mail account for connecting through IMAP protocol.
- Sender email - enter the email address which will be displayed in the From field.
- Service mail address - enter the mailbox address that the Salesforce org allocated for this feature.
- Deterministic tokenization key - enter the deterministic tokenization key that the InCountry Data Residency for Salesforce package generated.
- SMTP server - enter the address of the SMTP server, for example, smtp.gmail.com.
- Port - enter the SMTP port to connect to the mailbox.
- Username - enter the username of the mail account for connecting through SMTP protocol.
- Password - enter the password of the mail account for connecting through SMTP protocol.
- IMAP server name - enter the address of the email service for the chosen mail provider, for example,
-
Configure the parameters for the outbound email handling, as follows:
- Apply SMTP settings to outbound email - move the toggle right if you want to re-use SMTP parameters and credentials from the Inbound emails section.
- SMTP Server - enter the address of the SMTP server residing in the country of origin (of your recipients).
- Port - enter the SMTP port to connect to the mailbox.
- Username - enter the username of the mail account for connecting through SMTP protocol.
- Password - enter the password of the mail account for connecting through SMTP protocol.
-
When complete, click Next.
-
At the Review step, review the configuration.
-
When complete, enter the verification code and click Create.
-
Once a new Email service has been created, you need to save the credentials and the address of the email gateway. You will need to use these values when connecting your application to the email gateway. To save these values as a TXT file, click Download. To copy these values to the clipboard, click Copy to Clipboard.
noteWe show the Email service credentials only ones. Therefore, please copy this data and save it to some secure space on your side because you will not be able to view it again.
-
When complete, click Close.
Editing the Email service
- On the list of services within an activated country, locate the Email service you want to edit.
- Hover over the corresponding Email service and click the Edit service icon.
- On the Email handling page, modify the connection details as needed. For the details on email parameters, please check the Creating a new Email service section.
- When complete, click Next.
- Enter the verification code and click Update. You may need to save the credentials and the address of the email gateway.
- When complete, click Close.

Deleting the Email service
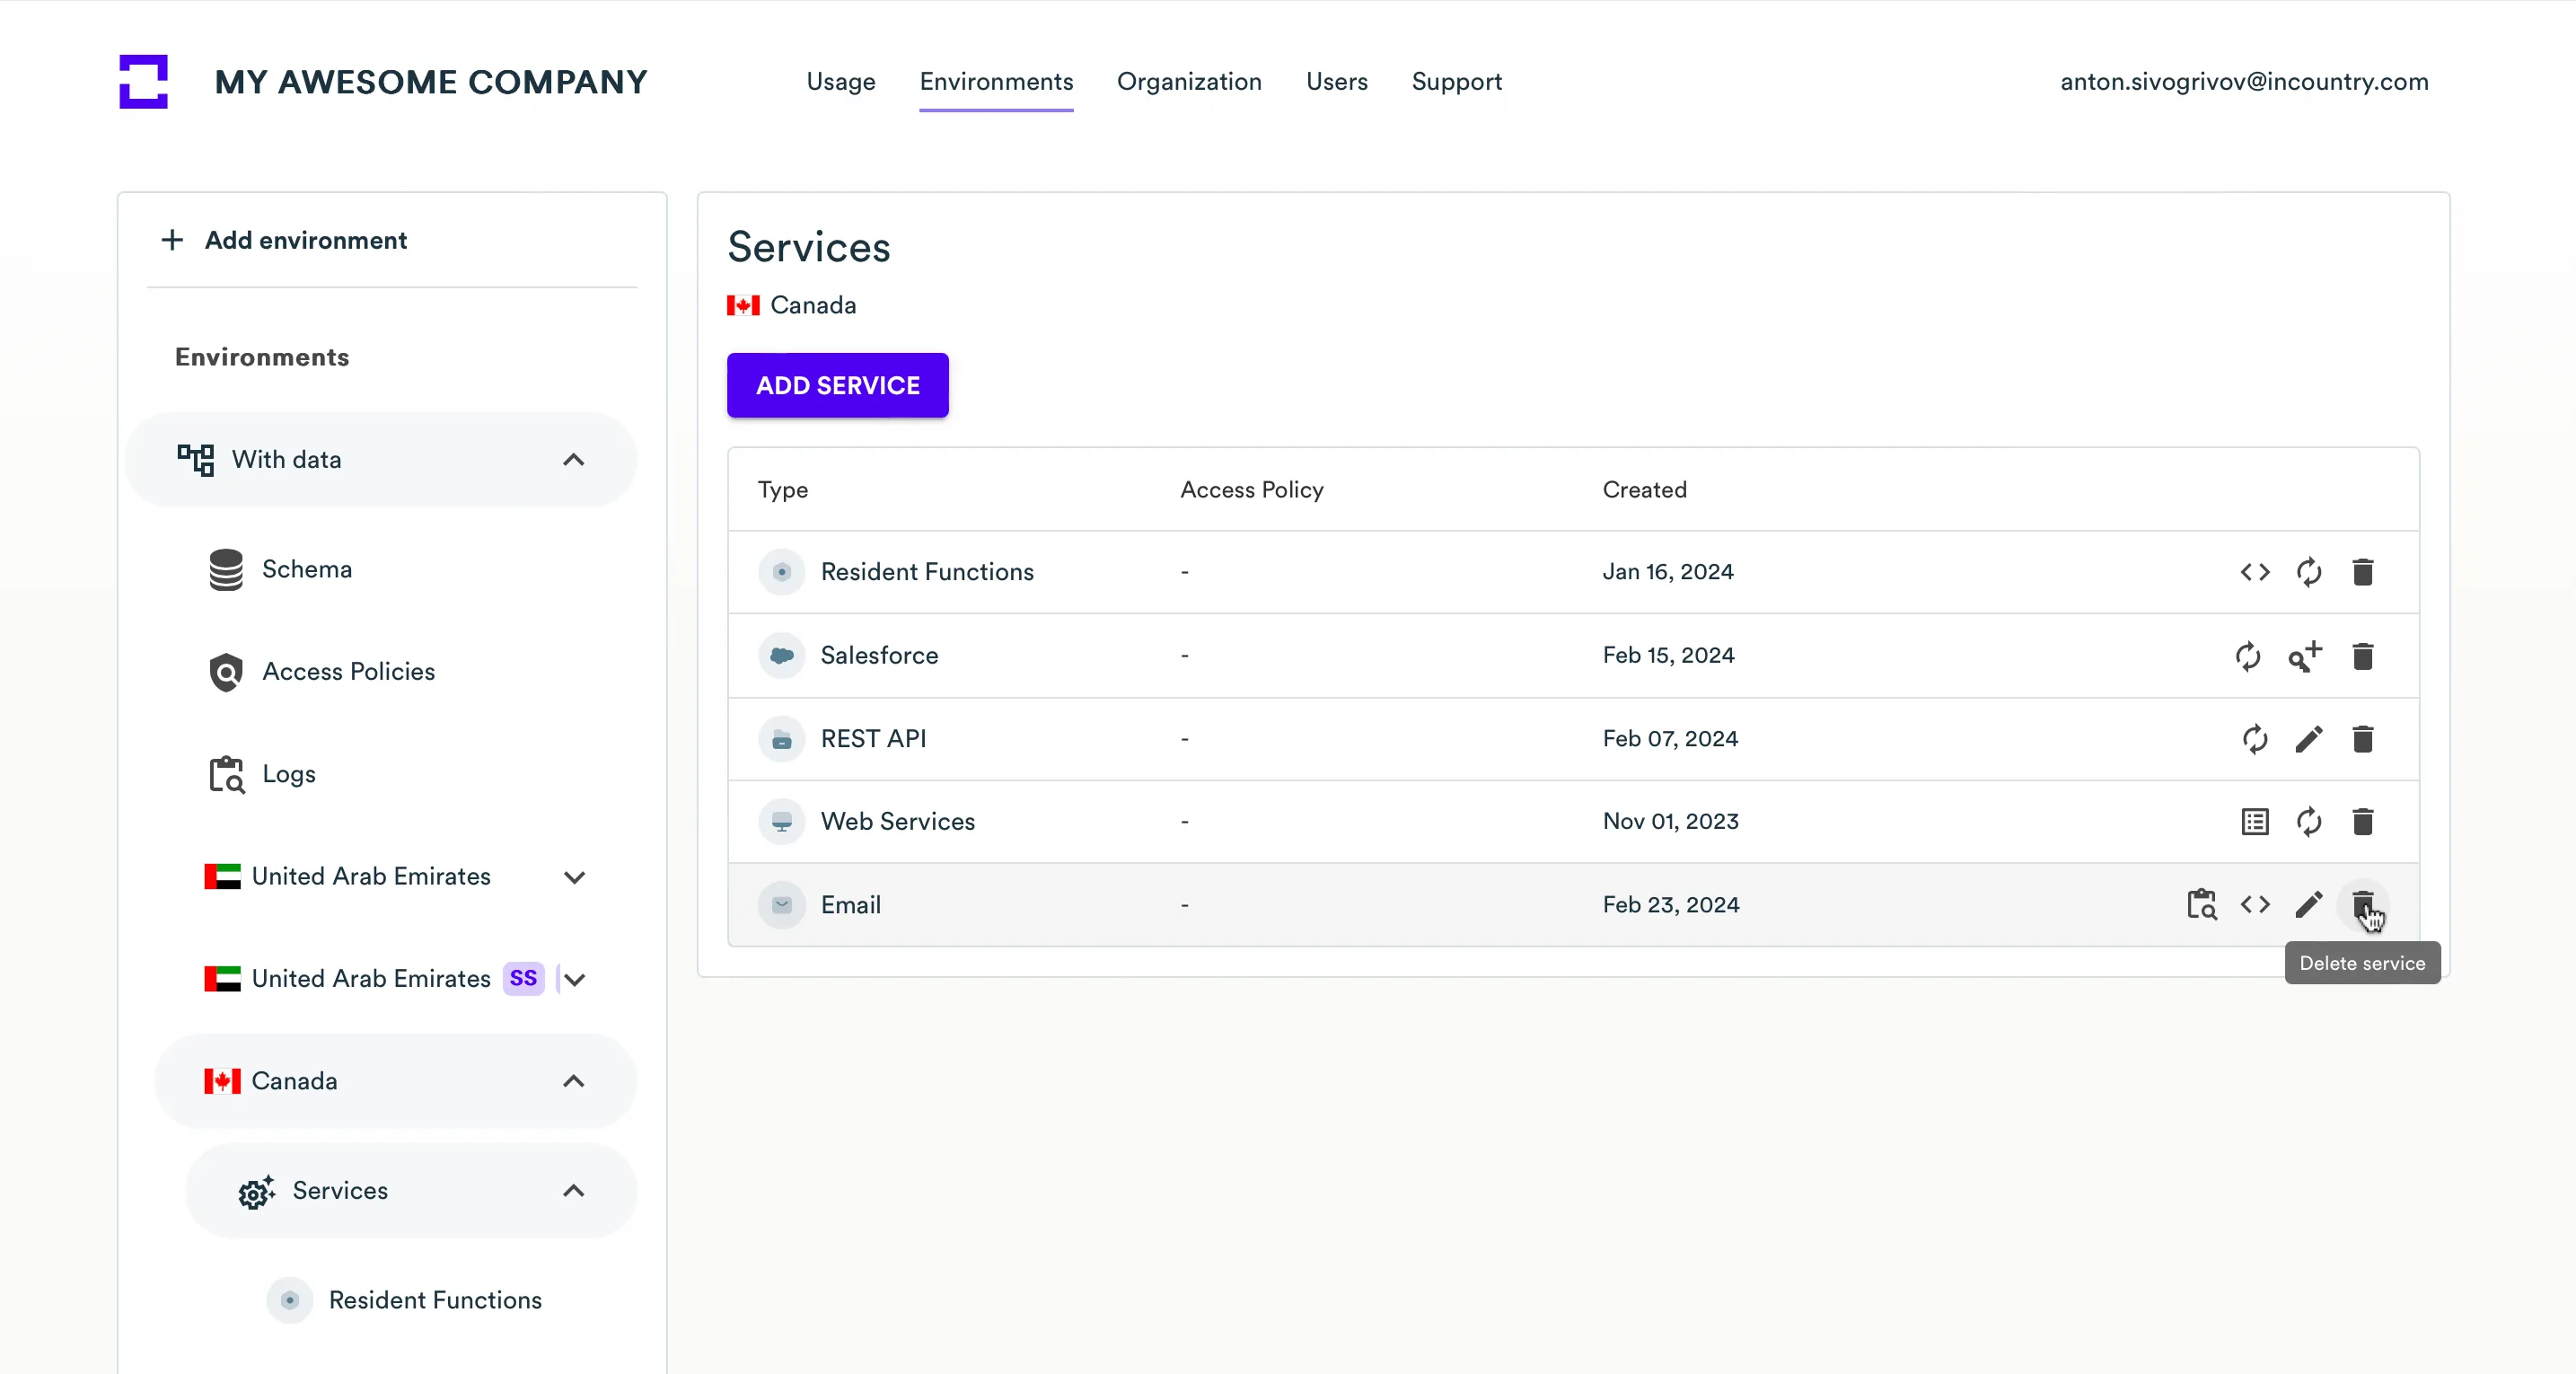
- On the list of services within an activated country, locate the Email service you want to delete.
- Hover over the corresponding Email service and click the Delete icon.
- Enter the verification code.
- Click Delete.
Please consider that after the removal of the Email service, emails will be neither redacted nor unredacted (depending on what modes were configured for the Email service). You may need to re-adjust your email workflows to restore the original functionality.
View Email service details
- On the list of services within an activated country, locate the Email service of which you would like to see logs.
- Hover over the corresponding Email service and click the Service details icon.
- Here you can find only the Email SMTP address and port.

We show username and password for Email service only ones, during creation. If you forgot them, you should delete and create the new Email service with the same configuration. Please copy this data next time and save it to some secure space on your side because you will not be able to view it again.
View logs of the Email service
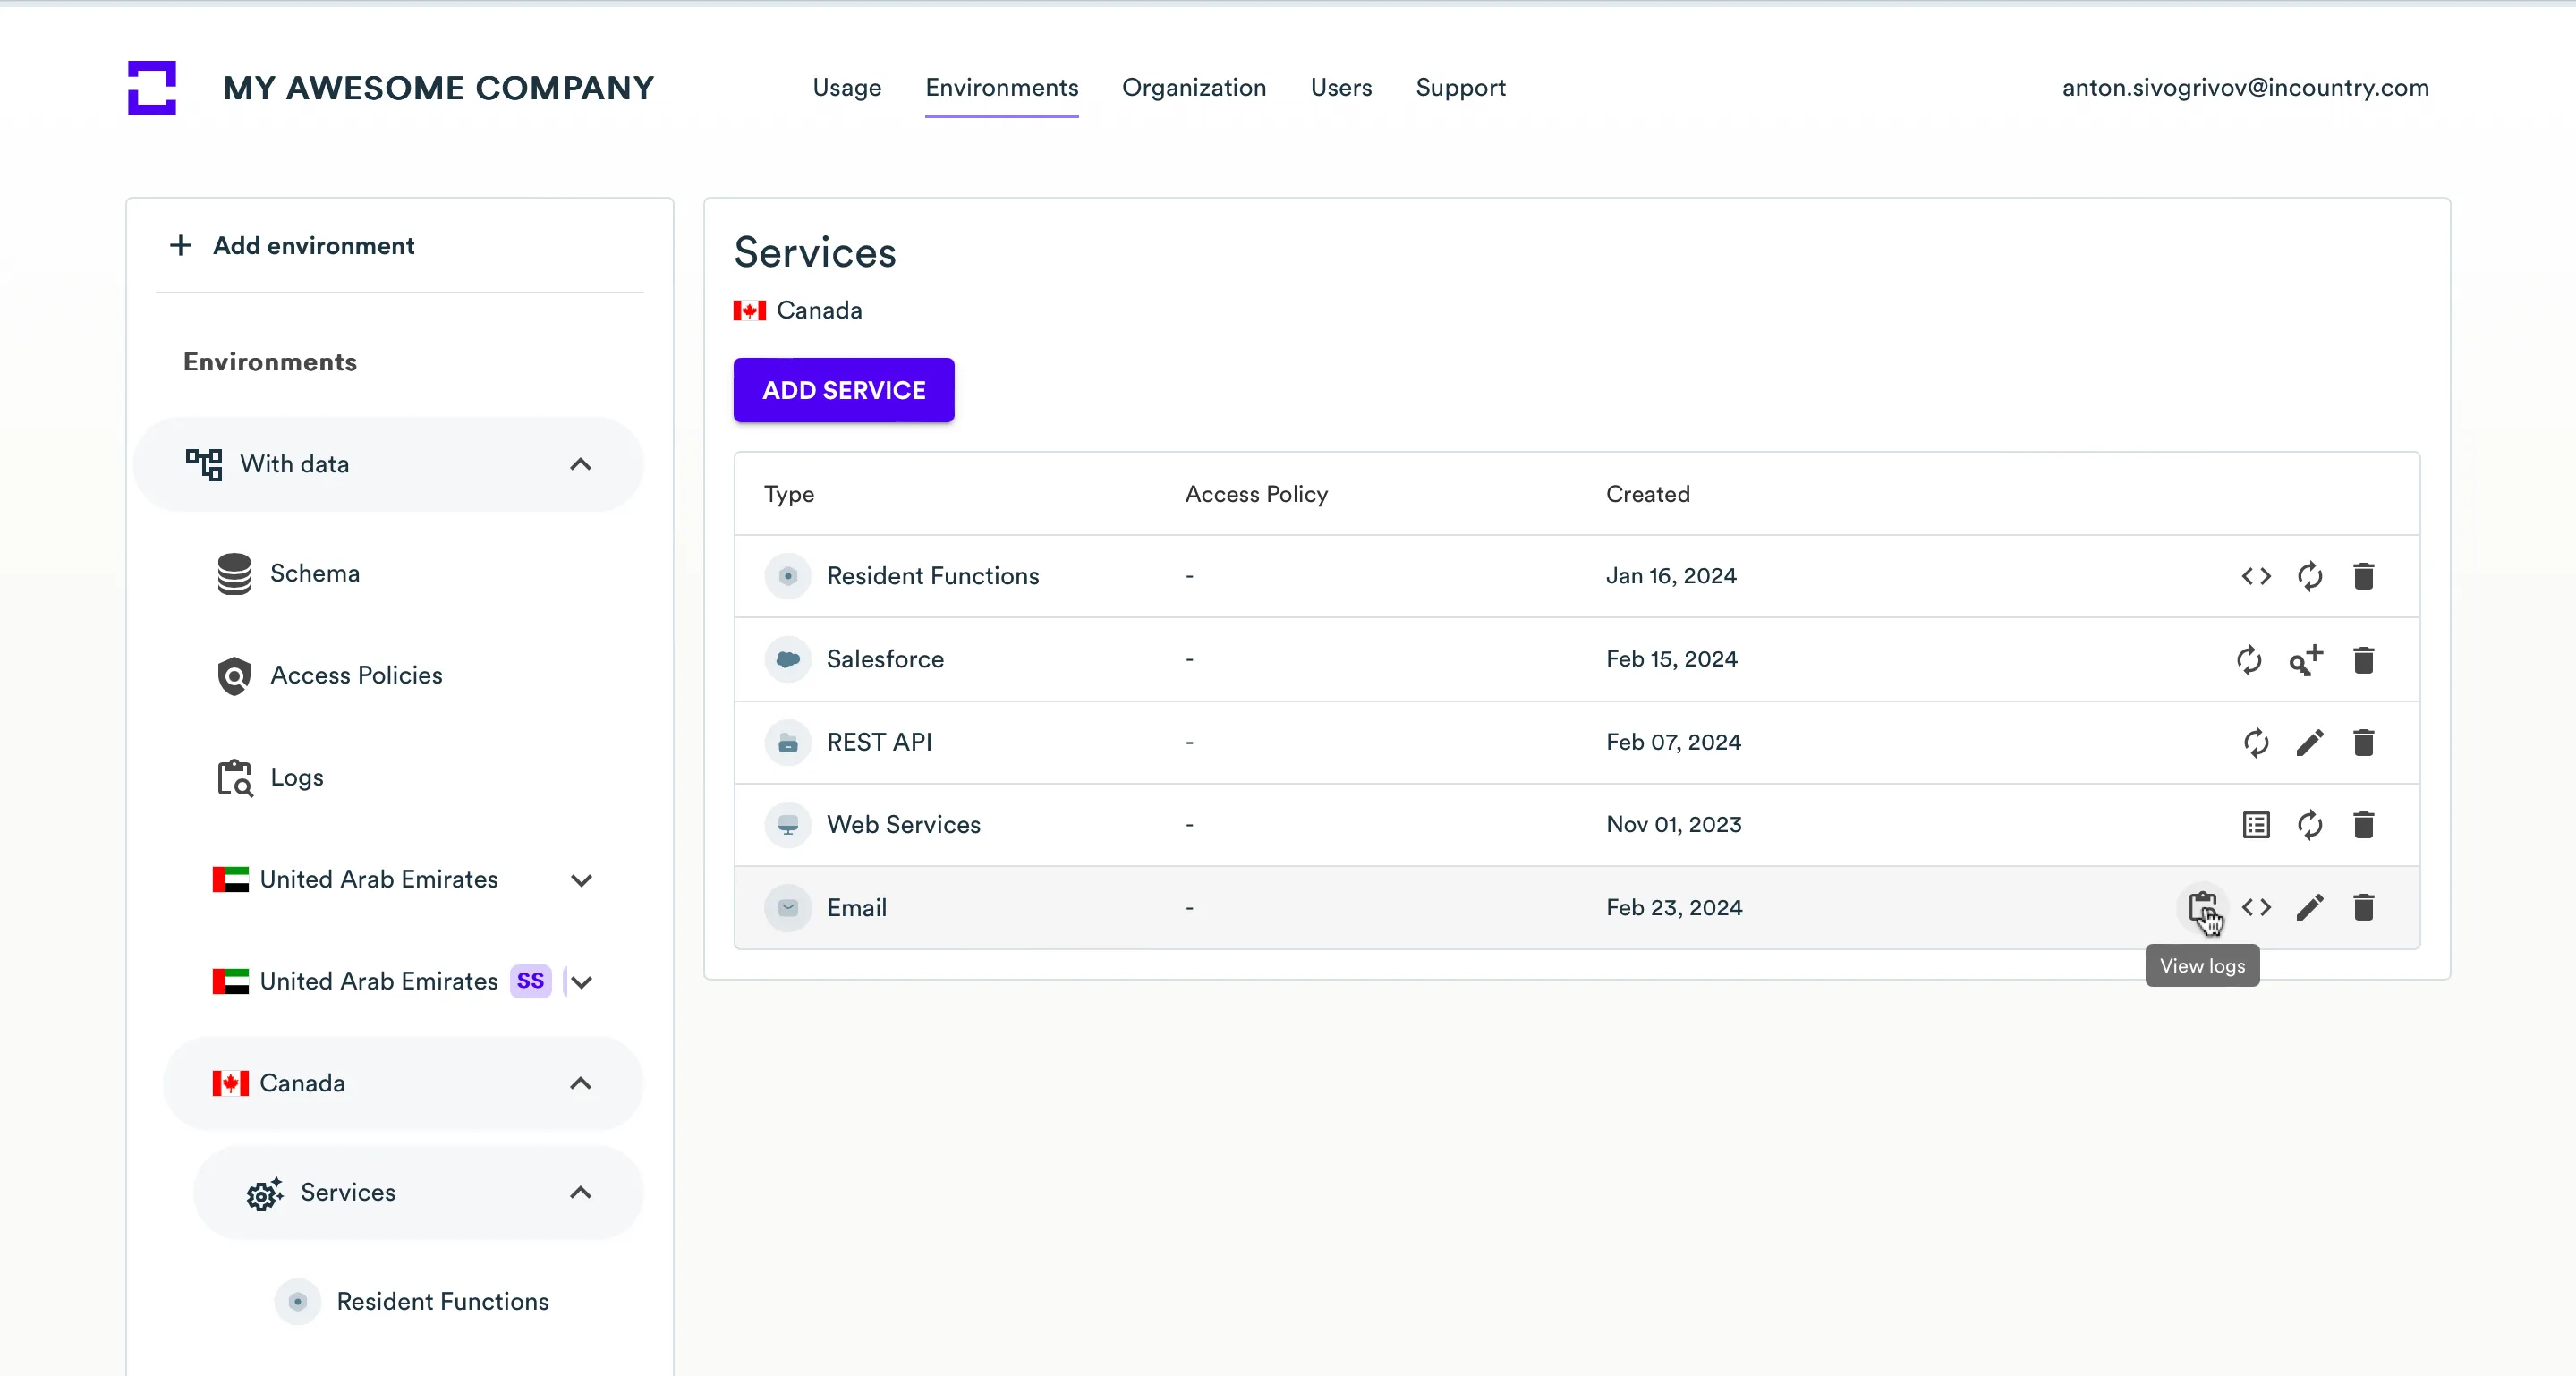
- On the list of services within an activated country, locate the Email service of which you would like to see logs.
- Hover over the corresponding Email service and click the View logs icon.
- On the logs page, you can see the logs of your Email service that will help to debug your integration. Proxy logs records live 30 days. Function and REST API logs records live 5 days. Here on the page, you can also filter logs by different parameters. Also, you can download file with logs by clicking DOWNLOAD LOGS button.
Email Receiver
Overview
The Email Receiver is a service that protects user email data and ensures secure delivery of incoming messages. It works by using cloaked addresses, so customer systems (such as CRMs or marketing platforms) never see real email addresses, while messages are safely delivered to the actual recipients.
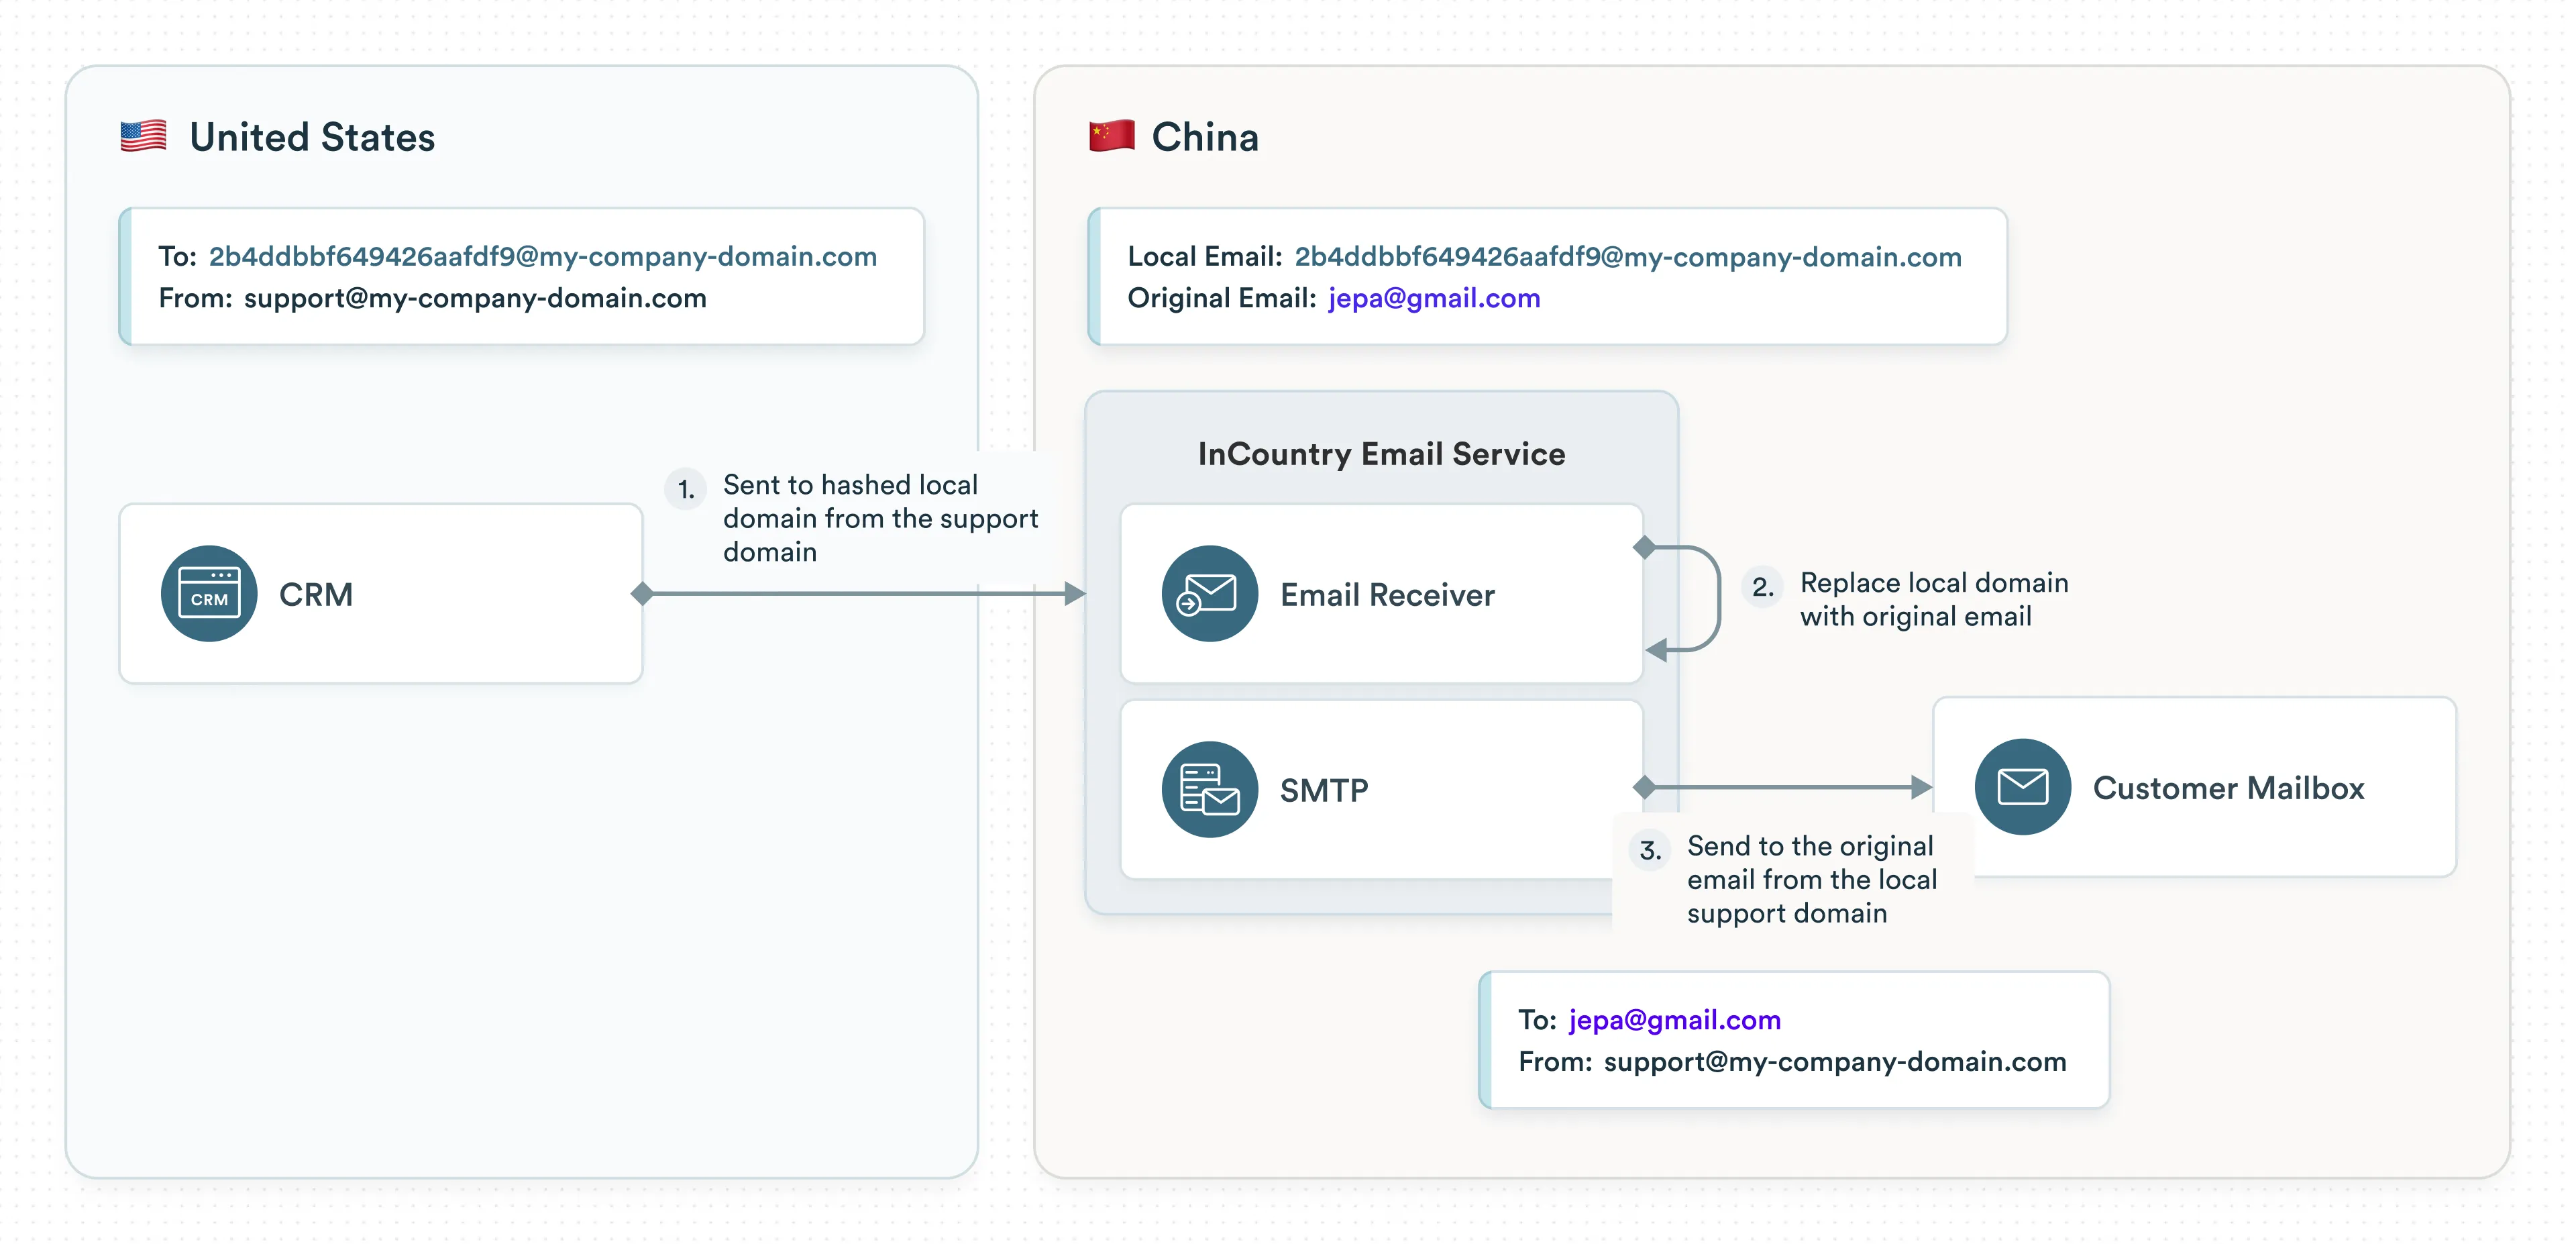
In this setup, a customer system (CRM or marketing platform) sends bulk email campaigns using cloaked addresses from a dedicated custom domain, for example: my-company-domain.com.
Cloaked addresses act as placeholders between the sending system and the real recipients. The Email Receiver sits in the middle and performs three main functions:
- Receives all emails sent to the cloaked domain
- Uncloaks the content and identifies the real user email for each message
- Sends the email to the real recipient
This process is repeated for every incoming email, so end users receive messages as if they were sent directly, without exposing their real email addresses.
Because all emails pass through the Email Receiver, it also allows centralized control. For example, emails can be logged, monitored, or checked for policy compliance before delivery.
How It Works
The Email Receiver workflow consists of several sequential steps that ensure correct routing and delivery while maintaining data security:
1. Set up the domain
- The customer chooses a dedicated domain for cloaked addresses (e.g.,
my-company-domain.com). - DNS records, typically an MX record, are configured so all emails to that domain are routed to the Email Receiver.
- This ensures that every email sent to any address under the domain is delivered to the service.
2. Cloaked email addresses
- Users in the customer system are stored with cloaked addresses instead of real emails. For example:
cloaked-user-email-1@my-company-domain.com
cloaked-user-email-2@my-company-domain.com
cloaked-user-email-3@my-company-domain.com
- Each cloaked address maps securely to a real user in a database or backend system.
- Cloaked addresses act as proxy identifiers — they look like normal emails but serve only as references to real users.
3. Send emails
- The customer system sends outgoing emails to cloaked addresses.
- From the system’s perspective, these addresses behave like normal email accounts — no special integration is needed.
4. Receive emails
- The Email Receiver accepts all emails sent to the cloaked domain.
- It acts as a full inbound mail server, parsing SMTP envelopes, headers, and message bodies.
- It checks the allowed domains from the whitelist for each tenant and blocks emails from domains that are not whitelisted.
- Optional checks may include spam filtering, authentication (SPF/DKIM), or other inbound rules.
5. Uncloak and process
For each email, the Email Receiver:
- Uncloaks content: Use our Email Gateway to convert any cloaked data back to its original form.
- Finds the real recipient: Use our Email Gateway to look up the actual email address corresponding to the cloaked address.
- Processes headers or content if needed: Use our Email Gateway, for example, to update From/Reply-To fields or remove sensitive metadata.
This step ensures emails remain correct and private while preserving the integrity of the message.
6. Forward emails
- After uncloaking and processing, the email is sent to the actual recipient.
- Delivery uses standard SMTP.
- Every incoming email goes through this process automatically, so end users receive messages seamlessly.
For detailed configuration assistance, please contact our support team at support@incountry.com
✅ Key Features Highlighted:
- Protects real email addresses by using cloaked addresses
- Uncloaks and forwards messages automatically
- Supports monitoring, logging, and optional content checks
- Works transparently for every incoming email