Tutorial
The InCountry solution can be integrated into a variety of web services, desktop, and mobile applications. In other words, in any service that is built using a client-server architecture. This page shows how to use InCountry RestAPI for on demand data redaction, when you can deeply integrate the service the way it matches your architecture best, or use InCountry Border to make it transparent for your application.
Example application
As an example, let’s imagine a web application for contact management that runs on AWS infrastructure. It will operate a single model like this:
{
    "id": "ff57e900-ef05-43b2-8cb1-3ac12cb7dc56",
    "first_name": "John",
    "last_name": "Doe",
    "email": "john.doe@company.com",
    "phone": "+1 (556) 486-9905",
    "company_name": "Acme Inc.",
    "department": "marketing"
}
Here we have four fields we want to redact using the InCountry platform: first_name, last_name, email, phone. And three we can keep as they are: id, company_name, department. By redaction, we mean replacing original data with a token that is not reversible and has no connection with the original data outside InCountry storage.
Identifying which fields are regulated usually depends on the country’s regulations, the industry, and the company’s requirements. In many cases, essential identity information such as names and email addresses is subject to regulation, whereas nonidentity information like order status and timestamps typically is not. Depending on the specific regulations, sensitive data like health records and financial transactions can sometimes be transferred across borders if anonymized.
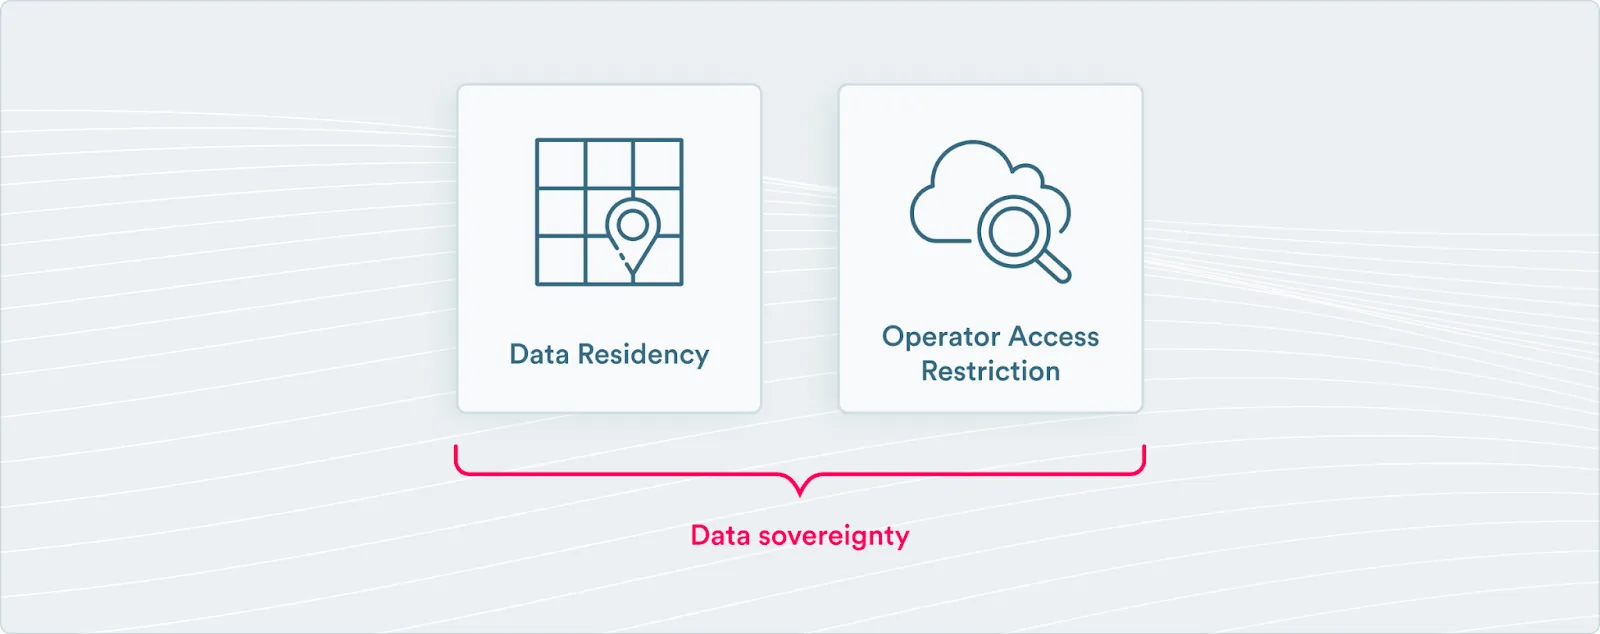
It's important to isolate only the data affected by identity regulations because isolating numerous non-regulated fields can be burdensome to implement and consume unnecessary resources. While there is no one definition of data sovereignty, InCountry has distilled key themes from listening to customers and regulators:
- Data residency – Knowing where all data is stored and controlling where it is stored and transferred.
- Operator access restriction – Ensuring that neither AWS nor a foreign government can access data in the cloud.
In this example, the application can list existing contacts, create or update selected contacts as well as delete one. In other words, our API has the following list of endpoints:
GET /contactsTo list all the existing contactsGET /contacts/:idTo read a particular contactPOST /contactsTo create a new onePATCH /contacts/:idTo update a particular contactDELETE /contacts/:idTo remove a particular
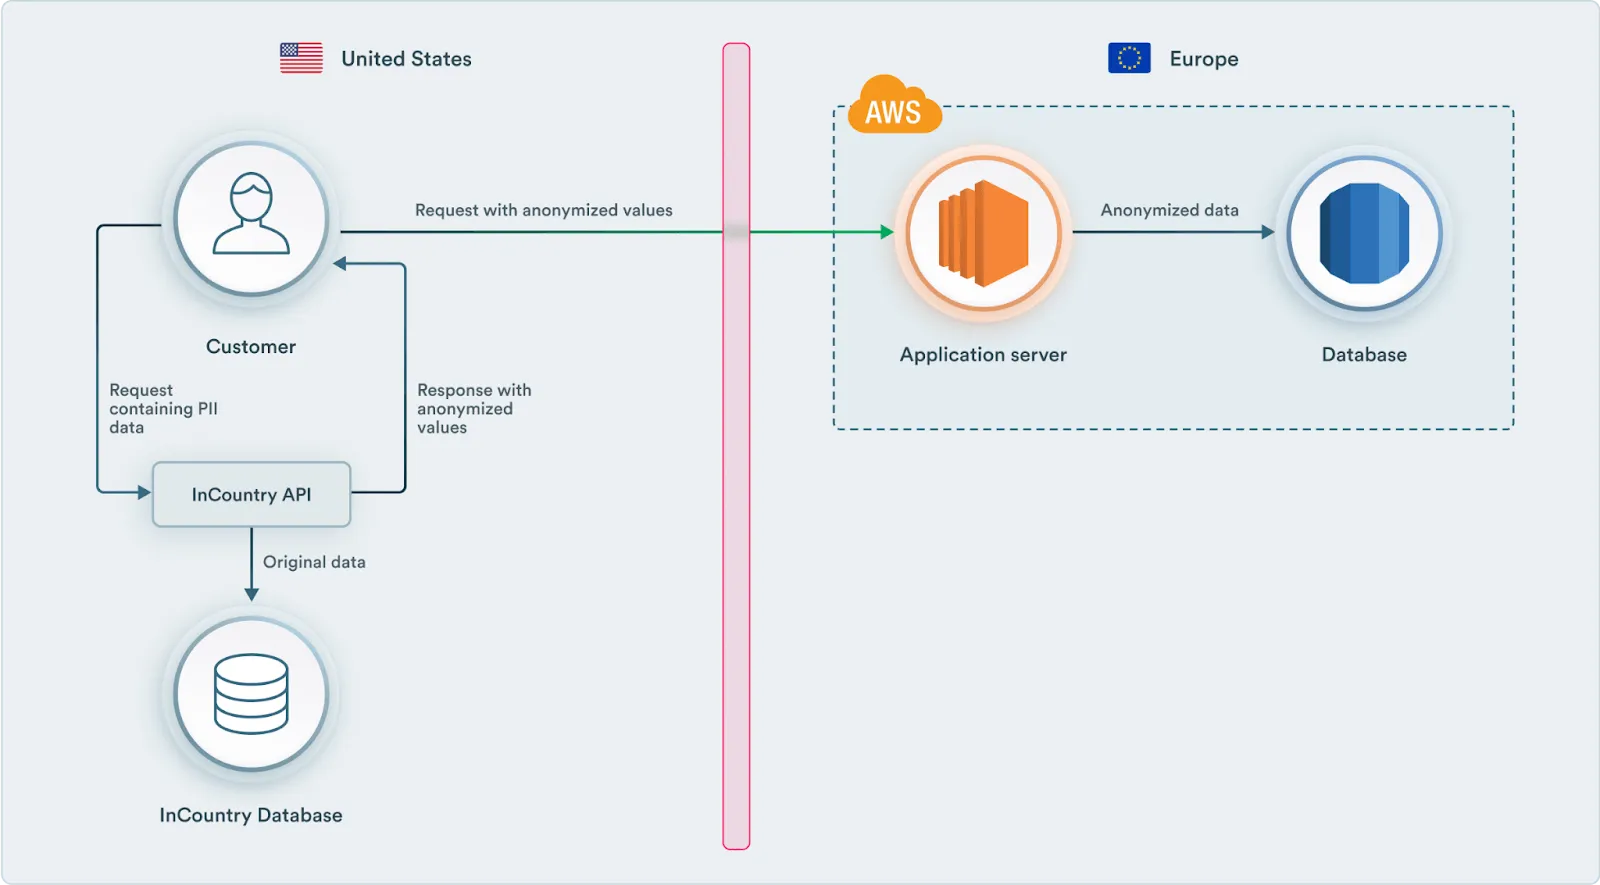
Typically, the web application frontend interacts with the backend in the following manner:
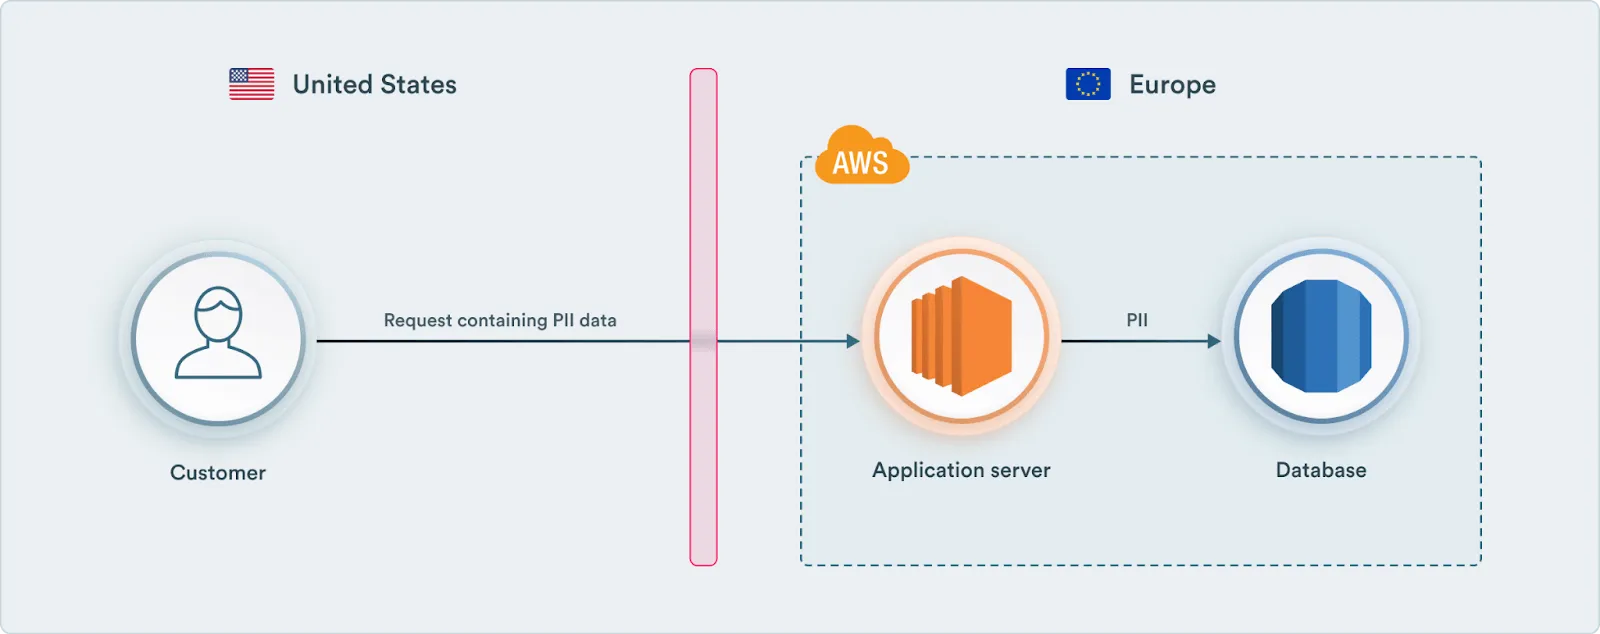
Please note that in the diagram above, a customer (an actor) represents a part of your application that will be executing on an end-user device whether that will be a web application frontend or a mobile application. And this part of the service is always located in the country of data residence. Also, for the sake of simplicity, we’re skipping authentication and authorization parts that are not related to interaction with the InCountry platform.
Running the application
First we want to launch the app that has no integration with InCountry to iteratively show different methods and results. We have prepared an example application located in this repository. To run it, first we need to set up an EC2 instance on AWS. Please follow the steps described in the official documentation to set up an EC2 instance and install NodeJS on it. Once you have it, clone the repository with an example application by running the following command:
git clone https://github.com/incountry/example-app
Create a .env file with the following content:
NODE_PORT=80
Then we need to install dependencies and run the app:
npm i && npm start
For any additional instructions, please refer to the README.md file in the example repository.
Once started, the app will be available at https://<public-domain-of-your-ec2>. With a structure like this, it violates data regulation policies since PII leaves the country of residence. Let's see how we can use the InCountry platform to make it compliant with data protection policies.
Data redaction options
There are two ways you can integrate InCountry service into the application:
- On demand redaction. In this case, you explicitly call the InCountry API from your application where needed and replace the original values with tokens obtained from the response. Even though this option is more fine-grained, it requires you to implement interactions manually at the application level.
- Transparent redaction. In this case, you will use the InCountry proxy that will automatically process the data on the way to your server and back. The only modification required on the application side is to change the server URL with a proxy URL. Those options are not mutually exclusive and can be used together to cover even more use cases. Let’s see what it takes to set up both of them on InCountry and the application sides.
On demand redaction
This section provides an example of how to operate regulated data by sending requests to the InCountry Data-Residency-as-a-Service components (InCountry RestAPI in this case) from a frontend tier using fine-grained credentials stored in the protected backend tier.
First we have to create and configure an environment in the InCountry portal and set up fine-grained access control policies.
Create a data schema
-
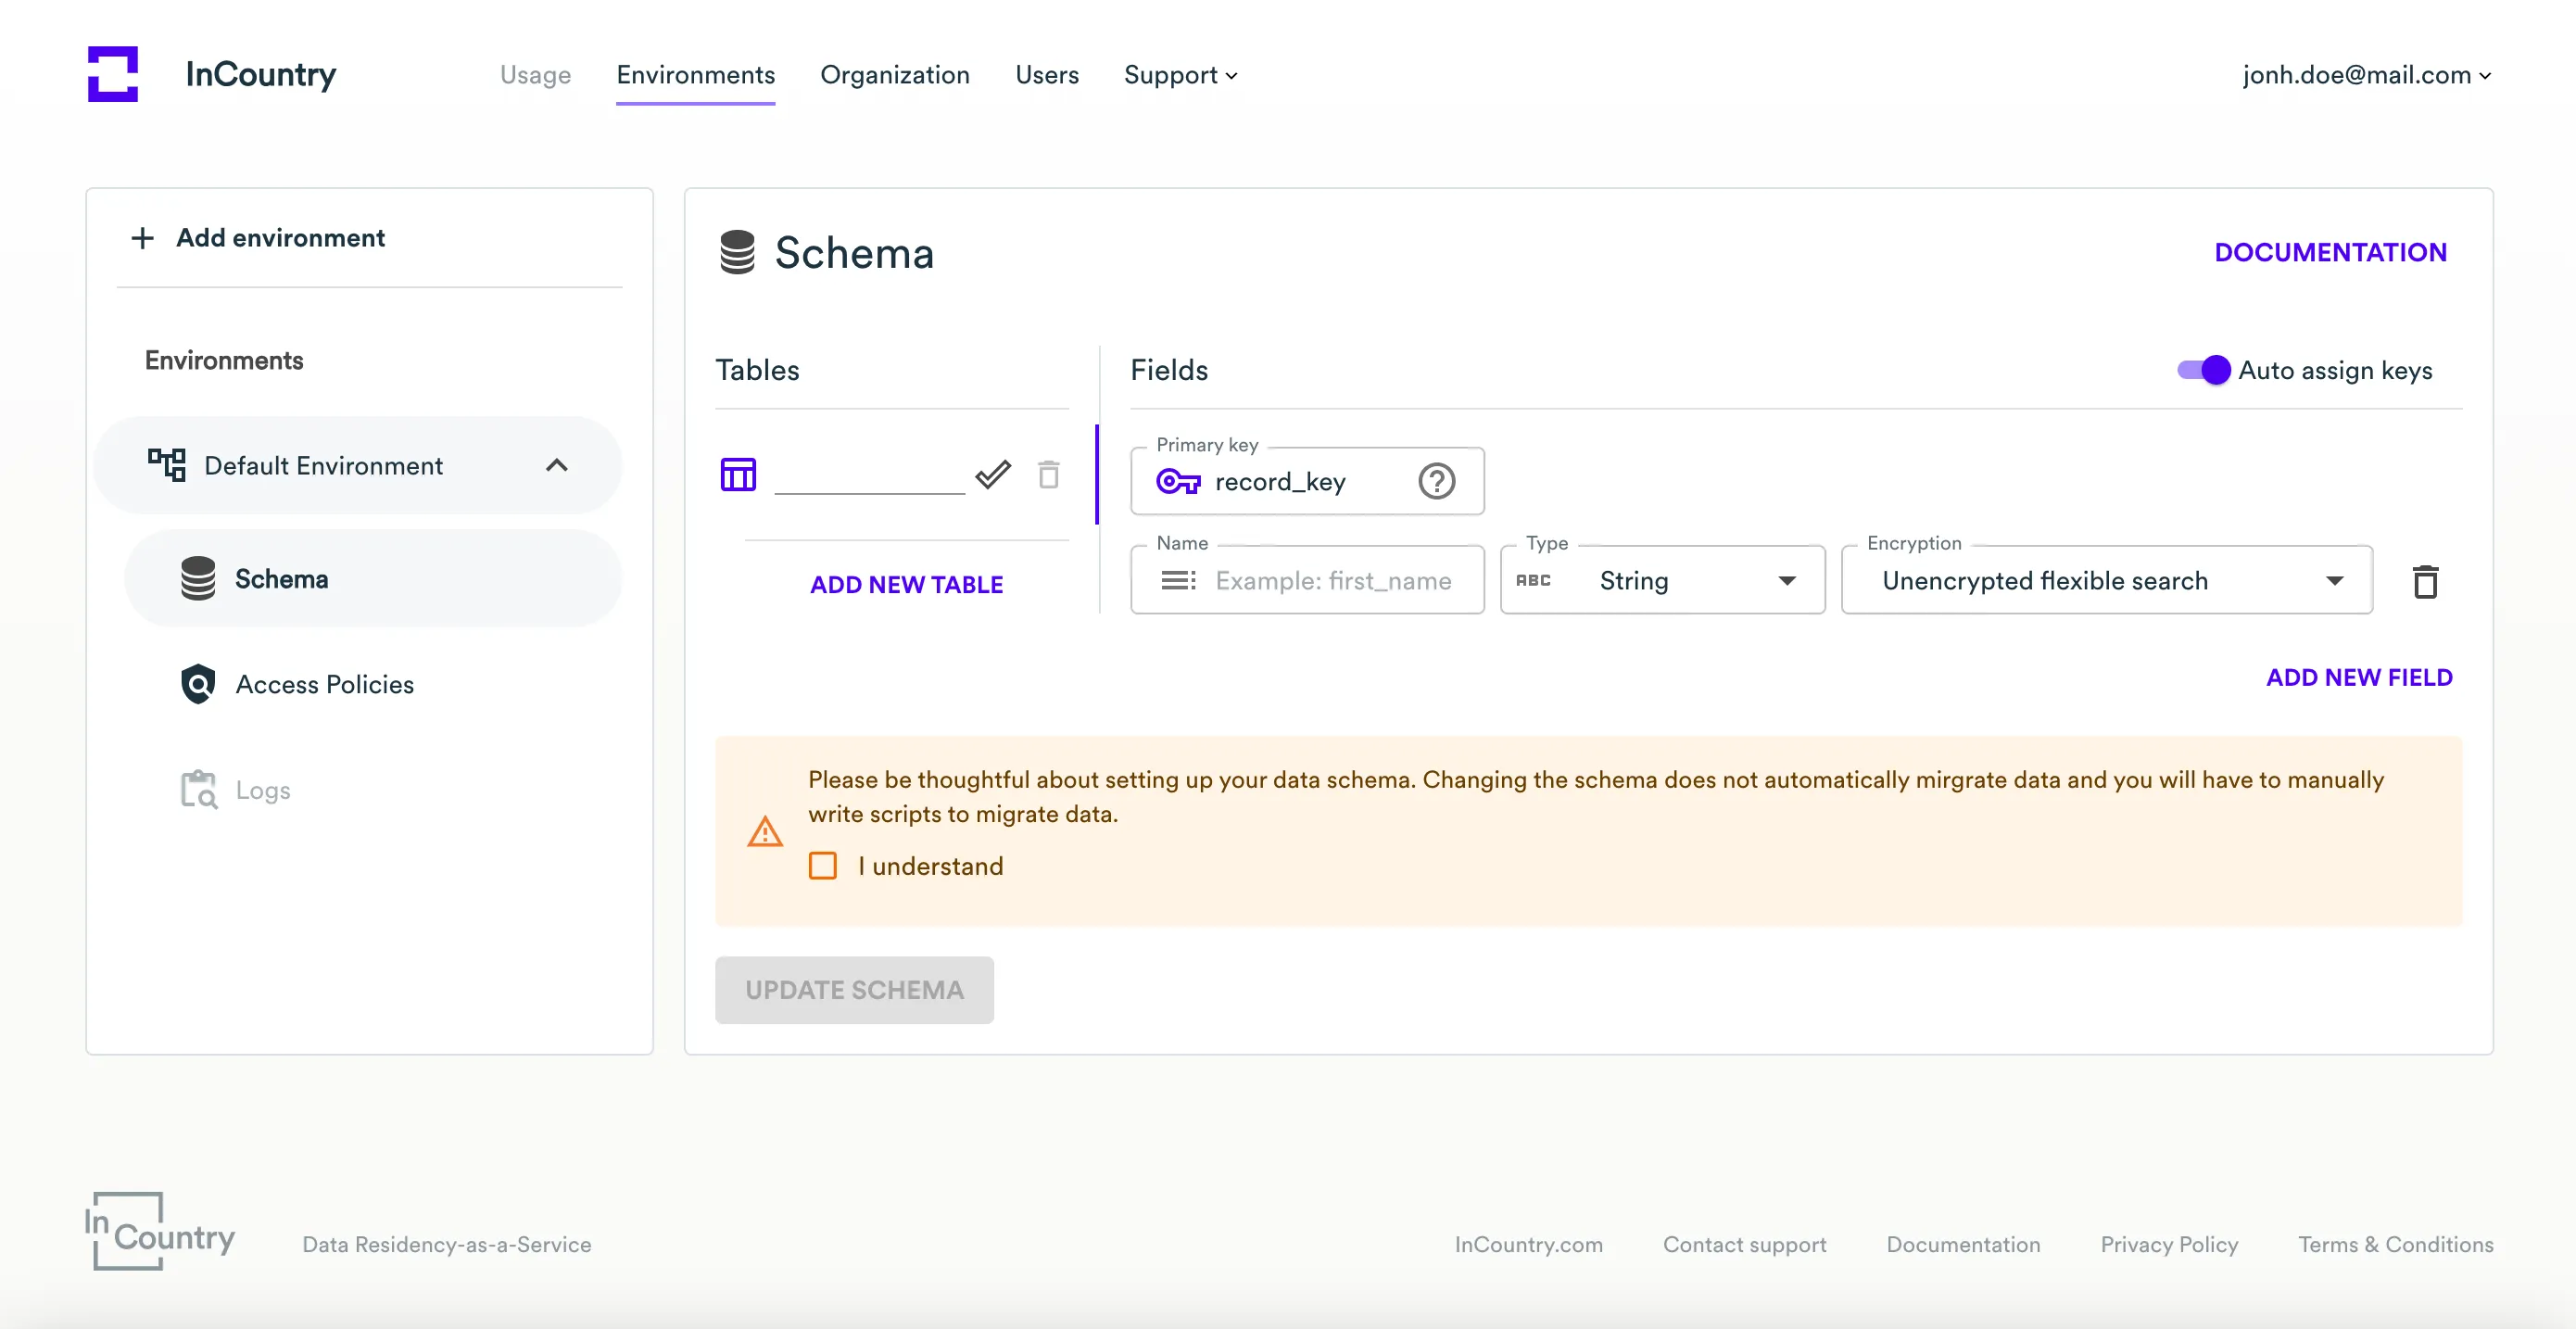
In the left menu, expand the environment for which you want to create a schema, then click on the Schema menu item.

-
You will be presented with an empty schema to fill in.
-
On the Schema page, specify the following information:
In the Tables section, pick the name of the table.
In the Fields section, specify the following information:
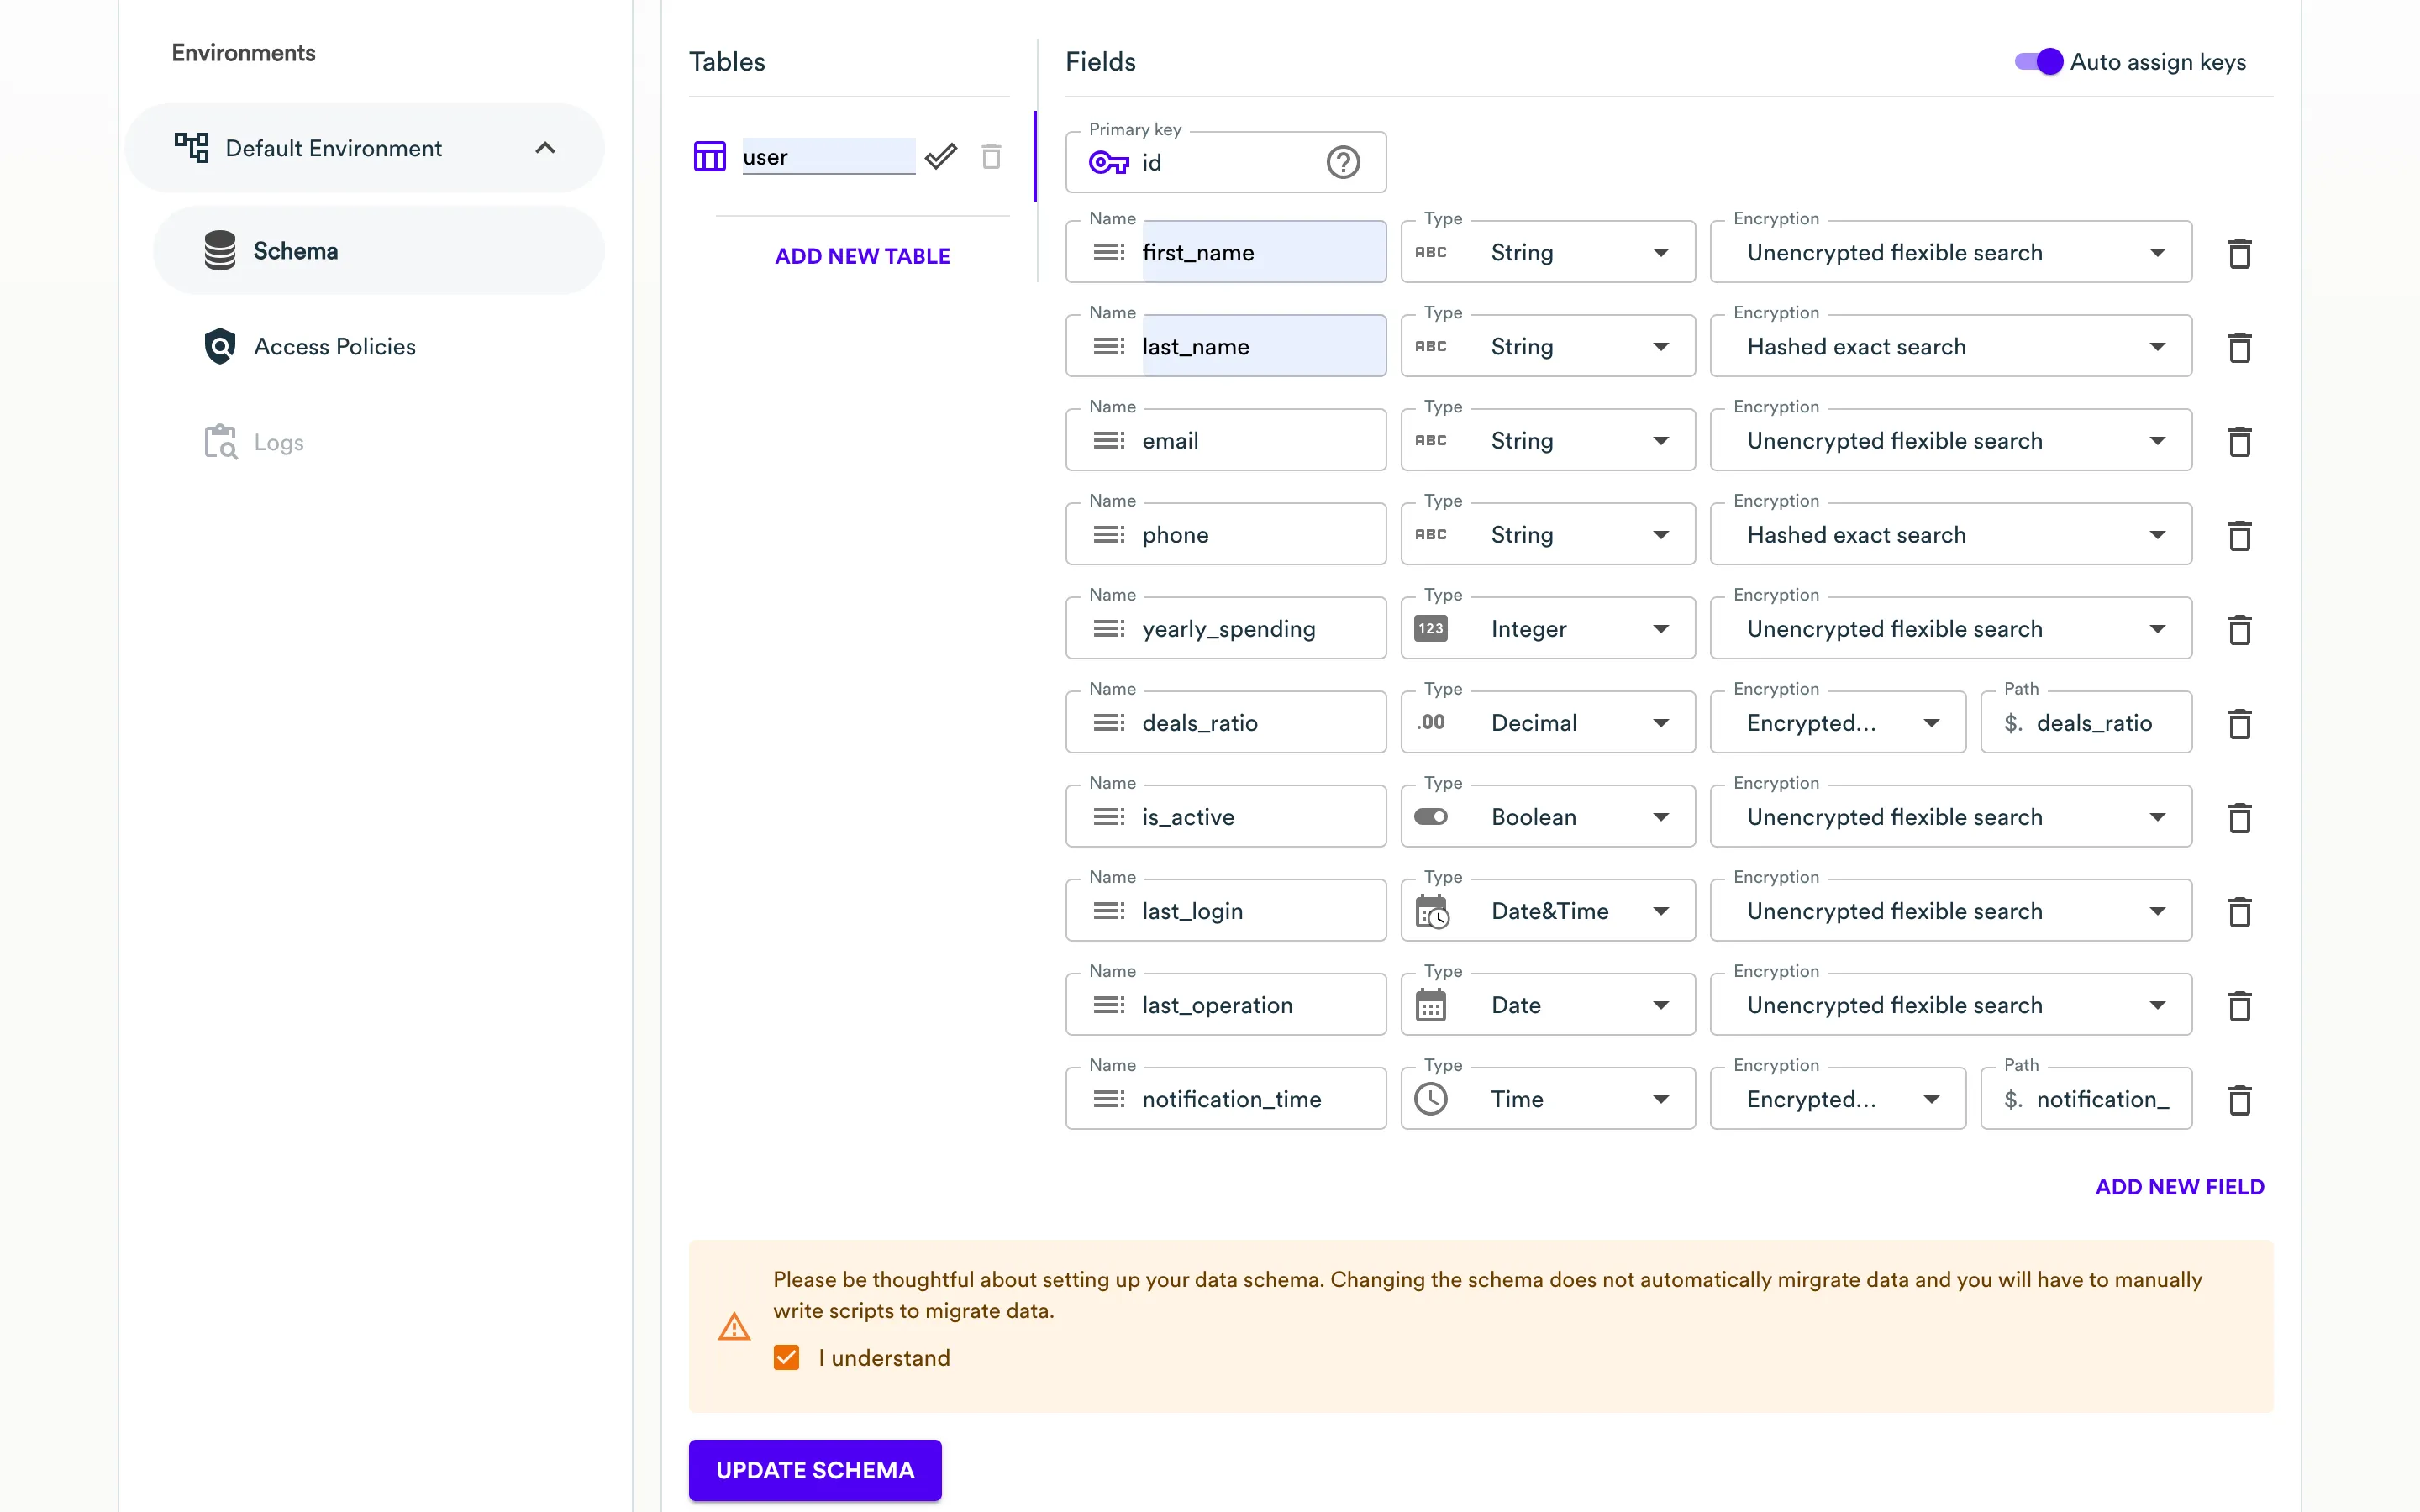
- Field name - specify the desired field name.
- Data type - select the field type (String, Integer, Decimal, Date, Time, Date&Time, Boolean, or JSON).
- Encryption - select the encryption type (Unencrypted flexible search, Hashed exact search or Encrypted not searchable). If Encrypted not searchable is selected, you must specify the JSON path where this field will be stored in the encrypted object inside the InCountry record.
- Click the plus icon to add a new field and repeat the procedure.
-
Click the plus icon to add a new table and repeat the procedure from step 3.
-
When complete, click Update Schema.
-
Enter the verification code and click Confirm.

The schema is saved. Further, you can edit or delete this schema.
Once you have defined the schema, you can further use fields instead of default record keys. Schema fields can be used in the following functionality:
- Management of Web Services endpoints
- Management of records with REST API
Create a policy and add CORS settings
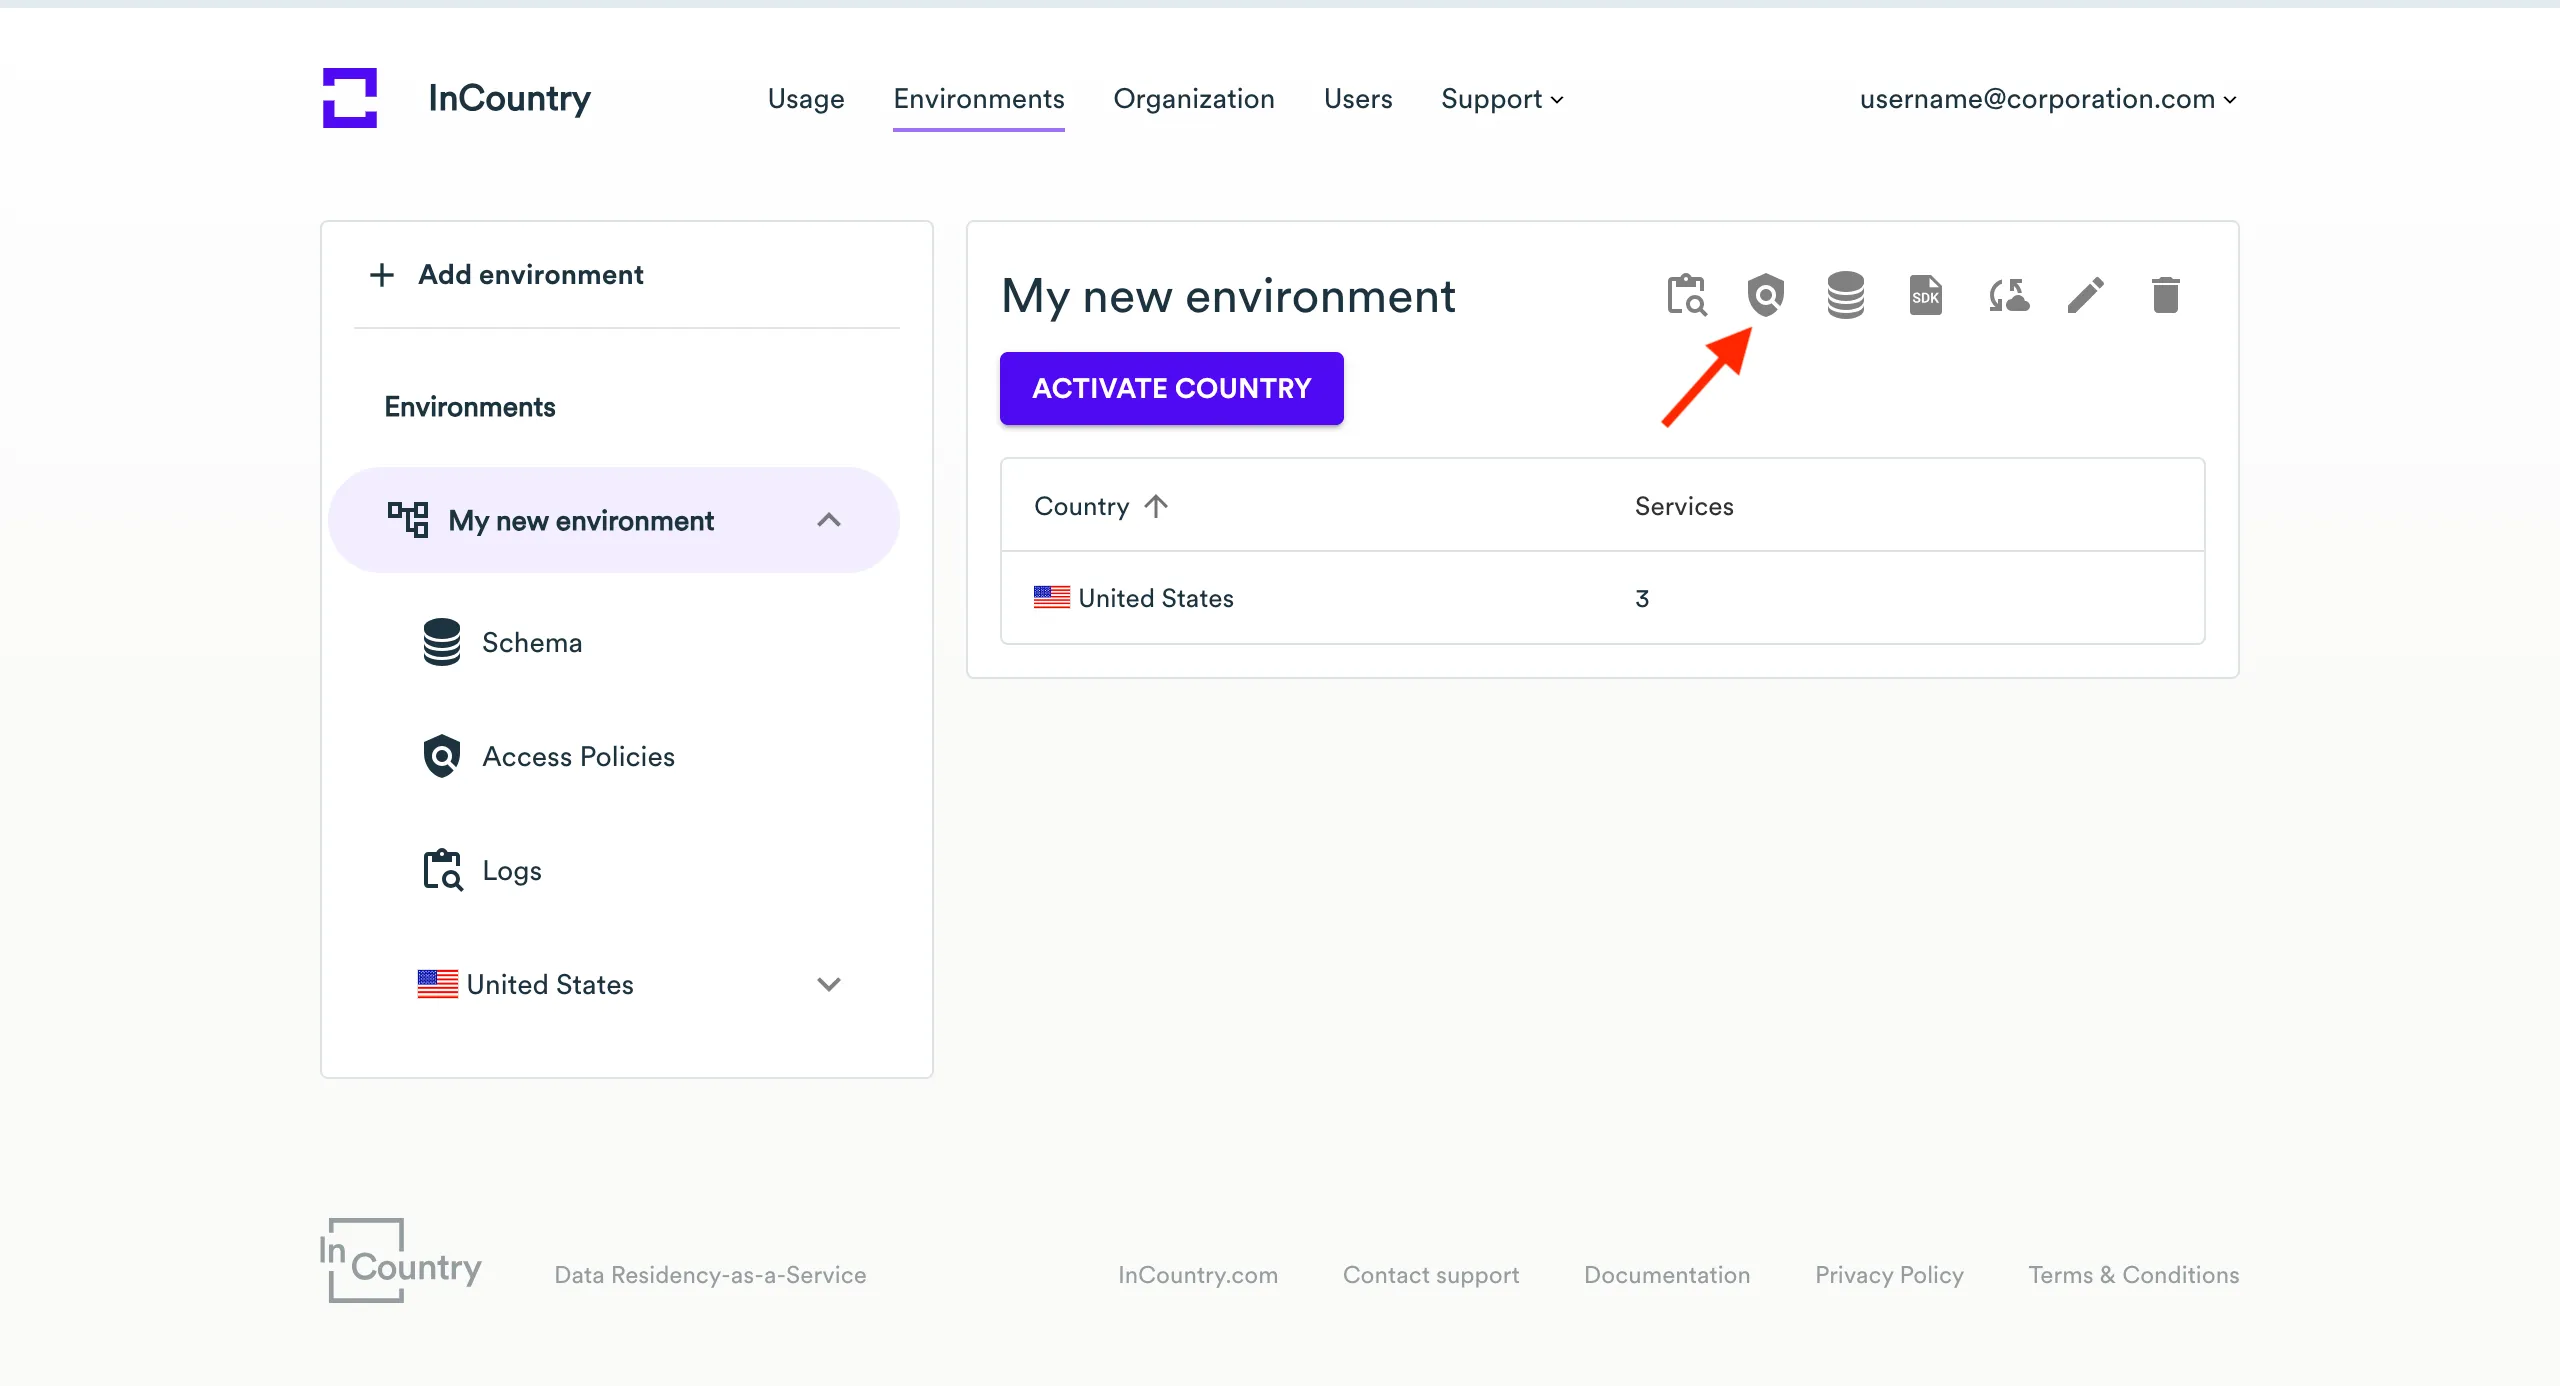
-
Open the environment page where you want to create a new access policy.
-
On the sidebar, select Access Policies.
-
On the page with the list of access policies, click Create Policy.
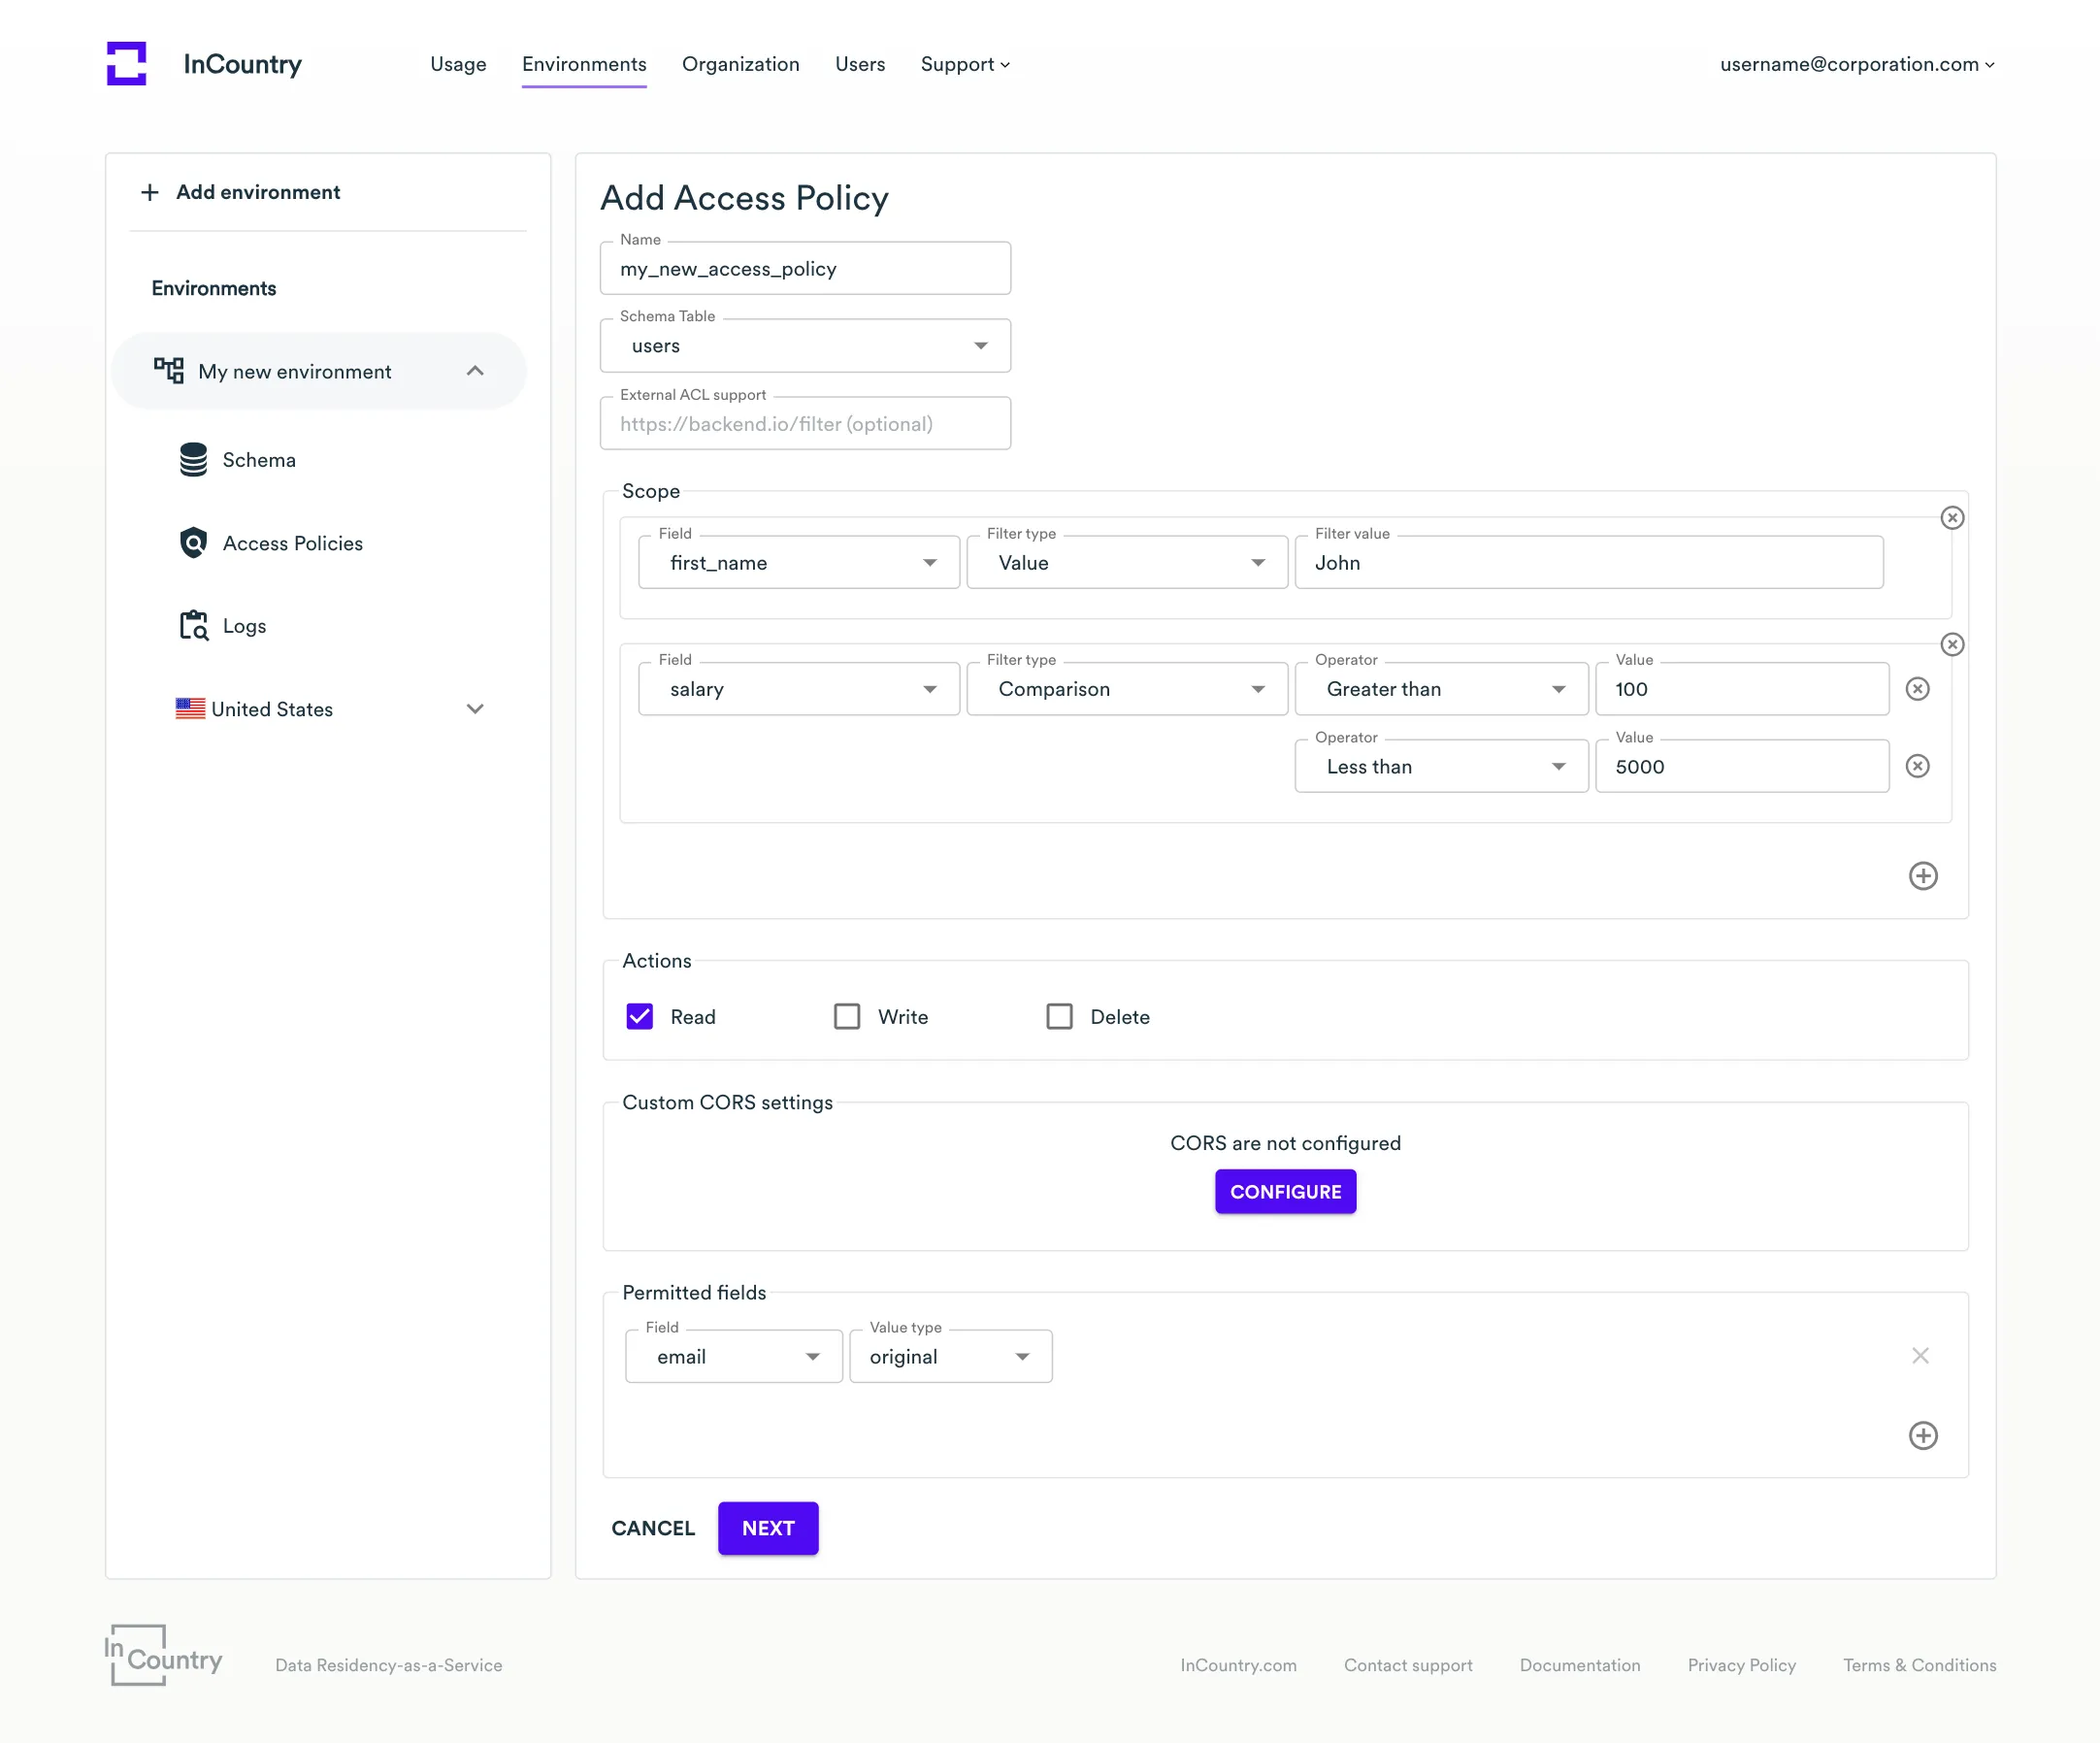
-
On the Add Access Policy page, define the parameters of a new access policy:
- Name - enter the name of an access policy. Policy names must contain only letters and numbers without spaces.
- Schema Table - select a schema table. Schema Table is a required field. If the schema table has not been created, then you need to go to the schema editor and create a new schema table.
-
For the added policy, fill out the following information:
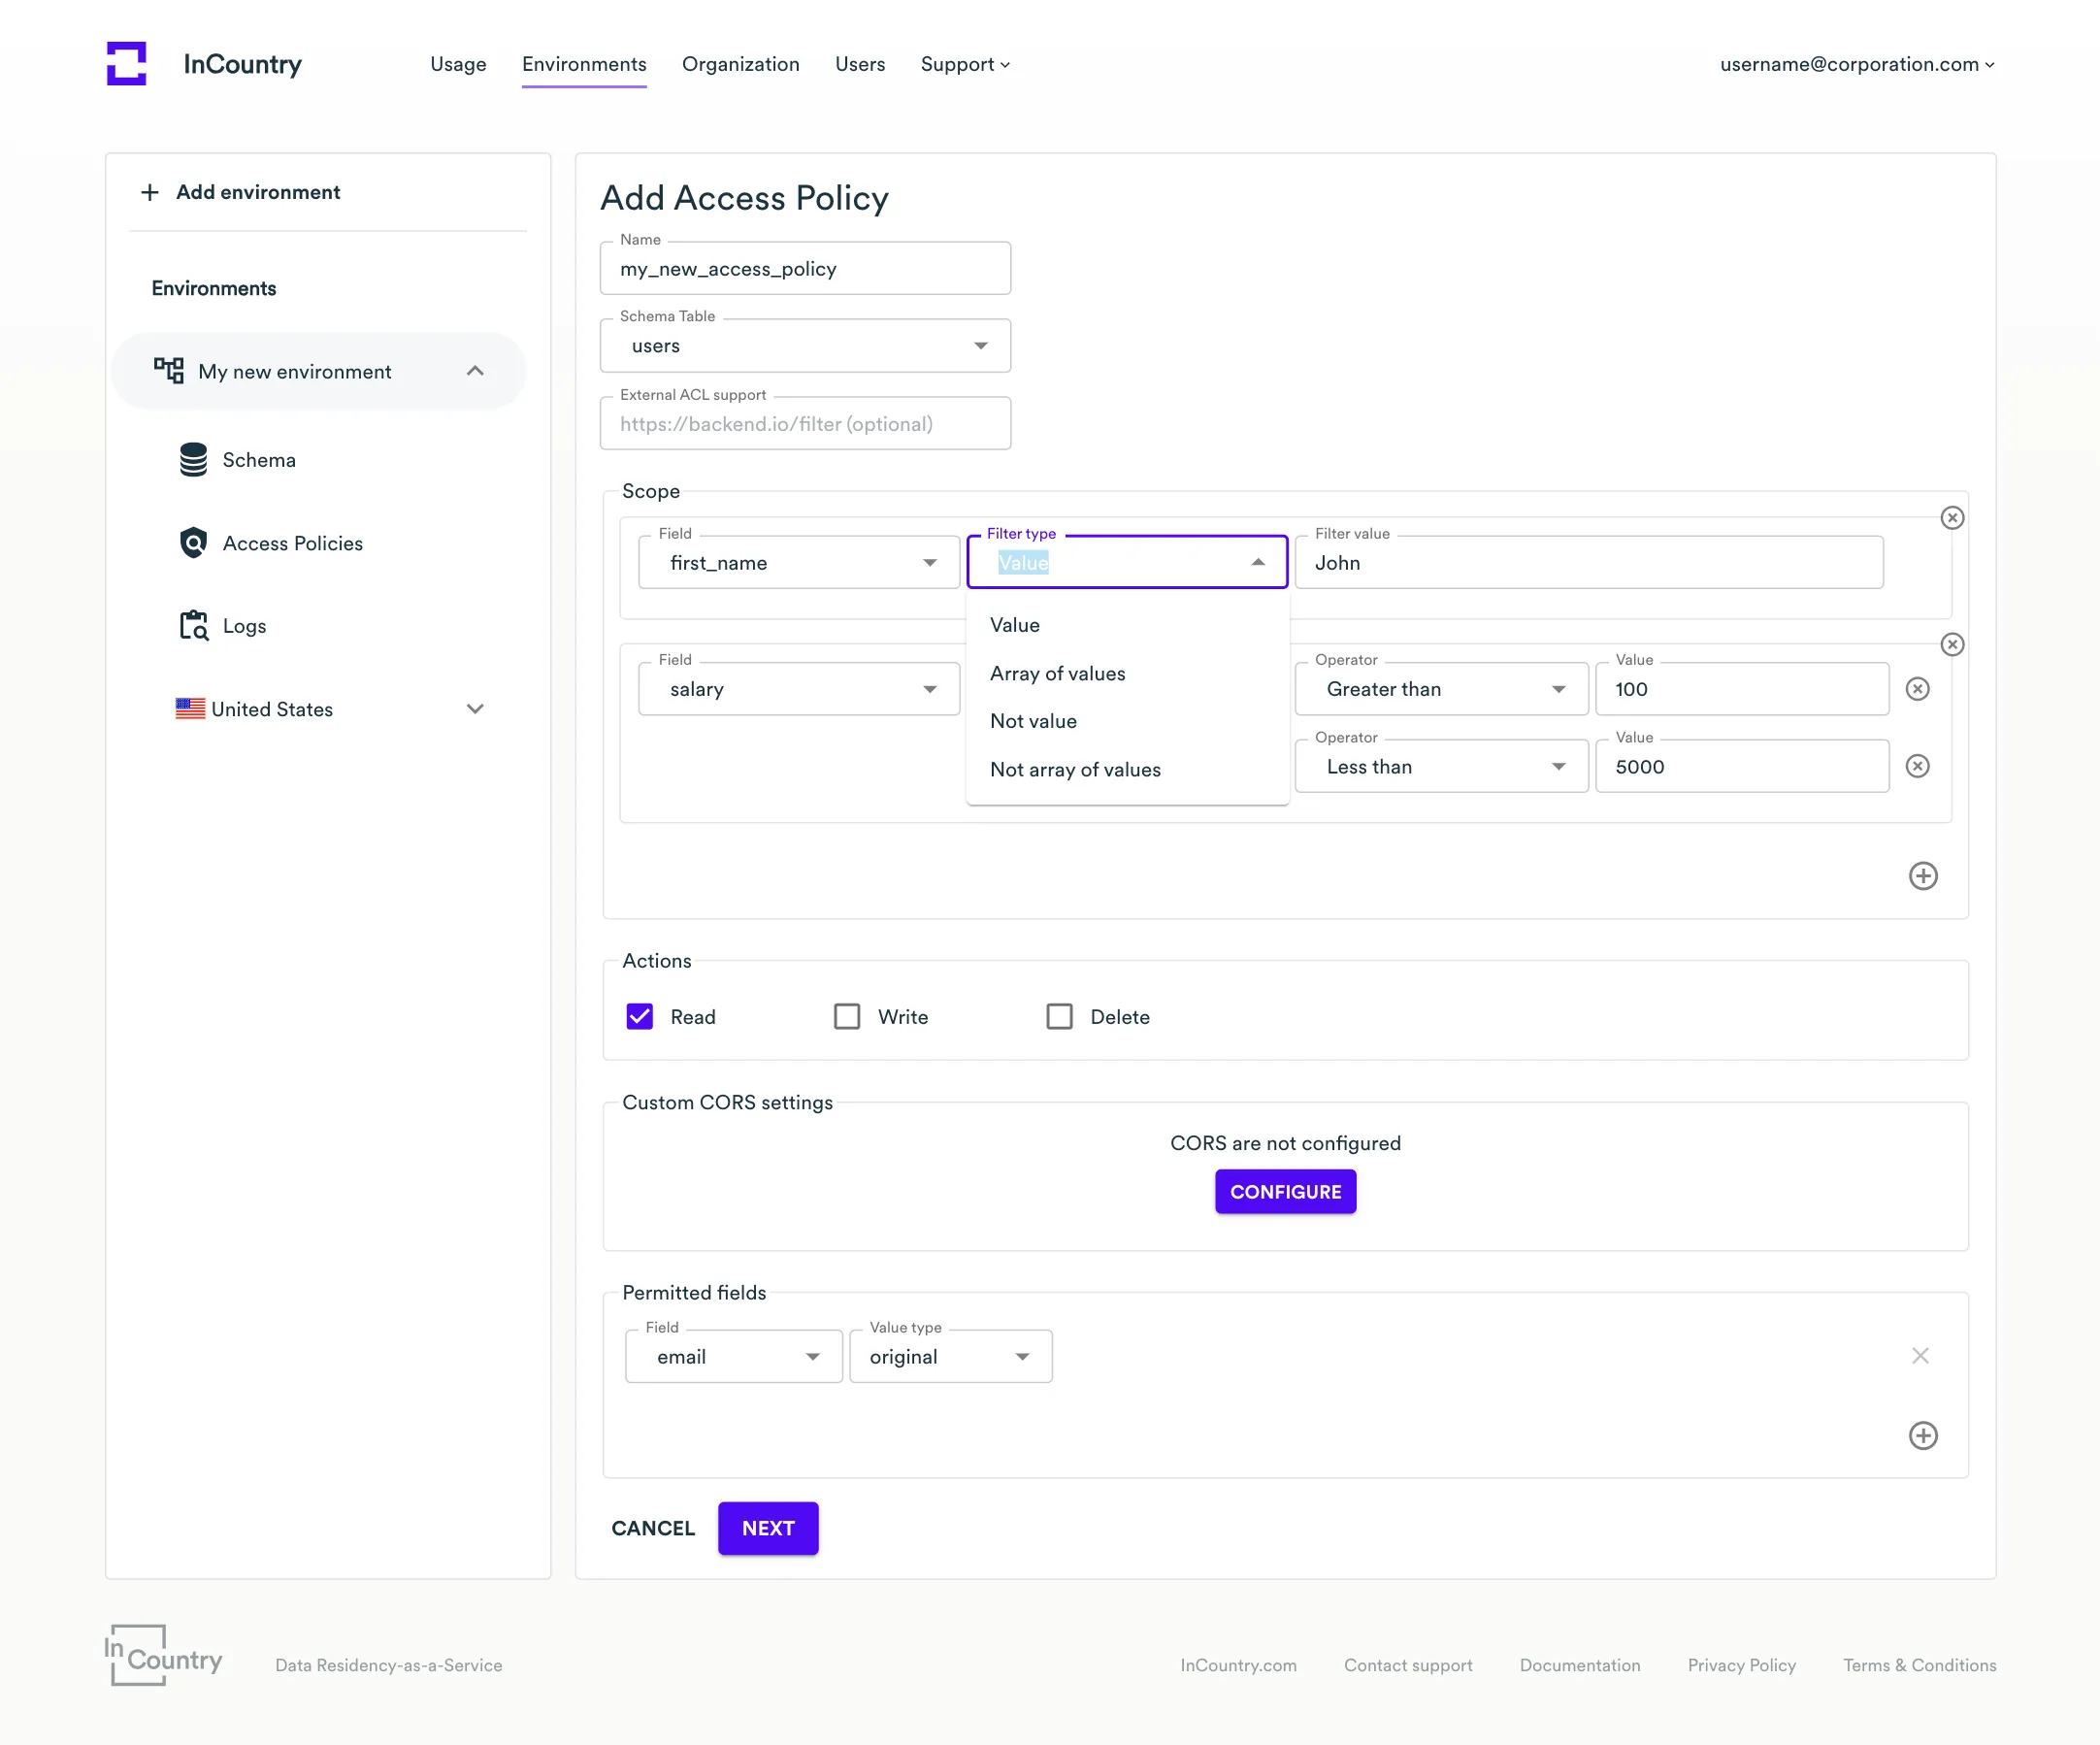
- Scope - enter policy rules to restrict access to the records that don't meet the specified criteria:
notePlease note a field called External ACL support. It is an additional layer of protection called fine-grained access control.
The different field types (string, integer, decimal) have different sets of criteria. Here is an example of criteria for the string field type:
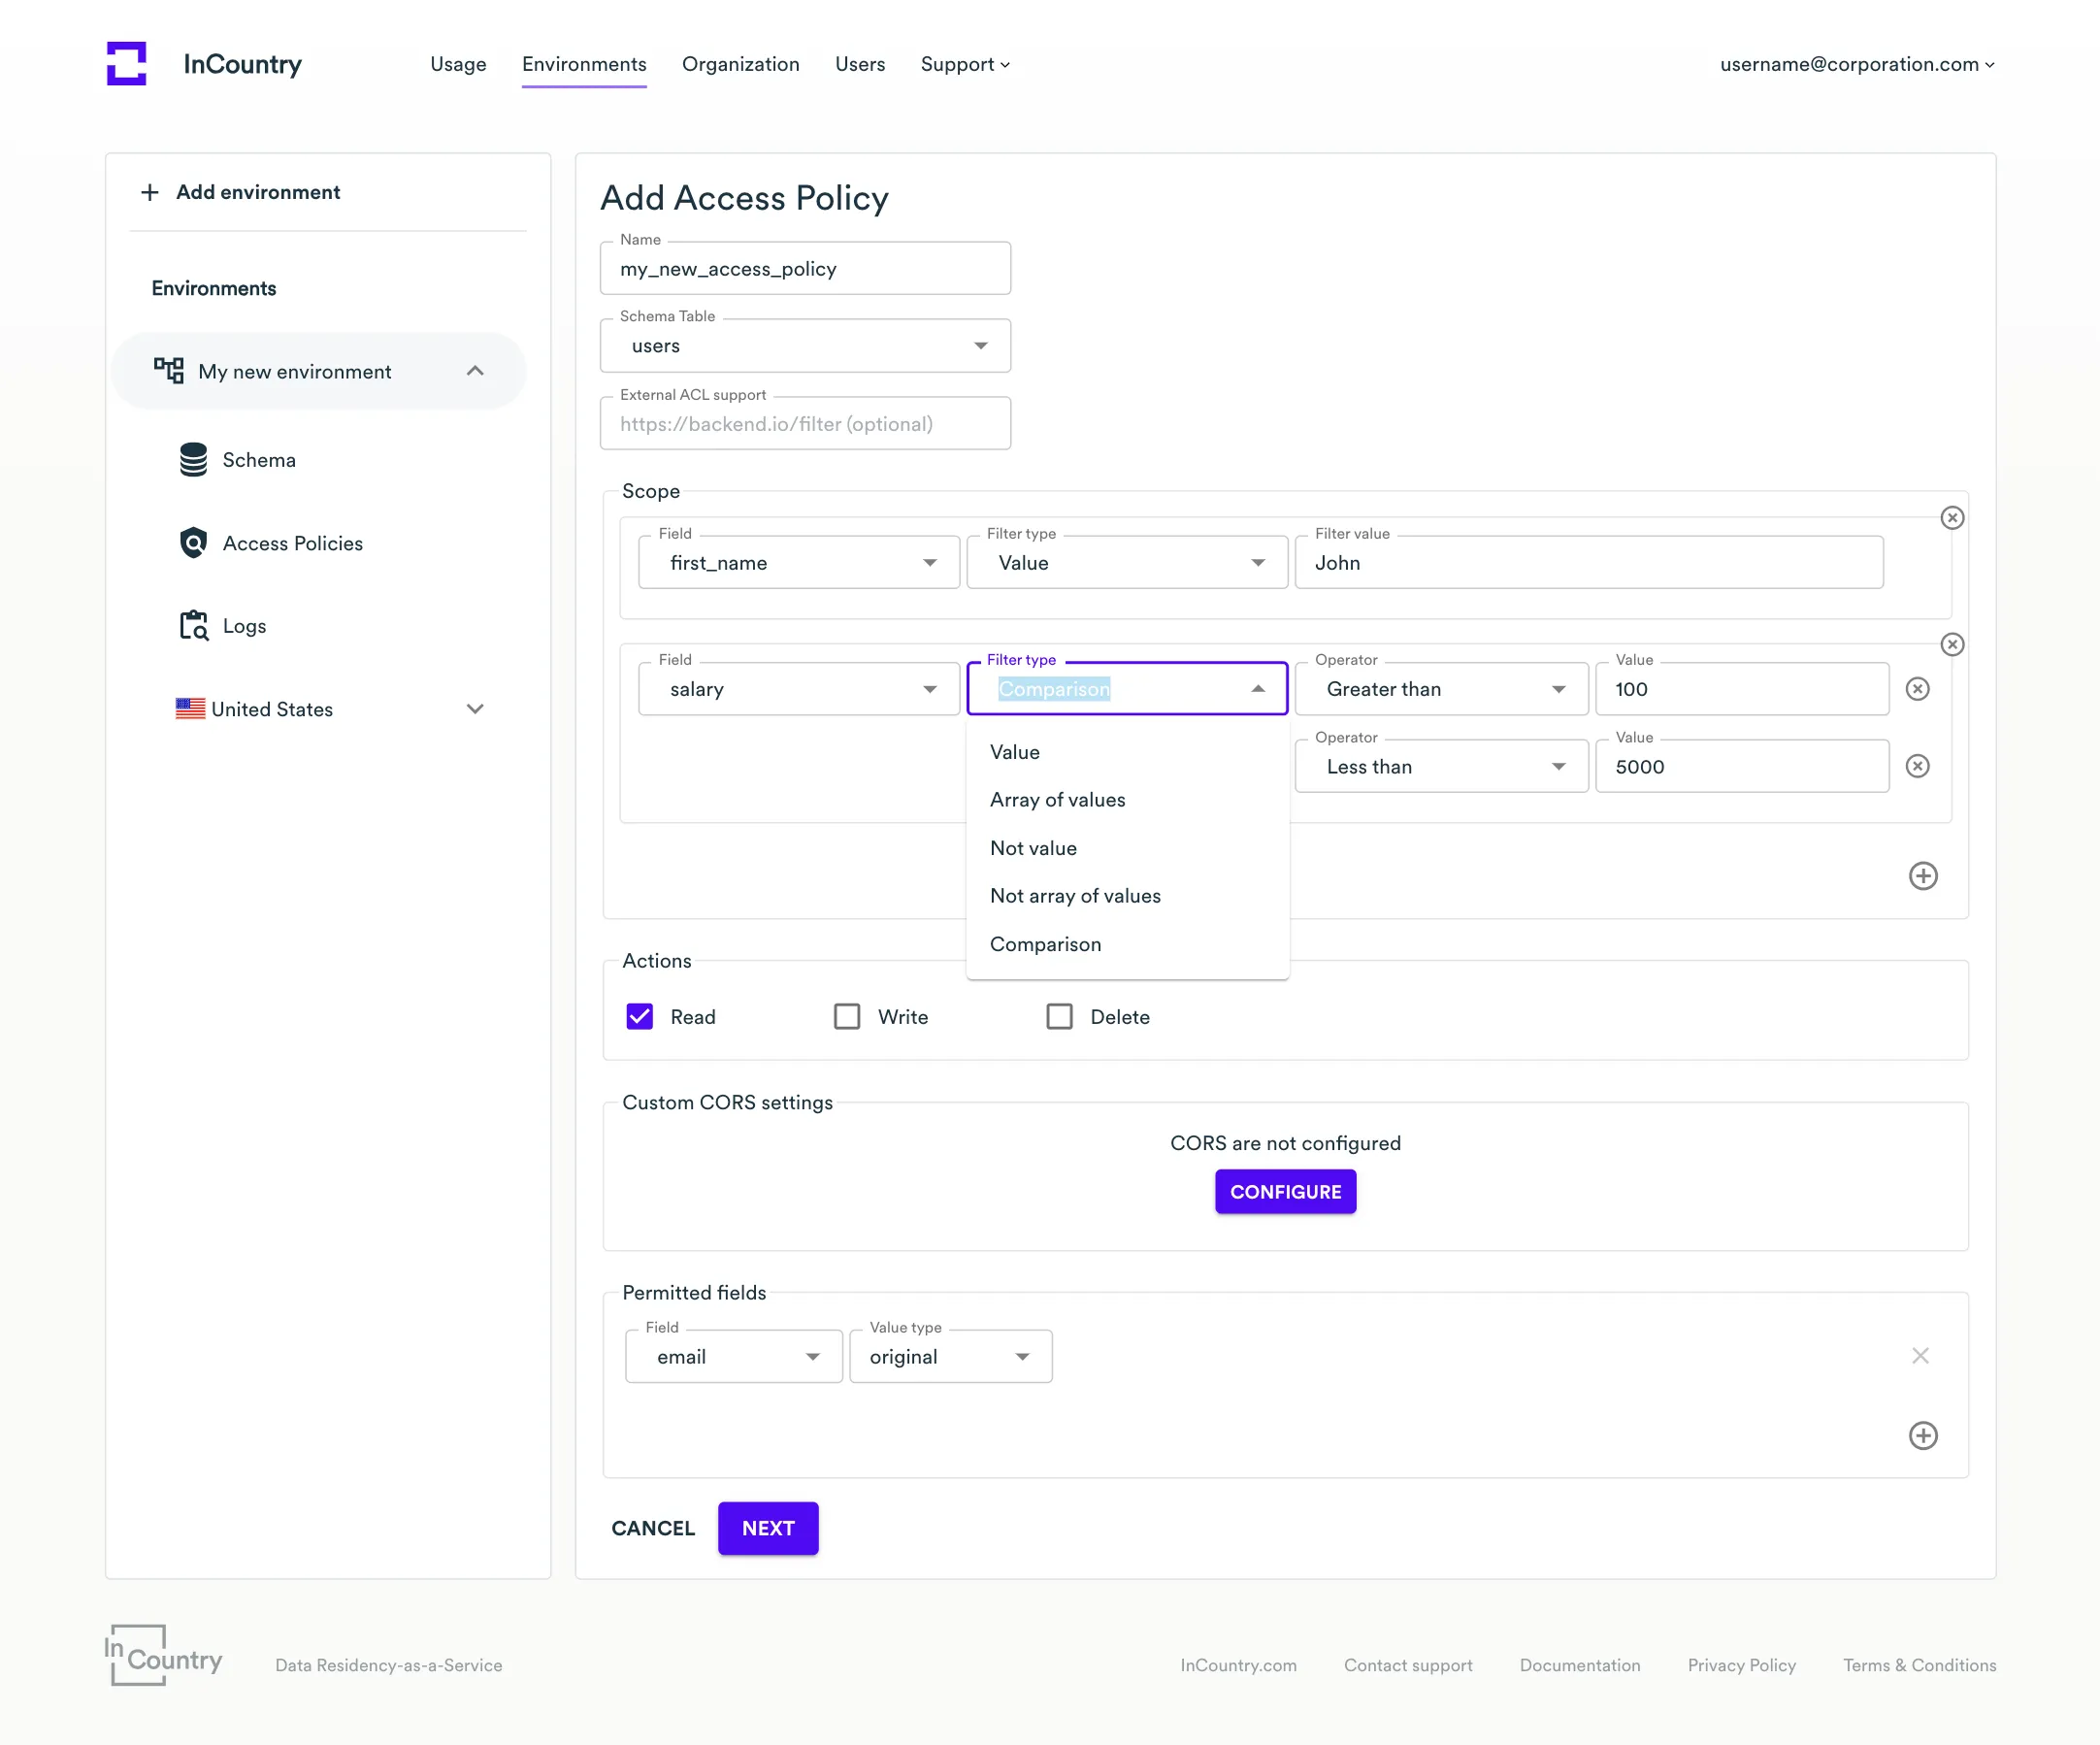
For the integer fields, you can add the Comparison field type.
-
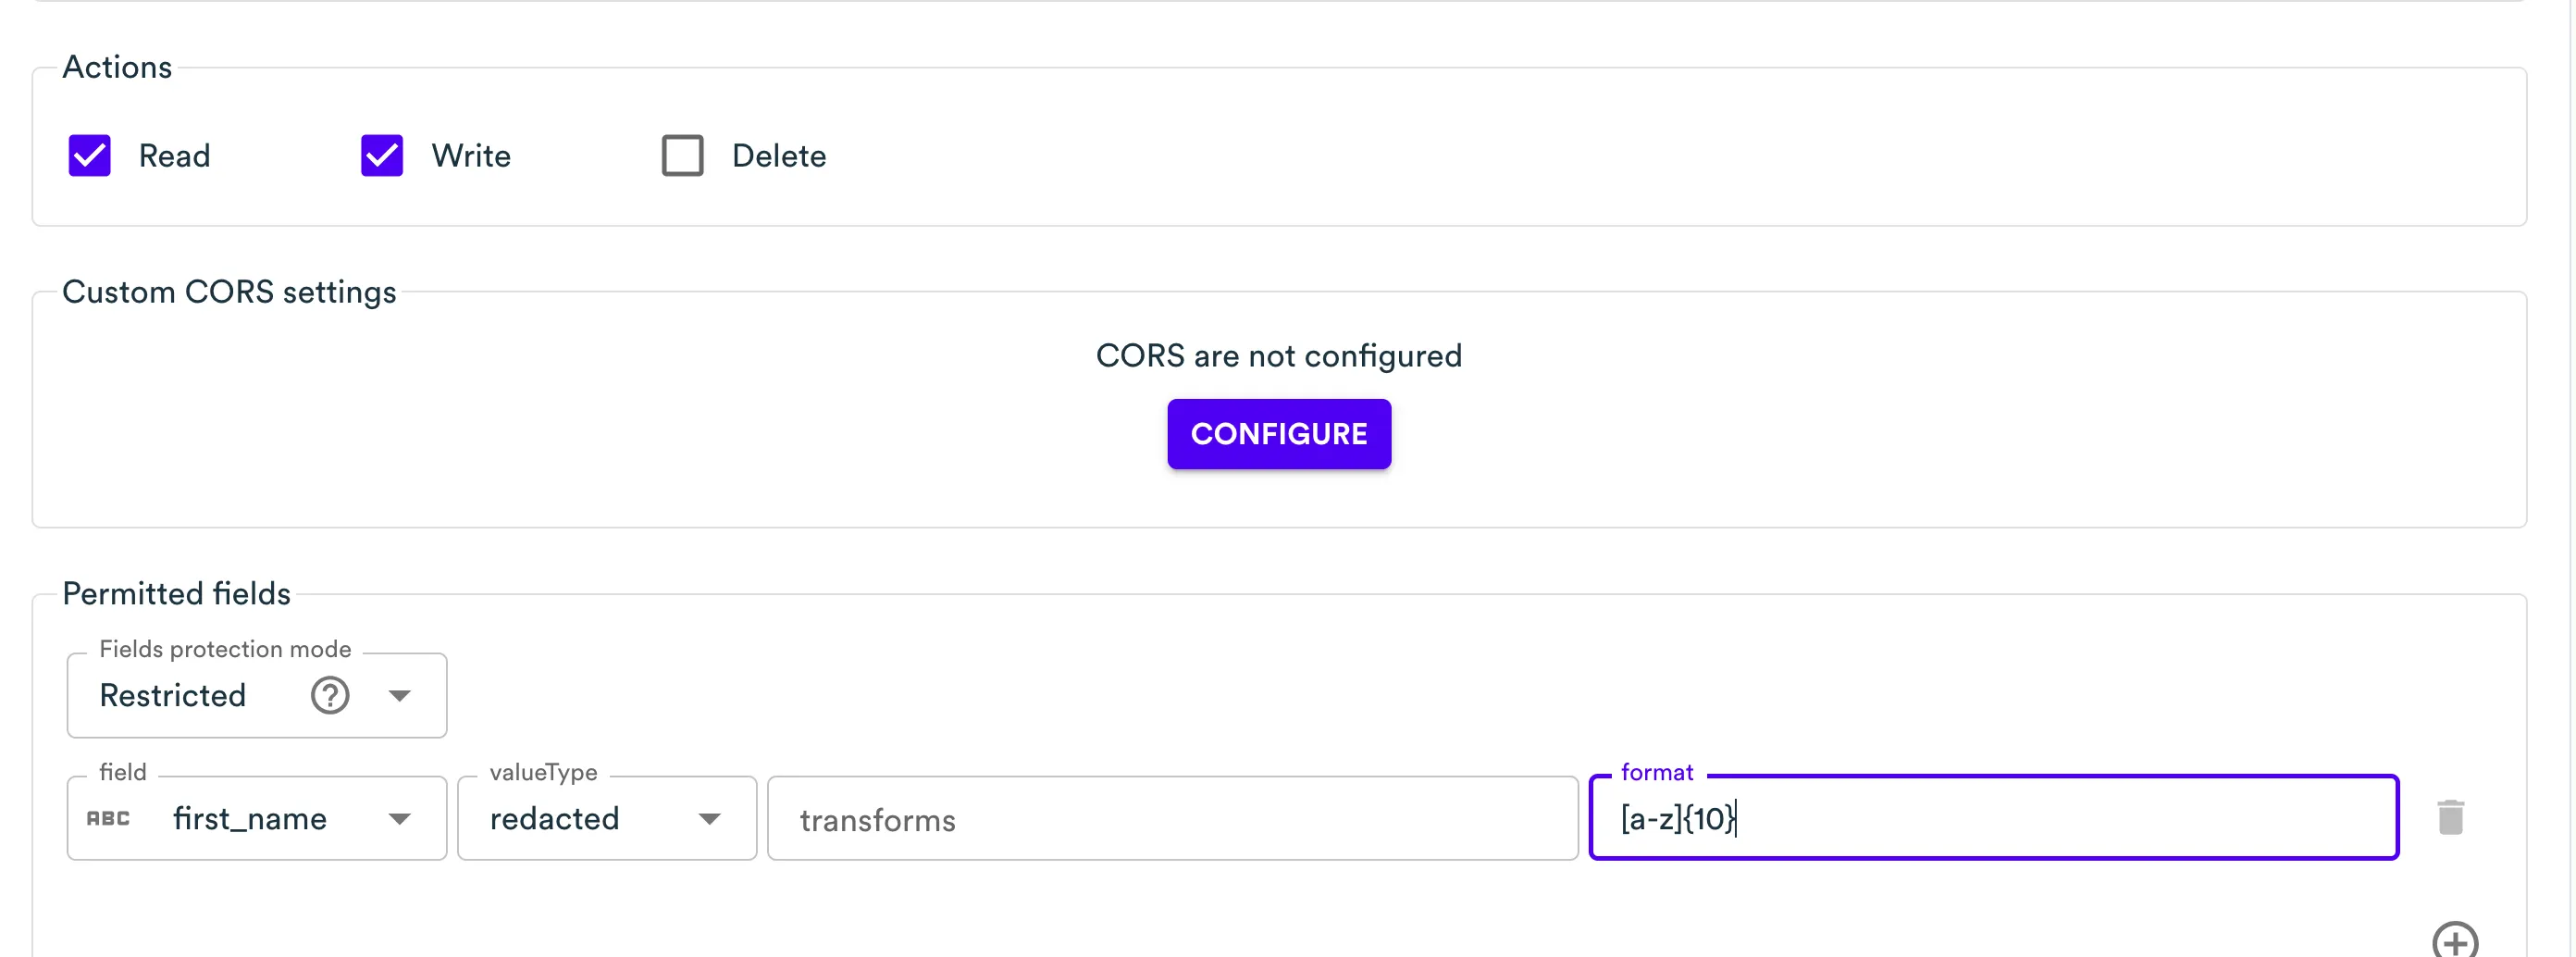
Actions - select actions, allowed to be performed under your policy (Read, Write, Delete).
-
Permitted fields - select fields to be available (both for the Read and Write actions) for the credentials using the policy. You may optionally apply masking to these fields (email or alphanumeric masking for string fields, numeric for integer fields).
noteMasking options depend on the field type. Some fields do not support masking, for example, the date fields:
created_at,updated_at,expires_at.Currently, supported data masking strategies in RestAPI are:
alphanumeric,email, andnumeric. Strategies supported for string type:-
alphanumericturns a string of delimiter-separated values into masked values. For this algorithm, you can specify additional settings:- After N characters - specify the number of characters that will be preserved as is at the value beginning. All the characters then will be masked with the masking character.
- Character - enter the character that will mask values from the original clear-text value, for example,
*(asterisk),@(ampersand) orX. - Length - specify the number of masking characters applied to the value.
- Value delimiter - delimiter to separate values with.
For example, "John Doe" turns into "Jo* Do*" using the following params:
After N characters=2,Character=*,Length=1,Value delimiter=" ". -
emailworks similarly toalphanumeric, but doesn’t use the delimiter option and keeps the original domain name, e.g. turningjohndoe@gmail.comintojo\*\*@gmail.comusing the following params:After N characters=2,Character=*,Length=2.Strategies supported for numeric type:
-
numeric- replaces the input number with a completely random number of the same order of magnitude, e.g. 12345 will be replaced with ABCDE, where A, B, C, D, E - any number between 0 and 9 (except A is between 1 and 9), e.g. 52612. (or e.g. 1.23 replaced with 7.25 for decimals).
You can apply redaction to both Read and Write actions by setting the value type to
redactedand defining a template in the format field. This template determines how the redacted value is displayed. The redacted value is persistent and will remain unchanged unless the original value is modified.The template uses the format:
<constant_text>[alphabet]{totalChars}<constant_text>. The[alphabet]{totalChars}portion defines a randomly generated string of the specified length using characters from the given set.For example:
-
[a-z]{10}generates a 10-character lowercase string (e.g.,xkqwejzvmt) -
[a-z]{10}@gmail.comgenerates a 10-character lowercase string followed by @gmail.com (e.g.,xkqwejzvmt@gmail.com)
- Scope - enter policy rules to restrict access to the records that don't meet the specified criteria:
-
In the Add Access Policy form, scroll to Custom CORS settings and click Configure.
-
Add origins to Allow Origin List or check the Allow any origin checkbox.
-
When complete, click Create. A new access policy appears on the list.


Create a new REST API service
This service type is used for server-to-server communication (backend requests only).
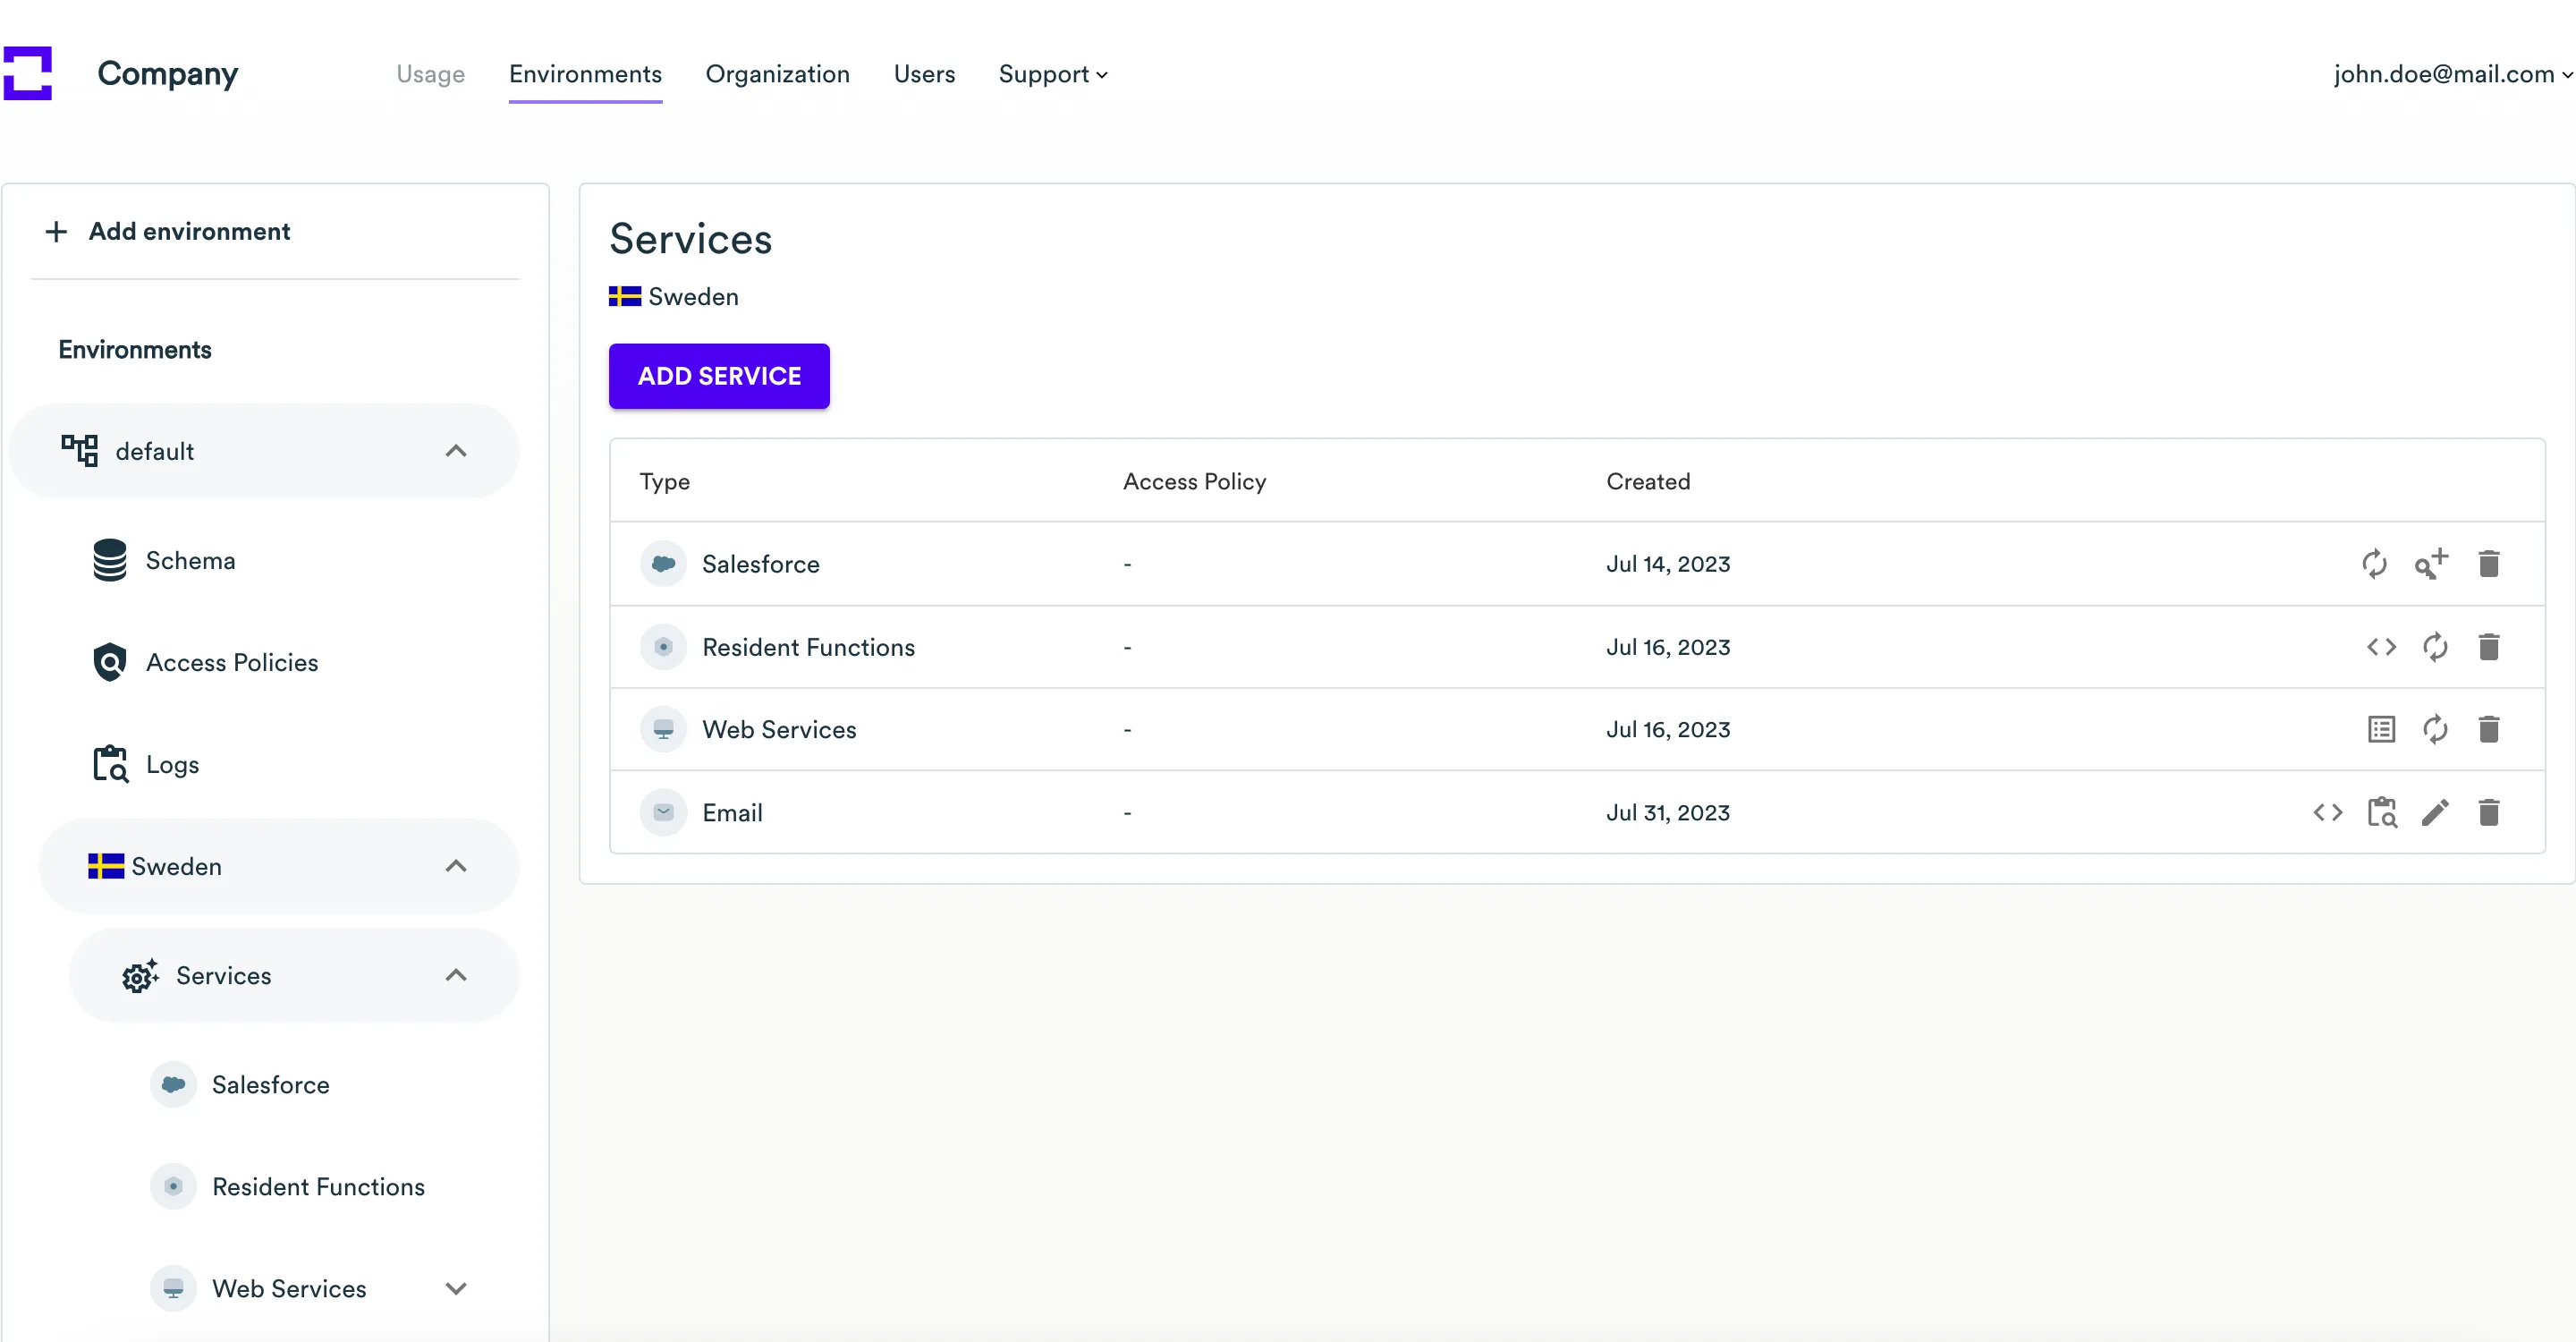
-
Expand the environment and country in the left sidebar where you wish to create a new service, then click on the Services menu item.
-
Click the Add service button.
-
On the Add Service page, select the REST API service.
-
Click the Create button.
-
On the page with the created service, save the Environment ID, Client ID, Client Secret, and REST API address. To download a text file with all these credentials, click the Download button. To copy these credentials to the clipboard, click the Copy to clipboard button.
-
When complete, click the Close button.

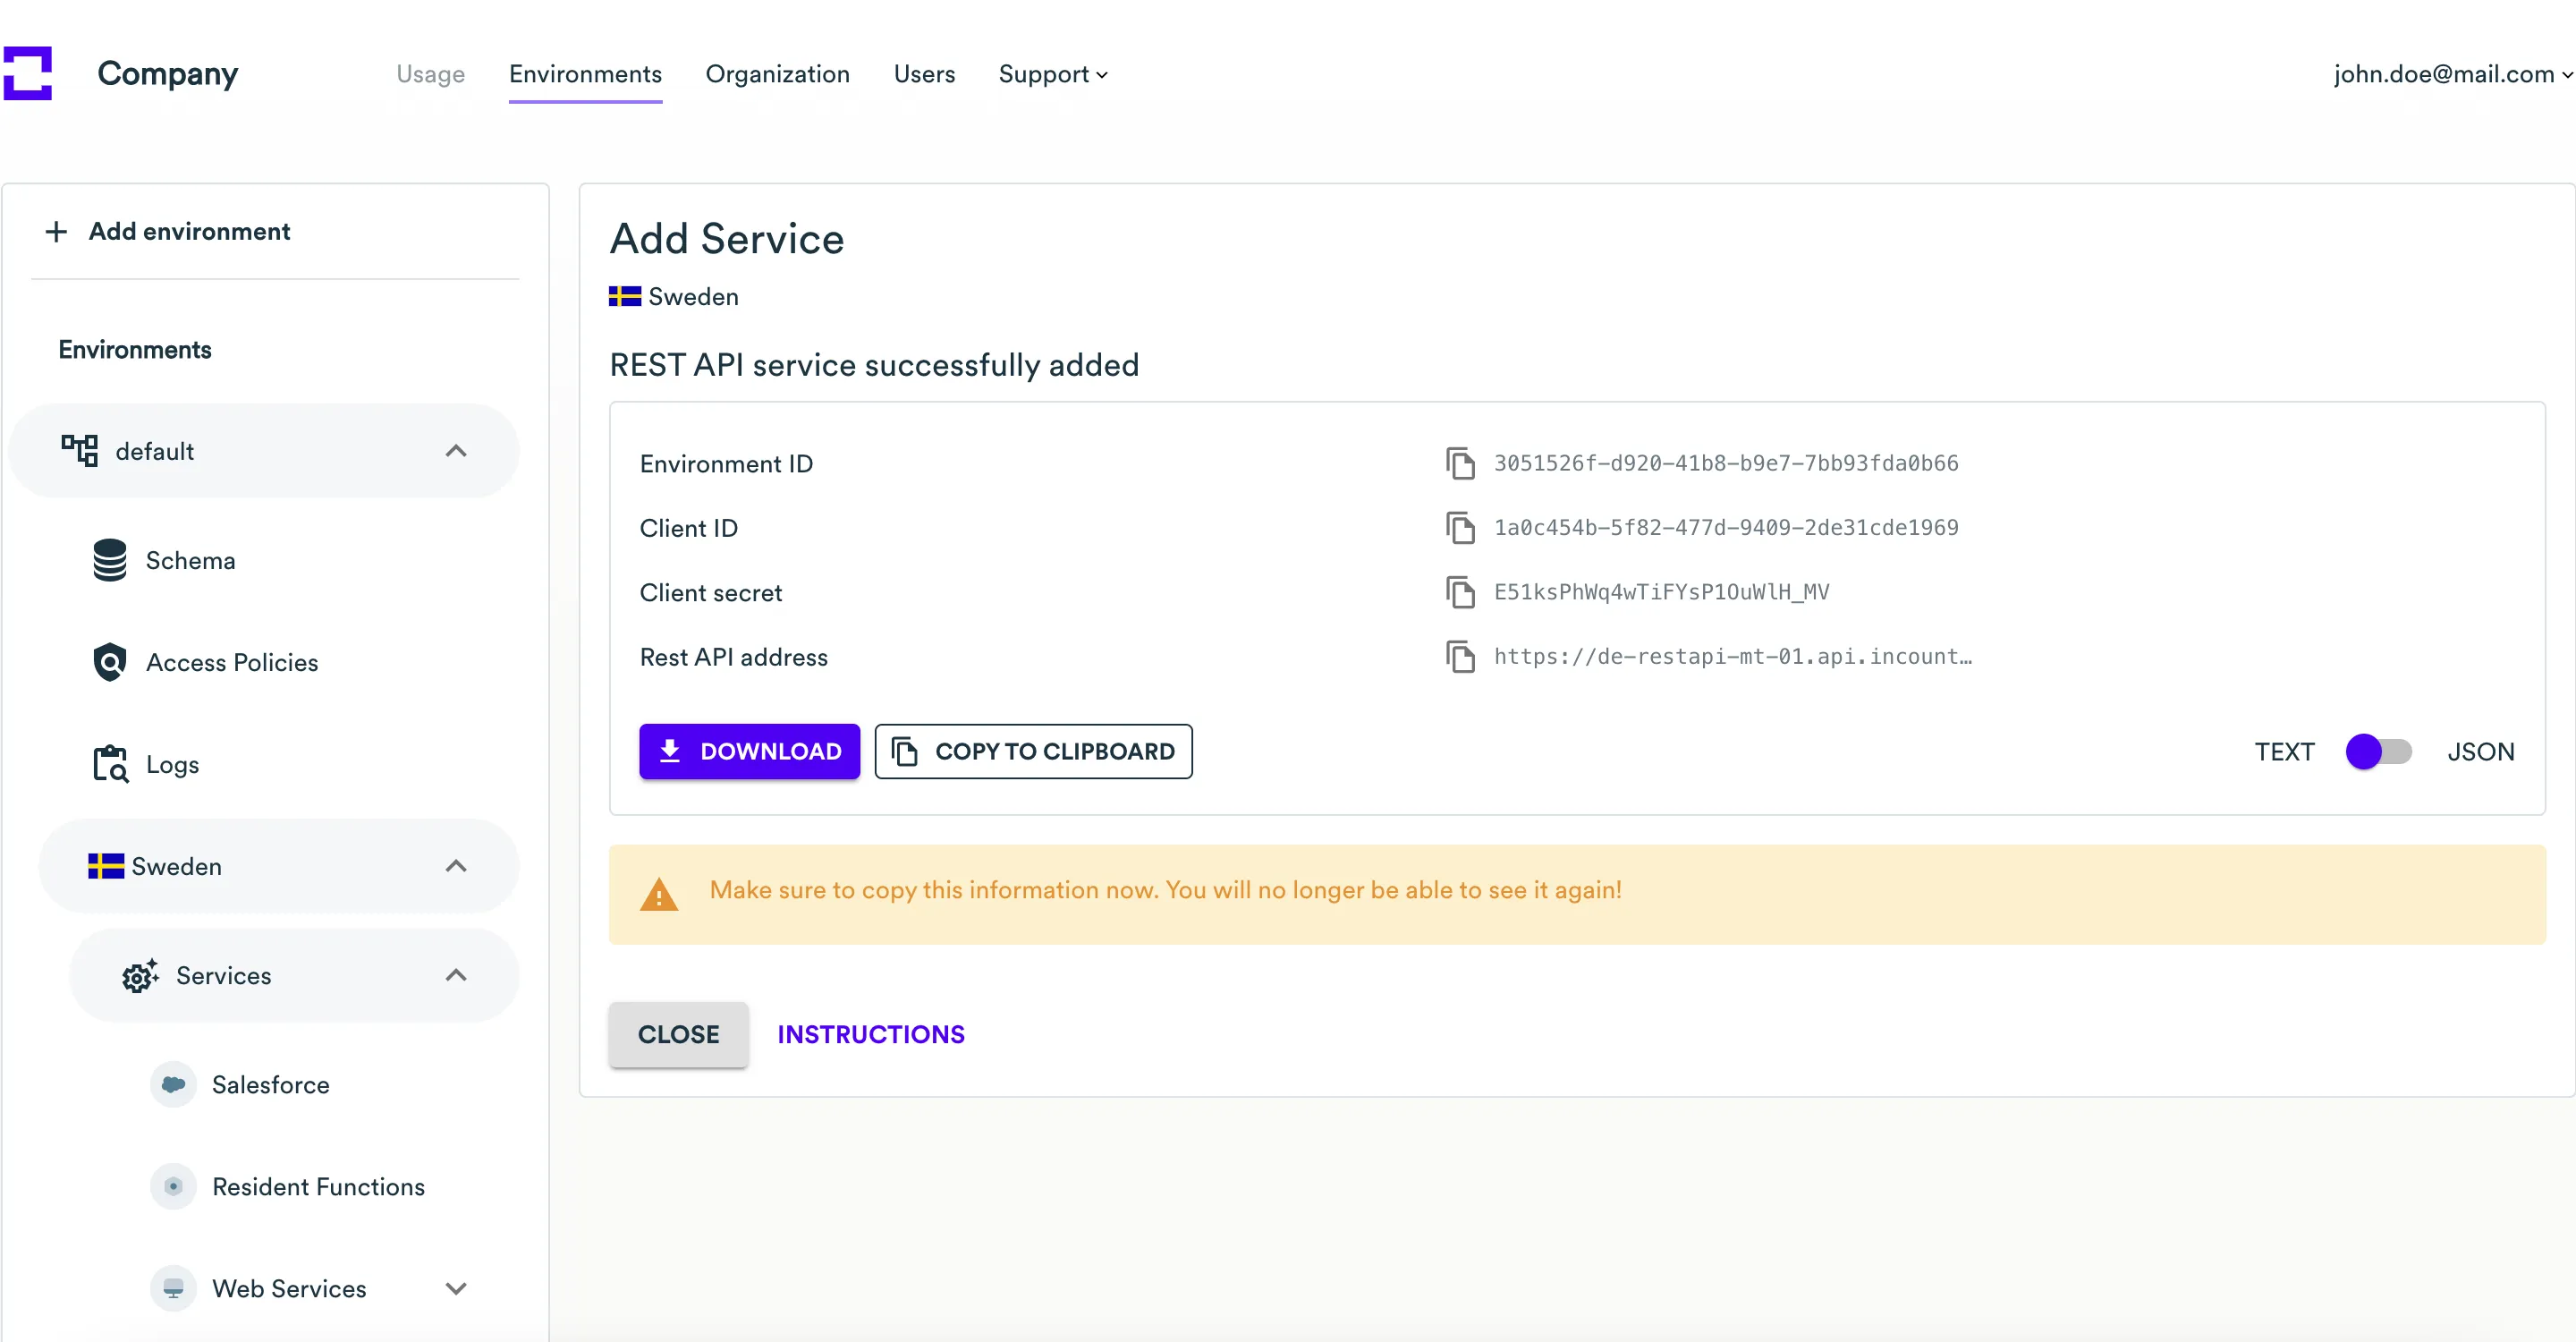
A new REST API service will appear on the list with other services within the current environment and country. Once you have created a REST API service, you need to manage its credentials.
Create credentials to REST API service with the attached policy
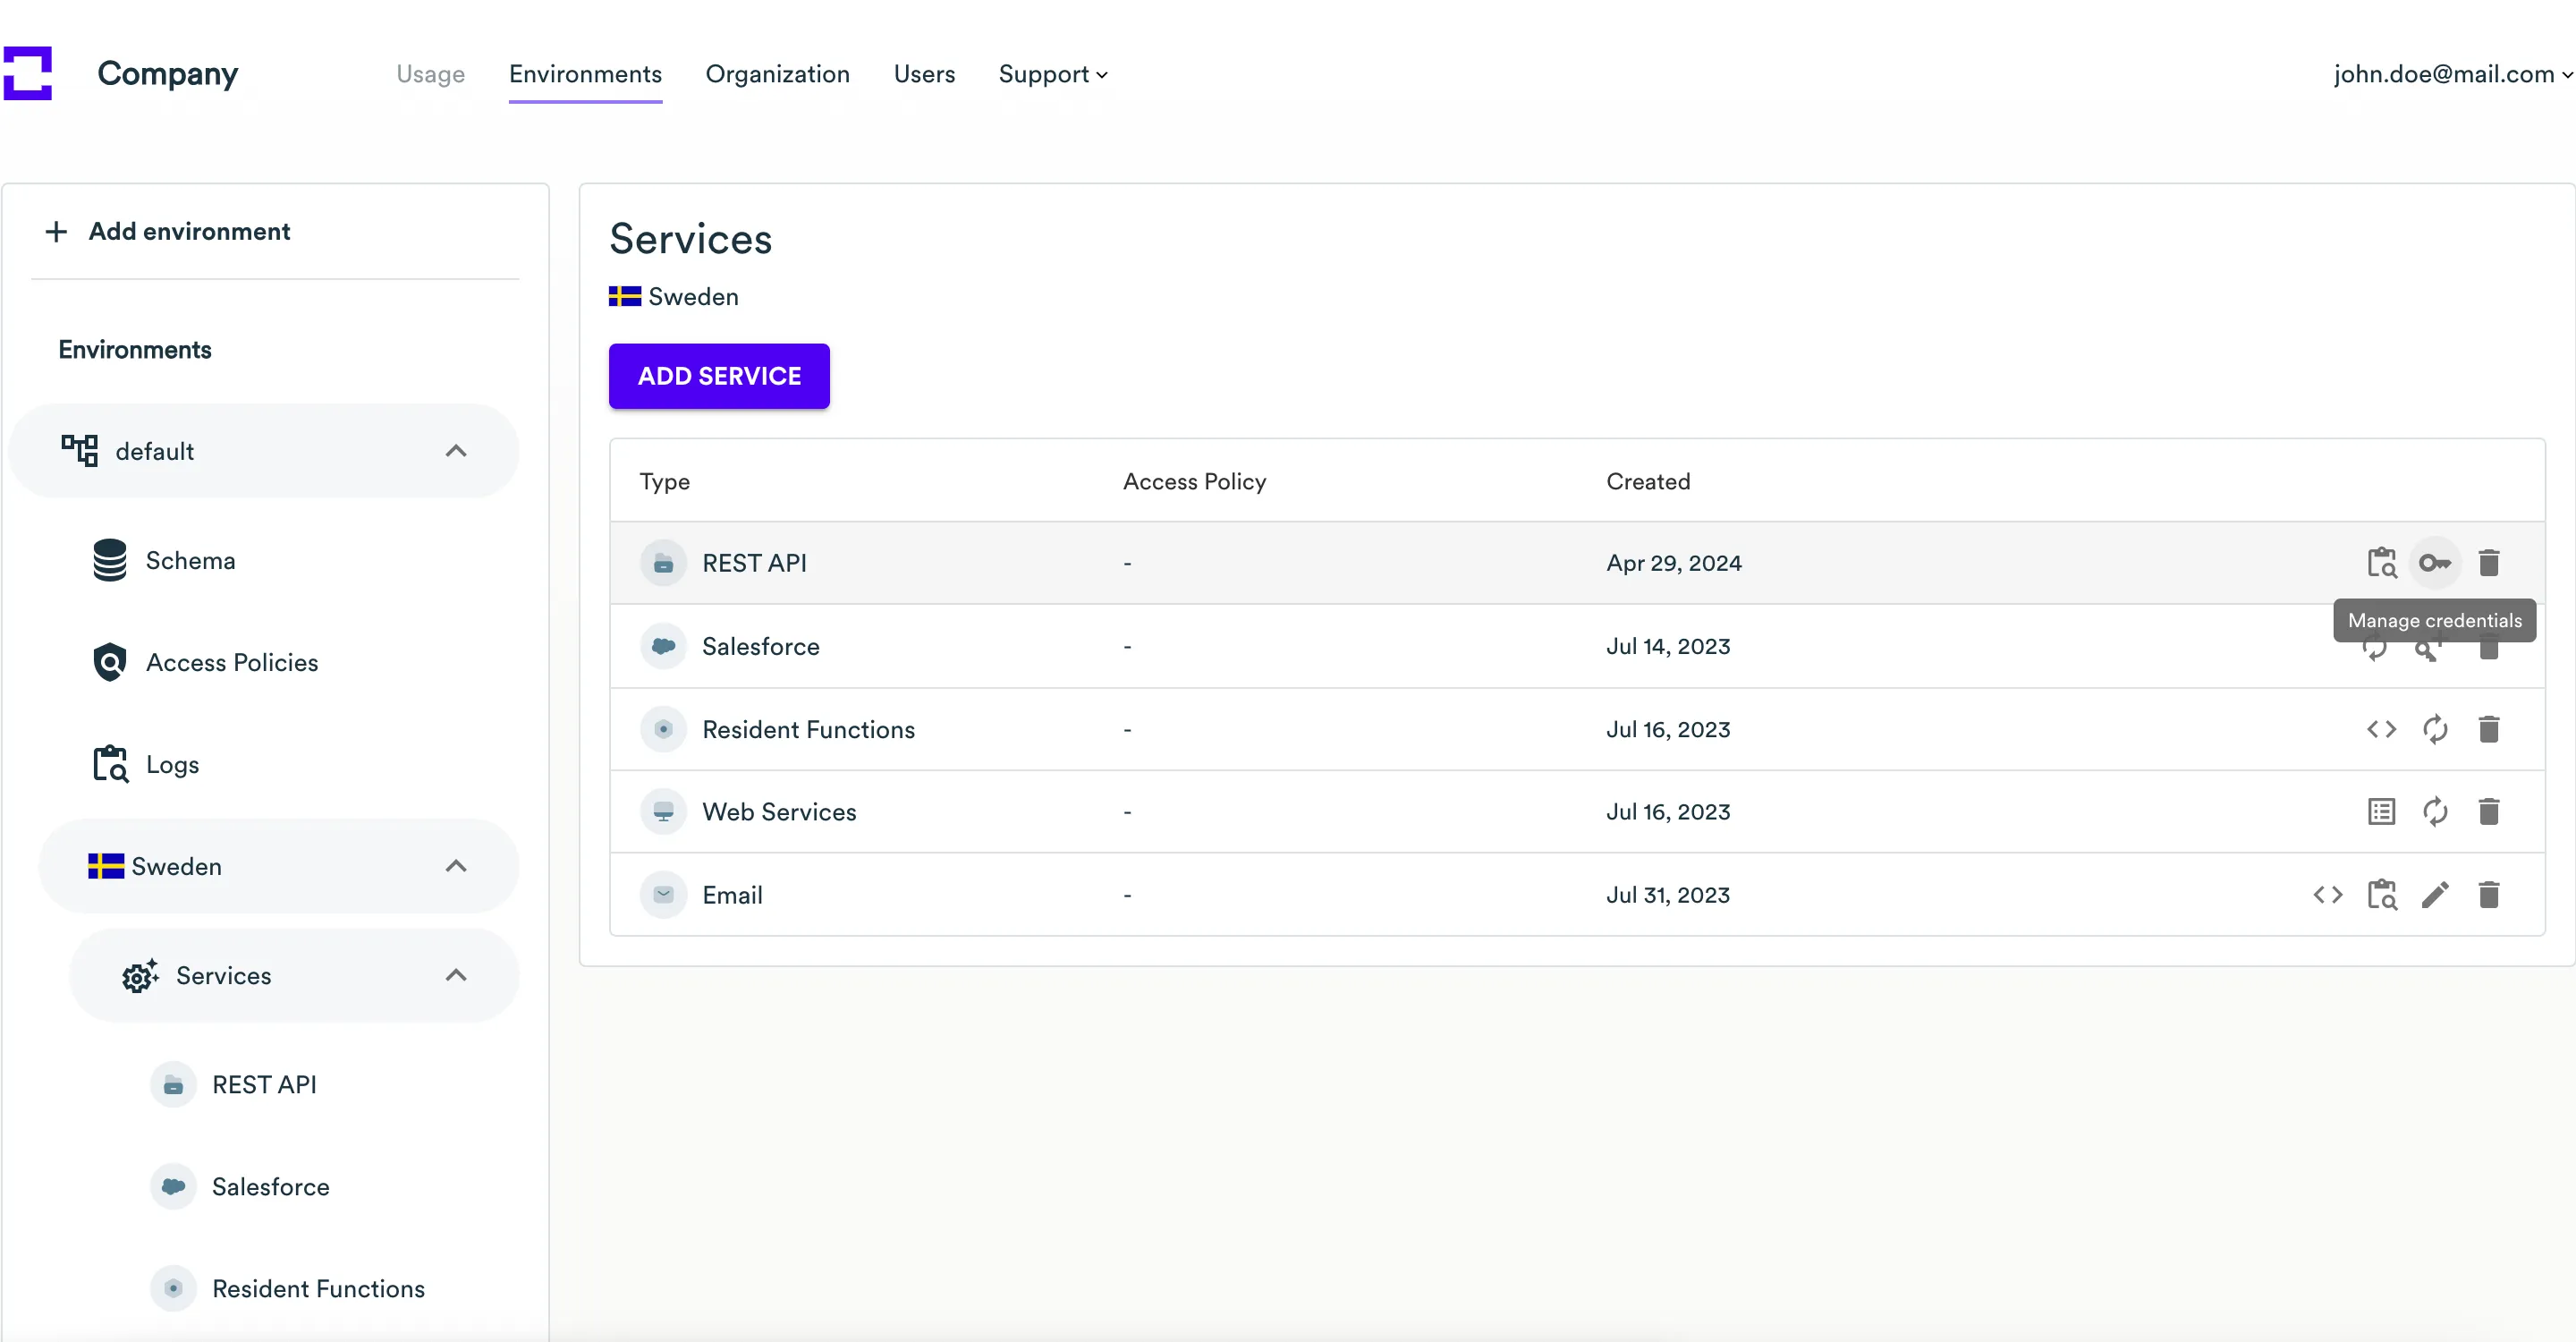
-
Expand the environment and country in the left sidebar where you created a new service, then click on the Services menu item.
-
In the list of services, locate the REST API service.
-
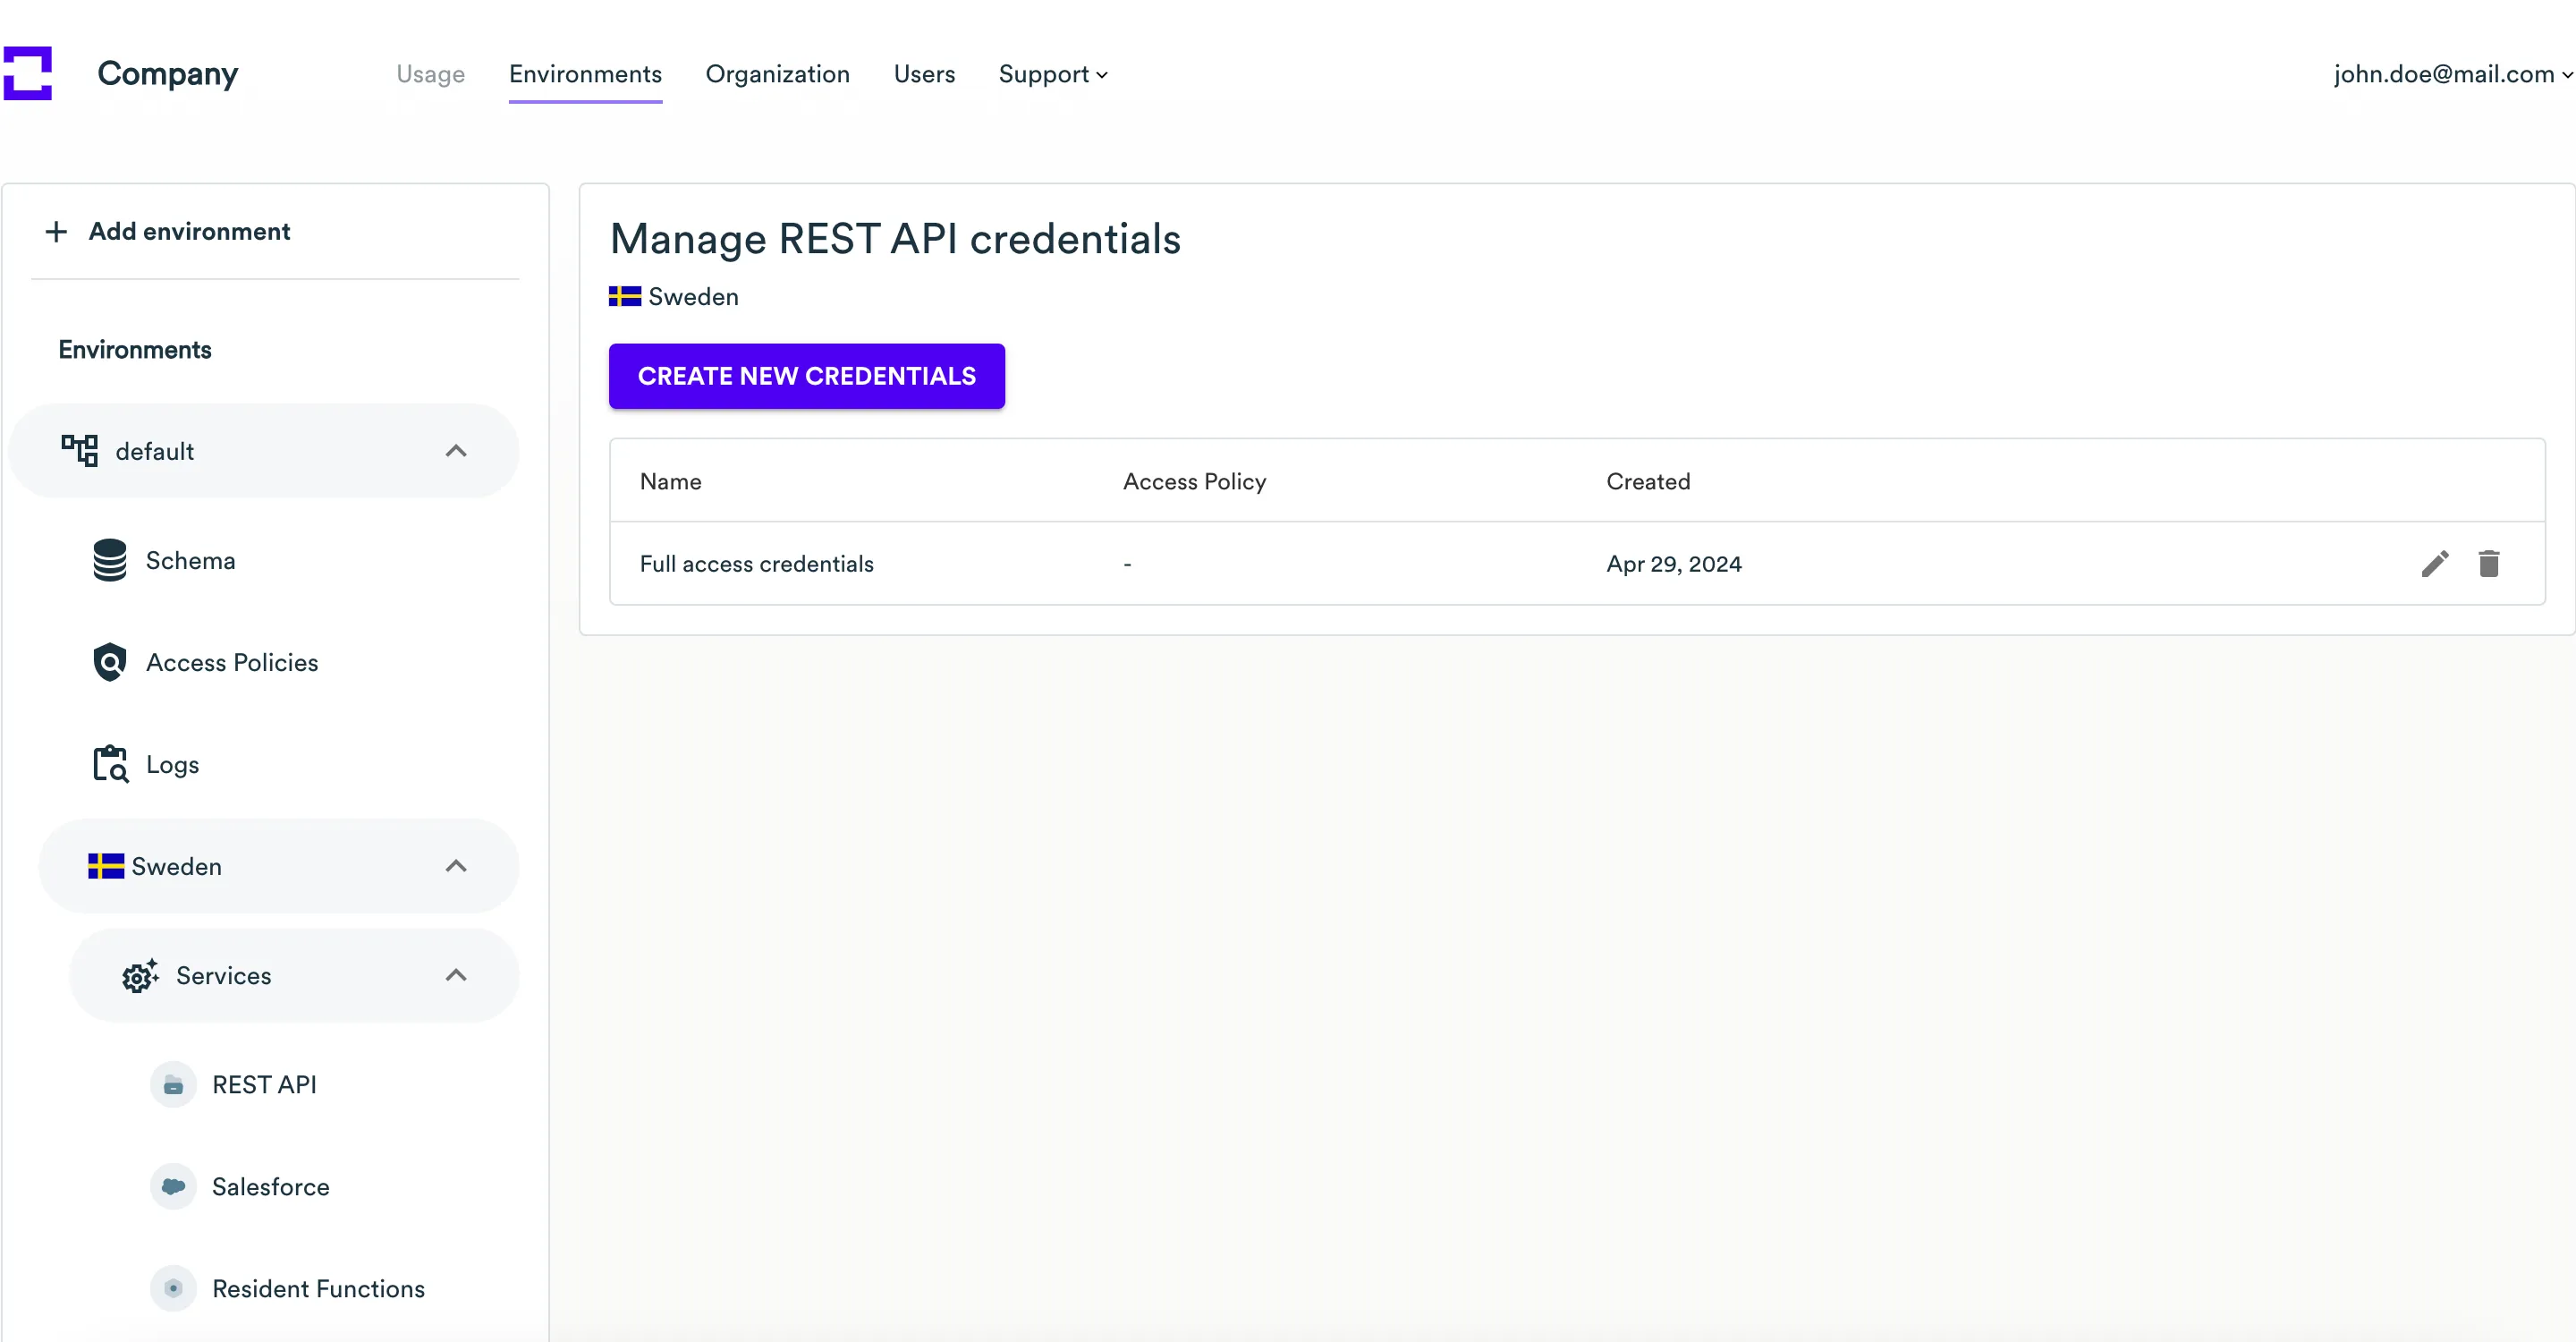
In the actions column, click the Manage credentials icon.
-
On the Manage REST API credentials page, you will see
Full access credentialscreated for you by default. Here, you can create new credentials, assign access policies to them, or edit/remove existing credentials. -
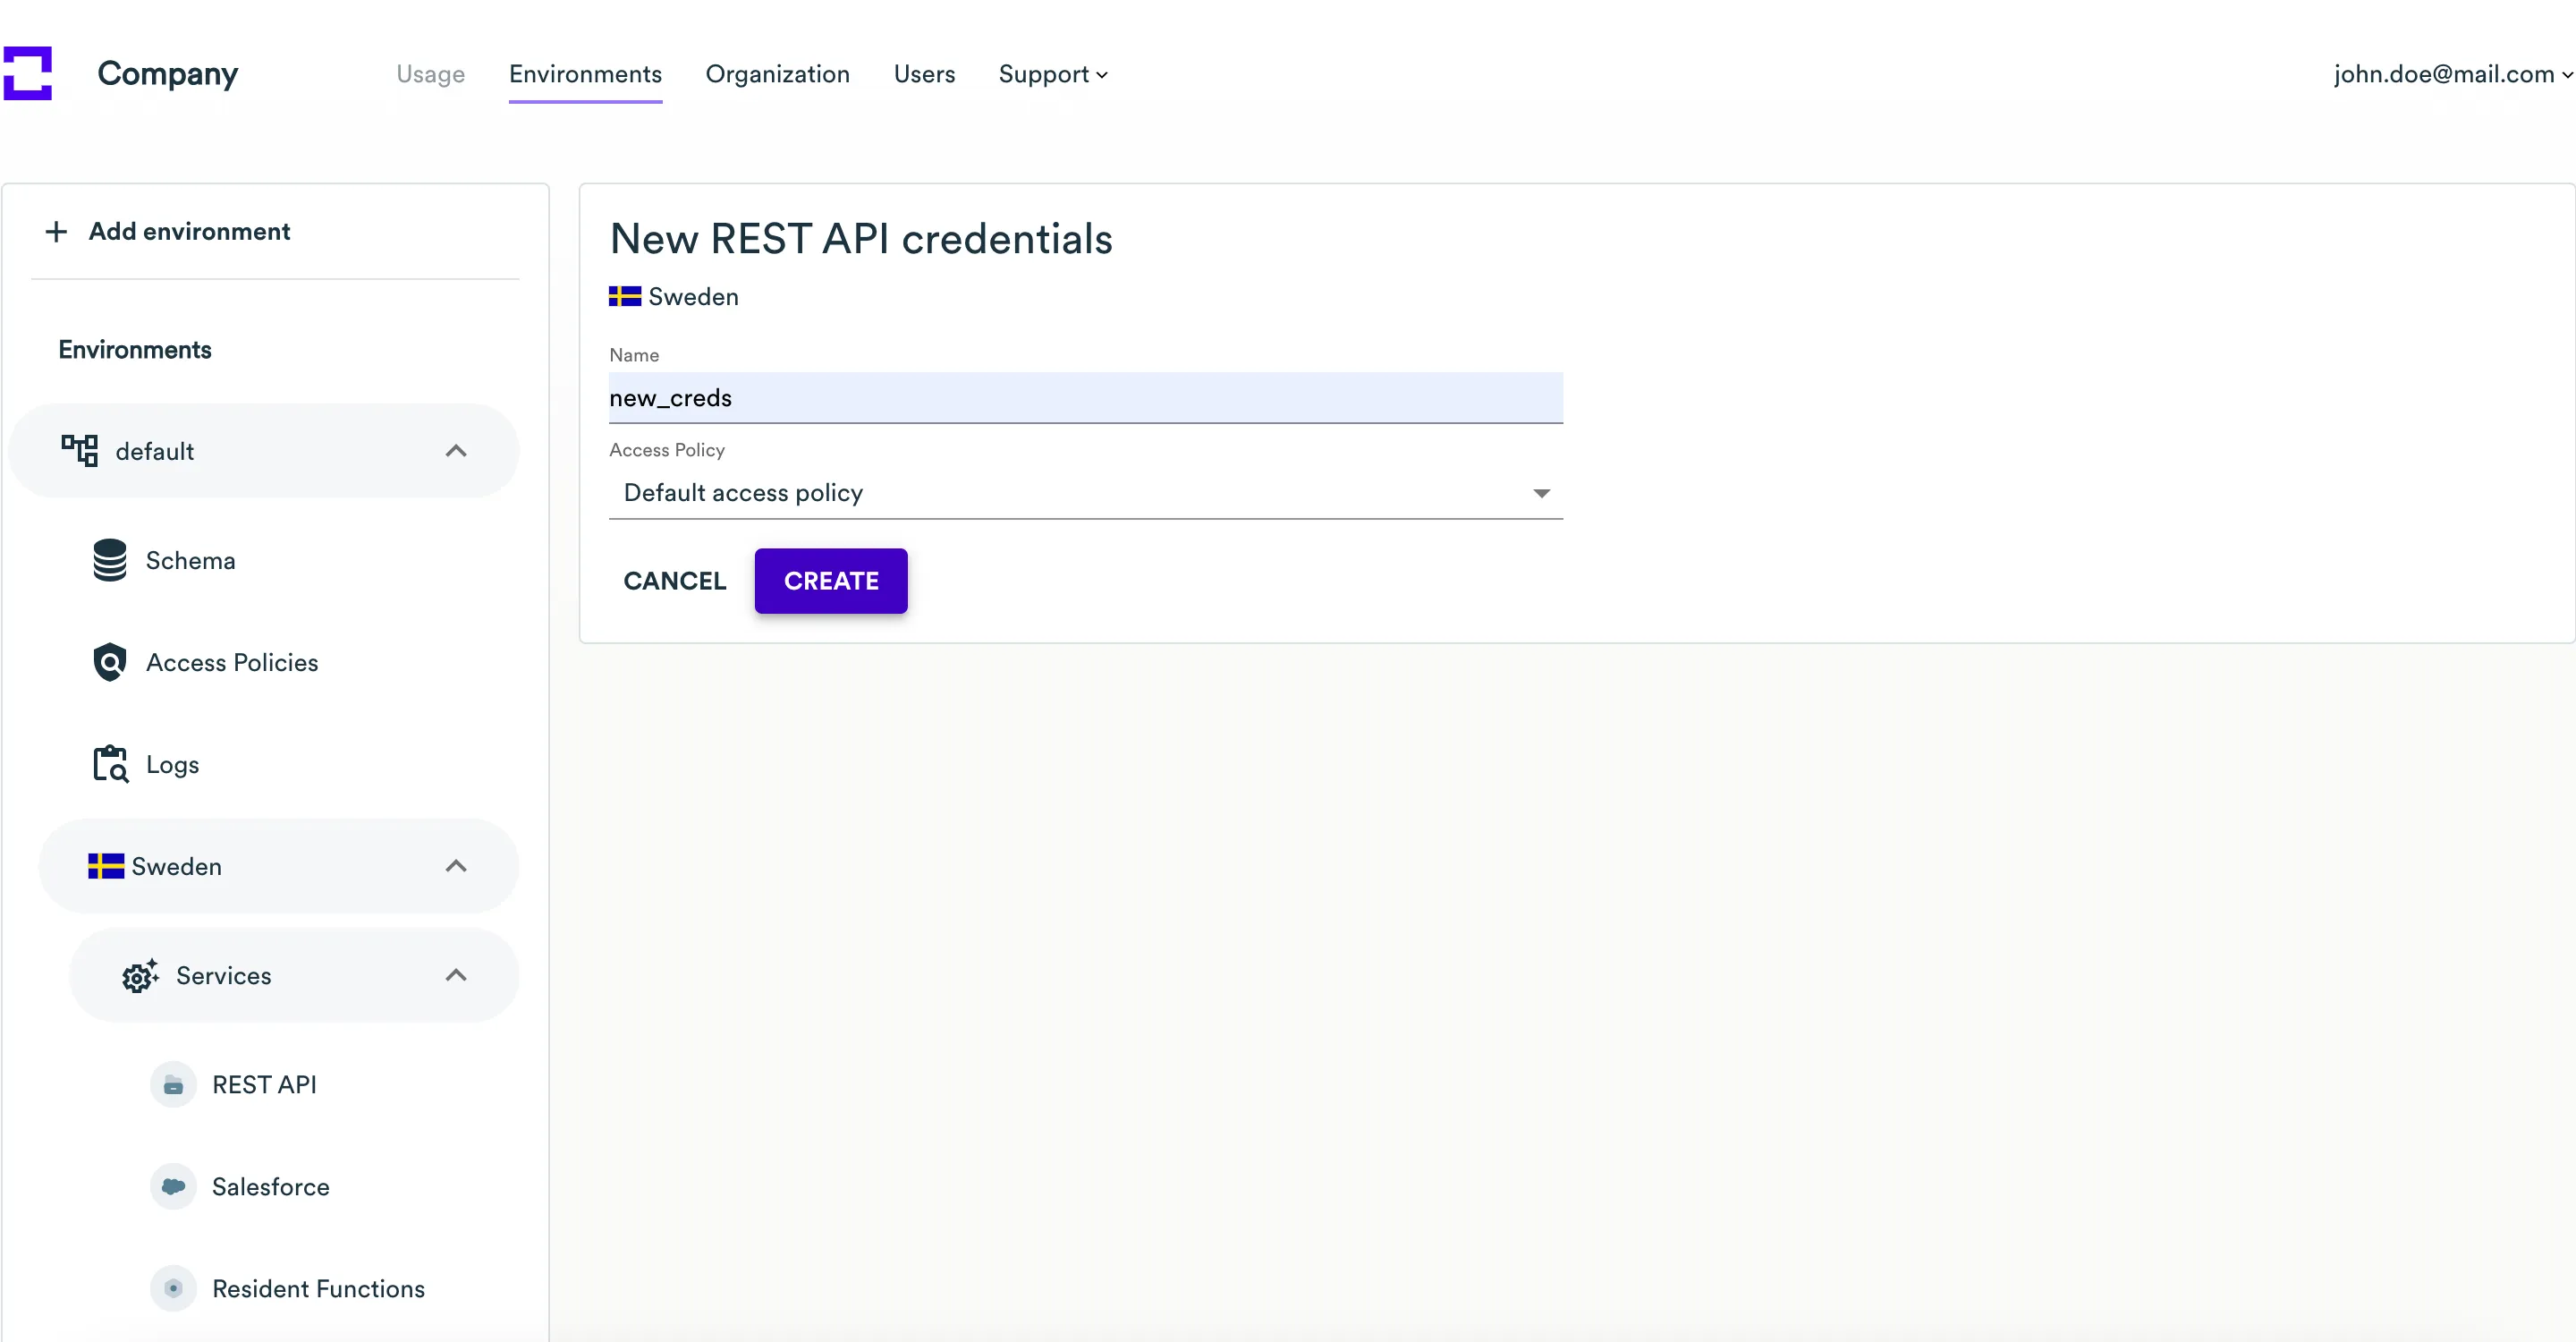
Click Create new credentials. On the new page, enter
Nameand optionally selectAccess Policyfor the new credentials. -
Click the Create button.
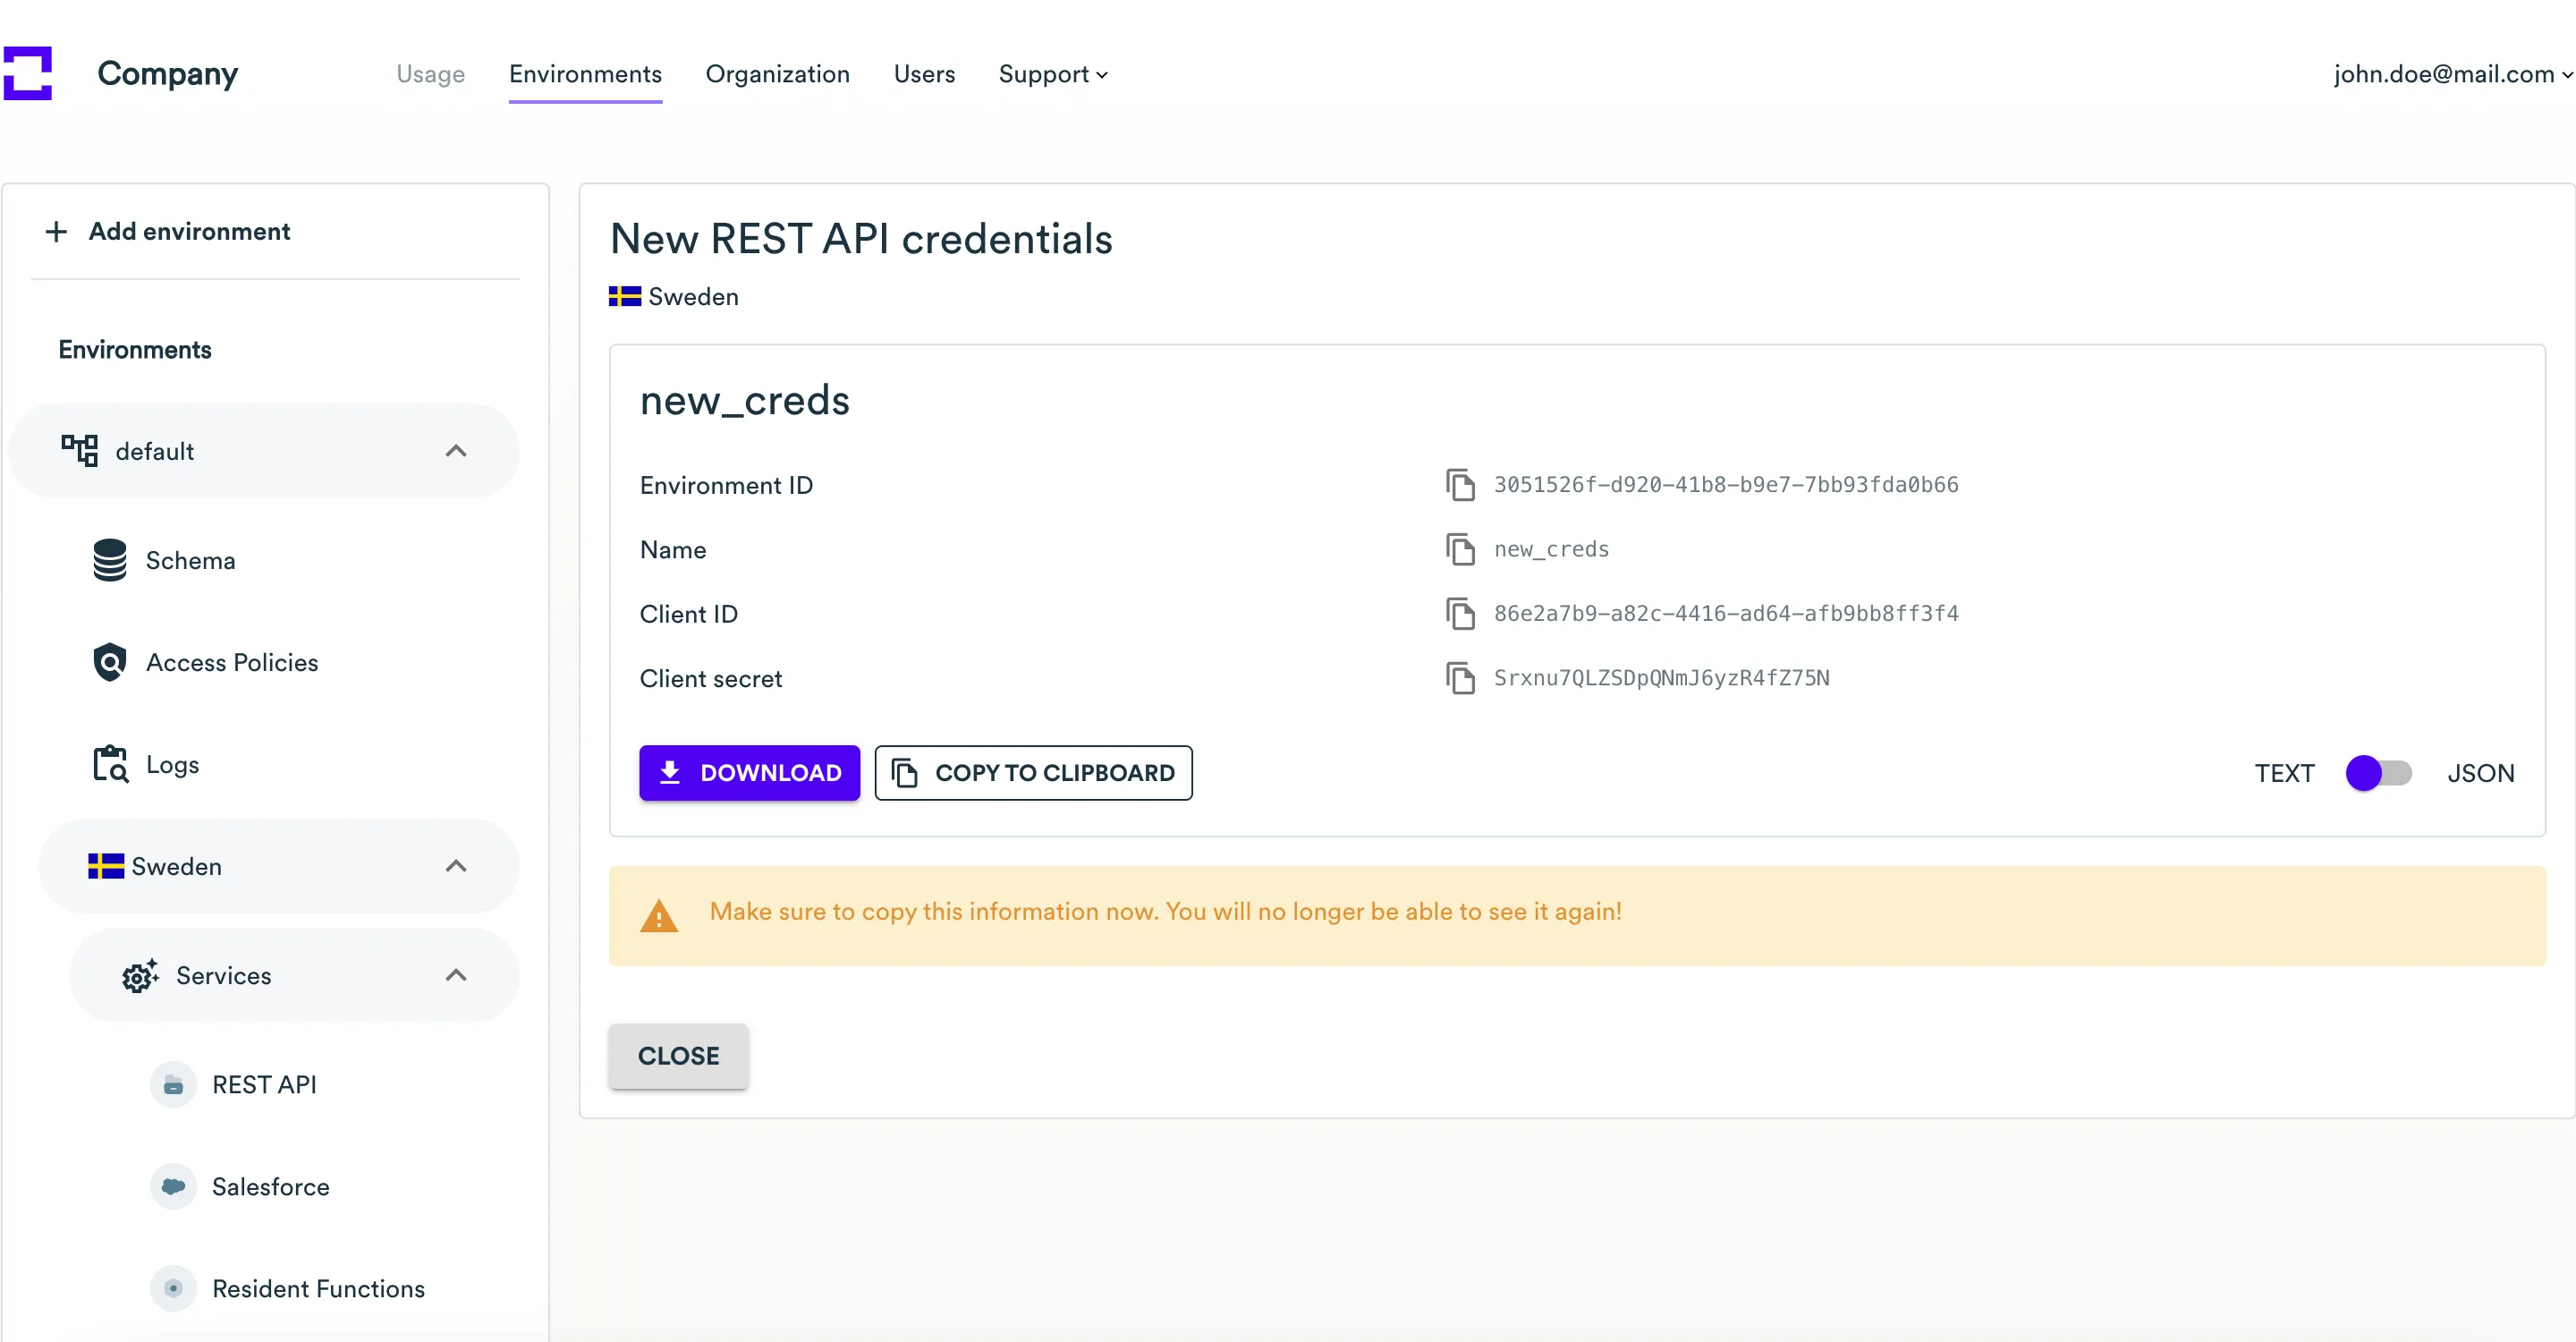
-
On the page with the created REST API credentials, save the Environment ID, Name, Client ID and Client Secret. To download a text file with all these credentials, click the Download button. To copy these credentials to the clipboard, click the Copy to clipboard button. Click the Close button.
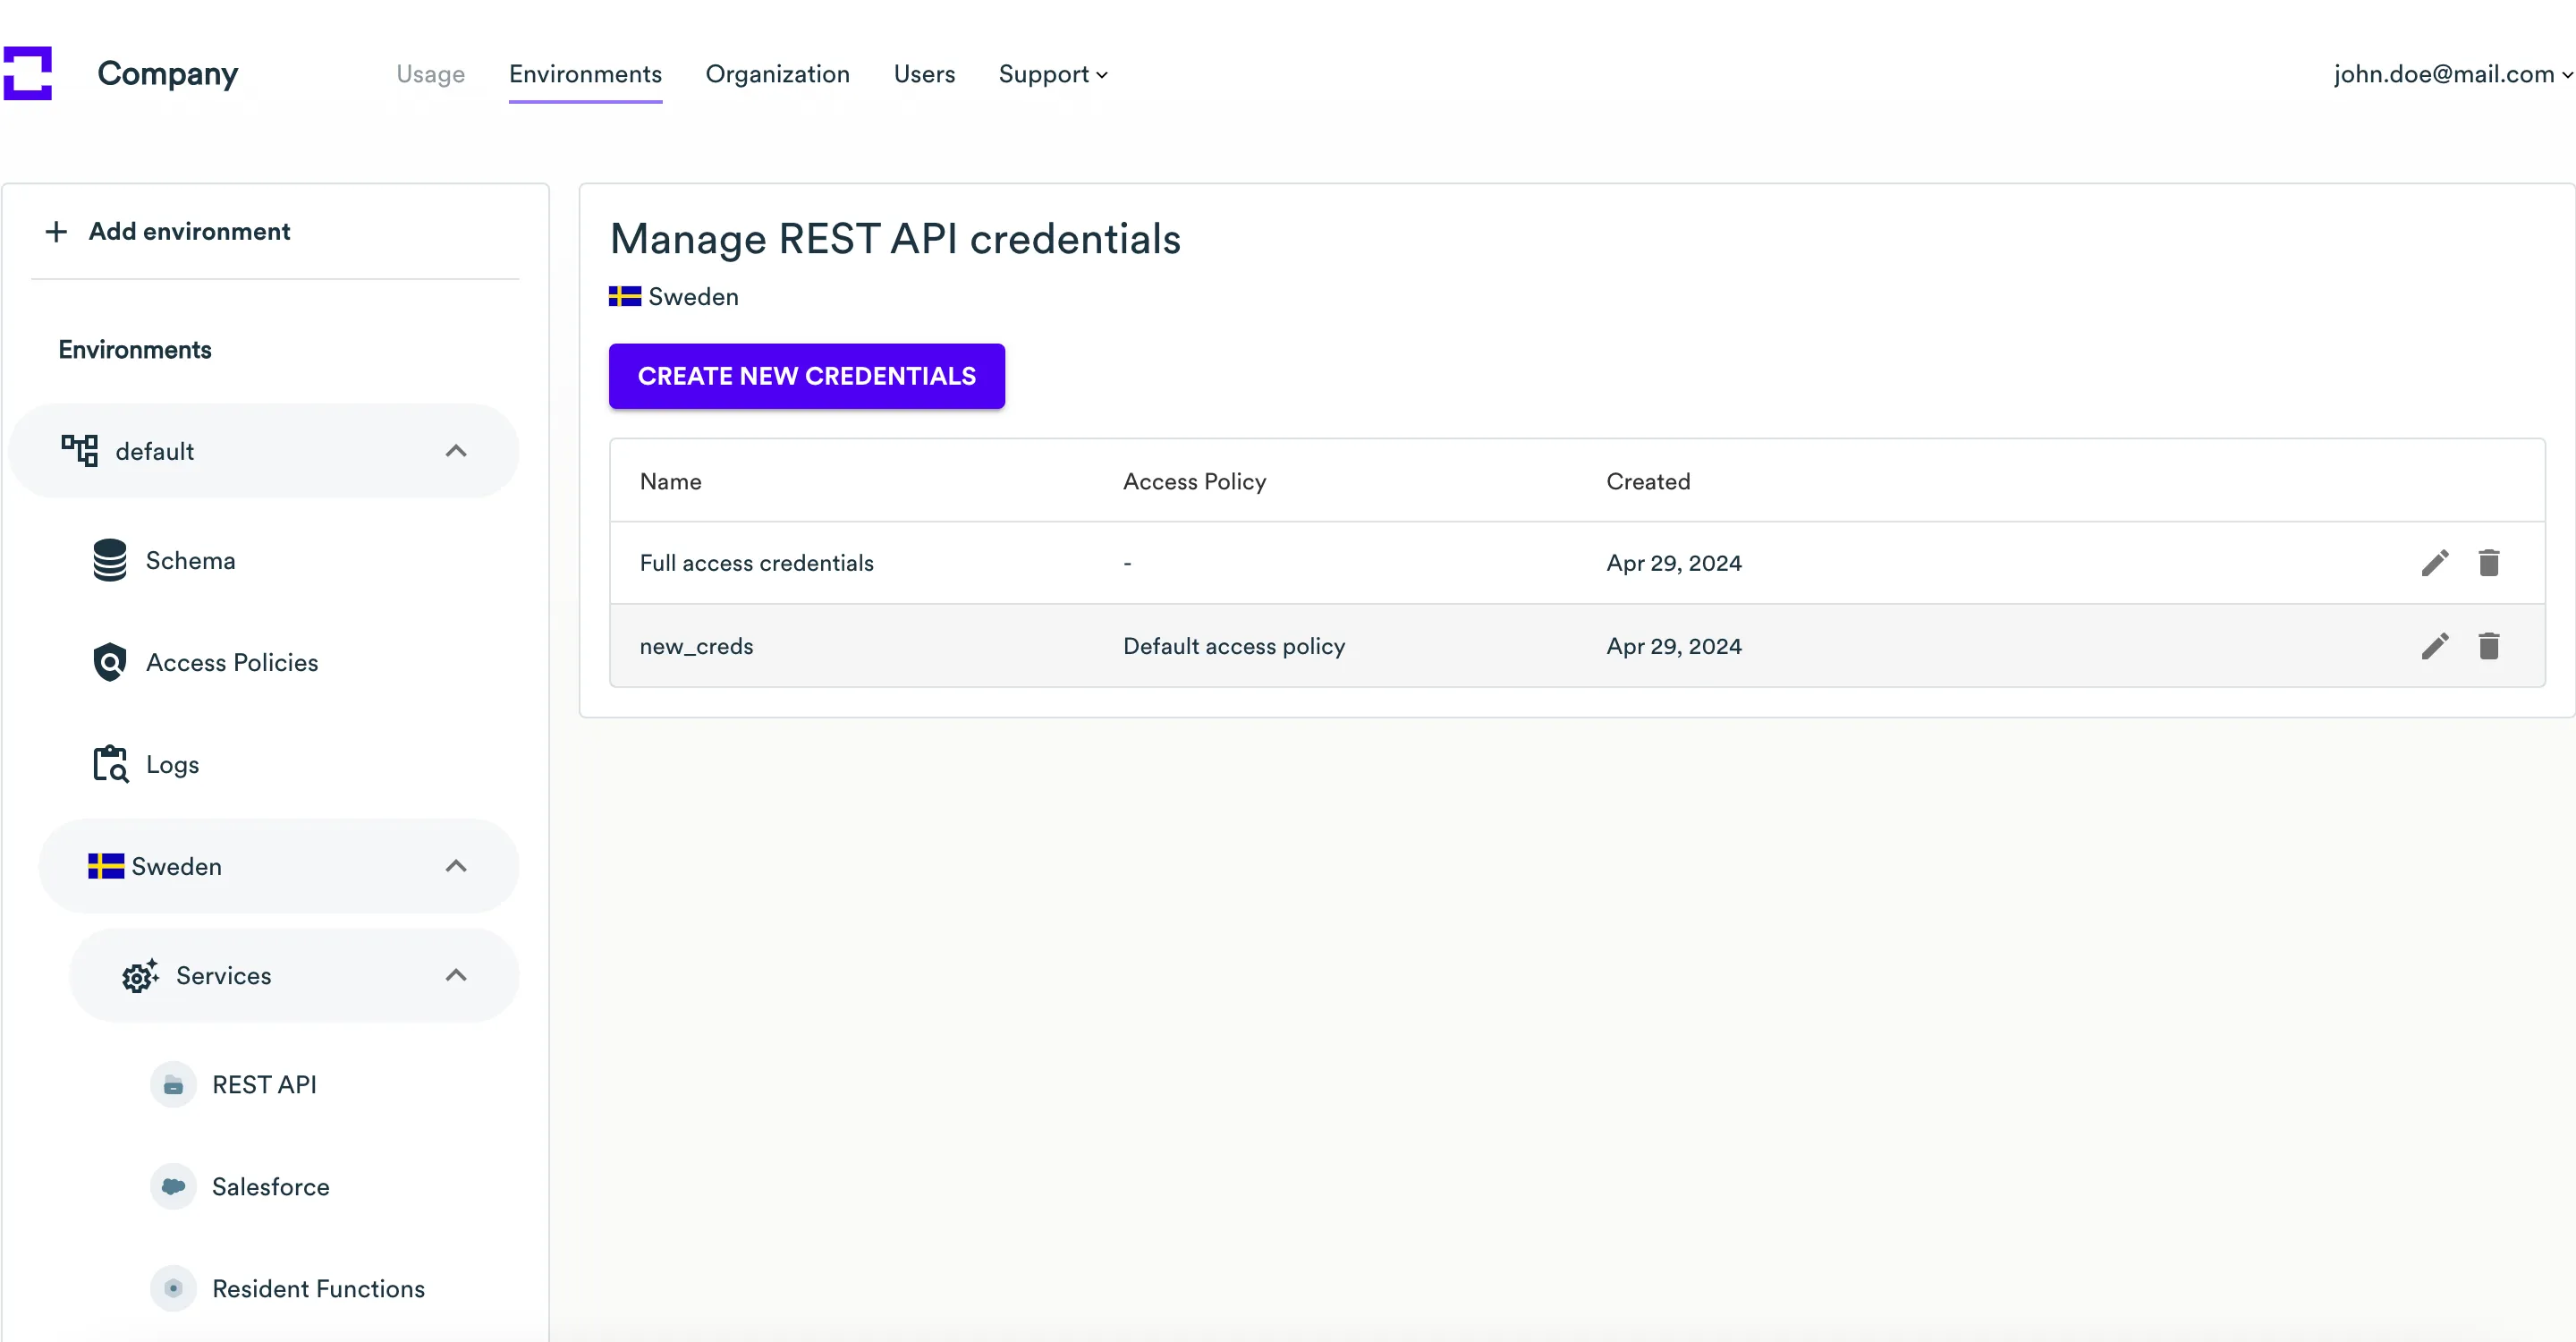
-
The newly created credentials will appear in the credentials list of the REST API service.
Running the application
Once done, you can stop the example application (if it is still running) and switch to the branch with RestAPI integration by calling
git checkout restapi
Update a .env file with the following values
NODE_PORT=80
ENV_ID="<your-env-id>"
CLIENT_ID="your-client-id"
CLIENT_SECRET="your-client-secret"
AUTH_URL="incountry-auth-url"
STORAGE_URL="restapi-url"
And start the app using the same command and additional environment variables.
npm start
Now the application explicitly calls the InCountry API to get anonymized data on the frontend before sending it to the server. And on request, it can exchange tokens for actual values if needed. Now, the request and response cycle will look as follows:
For write requests, the frontend will send the entire model to the InCountry API, which will replace all the required fields according to the rules set up in the ACL policy configured above. To interact with the InCountry API, the application needs to have a valid access token. That is why the full process including authentication will look like this:
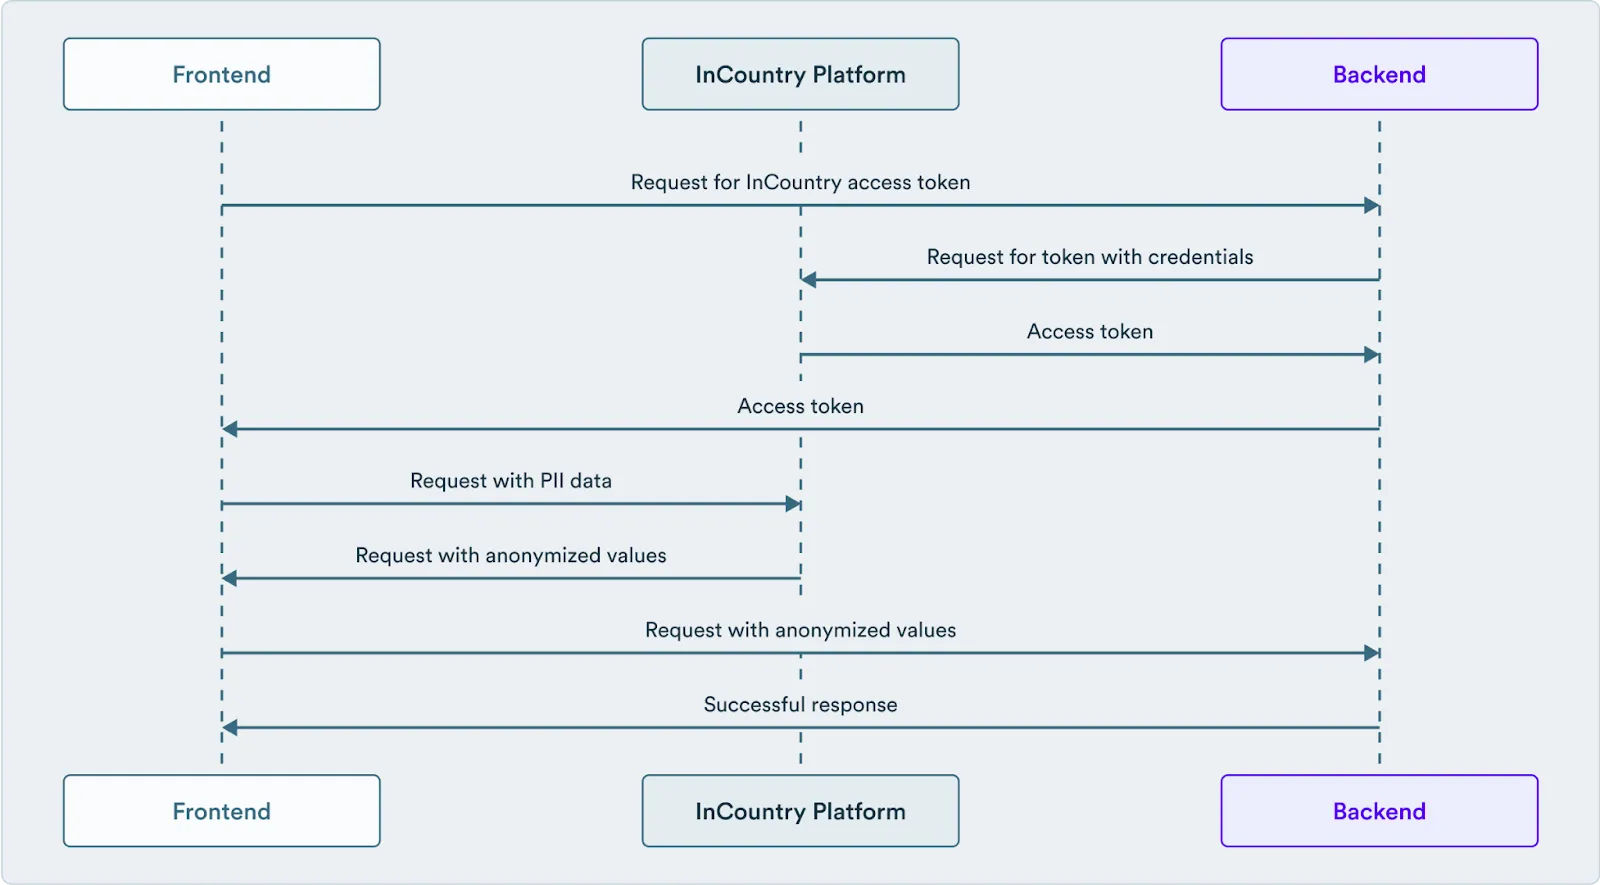
This option requires implementing some logic on the application side, and while it is more flexible and has more use cases covered, sometimes it is faster and easier to use the InCountry proxy in between the frontend and backend parts of your application, so no modification besides changing the backend URL required. In the following section, let’s see how to set it up for the same app.
Transparent redaction
InCountry Border is a proxy server that automatically processes requests and responses according to the configuration set on Portal. Let's see how to configure this service to work with our example application.
Create a new Border service
-
Expand the environment and country in the left sidebar where you wish to create a new service, then click on the "Services" menu item.
-
Click the Add Service button.
-
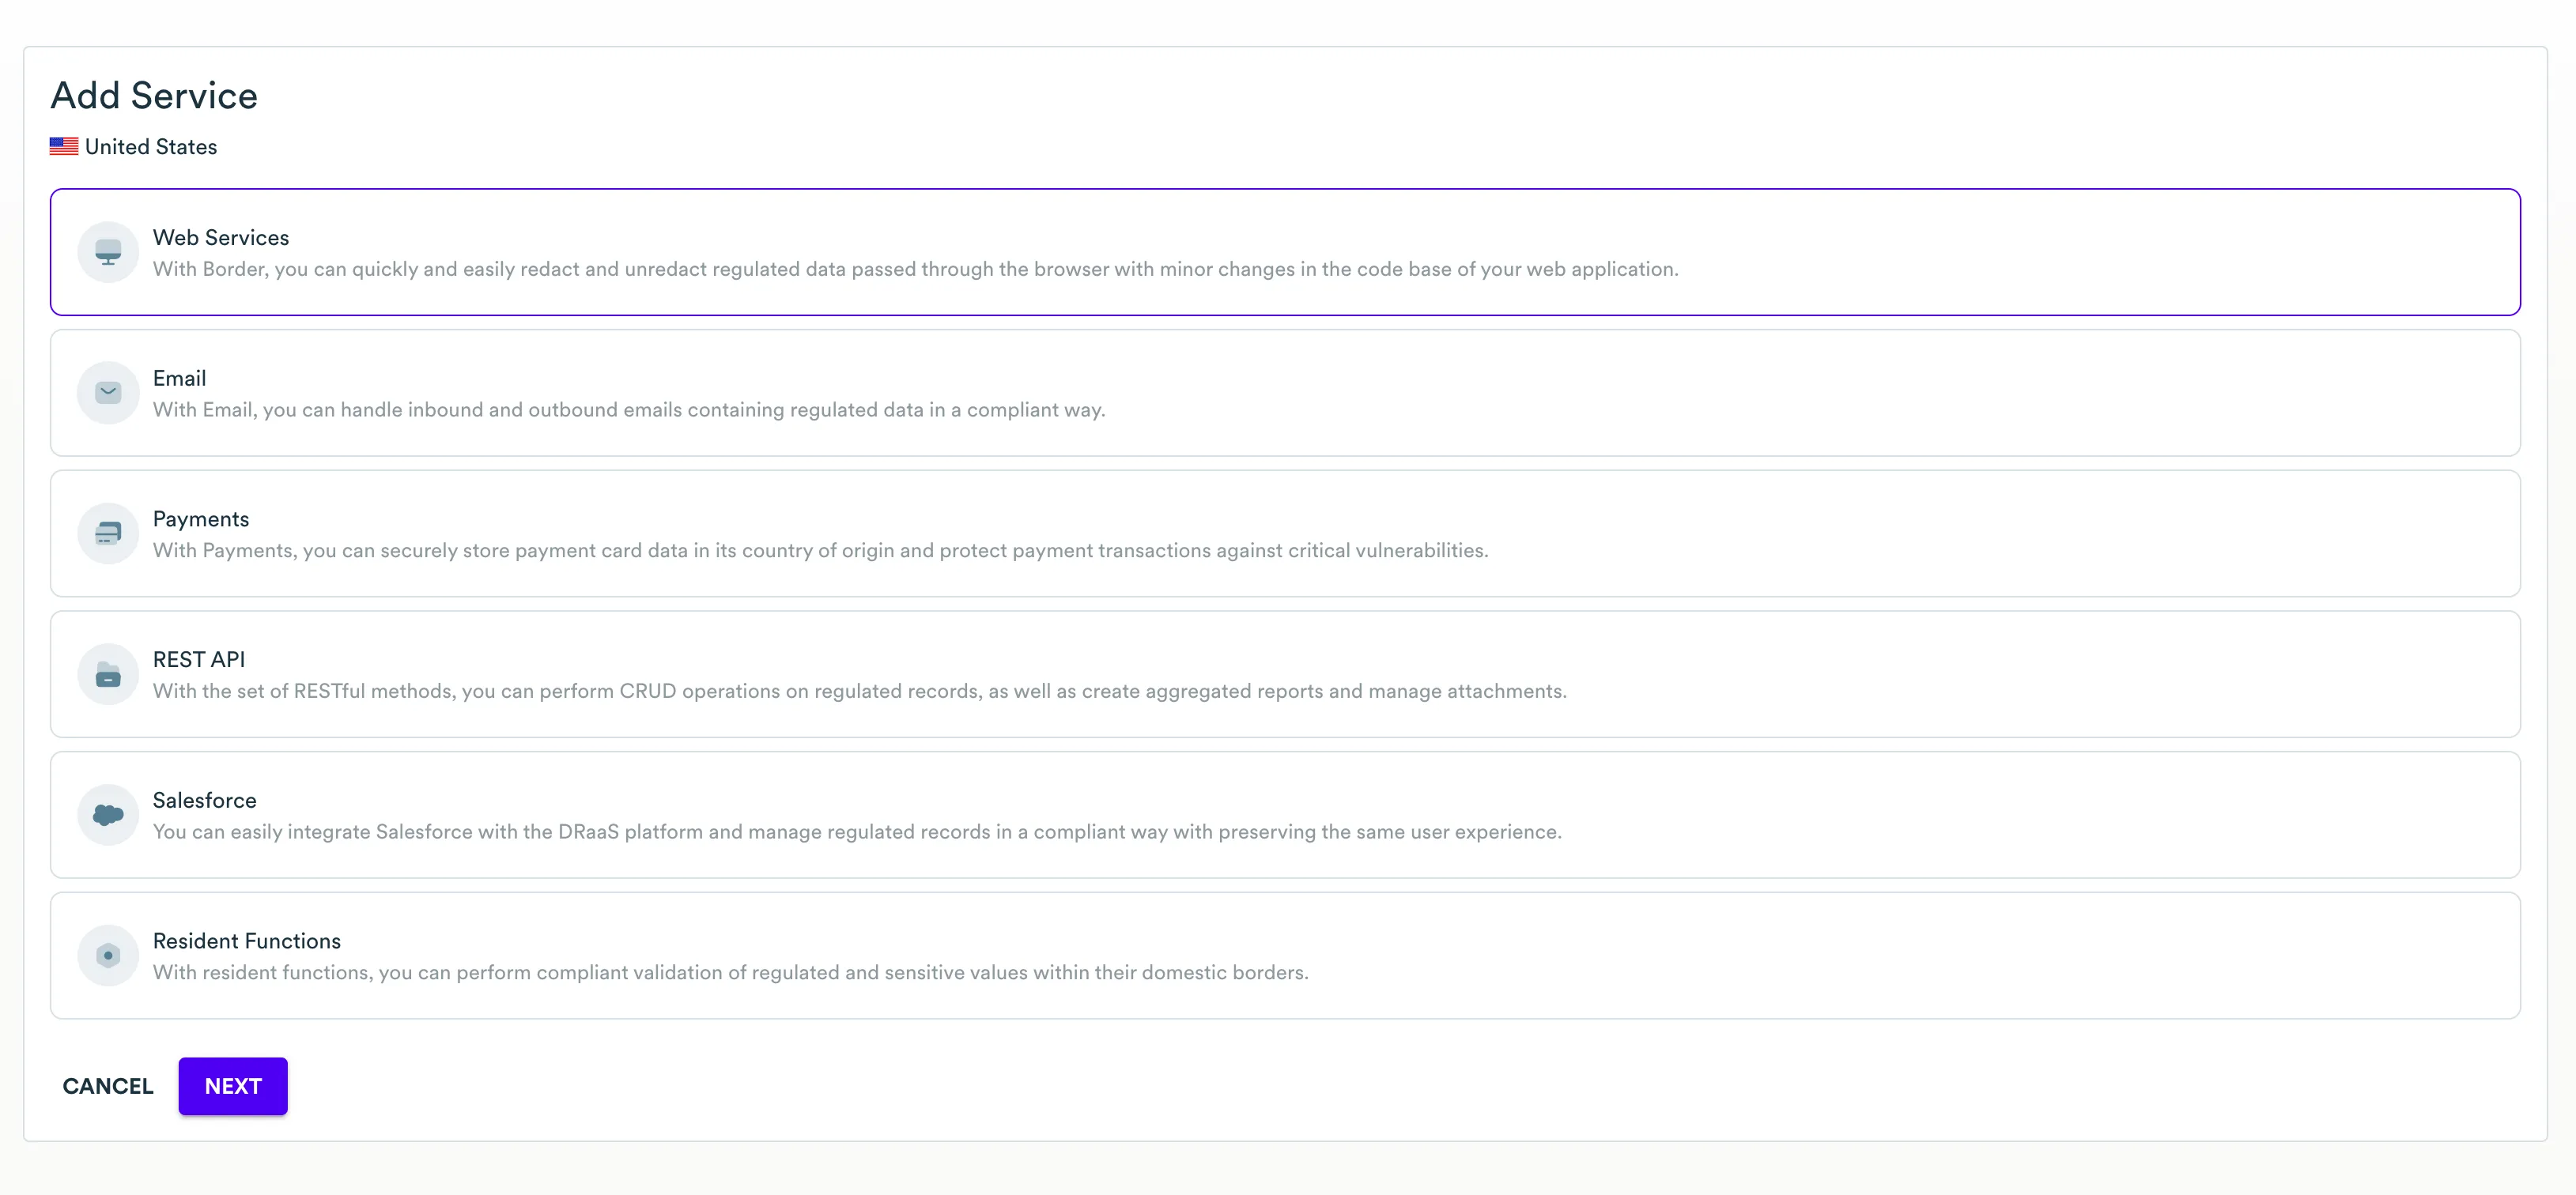
On the Add Service page, select the Web Services service at the bottom of the list.
-
Click the Next button.
-
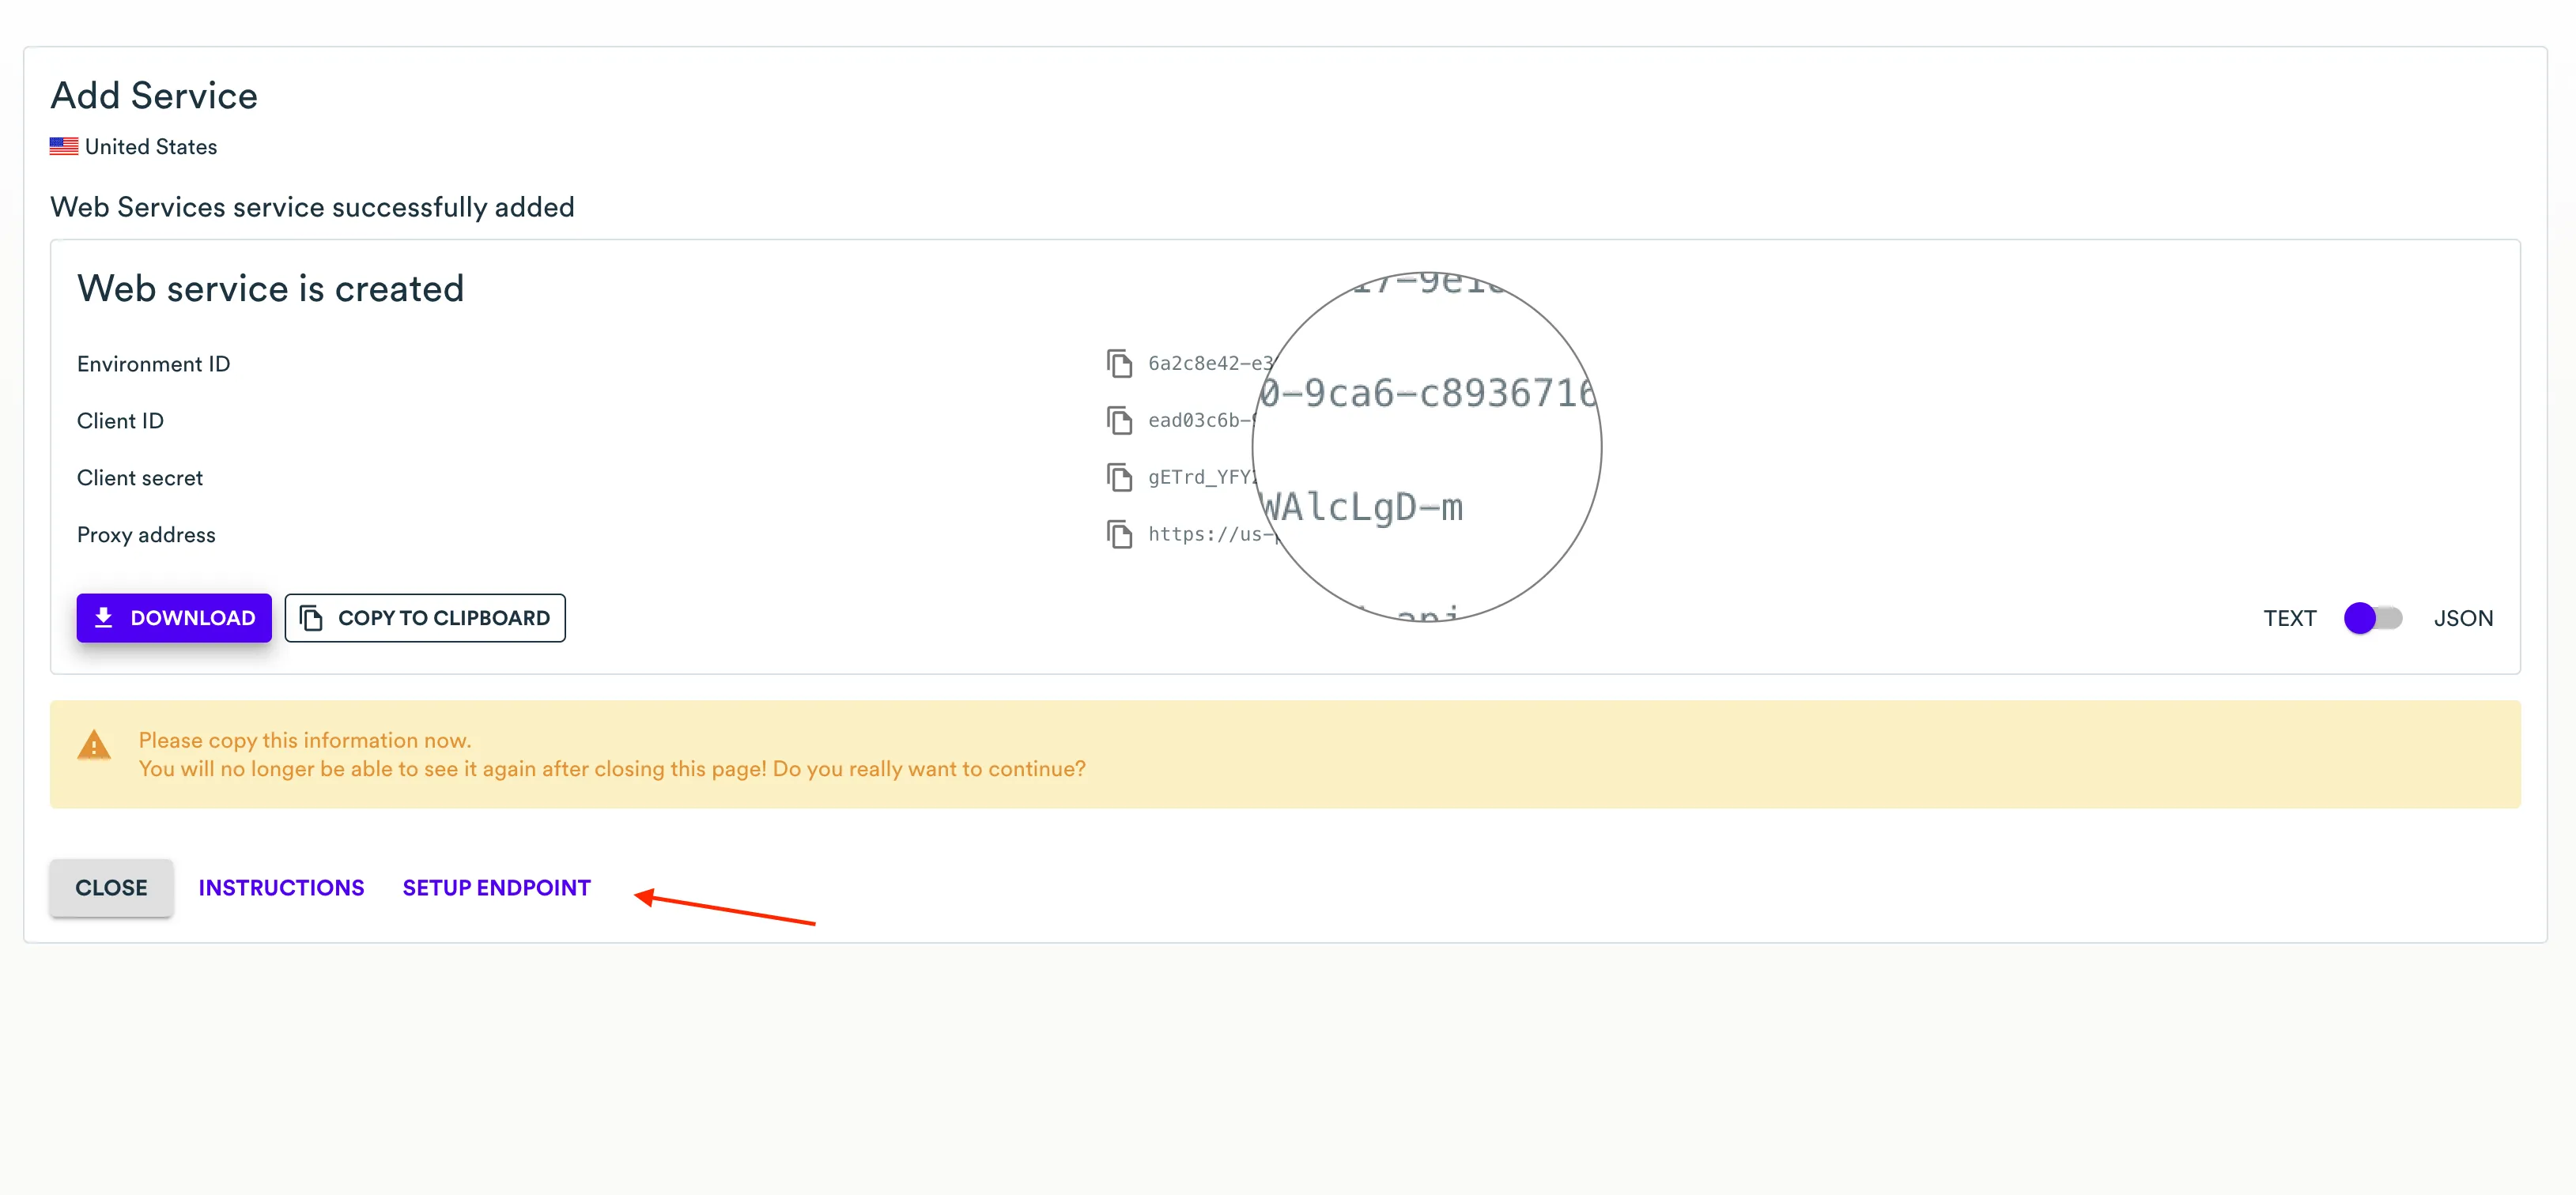
Once completed, please copy the credentials and proceed to configure redaction rules.
-
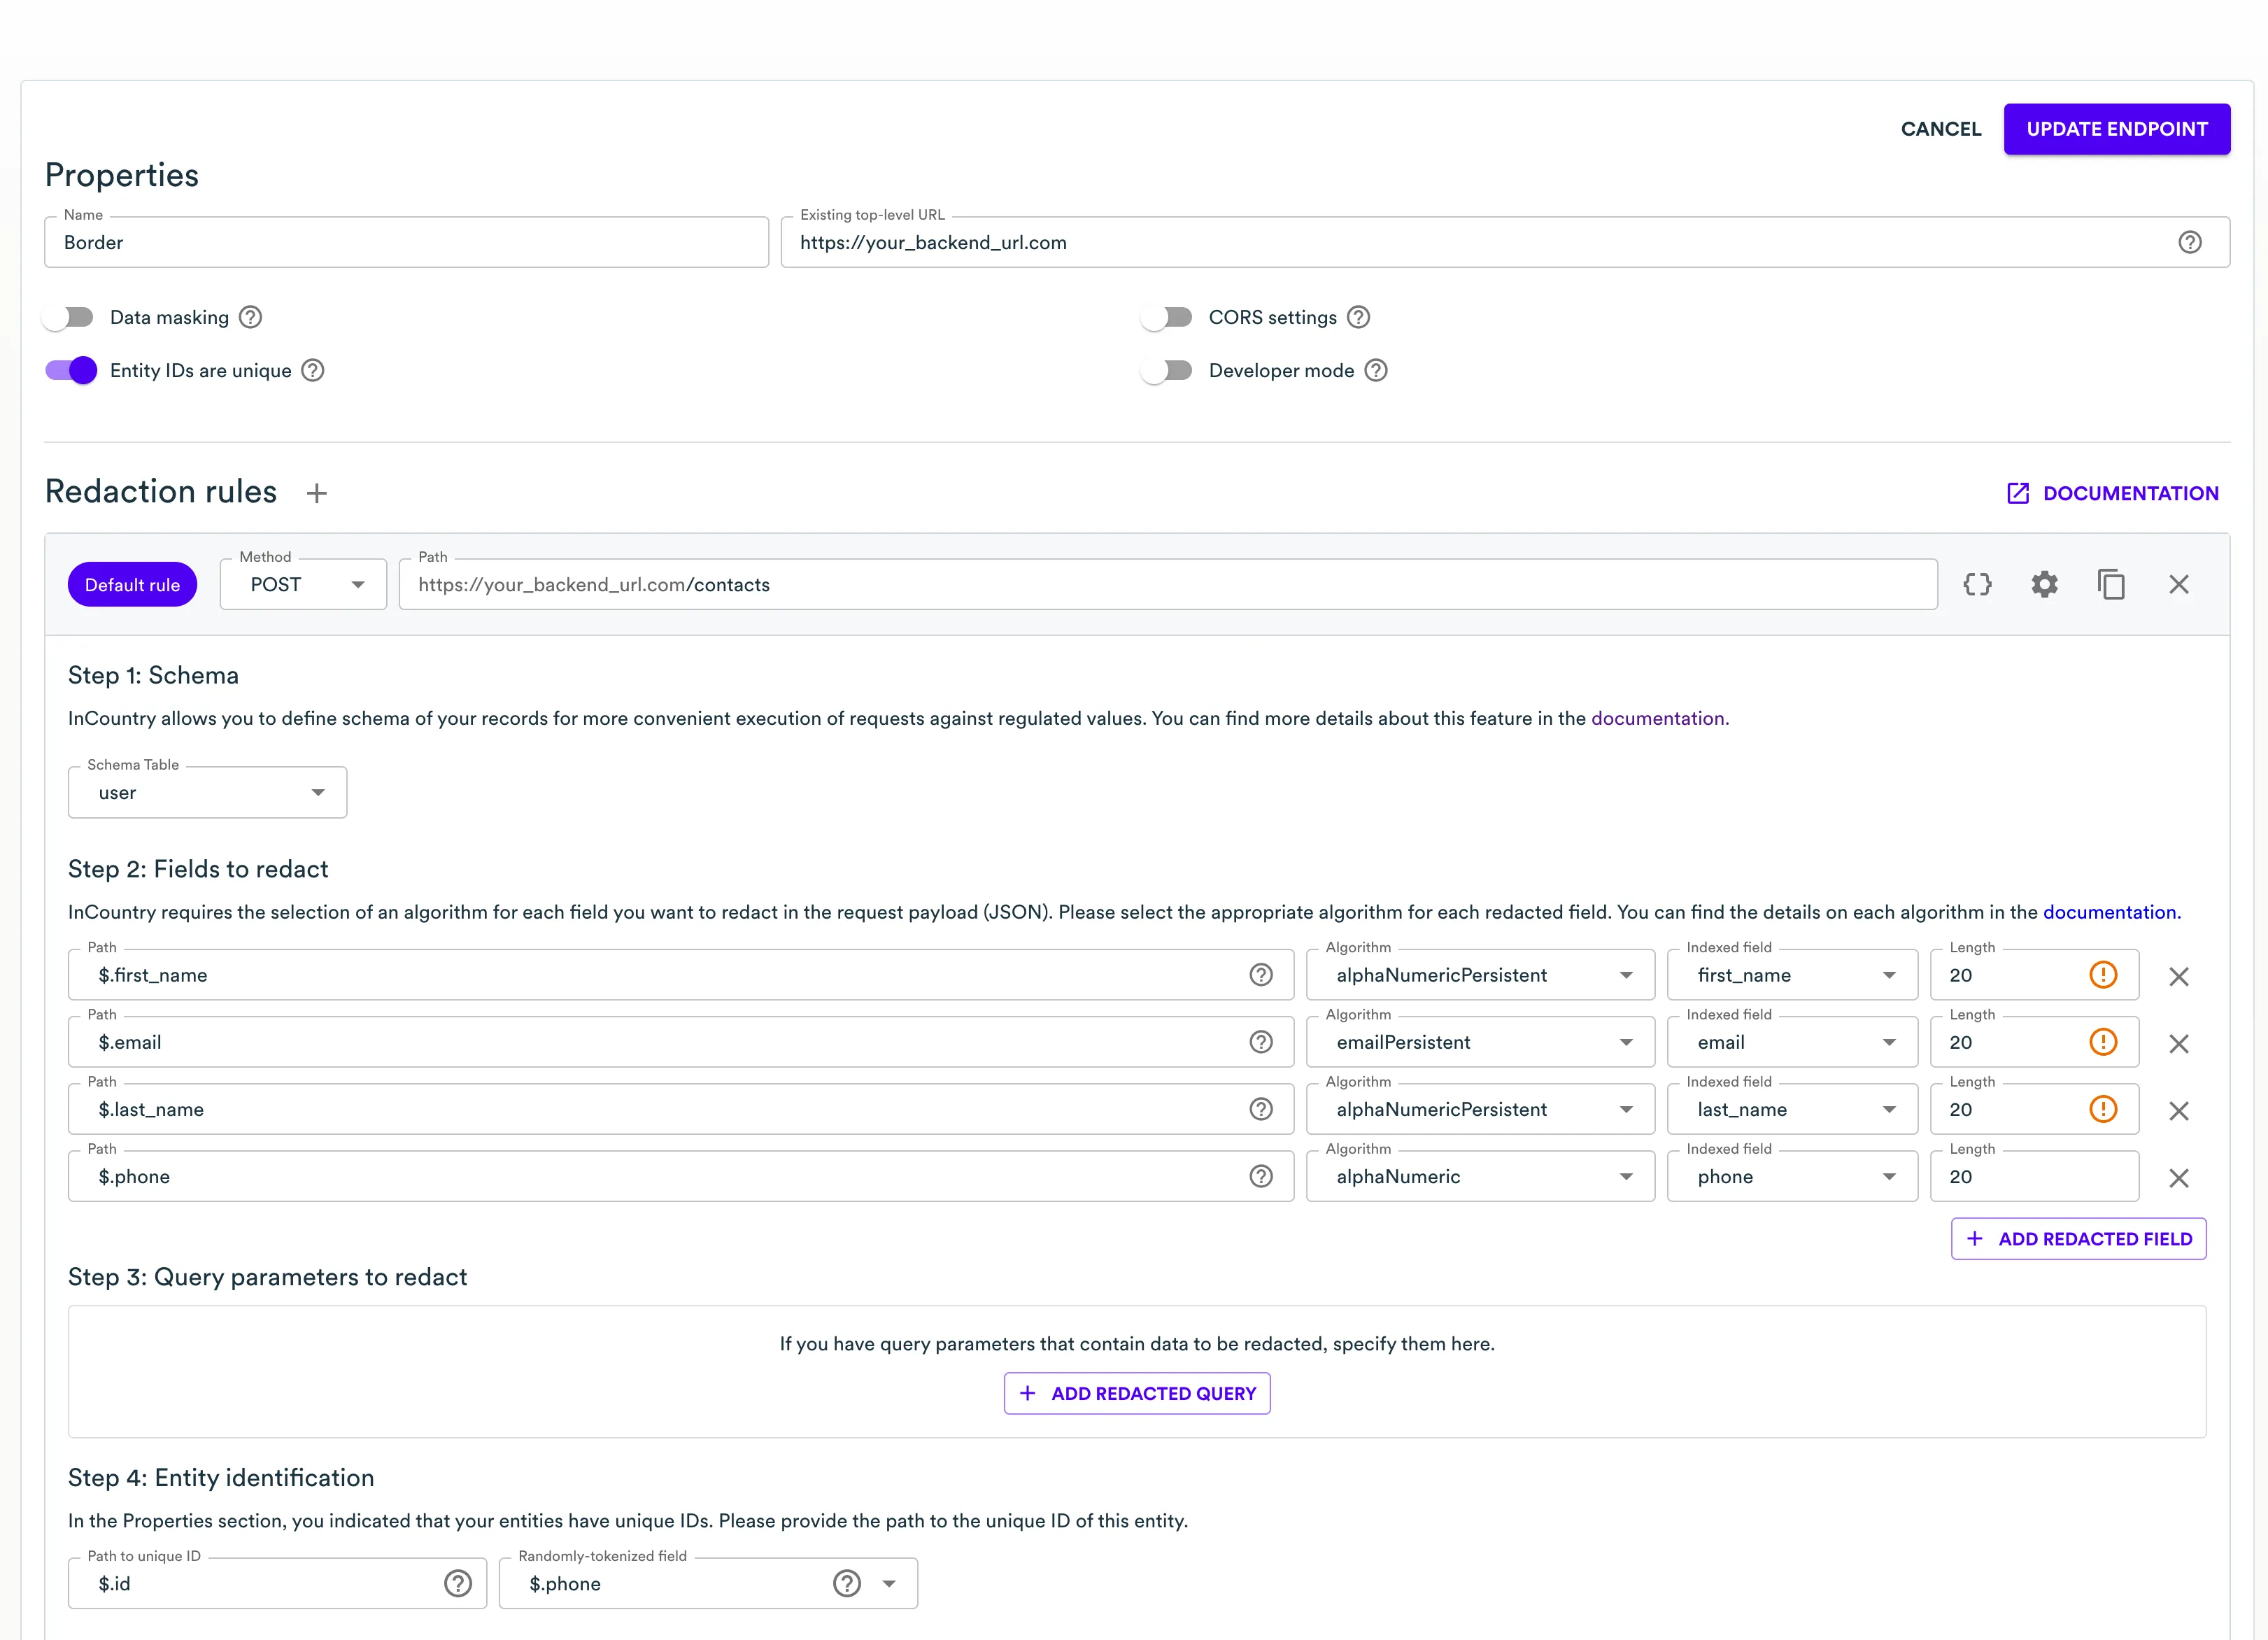
On the configuration editor, set the name and the URL of your server. There are four additional top-level options:
- Data Masking: Enables data masking support mostly used to show the data on the frontend. Instead of a unique token that could be stored and processed on your server, Border will return a string like
e******@redacted.comwhich is more clear for the end-user. - Entity IDs are unique: This tells the border it can rely on the ID uniqueness in the incoming data and should not add additional information.
- CORS settings: In case you need to interact with Border from the browser, you can set all the required CORS headers here.
- Developer mode: This is the special Border operating mode with which it will be possible to test difficult-to-test functions, e.g. data masking.
- Data Masking: Enables data masking support mostly used to show the data on the frontend. Instead of a unique token that could be stored and processed on your server, Border will return a string like
-
Now you can configure the redaction rule for a particular endpoint. Let's start with creating a contact.
Here we set different redaction rules for different parts on the payload, mapping to table fields we created in the schema section earlier, and some of the validation rules.
-
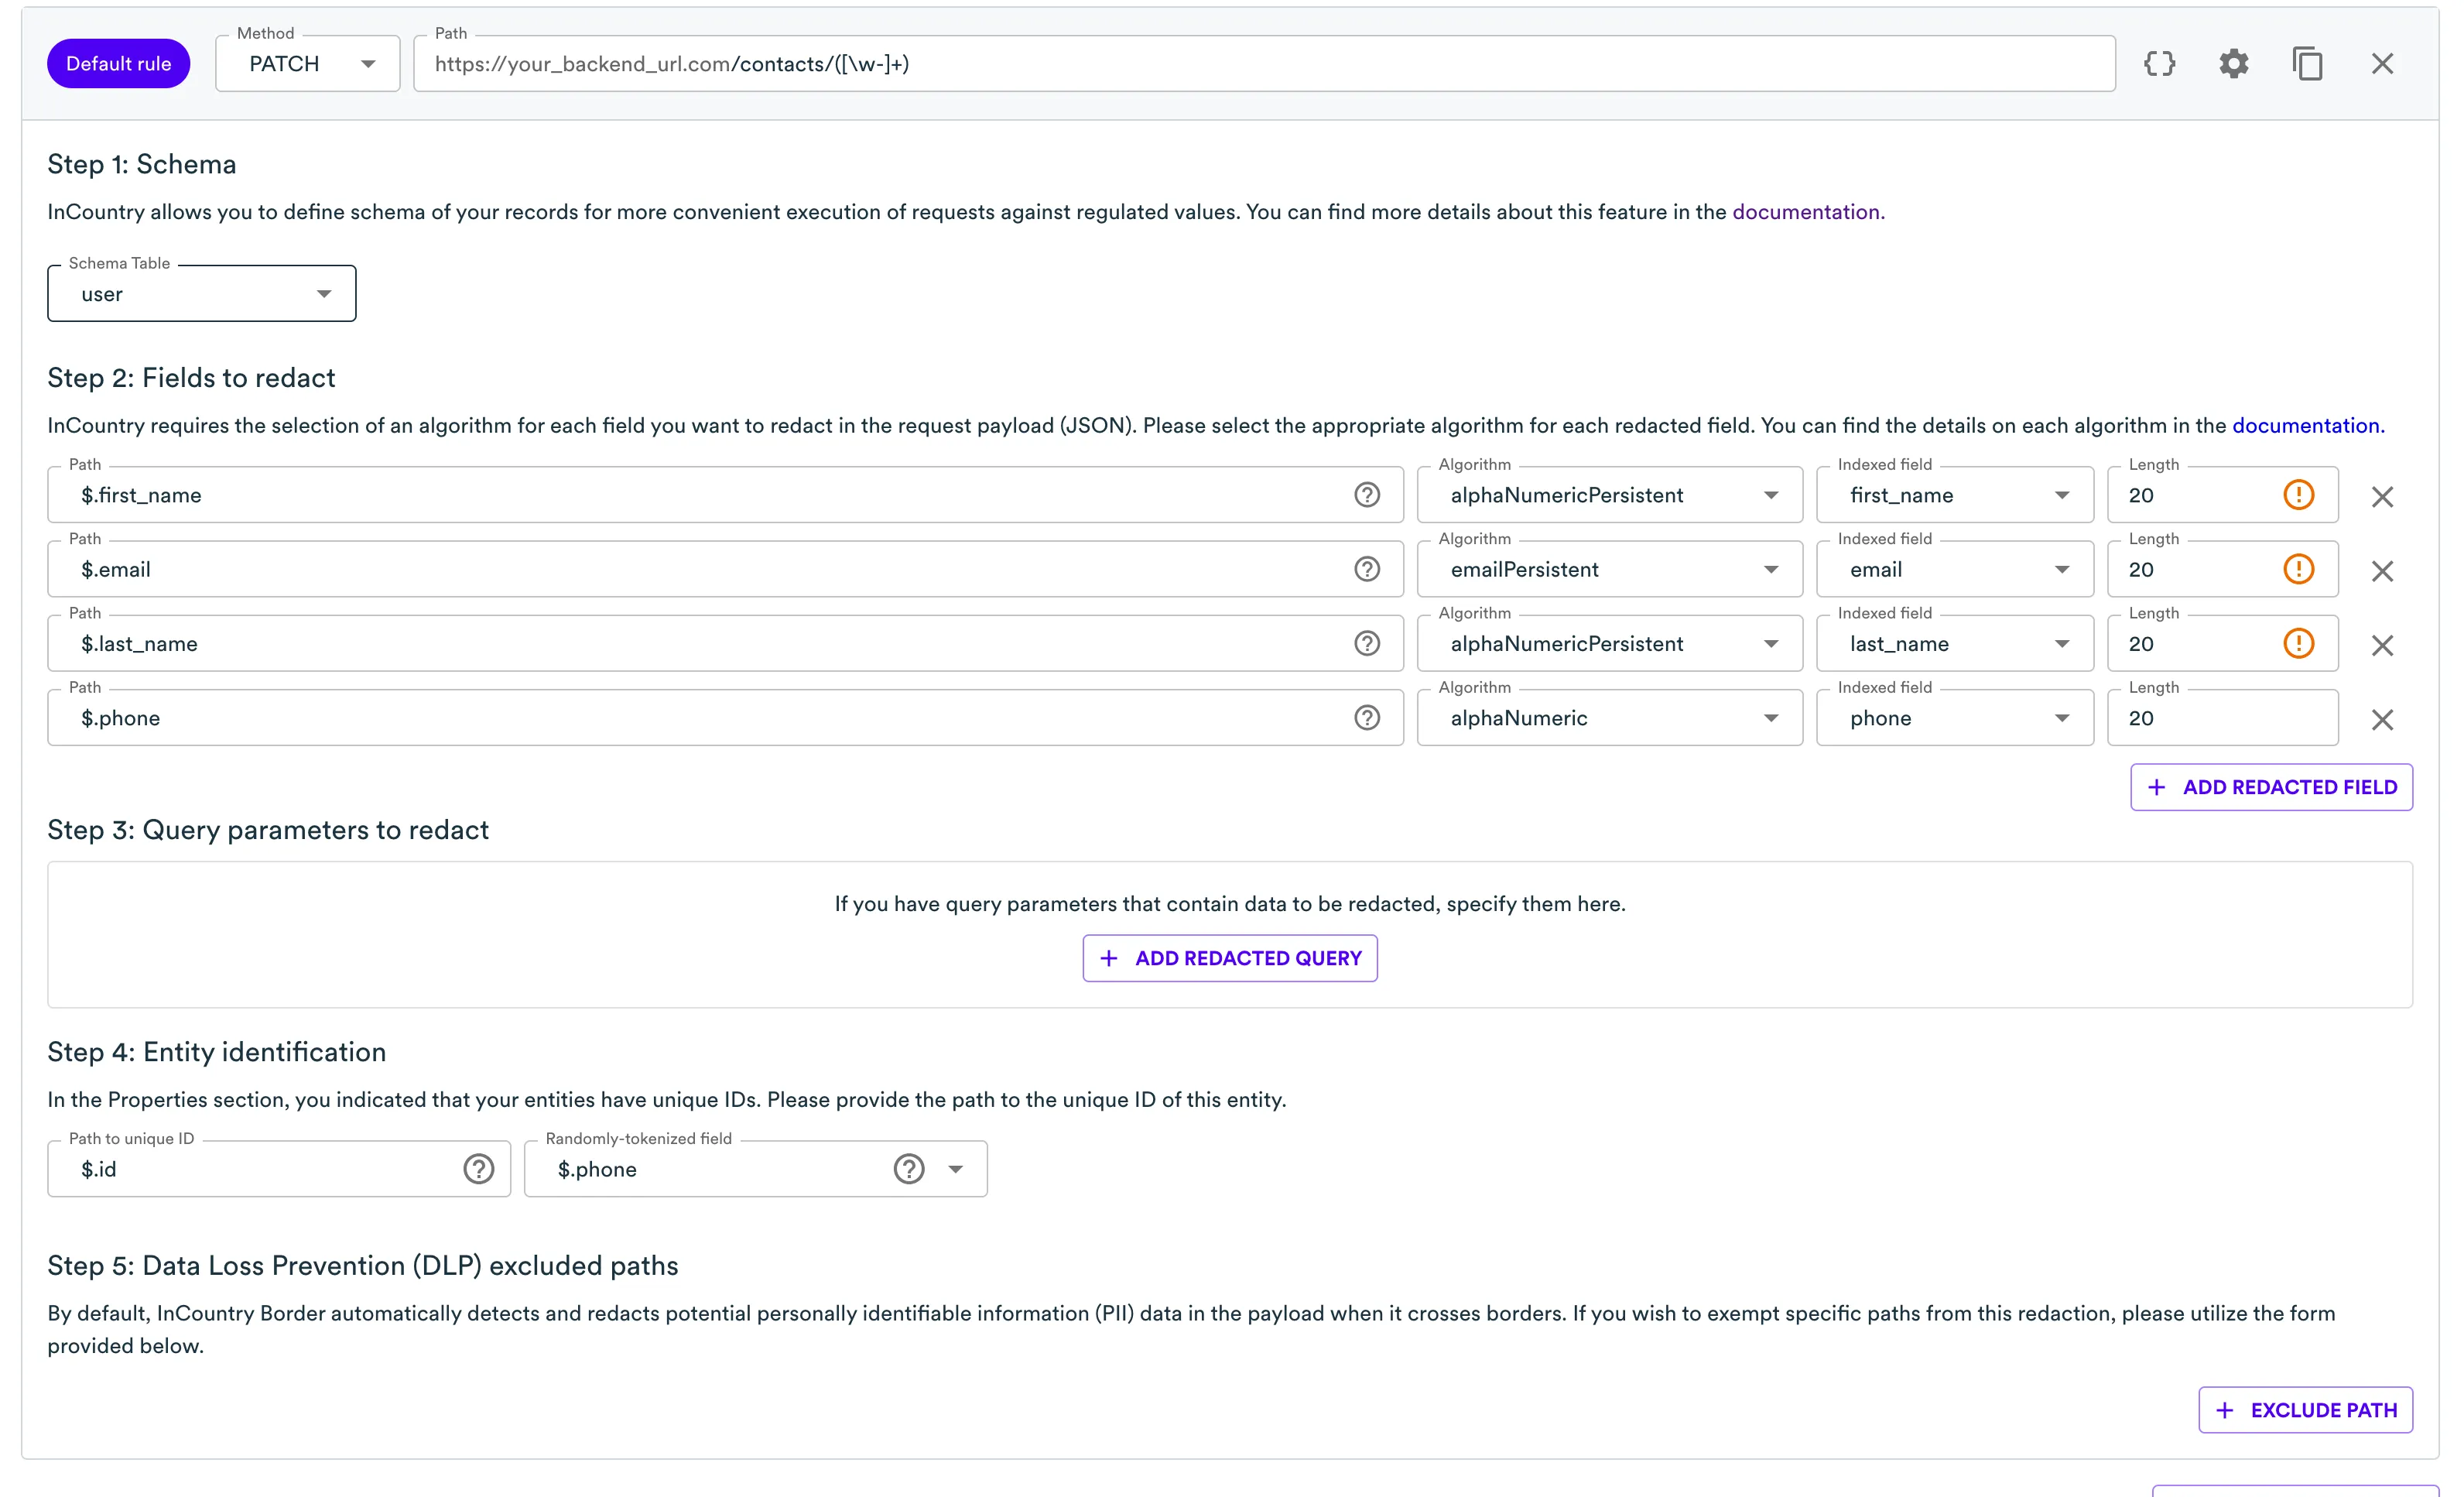
Now the same goes for updating a record.
-
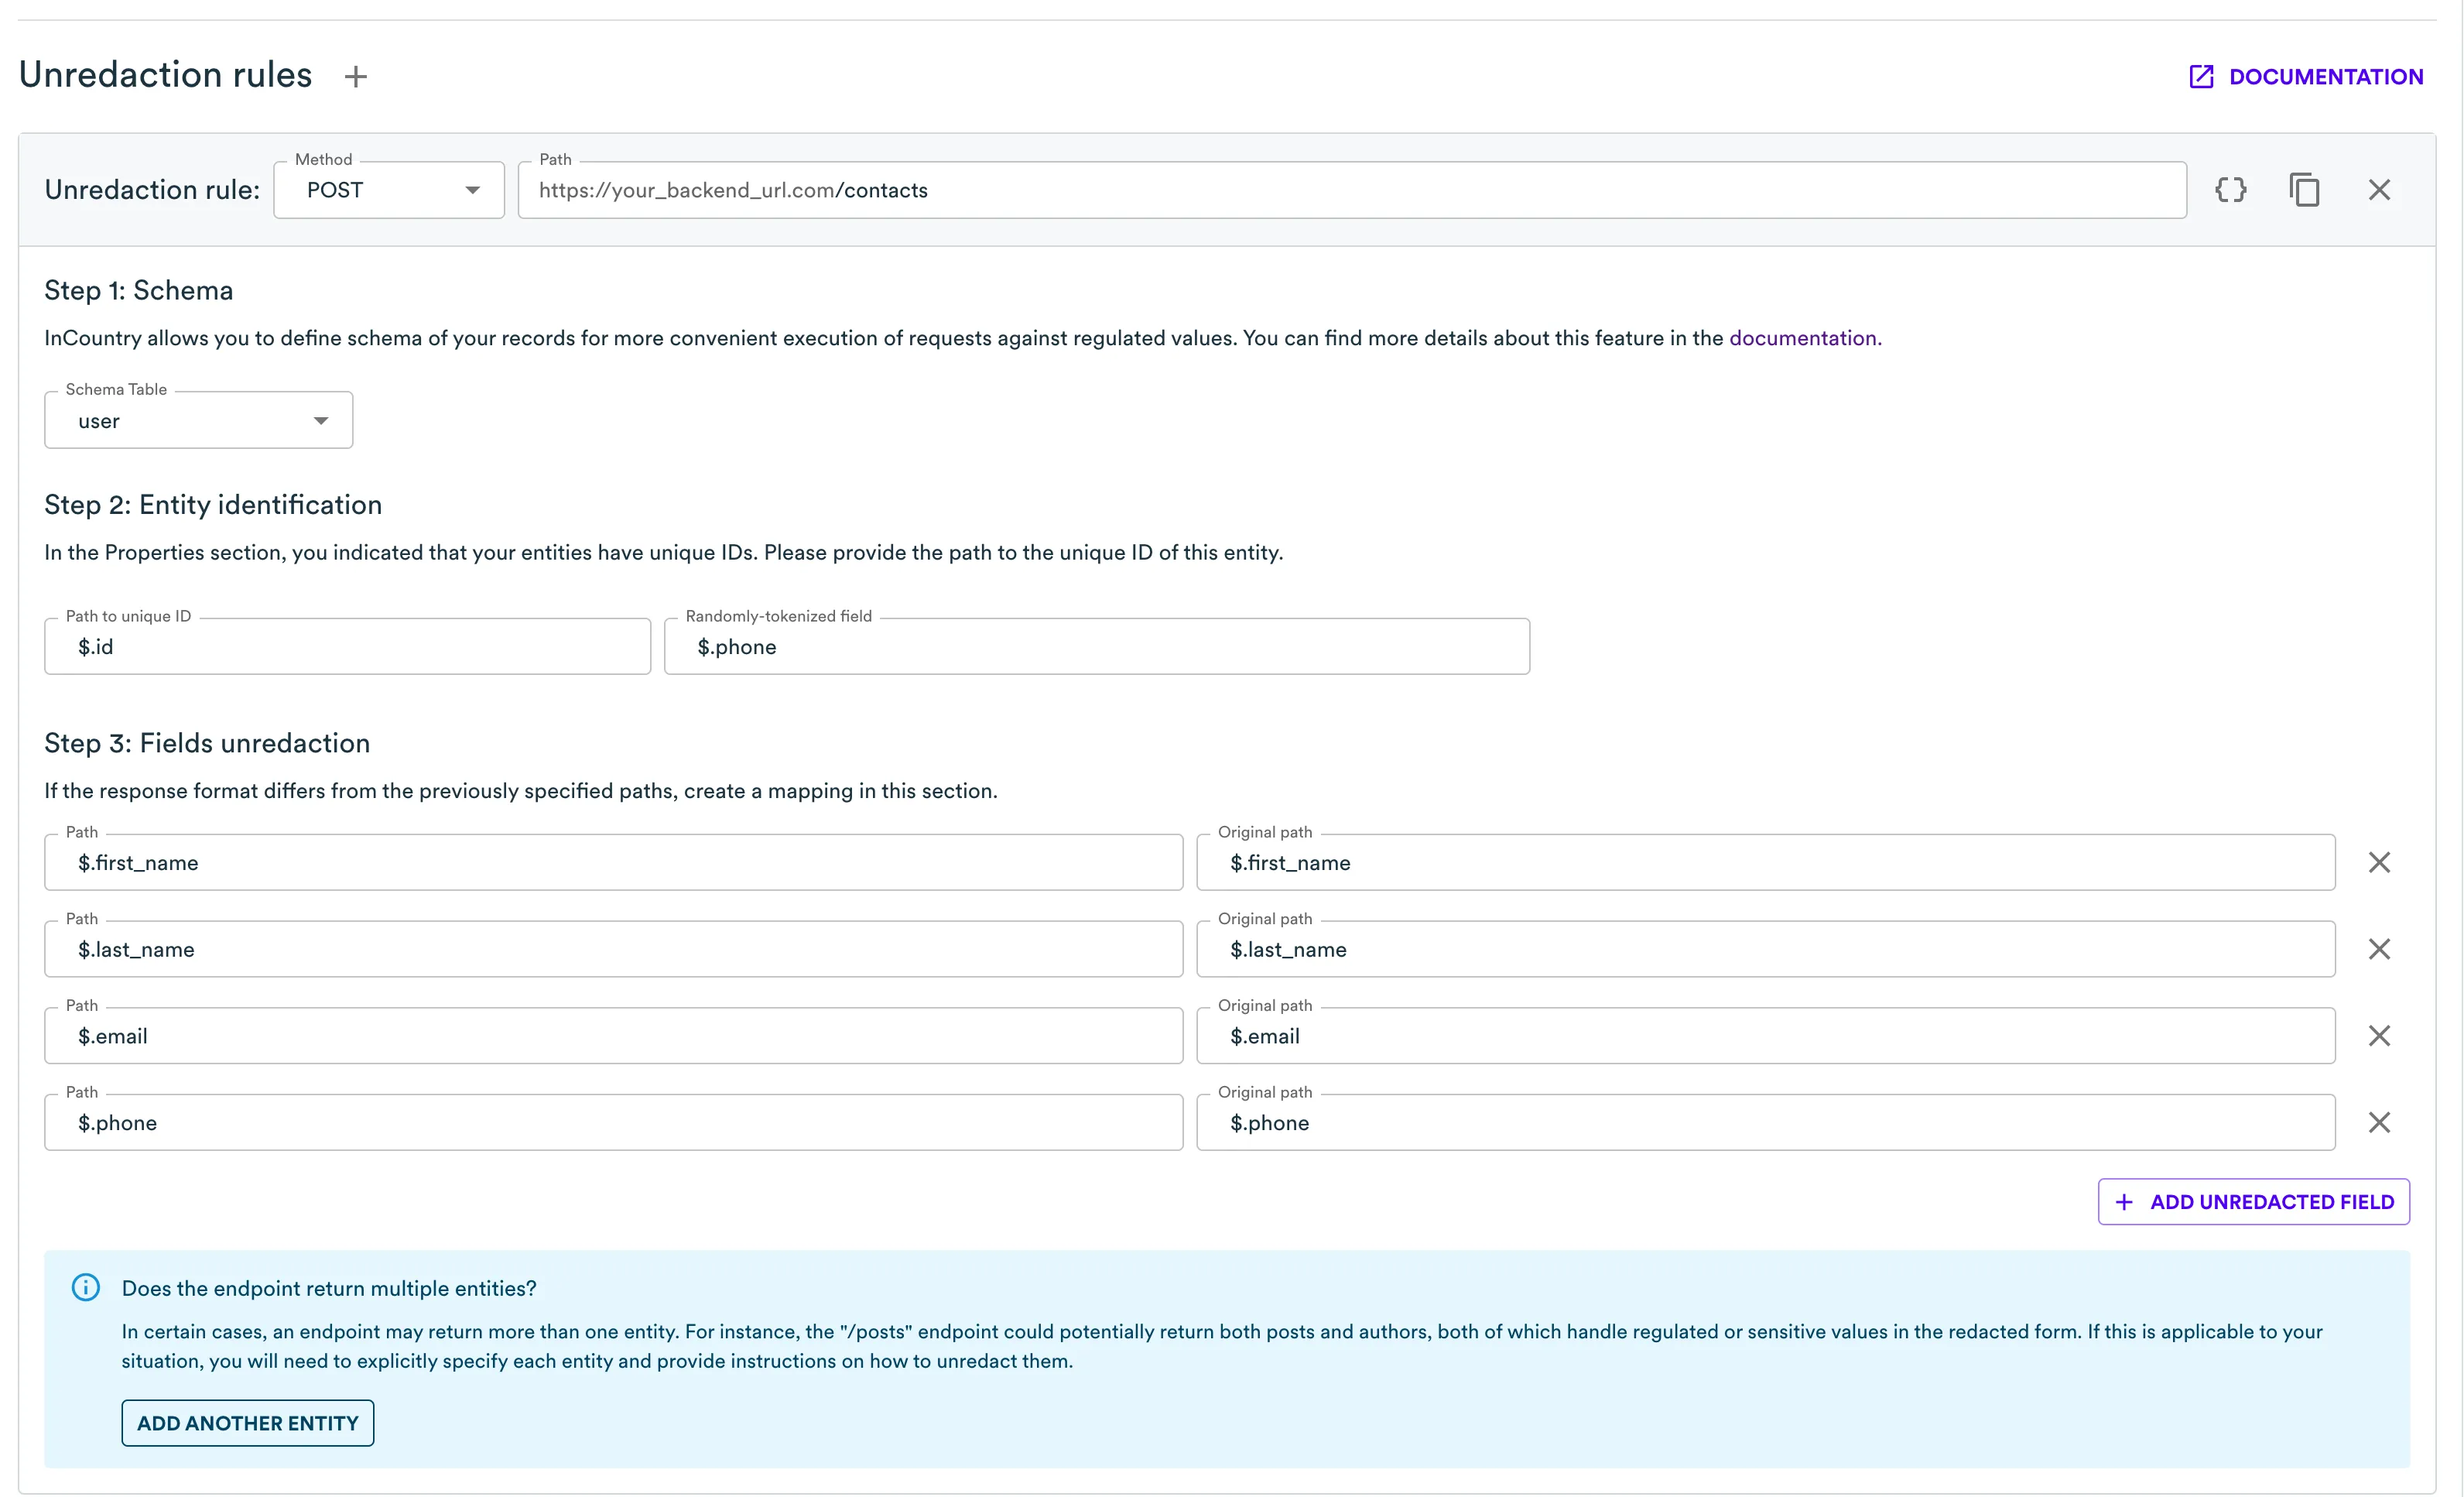
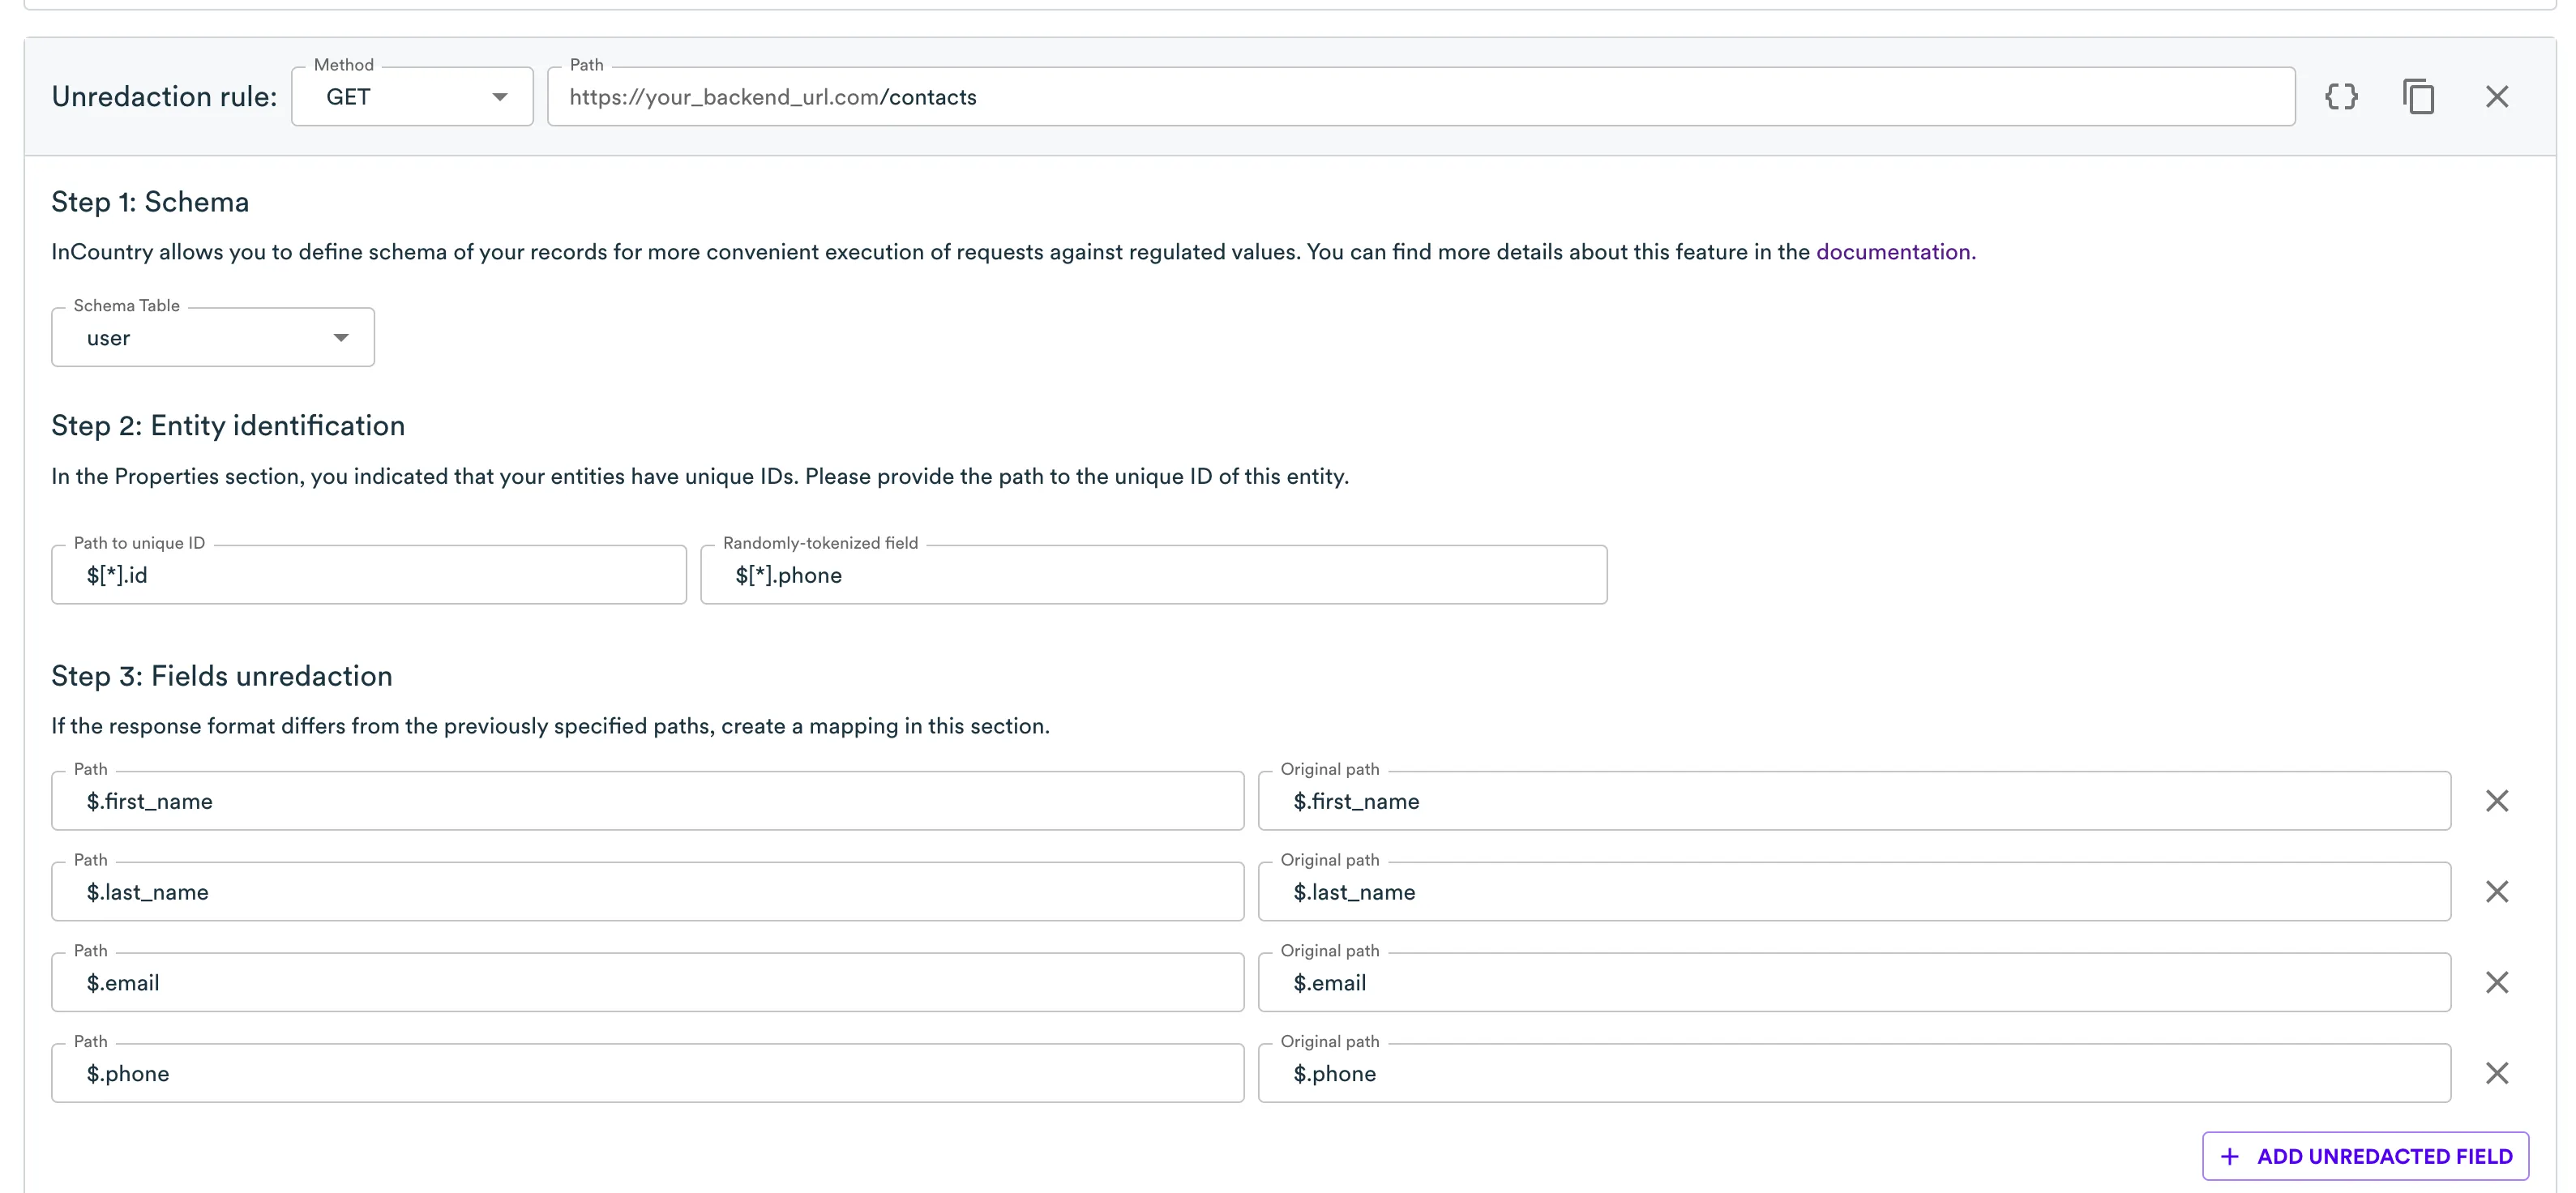
To receive clear-text data in the country of residence, we have to set up unredaction rules like those shown in the image below. First, for the create endpoint since it returns a new record.
The setup process is a bit different from for redaction. It is recommended to match the paths for the same field in redaction and unredaction rules for the same entity.
-
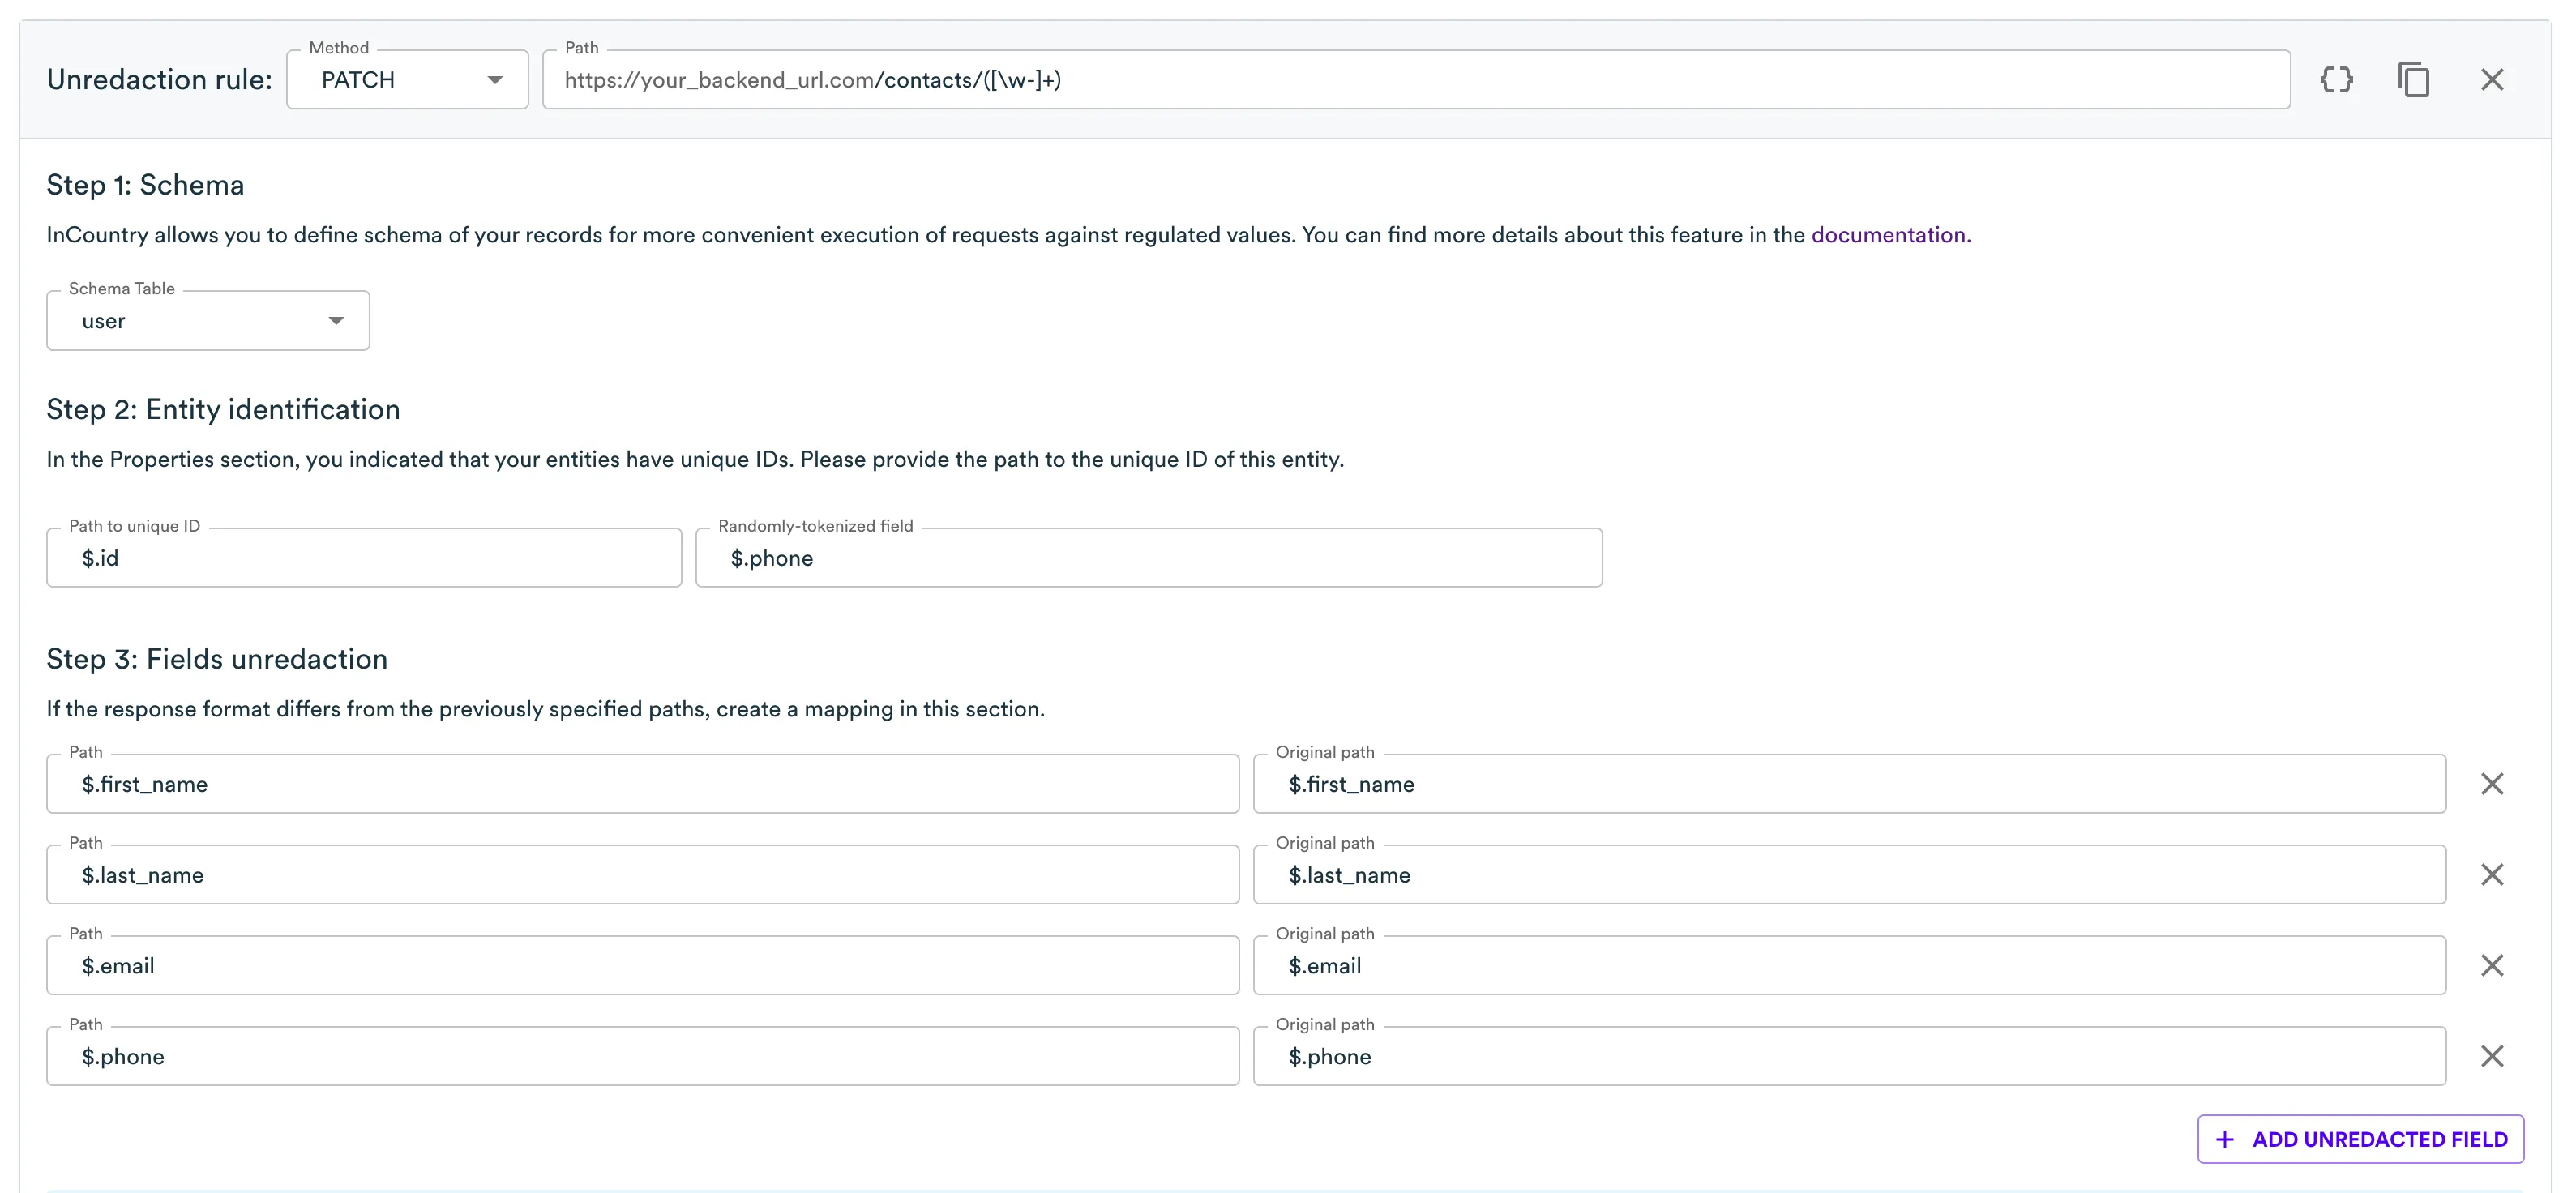
Then for the update endpoint.
-
And finally for the list.
Now, when the setup process is completed, we can start the application and see it using InCountry border in action.
Each rule has the Entity Identification section. There are two fields. The first one specifies where Border should look for a record identifier in the payload that comes from your server. The second one is for the cases where an identifier was not available, and we need some other definition to keep the data consistent across two systems or storages.
Running the application
git checkout border
Update a .env file with the following values:
NODE_PORT=80
ENV_ID="your-env-id"
BORDER_URL="https://<your-border-url>"
And start the app using the same command.
npm start
Now with very few modifications, the application works using the InCountry Border server as shown in the diagram below:

So our example application is compliant with personal data protection policies since all the PII stays in the country of residence.
What this solution has accomplished
An example application that runs on an AWS region can now redact regulated data using on-premises Amazon Outposts. The regulated data is fully isolated in the country to achieve full data sovereignty.
Conclusion
InCountry's solution, deployed via AWS Marketplace onto AWS Outposts or AWS Local Zones, allows customers to deploy and extend multi-jurisdiction applications into new countries efficiently and compliantly. This approach offers a cost-effective way to expand globally while ensuring verifiable isolation of identity data.