Segment with InCountry
InCountry operates seamlessly with Segment to dynamically redact regulated fields and insert anonymized values in their place. Regulated data is fully isolated in the country of origin in InCountry’s point-of-presence.
Getting Started
Before you start building the InCountry Segment integration, let’s complete some routine tasks including the following:
To build the InCountry Segment integration, you can use the following methods:
-
Segment functions
-
InCountry proxy for Analytics.js
Using Segment Functions
Segment has the ability to call a javascript function that you can write yourself.
-
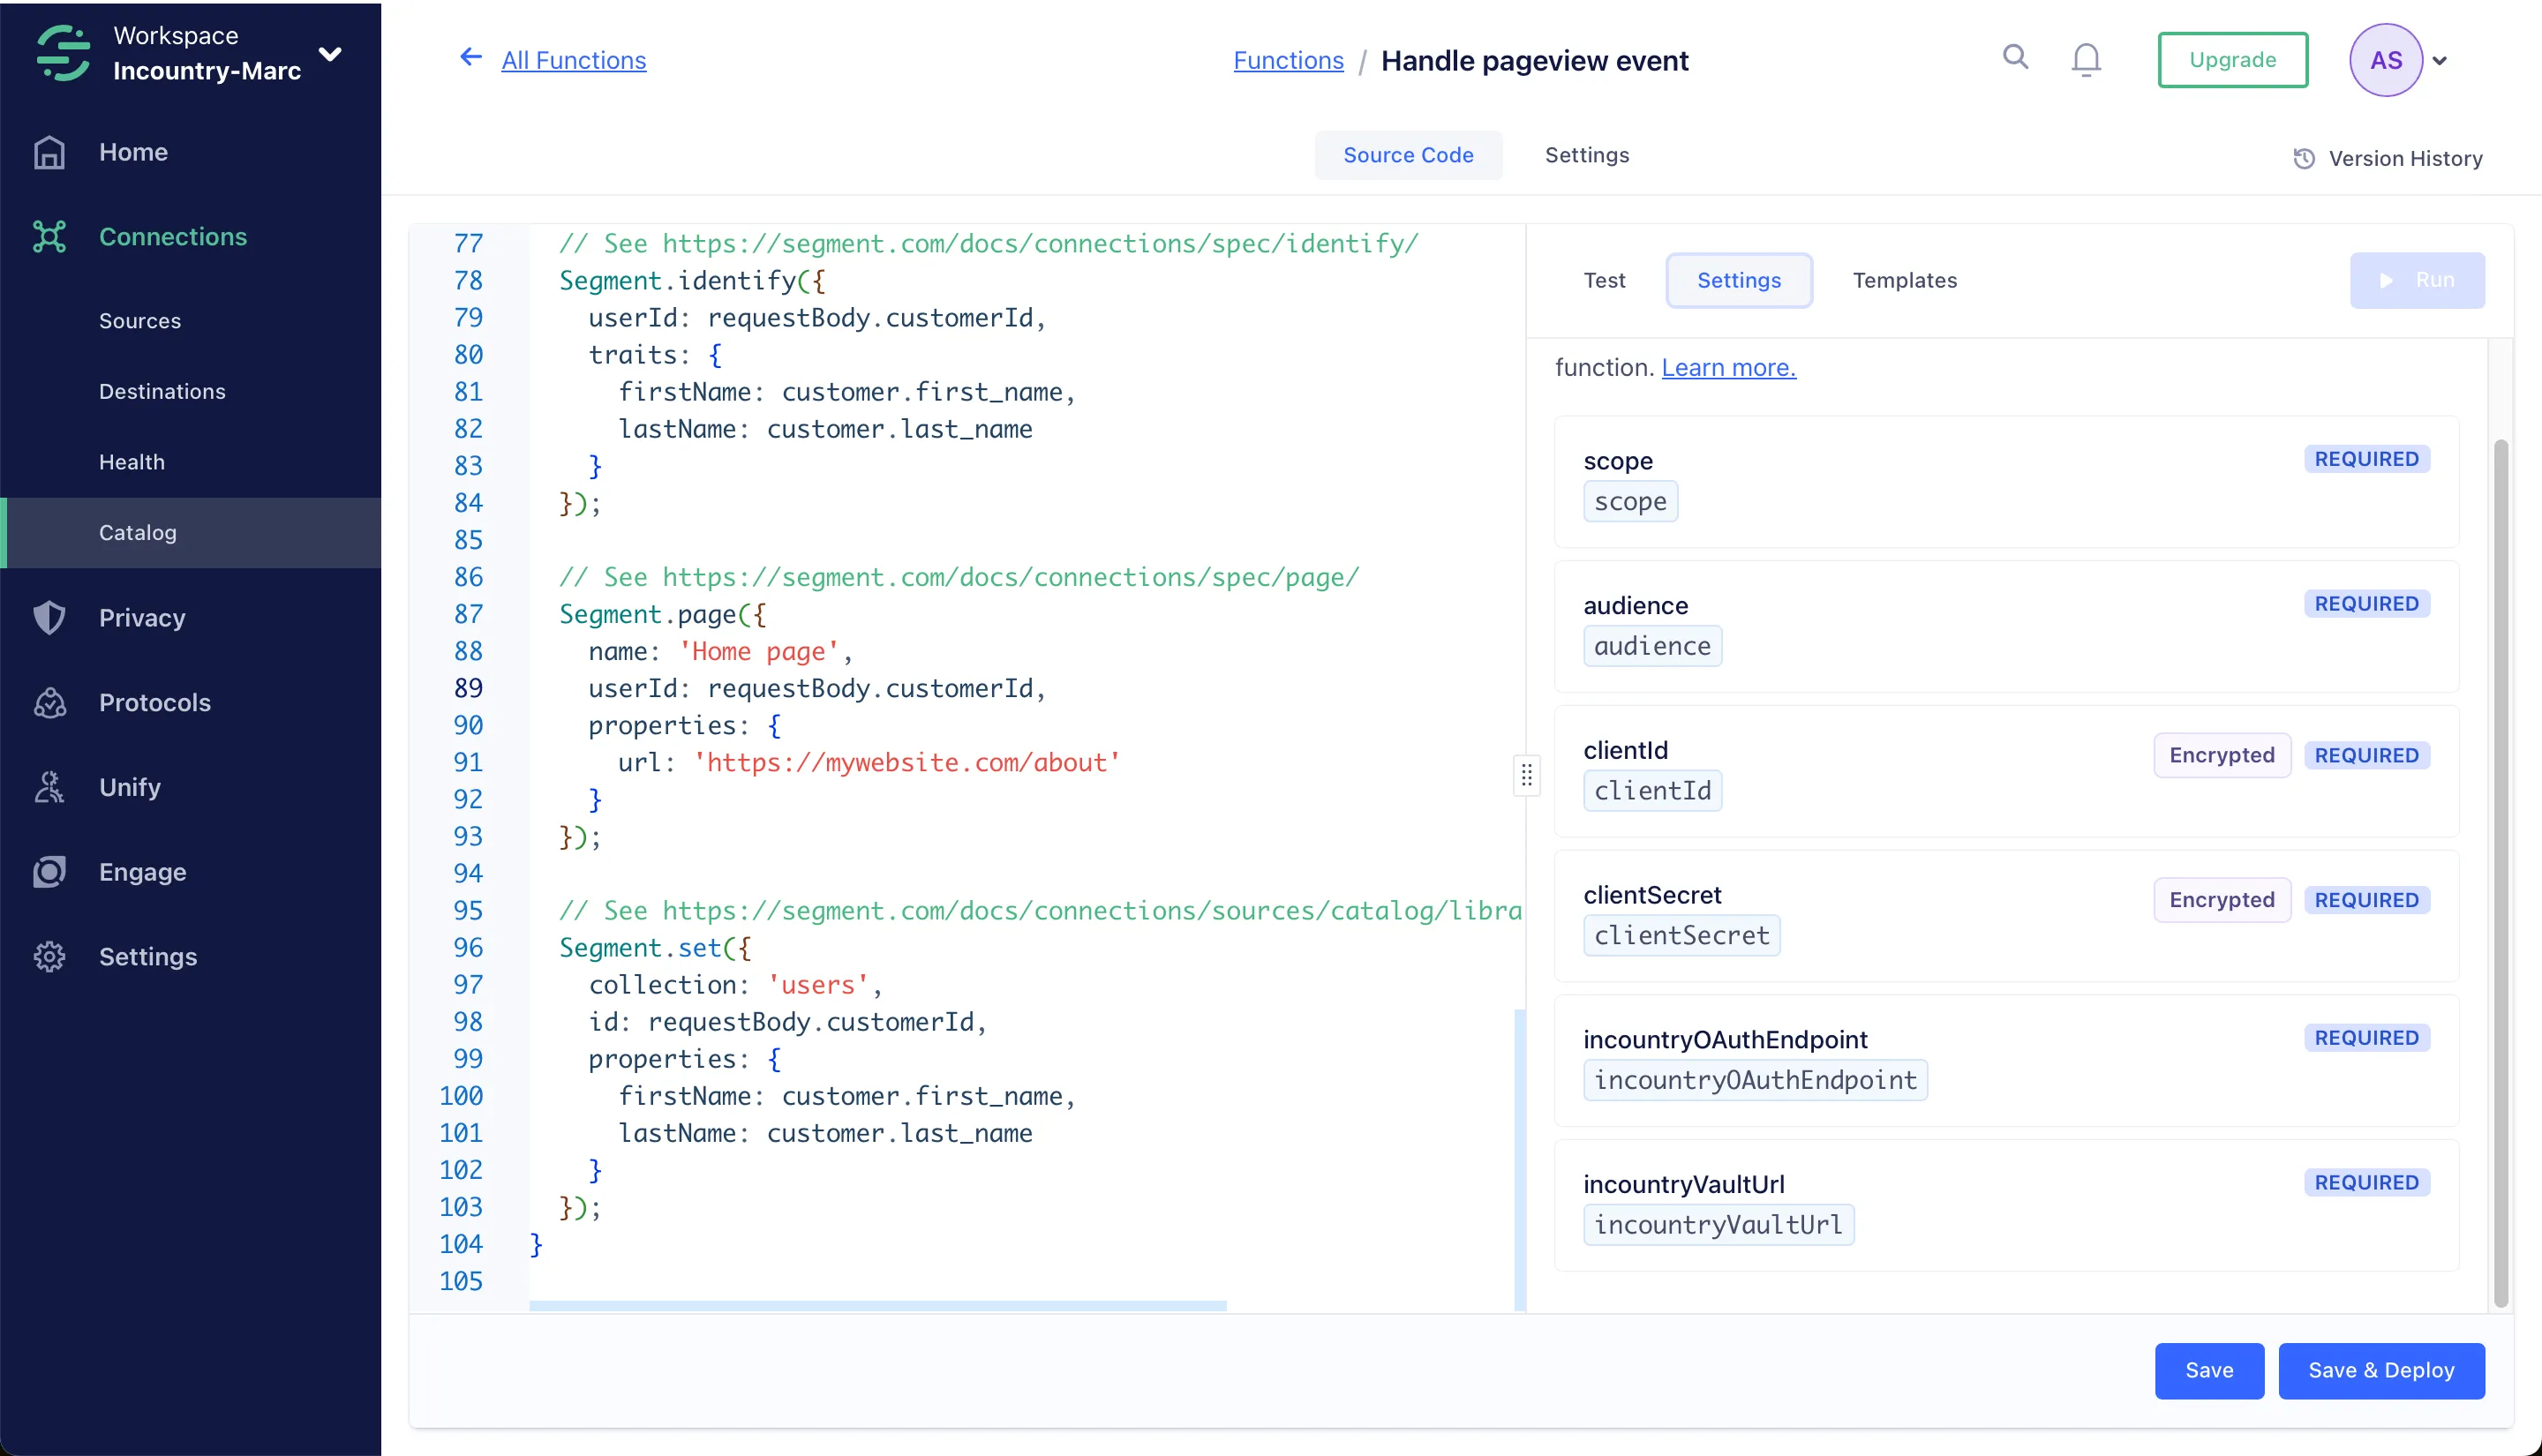
From your workspace, go to Connections > Catalog and click the Functions tab.
-
On the Functions tab, click Create Function.

In the next step, you can choose when to run this function. For example, you can do it before the data is ingested into Segment by using an HTTP request.
-
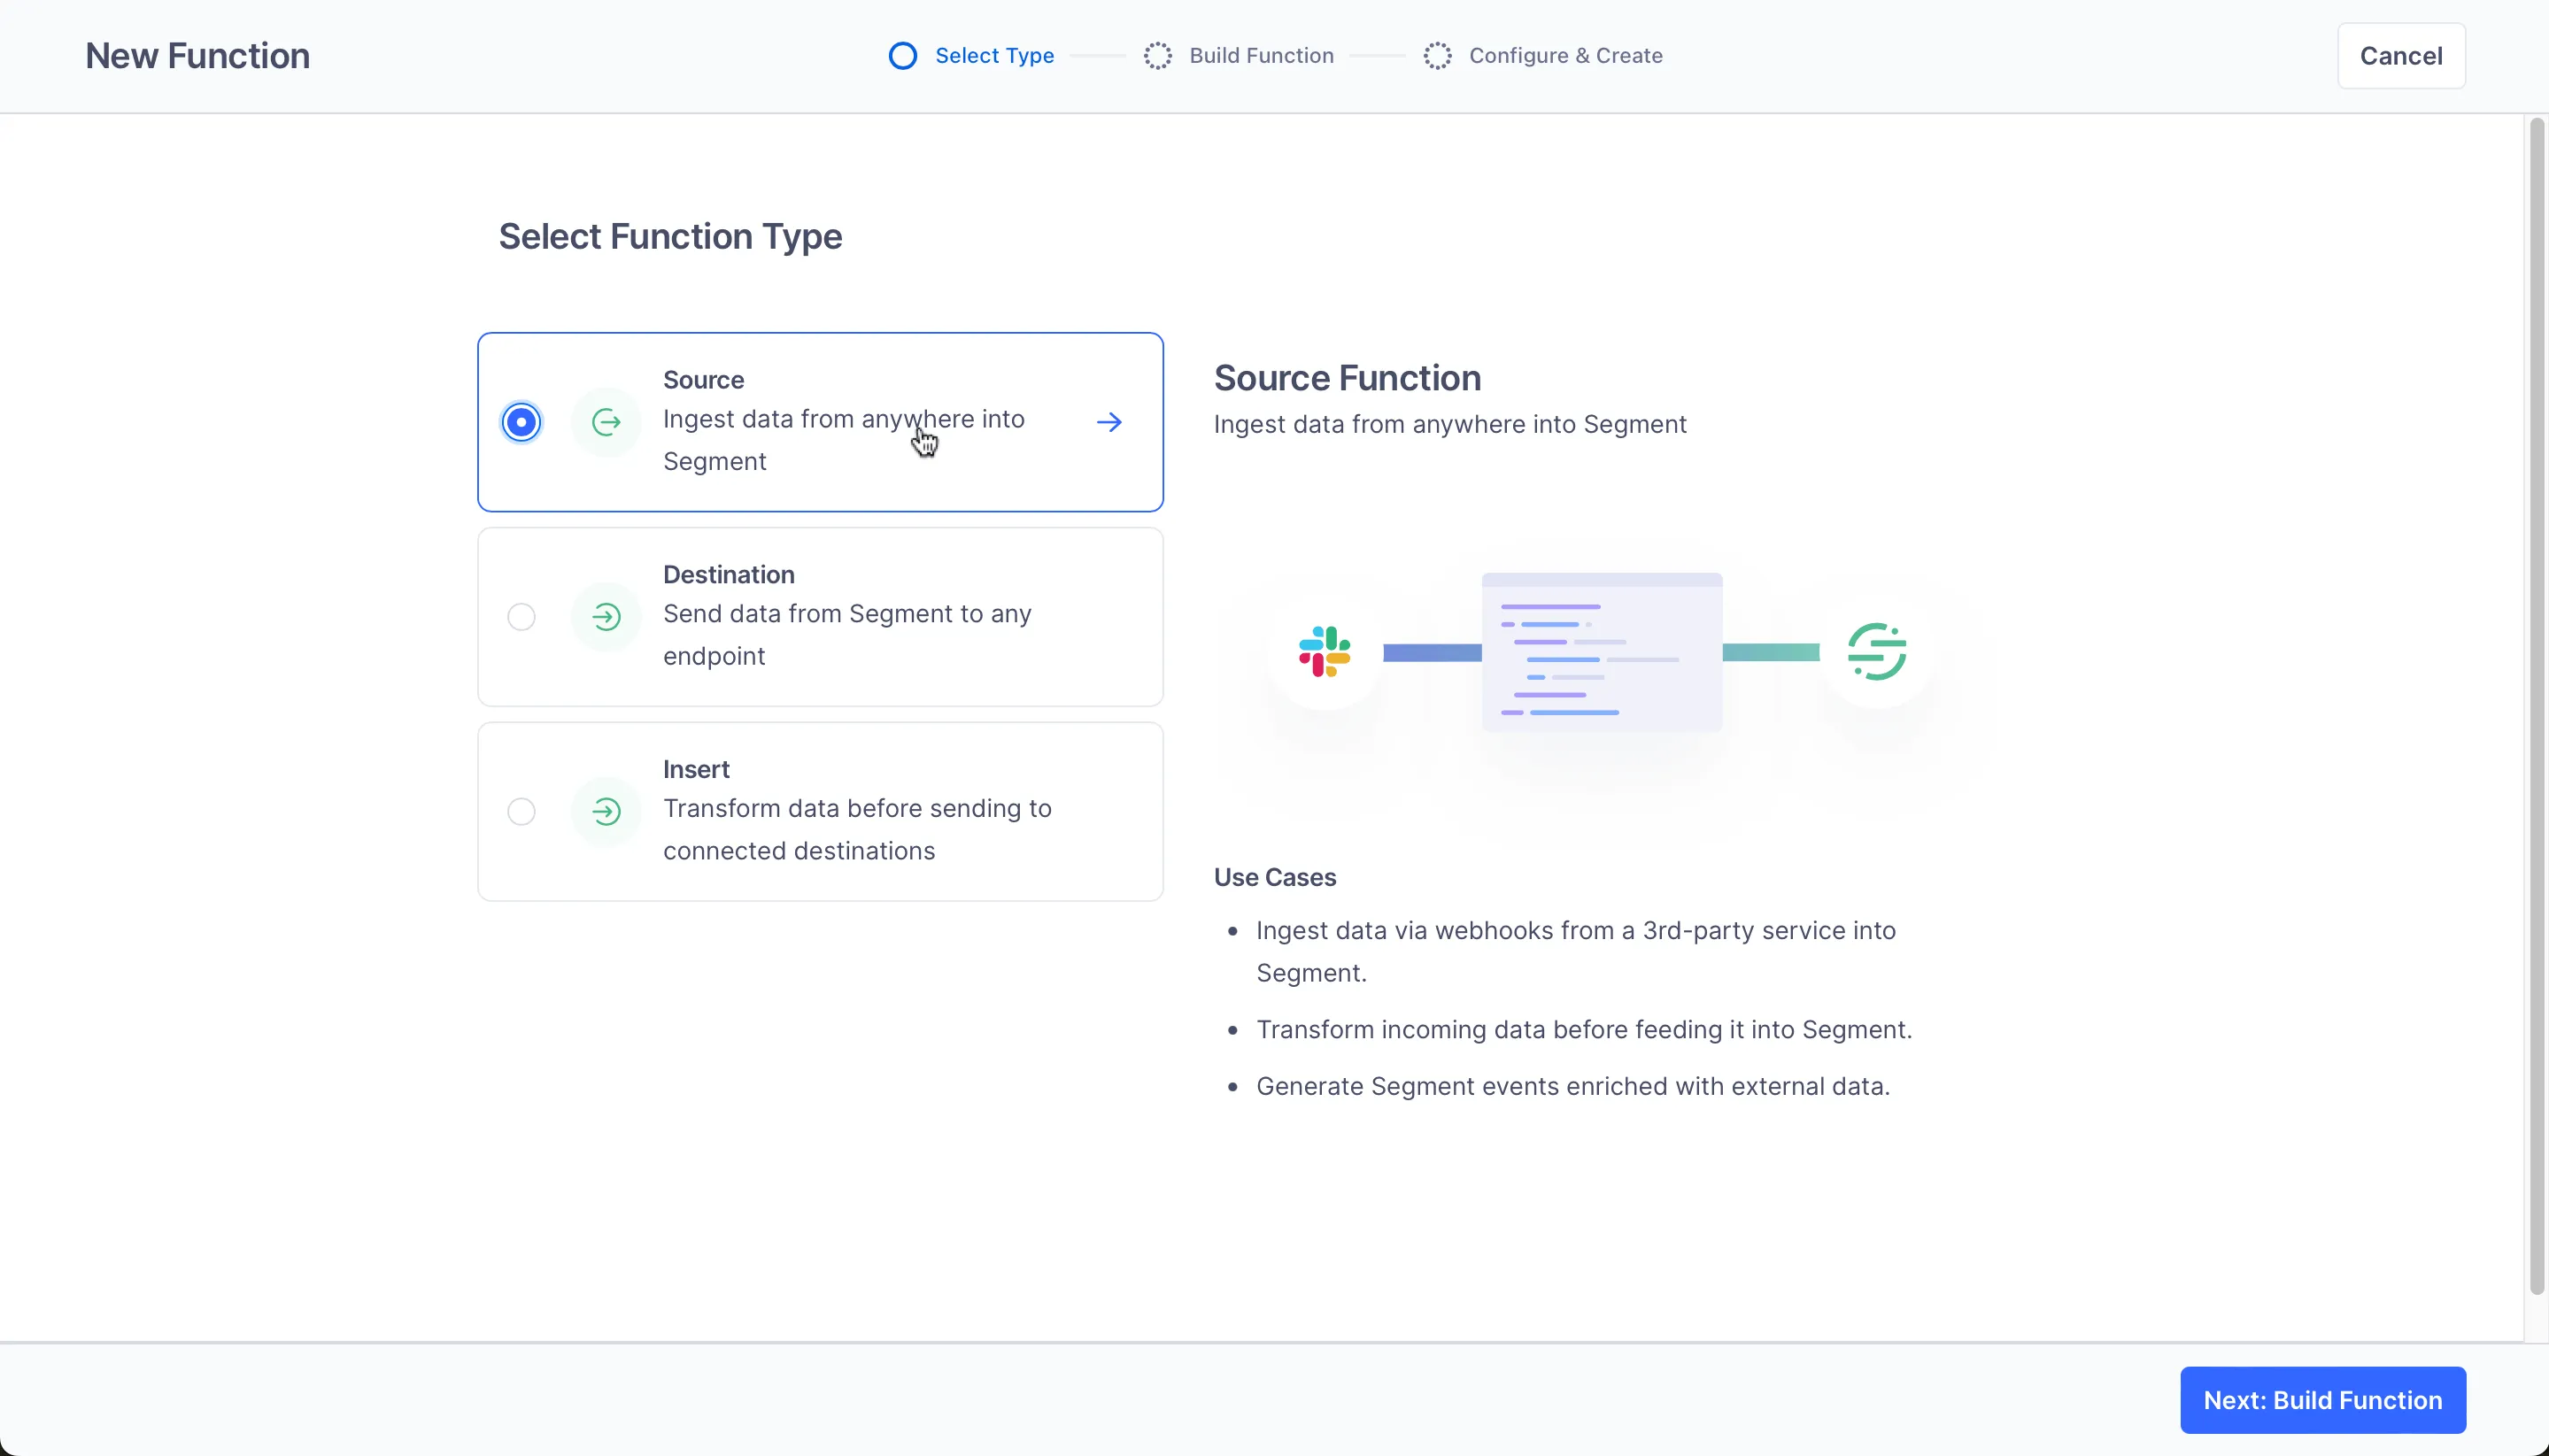
Select Source as the function type and click Build Function.
-
After you click Build Function, a code editor appears. Use the editor to write the code for your function.
Let’s imagine a situation when a user has a website backend. When a visitor downloads one of its pages, the website backend launches a function on the Segment side by using an HTTP request with the following parameters:
{
  "customerId": "c48b16fa-eabc-4ef5-9a1f-a5c891e6c5af",
  "event": "pageview",
  "pageName": "About",
  "pageUrl": "https://mywebsite.com/about"
}
This function should register a page view event by a customer with the id
c48b16fa-eabc-4ef5-9a1f-a5c891e6c5afand with the above page parameters and redact the user’s data so that thefirstNameandlastNamefields are redacted in Segment.As a result of the function, we created the redacted user in Segment, which Segment can then send to any destination.
The function works as follows: It receives a request with a customerId, then it receives the InCountry access token, which is configured via ACL to return the redacted values. With this token, it goes to InCountry REST API and, using customerId, it gets the redacted user, which is stored on the InCountry platform. The function creates a user with the redacted
firstNameandlastNamefields and a page event on the Segment side.Below is an example of a simple function in Segment, which is on the screenshots above and which implements the described case.
// Learn more about source functions API at
// https://segment.com/docs/connections/sources/source-functions
/**
* Handle incoming HTTP request
*
* @param {FunctionRequest} request
* @param {FunctionSettings} settings
*/
async function onRequest(request, settings) {
const requestBody = request.json();
const formData = new FormData();
let oAuthResponse;
let findResponse;
let oAuthData;
let findData;
// Construct request to get. oAuth token
formData.append('grant_type', 'client_credentials');
formData.append('audience', settings.audience);
formData.append('scope', settings.scope);
try {
// Request oAuth token
oAuthResponse = await fetch(settings.incountryOAuthEndpoint, {
method: 'POST',
headers: {
Authorization: `Basic ${btoa(
settings.clientId + ':' + settings.clientSecret
)}`,
...formData.getHeaders()
},
body: formData
});
} catch (error) {
// Retry on connection error
throw new RetryError(error.message);
}
if (oAuthResponse.status >= 500 || oAuthResponse.status === 429) {
// Retry on 5xx (server errors) and 429s (rate limits)
throw new RetryError(`Failed with ${oAuthResponse.status}`);
}
oAuthData = await oAuthResponse.json();
try {
// Find user in InCountry database by customerId from the request
findResponse = await fetch(
`${settings.incountryVaultUrl}/api/models/users/find`,
{
method: 'POST',
headers: {
Authorization: `Bearer ${oAuthData.access_token}`,
'Content-Type': 'application/json'
},
body: JSON.stringify({
filter: {
customer_id: requestBody.customerId
}
})
}
);
} catch (error) {
// Retry on connection error
throw new RetryError(error.message);
}
if (findResponse.status >= 500 || findResponse.status === 429) {
// Retry on 5xx (server errors) and 429s (rate limits)
throw new RetryError(`Failed with ${findResponse.status}`);
}
findData = await findResponse.json();
customer = findData.data[0];
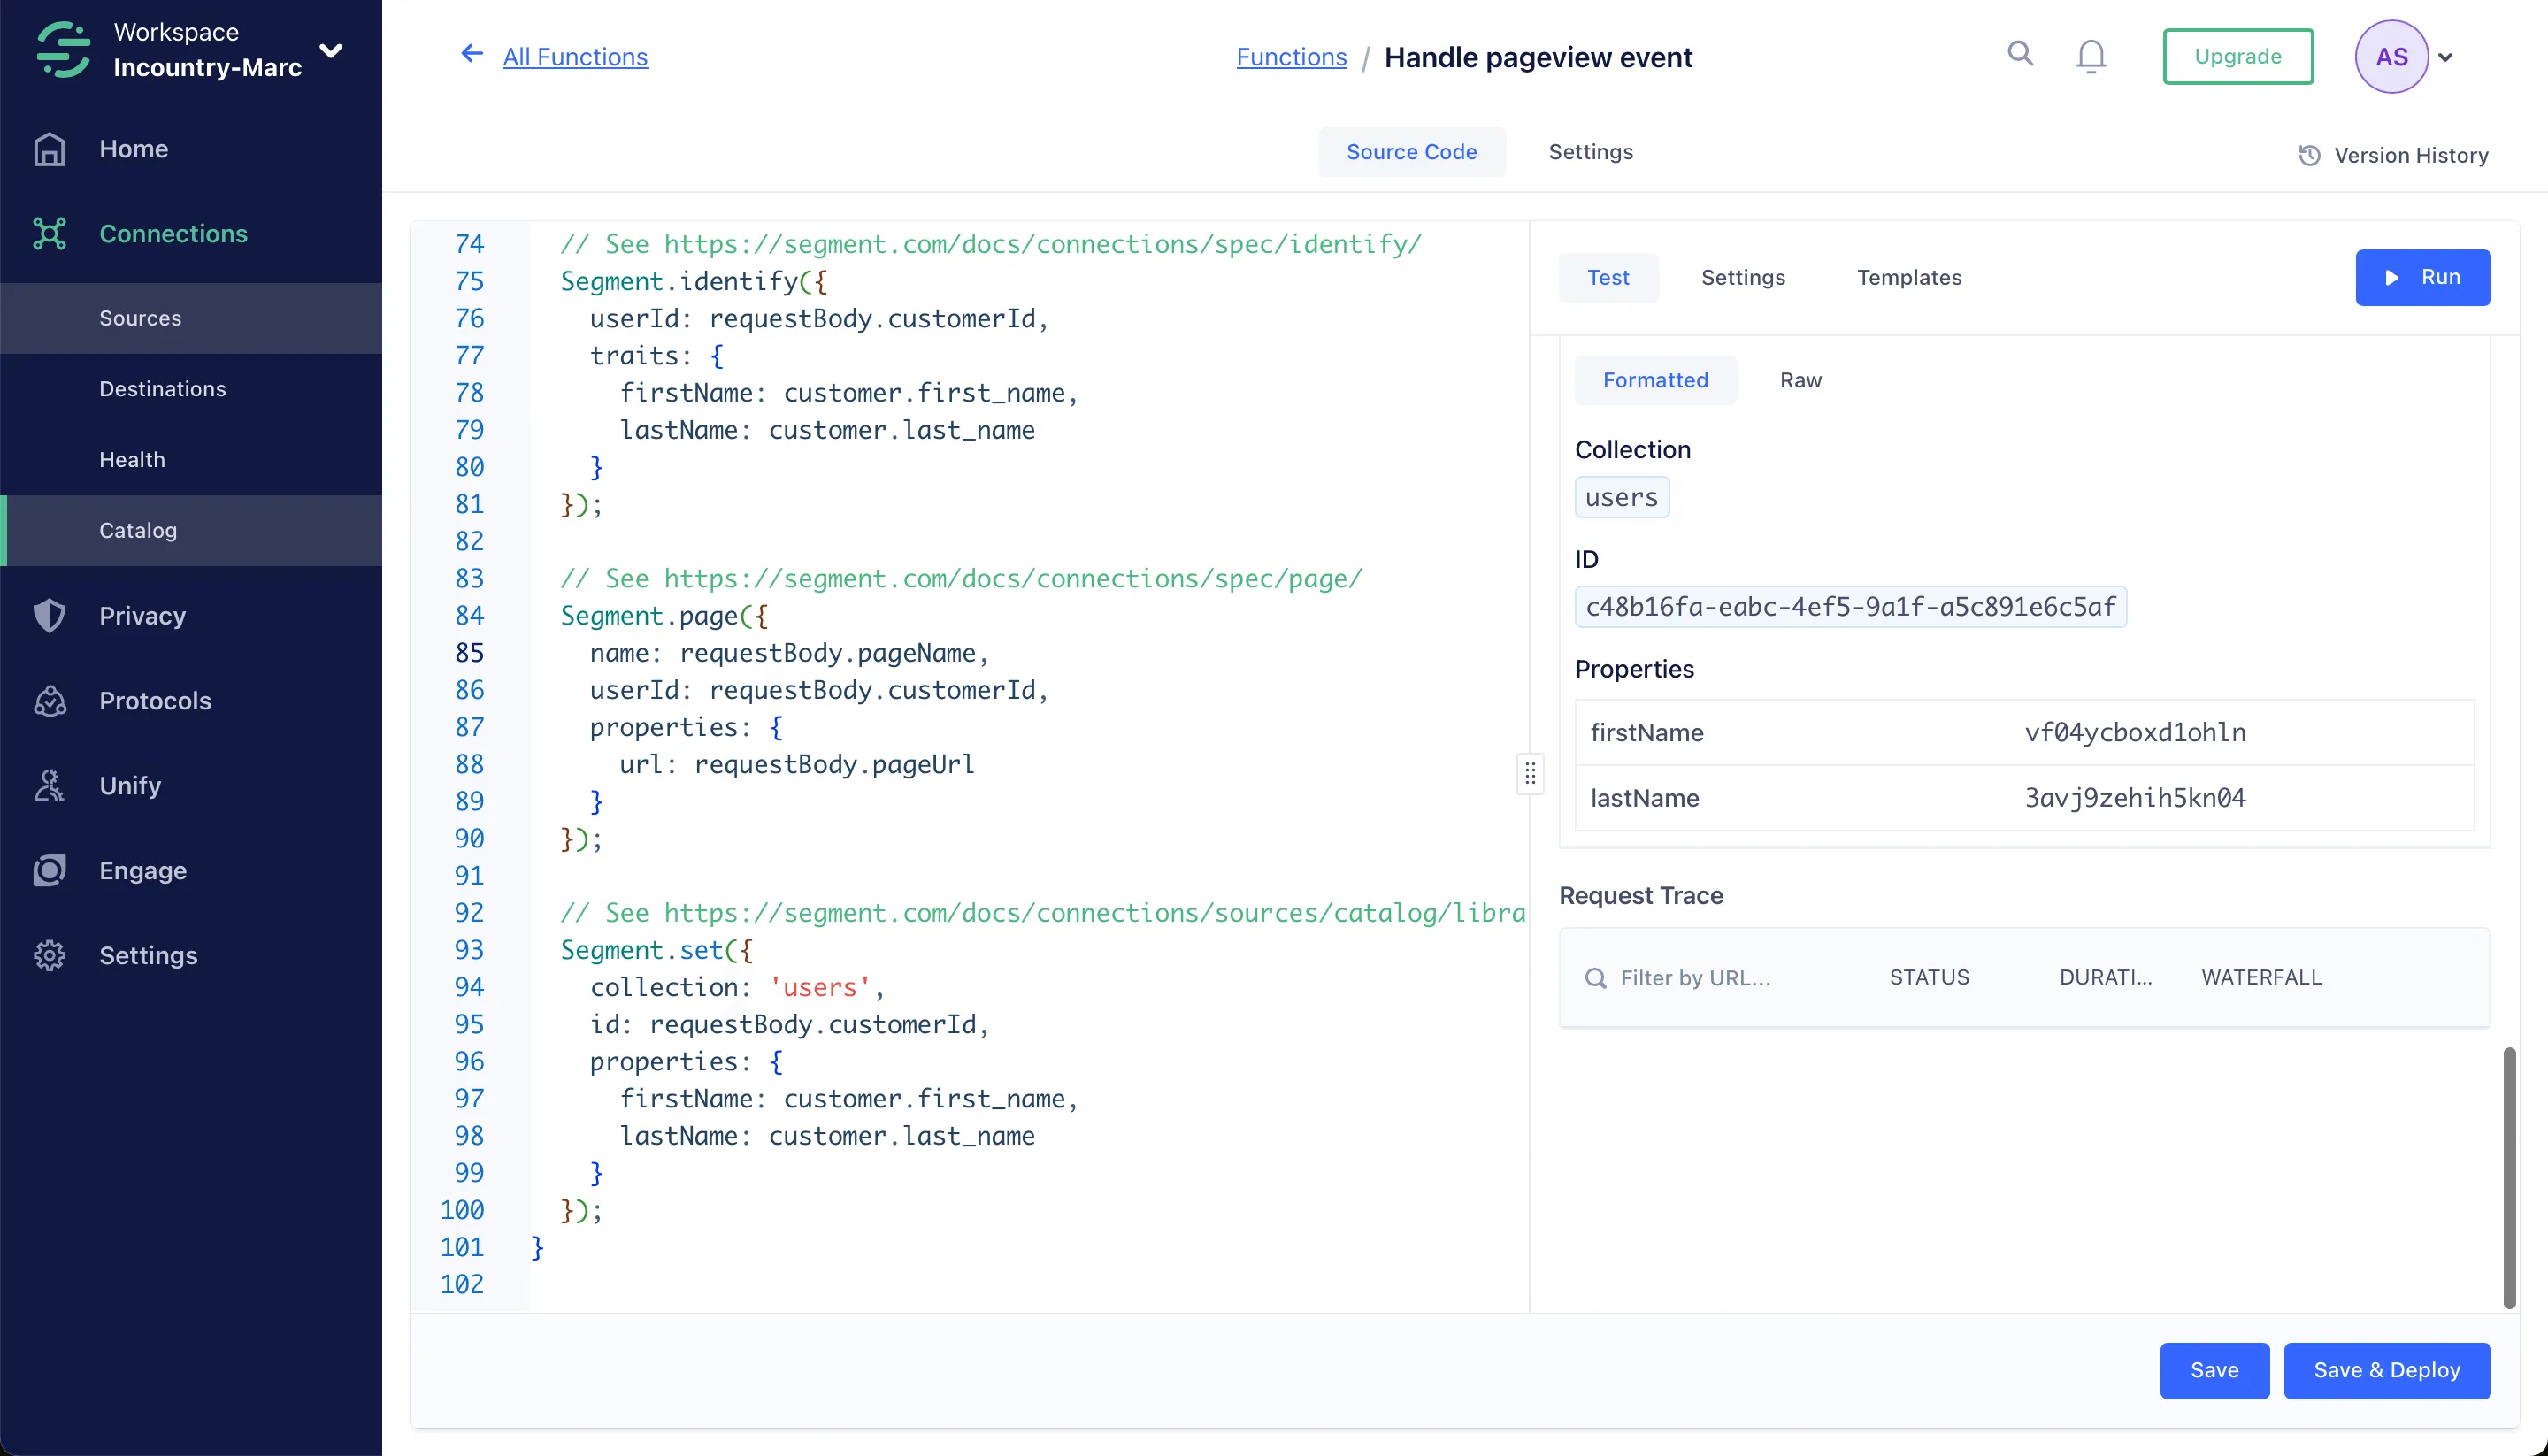
// See https://segment.com/docs/connections/spec/identify/
Segment.identify({
userId: requestBody.customerId,
traits: {
firstName: customer.first_name,
lastName: customer.last_name
}
});
// See https://segment.com/docs/connections/spec/page/
Segment.page({
name: 'Home page',
userId: requestBody.customerId,
properties: {
url: 'https://mywebsite.com/about'
}
});
// See https://segment.com/docs/connections/sources/catalog/libraries/server/object-api/
Segment.set({
collection: 'users',
id: requestBody.customerId,
properties: {
firstName: customer.first_name,
astName: customer.last_name
}
});
} -
Configure the settings for this function. On the Settings tab, you can see what settings are required.
-
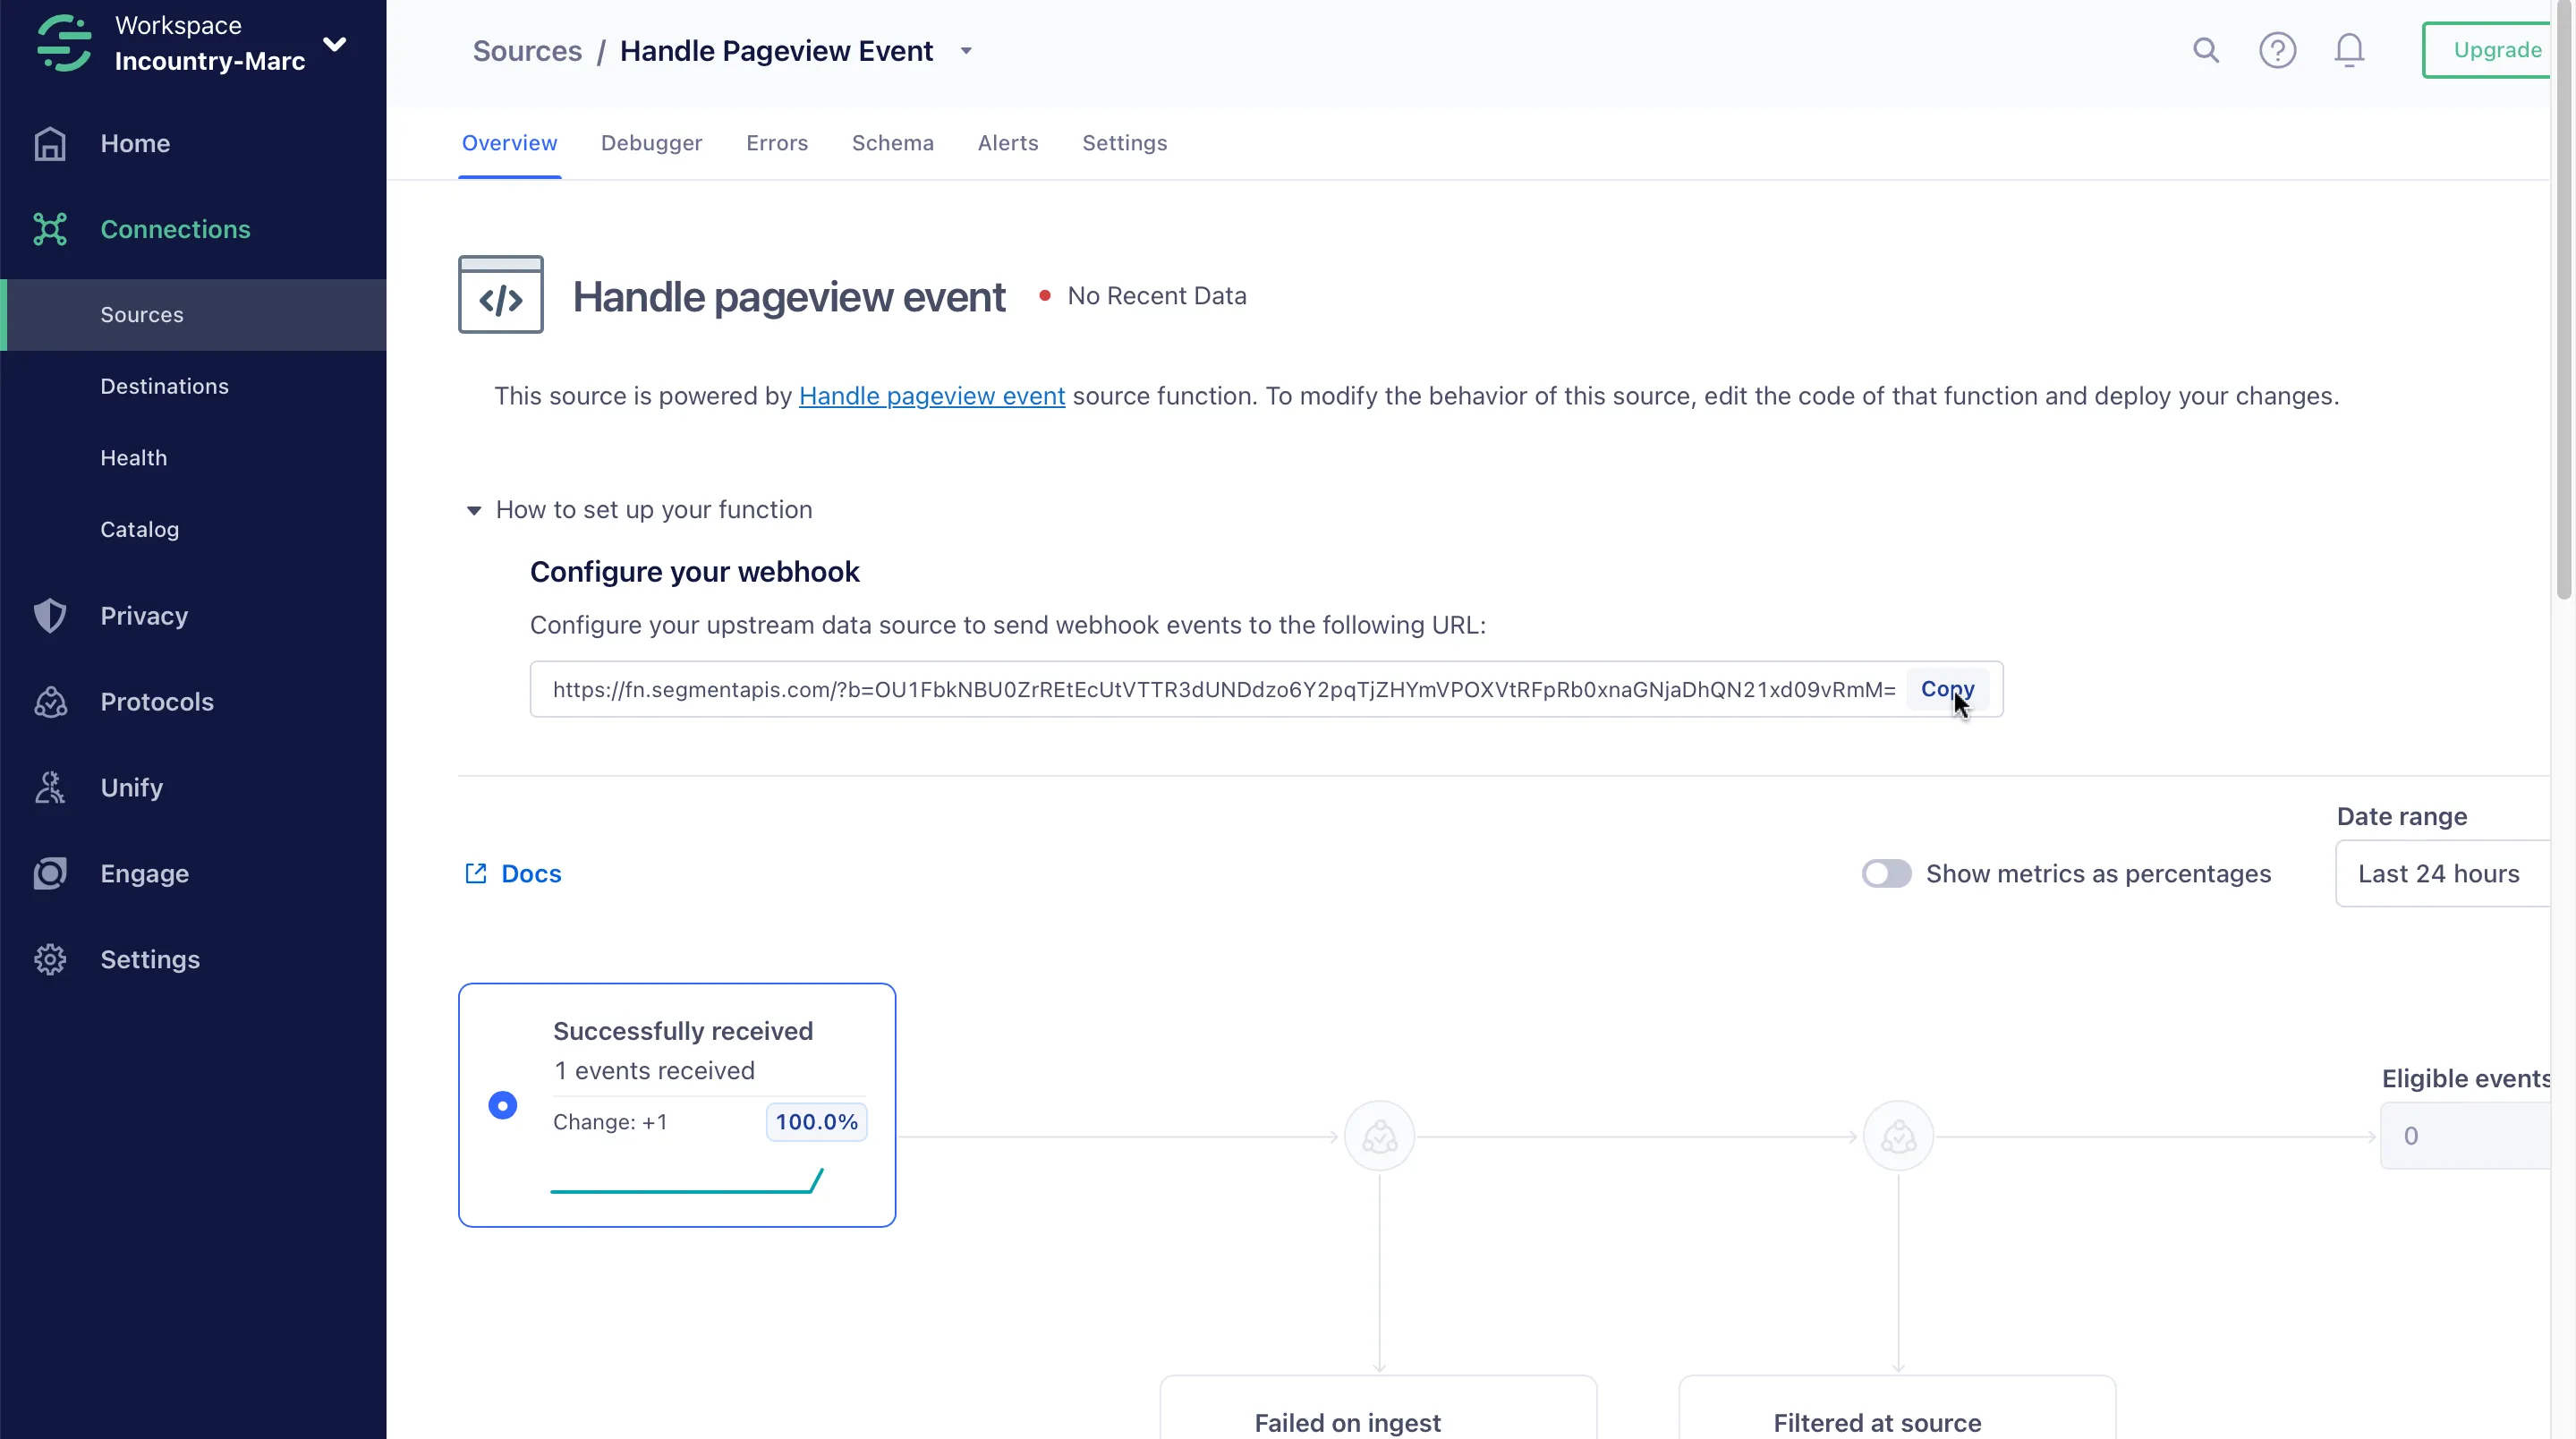
Click Save & Deploy. After clicking the Save & Deploy button, the function will be created as a source. You can find it in the Connections > Sources menu on the left sidebar.
-
Go to Connections > Sources and select the Settings tab. In the Connection Settings form, specify the RestAPI settings you received from Portal when created a RestAPI service.
-
Click Save Changes.
-
On the Overview tab, copy the URL and make a POST request to test this function, for example with a JSON body:
{
  "customerId": "c48b16fa-eabc-4ef5-9a1f-a5c891e6c5af",
  "event": "pageview",
  "pageName": "About",
  "pageUrl": "https://mywebsite.com/about"
}


Using Web Services Proxy for the Analytics.js library
To build the InCountry Segment integration using Web Services Proxy for the Analytics.js library, perform the following steps:
-
Create a new Web service for the required country using the existing top-level URL:
https://api.segment.ioor another URL depending on which Segment region you selected. The InCountry Portal will show the target URL. -
From your workspace, go to Connections > Sources and create a Javascript source.
Segment will give you a snippet of JavaScript that you copy and paste into the web page:
<script>
    !function(){var i="analytics",analytics=window[i]=window[i]||[];if(!analytics.initialize)if(analytics.invoked)window.console&&console.error&&console.error("Segment snippet included twice.");else{analytics.invoked=!0;analytics.methods=["trackSubmit","trackClick","trackLink","trackForm","pageview","identify","reset","group","track","ready","alias","debug","page","screen","once","off","on","addSourceMiddleware","addIntegrationMiddleware","setAnonymousId","addDestinationMiddleware","register"];analytics.factory=function(e){return function(){if(window[i].initialized)return window[i][e].apply(window[i],arguments);var n=Array.prototype.slice.call(arguments);if(["track","screen","alias","group","page","identify"].indexOf(e)>-1){var c=document.querySelector("link[rel='canonical']");n.push({__t:"bpc",c:c&&c.getAttribute("href")||void 0,p:location.pathname,u:location.href,s:location.search,t:document.title,r:document.referrer})}n.unshift(e);analytics.push(n);return analytics}};for(var n=0;n<analytics.methods.length;n++){var key=analytics.methods[n];analytics[key]=analytics.factory(key)}analytics.load=function(key,n){var t=document.createElement("script");t.type="text/javascript";t.async=!0;t.setAttribute("data-global-segment-analytics-key",i);t.src="https://cdn.segment.com/analytics.js/v1/" + key + "/analytics.min.js";var r=document.getElementsByTagName("script")[0];r.parentNode.insertBefore(t,r);analytics._loadOptions=n};analytics._writeKey="bWel0ovFtfqFR3yvWNFsNf6ybFQBFYA2";;analytics.SNIPPET_VERSION="5.2.0";
     analytics.load("<MY_WRITE_KEY>");
 }}();
</script> -
Edit the following parameters in the snippet:
- analytics.load("<MY_WRITE_KEY>")
+ analytics.load("<MY_WRITE_KEY>", { integrations: { "Segment.io": { apiHost: "<INCOUNTRY_WEBSERVICES_TARGET_URL>/v1" }}})
where
INCOUNTRY_WEBSERVICES_TARGET_URLis the target URL shown in the Step 1. -
As a result, the snippet on the web page will look like this:
!function(){var i="analytics",analytics=window[i]=window[i]||[];if(!analytics.initialize)if(analytics.invoked)window.console&&console.error&&console.error("Segment snippet included twice.");else{analytics.invoked=!0;analytics.methods=["trackSubmit","trackClick","trackLink","trackForm","pageview","identify","reset","group","track","ready","alias","debug","page","screen","once","off","on","addSourceMiddleware","addIntegrationMiddleware","setAnonymousId","addDestinationMiddleware","register"];analytics.factory=function(e){return function(){if(window[i].initialized)return window[i][e].apply(window[i],arguments);var n=Array.prototype.slice.call(arguments);if(["track","screen","alias","group","page","identify"].indexOf(e)>-1){var c=document.querySelector("link[rel='canonical']");n.push({__t:"bpc",c:c&&c.getAttribute("href")||void 0,p:location.pathname,u:location.href,s:location.search,t:document.title,r:document.referrer})}n.unshift(e);analytics.push(n);return analytics}};for(var n=0;n<analytics.methods.length;n++){var key=analytics.methods[n];analytics[key]=analytics.factory(key)}analytics.load=function(key,n){var t=document.createElement("script");t.type="text/javascript";t.async=!0;t.setAttribute("data-global-segment-analytics-key",i);t.src="https://cdn.segment.com/analytics.js/v1/" + key + "/analytics.min.js";var r=document.getElementsByTagName("script")[0];r.parentNode.insertBefore(t,r);analytics._loadOptions=n};analytics._writeKey="bWel0ovFtfqFR3yvWNFsNf6ybFQBFYA2";;analytics.SNIPPET_VERSION="5.2.0";
     analytics.load("<MY_WRITE_KEY>", { integrations: { "Segment.io": { apiHost: "us-proxy-mt-01.preprod.incountry.io/x-inc-0099062e-ad6f-4ff8-9857-8d9bd8ca722b/v1" }}});
}}();noteYou need to enter a non-http/https URL in
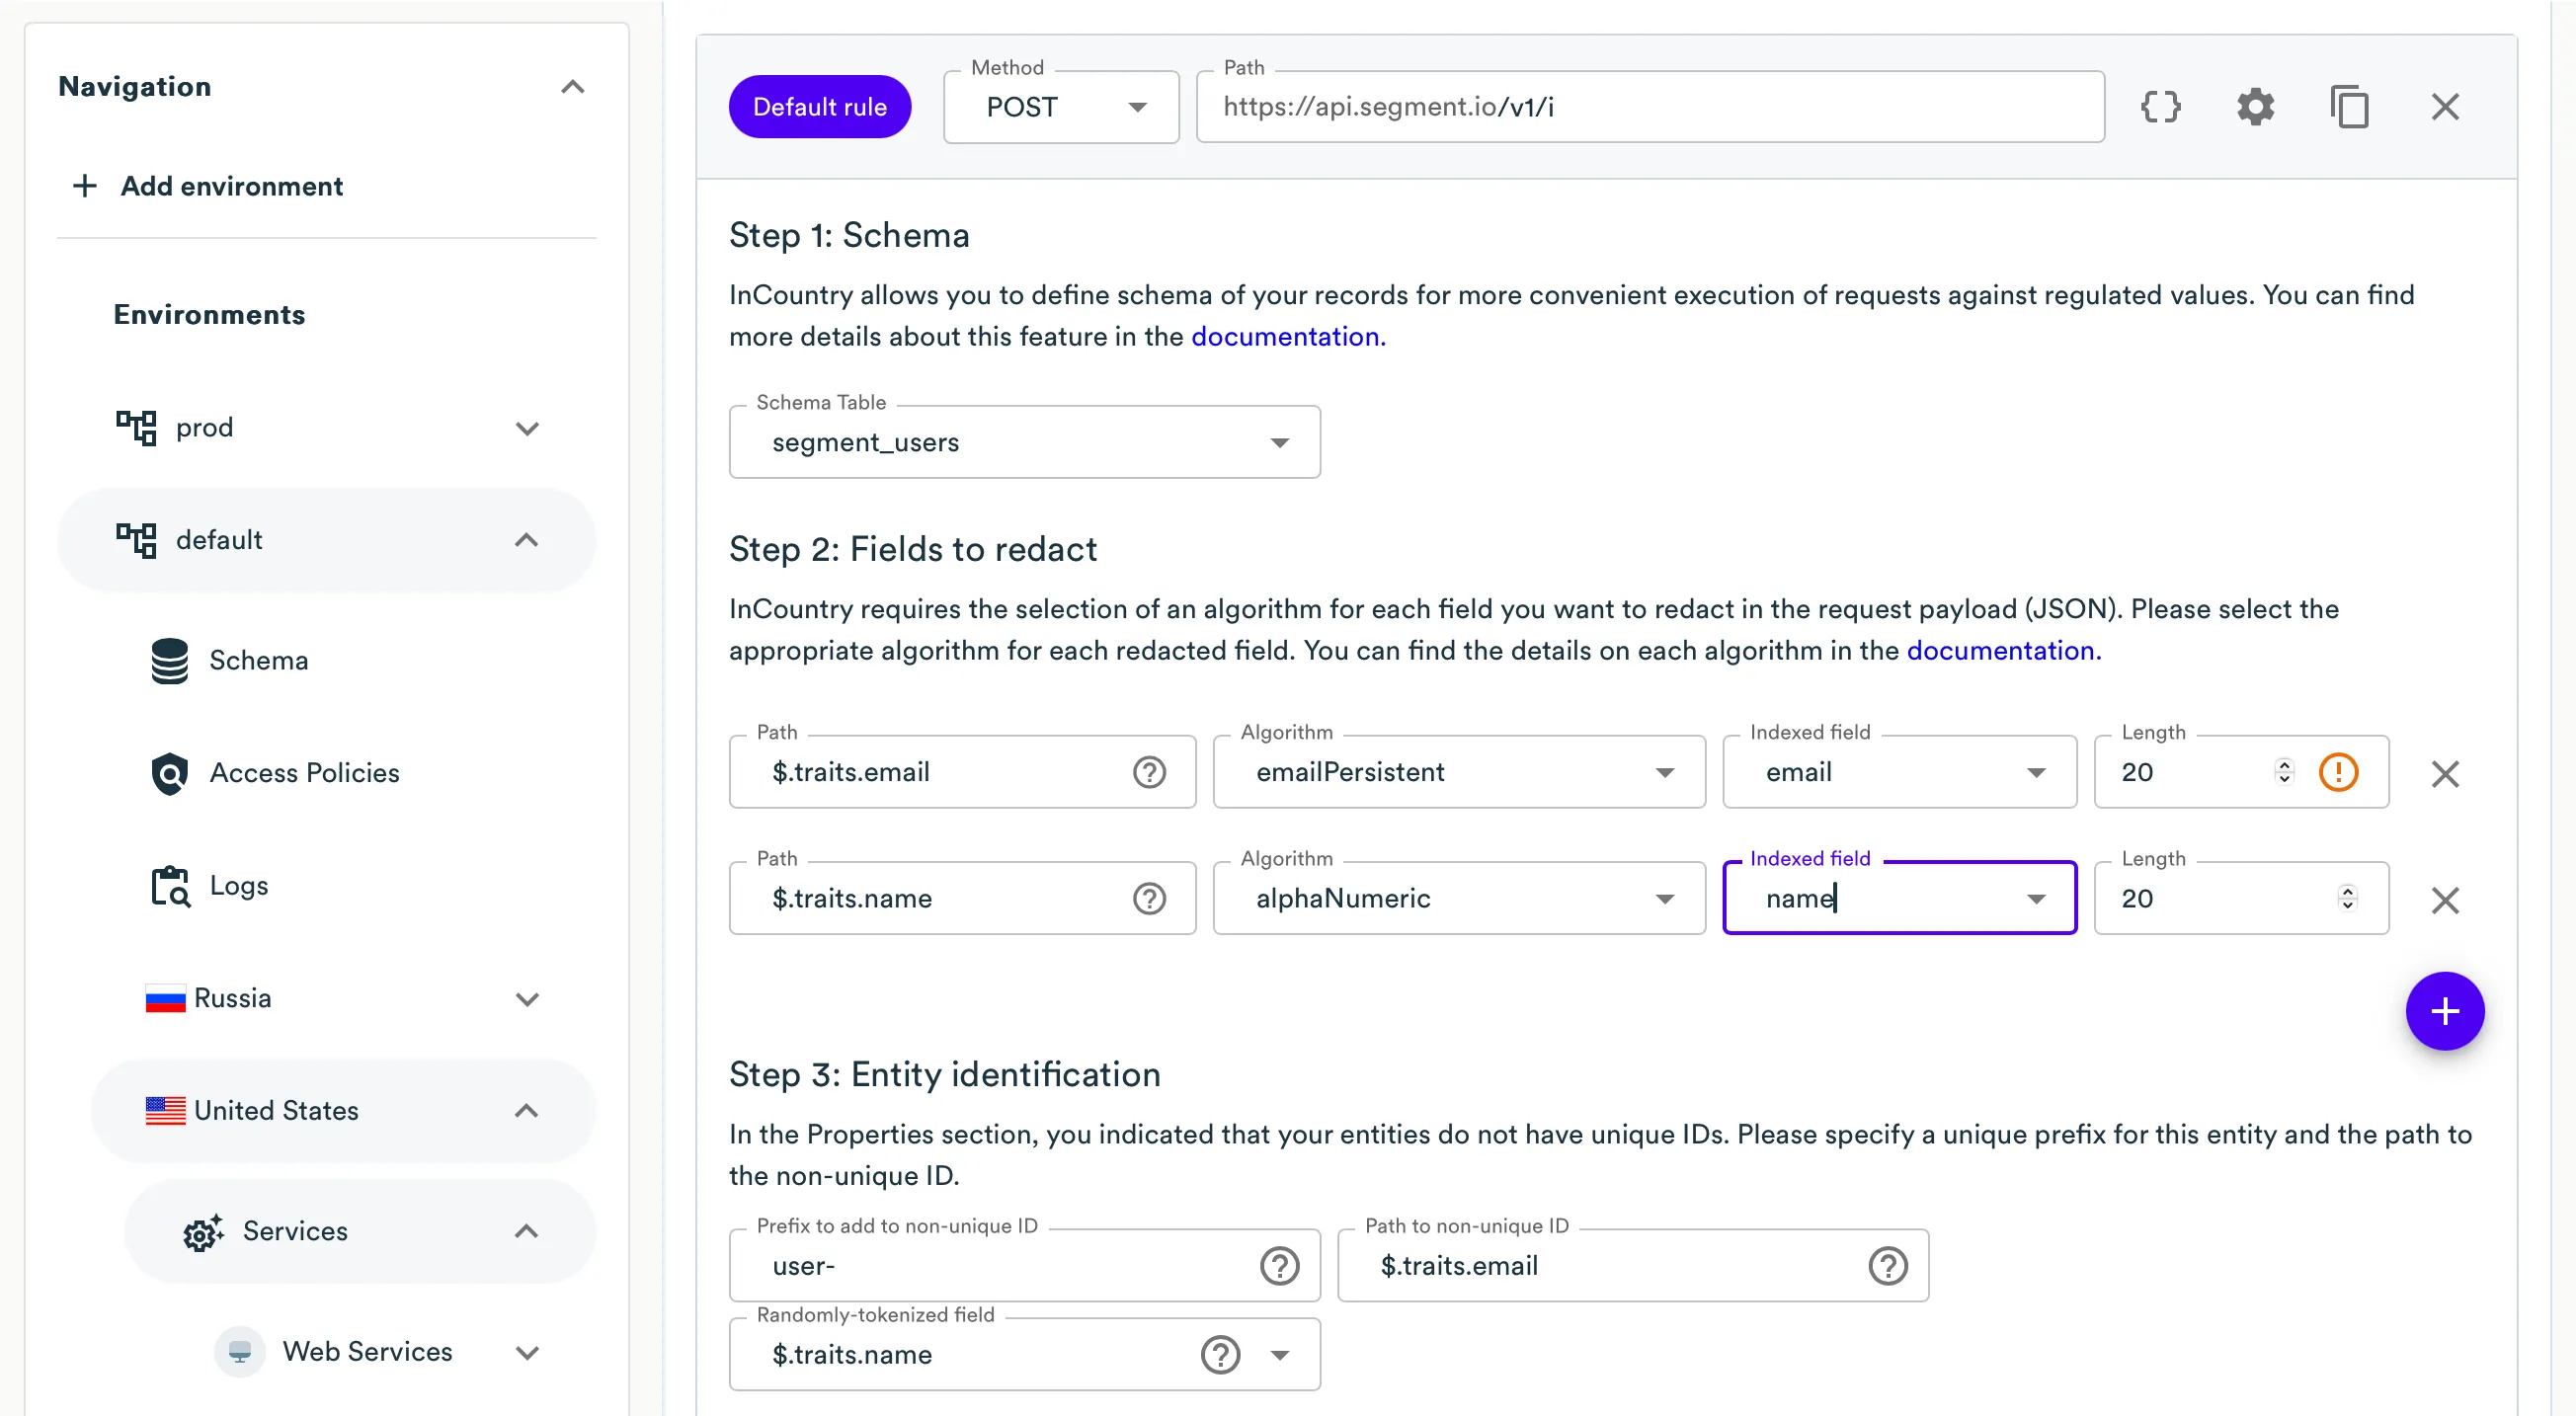
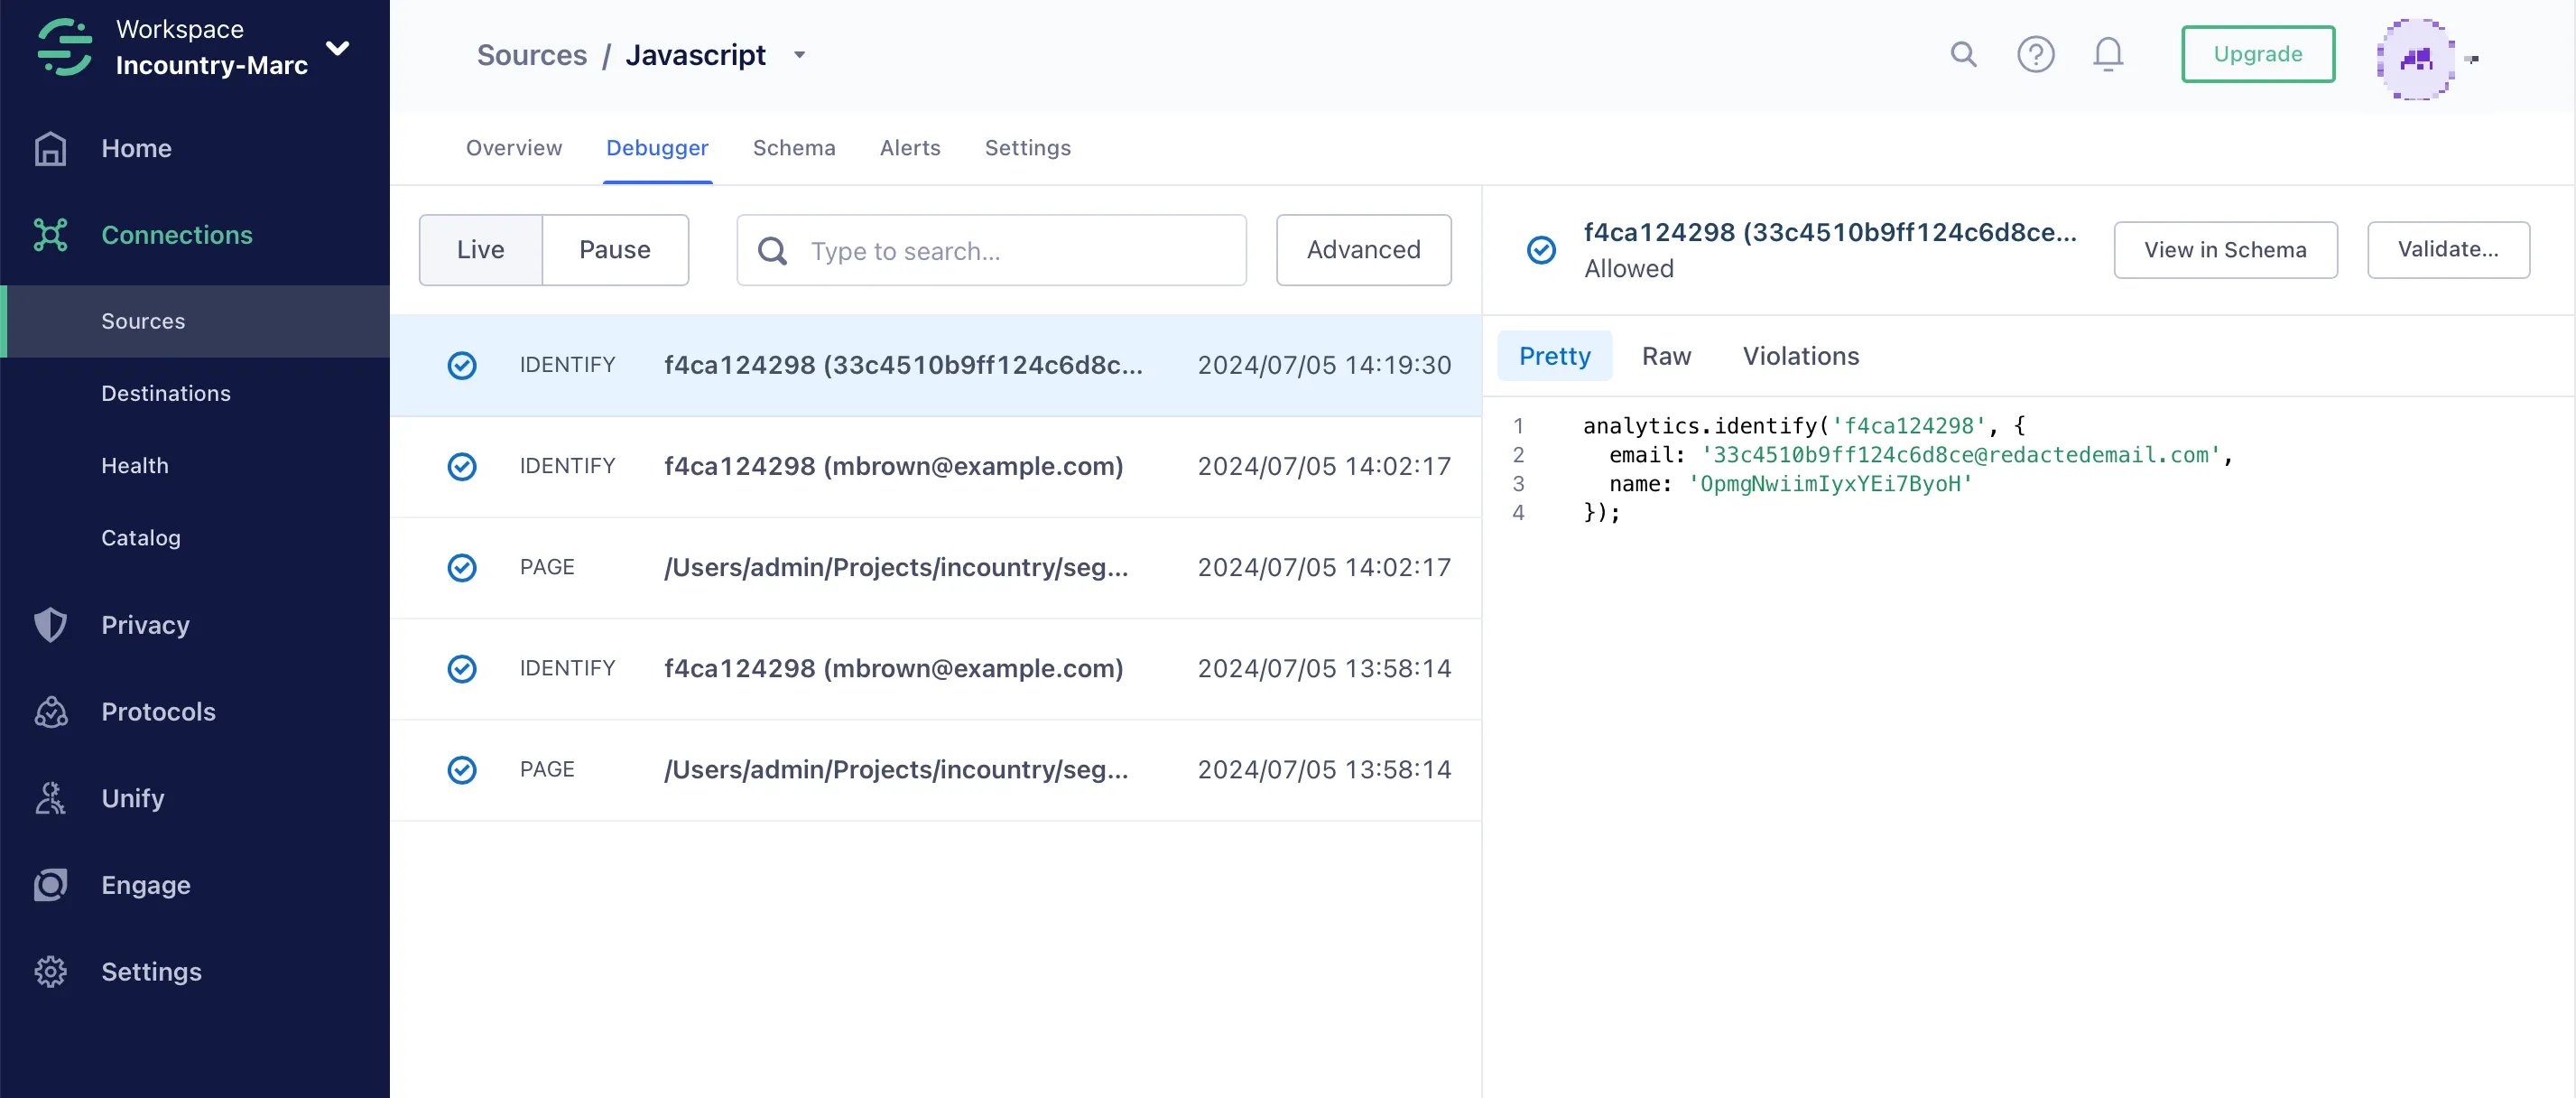
apiHost.Now events are moving through the Web Services and the required fields can be redacted through this service.
Let’s imagine a situation when the web page sends the identify event like this:
analytics.identify('f4ca124298', {
            name: 'Michael Brown',
            email: 'mbrown@example.com'
        });
We want to redact the
emailandnamefields. To do this, we need to return to the Web Services configuration and set up a rule for identify and save it. After that, All identify requests, where the body contains thenameandemailfields, will be redacted.The following screenshot shows when the redacted identify event arrived in Segment.