InCountry REST API documentation
Table of сontents
Welcome to InCountry REST API reference documentation. You can use this REST API to build apps for taking advantage of data residency services provided by InCountry. This page documents the REST resources provided by the InCountry Data Residency-as-a-Service (DRaaS), along with the expected HTTP response codes and sample requests.
Overview
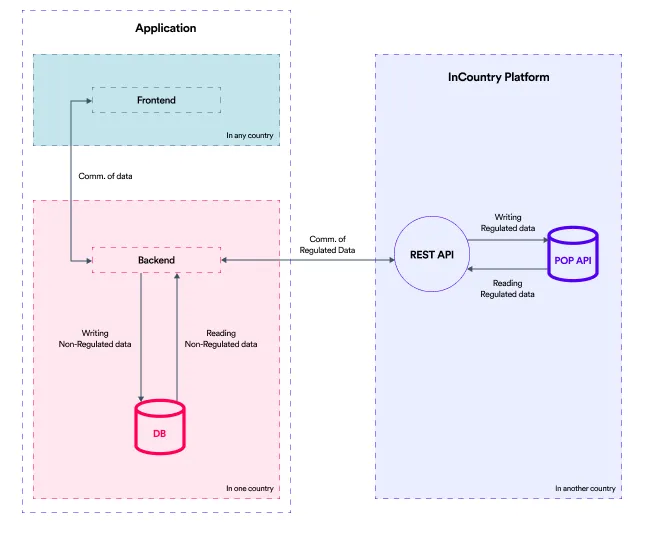
InCountry REST API is a set of RESTful methods that allow you to query regulated data from the InCountry Data Residency-as-a-Service (DRaaS). It simplifies data communication and lets you quickly build applications with data localization capabilities.
The data flow diagram is shown below:
Authentication and authorization
InCountry REST API uses OAuth2 to authenticate and authorize requests with access tokens that are issued by the authentication server. To get a token, you need to create a REST API integration on the InCountry Portal and use the generated Client ID and Client Secret to get an access token for authorizing your data communication requests.
InCountry REST API supports two ways of working with requests:
-
requests coming from the application backend
-
requests coming from the application frontend
Depending on the source of the request, you need to properly implement the authorization flow within your application for communicating regulated data between your application and InCountry REST API.
Requesting a token
This procedure is common for requests coming from the application backend and frontend. The only difference for frontend requests is that you need to specify only the address of the REST API instance and exclude the address of the PoP API instance.
The Auth URL is https://idp.incountry.com/oauth2/token/
As authorization credentials, you need to pass the Client ID (as username) and Client Secret (as password) that you received on the InCountry Portal. The authorization type should be basic authorization. It will transform authorization credentials into Base64 format.
Within the request body, you need to pass additional keys:
| Key | Value | Description |
|---|---|---|
grant_type | client_credentials | |
audience | For example:https://se-restapi-mt-01.api.incountry.io https://se-mt-01.incountry.api.incountry.io | You need to pass the address of the REST API server. It will be provided by the InCountry Portal when you create an integration of the restapi type. Such address looks like:https://{country_code}-restapi-mt-01.api.incountry.ioBesides, the address of a REST API server you need to pass the address of the PoP API instance within the same country where a REST API server is located. Such address looks like: https://{country_code}-mt-01.api.incountry.io |
scope | For example:f2e5a966-1564-4c25-a3bf-0ef7a231fb2b | Identifier of the environment within the target country. The environment ID should correspond to the authorization credentials (Client ID and Client Secret). |
cURL request
curl --location --request POST
  --url 'https://{oauth_endpoint}/oauth2/token' \
  --header 'Authorization: Basic base64{your_client_id:your_client_secret}' \
  --header 'Content-Type: application/x-www-form-urlencoded' \
  --data-urlencode 'grant_type=client_credentials' \
  --data-urlencode 'audience={rest_api_address popapi_address)' \
  --data-urlencode 'scope={your_environment_id}'
For the audience parameter, please use the appropriate endpoint that you receive upon the creation of the REST API service.
For the Authorization part, you need to encode the {client_id:client_secret} string into a base64 string. For example, after appending Client Secret to Client ID, you should get something like this:
2681cad2-61a2-467f-a82c-a974e6d891e9:SGmdEj6plYd5nSeY-b-NHmCX3f
After base64 encoding this string, will look like this:
MjY4MWNhZDItNjFhMi00NjdmLWE4MmMtYTk3NGU2ZDg5MWU5OlNHbWRFajZwbFlkNW5TZVktYi1OSG1DWDNm
For testing purposes on non-production data, you can use the following service for base64 encoding.
As a response from the OAuth server, you will receive the following:
-
access_token- token string. -
expires_in- life span of a generated token in seconds before it expires. -
scope- environment ID. -
token_type- bearer.
Once you have received the access token, use it for data management requests that you perform.
The access token is valid for 300 seconds, then it expires. You need further to get a new token by following the same approach.
Data Encryption
InCountry REST API is using the AES-GCM encryption with a 256-bit AES key and a 96-bit nonce.
URI structure
InCountry REST API provides access to resources (like data entities) via URI paths. To use REST API, your application makes an HTTP request and parses the response.
InCountry REST API uses JSON as its communication format and the standard HTTP methods like POST, GET, and DELETE. URIs for InCountry REST API resources have the following structure:
//For record management (backend):
https://{host}/api/records/{resource_name}

//For attachment management(backend):
https://{host}/api/records/{country}/{record_key}/files/{file_id}

//For record and attachment managemnt (frontend):
https://{host}/api/records//{record_key}/files/{resorce_name}
Getting started with REST API
To get started with the REST API, you can download the Postman collection of requests. You can use this collection to perform test requests and queries to the InCountry DRaaS.
-
Create a new REST integration on the InCountry Portal.
-
Download the Postman collection and import it into the application.
-
Add your Client ID and Client Secret into the token acquiring request.
-
Perform data communication requests with regulated data.
Download RestAPI Demo oAuth Postman Collection
REST API resources
Below you can find the available API resources within InCountry REST API.
Management of records
You can manage records on the InCountry DRaaS, as follows:
Available record fields
All records saved to the InCountry Vault may have the following fields:
| Field | Type | Storage | Specifics |
|---|---|---|---|
record_key | string | Hashed | This is a unique identifier of the record which is returned by the REST API. This field is used to store the primary key of the record. |
body | string | Encrypted | You can also stringify data in the JSON format and save it within this field. |
precommit_body | string | Encrypted | You can use this field to store some service information about the record. |
profile_key | string | Hashed | The unique identifier of the data record in an external system. It can be used for storing any other data string if needed. |
parent_key | string | Hashed | Key of the parent record which the current record is attributed to. |
range_keyN | integer | Plain | N can be between 1 … 10. You can use up to 10 fields. The range_keyN fields are used for value range filtration of numerical values. |
service_keyN | string | Hashed | N can take from 1 to 5. You can have up to 5 fields. The service_keyN fields can be used for storing additional text information. |
keyN | string | Hashed / Plain | N can take from 1 to 20. You can use up to 20 fields. This value can be hashed or remain as a plain value depending on your configuration. This field can be used for record lookup. |
created_at | string (date-time) | Plain | The timestamp in the ISO-8601 format when a record was created. |
updated_at | string (date-time) | Plain | The timestamp in the ISO-8601 format when a record was updated. |
expires_at | string (date-time) | Plain | This field determines the date and time when the record will be automatically deleted from the InCountry Vault. |
country | ISO country code (lowercase) | Plain | Country where a new record is stored. |
attachments | object | For the details on the attachments field, please see the Management of attachments section. |
Creating a single record
POST /api/records
Alternatively, this request can be used to update the record. Be careful, as it rewrites the data record with new values you provide.
Request body
Please see the example of the request body structure.
Example
{
  "key": "string",
  "record_key": "string",
  "body": "string / string in the JSON format",
  "precommit_body": "string",
  "profile_key": "string",
  "parent_key": "string",
  "range_key": 0,
  "range_key1": 0,
  "range_key2": 0,
  "range_key3": 0,
  "range_key4": 0,
  "range_key5": 0,
  "range_key6": 0,
  "range_key7": 0,
  "range_key8": 0,
  "range_key9": 0,
  "range_key10": 0,
  "service_key1": "string",
  "service_key2": "string",
  "service_key3": "string",
  "service_key4": "string",
  "service_key5": "string",
  "key1": "string",
  "key2": "string",
  "key3": "string",
  "key4": "string",
  "key5": "string",
  "key6": "string",
  "key7": "string",
  "key8": "string",
  "key9": "string",
  "key10": "string",
  "key11": "string",
  "key12": "string",
  "key13": "string",
  "key14": "string",
  "key15": "string",
  "key16": "string",
  "key17": "string",
  "key18": "string",
  "key19": "string",
  "key20": "string",
  "expires_at": "2021-04-07T07:15:44.393Z",
  "country": "string"
}
The country code is defined by the Rest API instance. For one instance, you can use only one country code. For example, for https://se-restapi-mt-01.incountry.io it can only be se.
cURL request
curl --request POST \
  --url 'https://{restApiURLAddress}/api/records' \
  --header 'Authorization: Bearer <ACCESS_TOKEN>' \
  --header 'Content-Type: application/json' \
  --data '{
  "record_key": "d1c2e12cfeababc8b95daf6902e210b1",
  "profile_key": "4274e510a2f41aeb9e8e0f8b56ff6c2",
  "range_key": 2000,
  "key10": "New",
  "key9": null,
  "key8": null,
  "key7": null,
  "key6": null,
  "key5": null,
  "key4": "Shipping",
  "key3": null,
  "key2": null,
  "key1": "Additional info",
  "key": null,
  "body": "{\"name\":\"John\",\"vehicle\":\"Audi\"}",
  "country": "se"
}'
Responses
STATUS 201 - application/json Returns information and a record key for the newly created record. The InCountry DRaaS will return the record data with information similar to the data you submitted within the request.
Example
{
  "country": "se",
  "key": "d1c2e12cfeababc8b95daf6902e210b1",
  "record_key": "d1c2e12cfeababc8b95daf6902e210b1",
  "profile_key": "4274e510a2f41aeb9e8e0f8b56ff6c2",
  "range_key": 2000,
  "range_key1": 2000,
  "body": "{\"name\":\"John\",\"vehicle\":\"Audi\"}",
  "key1": "Additional info",
  "key2": null,
  "key3": null,
  "key4": "Shipping",
  "key5": null,
  "key6": null,
  "key7": null,
  "key8": null,
  "key9": null,
  "key10": "New"
}
STATUS 400 - application/json An invalid record has been provided.
STATUS 401 - Access is denied.
STATUS 409 - The InCountry Vault for the country is not supported.
STATUS 415 - An unsupported request content type.
STATUS 422 - Validation of input parameters has failed.
STATUS 429 - The number of allowed requests has been exceeded.
STATUS 5** - Server error.
Duplicating a single record
POST /api/records/clone
This request can duplicate a record as-is or modify the duplicated record on the fly.
Request body
Please see the example of the request body structure. It contains the section which specifies filters to find the records for duplication and the section to specify the values for a record update.
Example
{
  "filter": {
    "record_key": "string",
    "profile_key": "string",
    "parent_key": "string",
    "range_key1": 0,
    "range_key2": 0,
    "range_key3": 0,
    "range_key4": 0,
    "range_key5": 0,
    "decimal_key1": 0,
    "decimal_key2": 0,
    "decimal_key3": 0,
    "decimal_key4": 0,
    "decimal_key5": 0,
    "key1": "string",
    "key2": "string",
    "key3": "string",
    "key4": "string",
    "key5": "string",
    "key6": "string",
    "key7": "string",
    "key8": "string",
    "key9": "string",
    "key10": "string",
    "key11": "string",
    "key12": "string",
    "key13": "string",
    "key14": "string",
    "key15": "string",
    "key16": "string",
    "key17": "string",
    "key18": "string",
    "key19": "string",
    "key20": "string",
    "key21": "string",
    "key22": "string",
    "key23": "string",
    "key24": "string",
    "key25": "string",
    "service_key1": "string",
    "service_key2": "string",
    "service_key3": "string",
    "service_key4": "string",
    "service_key5": "string",
    "version": 0,
    "search_keys": "string",
    "created_at": "2023-08-07T07:45:38.256Z",
    "updated_at": "2023-08-07T07:45:38.256Z"
  },
  "update_with": {
    "record_key": "string",
    "body": "string",
    "profile_key": "string",
    "parent_key": "string",
    "range_key1": 0,
    "range_key2": 0,
    "range_key3": 0,
    "range_key4": 0,
    "range_key5": 0,
    "range_key6": 0,
    "range_key7": 0,
    "range_key8": 0,
    "range_key9": 0,
    "range_key10": 0,
    "service_key1": "string",
    "service_key2": "string",
    "service_key3": "string",
    "service_key4": "string",
    "service_key5": "string",
    "key1": "string",
    "key2": "string",
    "key3": "string",
    "key4": "string",
    "key5": "string",
    "key6": "string",
    "key7": "string",
    "key8": "string",
    "key9": "string",
    "key10": "string",
    "key11": "string",
    "key12": "string",
    "key13": "string",
    "key14": "string",
    "key15": "string",
    "key16": "string",
    "key17": "string",
    "key18": "string",
    "key19": "string",
    "key20": "string",
    "key21": "string",
    "key22": "string",
    "key23": "string",
    "key24": "string",
    "key25": "string",
    "decimal_key1": 0,
    "decimal_key2": 0,
    "decimal_key3": 0,
    "decimal_key4": 0,
    "decimal_key5": 0,
    "decimal_key6": 0,
    "decimal_key7": 0,
    "decimal_key8": 0,
    "decimal_key9": 0,
    "decimal_key10": 0,
    "decimal_key11": 0,
    "decimal_key12": 0,
    "decimal_key13": 0,
    "decimal_key14": 0,
    "decimal_key15": 0,
    "decimal_key16": 0,
    "decimal_key17": 0,
    "decimal_key18": 0,
    "decimal_key19": 0,
    "decimal_key20": 0
  }
}
cURL request
curl --request POST \
  --url 'https://{restApiURLAddress}/api/records/clone' \
  --header 'Authorization: Bearer <ACCESS_TOKEN>' \
  --header 'Content-Type: application/json' \
  --data '{
    "filter": {
        "record_key": "d1c2e12cfeababc8b95daf6902e210b1",
    "profile_key": "4274e510a2f41aeb9e8e0f8b56ff6c2",
    "range_key": 2000,
    "key10": "New",
    "key9": "Position",
    "key8": "Product Manager",
    "key7": null,
    "key6": null,
    "key5": null,
    "key4": "Shipping",
    "key3": null,
    "key2": null,
    "key1": "Additional info",
    "key": null,
    "body": "{\"name\":\"John\",\"vehicle\":\"Audi\"}",
        "created_at": "2023-08-07T07:45:38.256Z",
        "updated_at": "2023-08-07T07:45:38.256Z"
    },
    "update_with": {
      "record_key": "d1c6e12cfea6abc4t95daf6902ht10b1",
    "profile_key": "4274e510a2fgh572ht0f8b56ff6c2",
    "range_key": 5000,
    "key10": "New",
    "key9": "Position",
    "key8": "Product Manager",
    "key7": null,
    "key6": null,
    "key5": null,
    "key4": "Shipping",
    "key3": null,
    "key2": null,
    "key1": "Additional info",
    "key": null,
    "body": "{\"name\":\"John\",\"vehicle\":\"Audi\"}",
        "created_at": "2023-08-07T07:45:38.256Z",
        "updated_at": "2023-08-07T07:45:38.256Z"
    }
  }
STATUS 201 - The record has been duplicated successfully.
STATUS 400 - Invalid input parameters have been provided for record lookup or duplication.
STATUS 401 - Access is denied.
STATUS 403 - Search by keys is not available for the InCountry Vault.
STATUS 403 - No records matching the filtration criteria have been found.
STATUS 409 - The InCountry Vault for the country is not supported.
STATUS 415 - An unsupported request content type.
STATUS 422 - Decryption of records matching the filtration criteria has failed.
STATUS 429 - The number of allowed requests has been exceeded.
STATUS 5** - Server error.
Updating a single record
POST /api/records
You can use this request to update the existing records. You need to pass new values for fields that you want to modify, along with old values for fields that you do not want to modify. This request will overwrite the current record’s values with new ones, so if you do not provide old values for specific fields, values in such fields will be cleared.
For the details on this request body, please see the Create a single record request.
cURL request
curl --request POST \
  --url 'https://{restApiURLAddress}/api/records' \
  --header 'Authorization: Bearer <ACCESS_TOKEN>' \
  --header 'Content-Type: application/json' \
  --data '{
  "record_key": "d1c2e12cfeababc8b95daf6902e210b1",
  "profile_key": "4274e510a2f41aeb9e8e0f8b56ff6c2",
  "range_key": 2000,
  "key10": "New",
  "key9": "Position",
  "key8": "Product Manager",
  "key7": null,
  "key6": null,
  "key5": null,
  "key4": "Shipping",
  "key3": null,
  "key2": null,
  "key1": "Additional info",
  "key": null,
  "body": "{\"name\":\"John\",\"vehicle\":\"Audi\"}",
  "country": "se",
  "expires_at": "2021-04-07T07:15:44.393Z"
}'
Responses
STATUS 201 - application/json Returns information and a record key for the newly created record. The InCountry DRaaS will return the record data with information similar to the data you submitted within the request.
Example
{
  "country": "se",
  "key": "d1c2e12cfeababc8b95daf6902e210b1",
  "record_key": "d1c2e12cfeababc8b95daf6902e210b1",
  "profile_key": "4274e510a2f41aeb9e8e0f8b56ff6c2",
  "range_key": 2000,
  "range_key1": 2000,
  "body": "{\"name\":\"John\",\"vehicle\":\"Audi\"}",
  "key1": "Additional info",
  "key2": "Position",
  "key3": "Product Manager",
  "key4": "Shipping",
  "key5": null,
  "key6": null,
  "key7": null,
  "key8": null,
  "key9": null,
  "key10": "New",
  "expires_at": "2021-04-07T07:15:44.393Z"
}
STATUS 400 - application/json An invalid record has been provided.
STATUS 401 - Access is denied.
STATUS 409 - The InCountry Vault for the country is not supported.
STATUS 415 - An unsupported request content type.
STATUS 422 - Validation of input parameters has failed.
STATUS 429 - The number of allowed requests has been exceeded.
STATUS 5** - Server error.
Creating multiple records
POST /api/records/batch
Request body
Please see the example of the request structure.
Example
{
  "country": "string",
  "records": [
    {
      "key": "string",
      "record_key": "string",
      "body": "string / string in the JSON format",
      "precommit_body": "string",
      "profile_key": "string",
      "parent_key": "string",
      "range_key": 0,
      "range_key1": 0,
      "range_key2": 0,
      "range_key3": 0,
      "range_key4": 0,
      "range_key5": 0,
      "range_key6": 0,
      "range_key7": 0,
      "range_key8": 0,
      "range_key9": 0,
      "range_key10": 0,
      "service_key1": "string",
      "service_key2": "string",
      "service_key3": "string",
      "service_key4": "string",
      "service_key5": "string",
      "key1": "string",
      "key2": "string",
      "key3": "string",
      "key4": "string",
      "key5": "string",
      "key6": "string",
      "key7": "string",
      "key8": "string",
      "key9": "string",
      "key10": "string",
      "key11": "string",
      "key12": "string",
      "key13": "string",
      "key14": "string",
      "key15": "string",
      "key16": "string",
      "key17": "string",
      "key18": "string",
      "key19": "string",
      "key20": "string",
      "expires_at": "2021-04-07T07:15:44.435Z"
    },
    {
      "key": "string",
      "record_key": "string",
      "body": "string / string in the JSON format",
      "precommit_body": "string",
      "profile_key": "string",
      "parent_key": "string",
      "range_key": 0,
      "range_key1": 0,
      "range_key2": 0,
      "range_key3": 0,
      "range_key4": 0,
      "range_key5": 0,
      "range_key6": 0,
      "range_key7": 0,
      "range_key8": 0,
      "range_key9": 0,
      "range_key10": 0,
      "service_key1": "string",
      "service_key2": "string",
      "service_key3": "string",
      "service_key4": "string",
      "service_key5": "string",
      "key1": "string",
      "key2": "string",
      "key3": "string",
      "key4": "string",
      "key5": "string",
      "key6": "string",
      "key7": "string",
      "key8": "string",
      "key9": "string",
      "key10": "string",
      "key11": "string",
      "key12": "string",
      "key13": "string",
      "key14": "string",
      "key15": "string",
      "key16": "string",
      "key17": "string",
      "key18": "string",
      "key19": "string",
      "key20": "string",
      "expires_at": "2021-04-07T07:15:44.435Z"
    }
  ]
}
cURL request
curl --request POST \
  --url 'https://{restApiURLAddress}/api/records/batch' \
  --header 'Authorization: Bearer <ACCESS_TOKEN>' \
  --header 'Content-Type: application/json' \
  --data '{
    "records": [
        {
            "record_key": "d1c2e12cfeababc8b95daf6902e210b1",
            "profile_key": "4274e510a2f41aeb9e8e0f8b56ff6c2",
            "range_key": 2000,
            "key10": "New",
            "key9": null,
            "key8": null,
            "key7": null,
            "key6": null,
            "key5": null,
            "key4": "Shipping",
            "key3": null,
            "key2": null,
            "key1": "Additional info",
            "key": null,
            "body": "{\"name\":\"John\",\"vehicle\":\"Audi\"}"
        },
        {
            "record_key": "69f6a71405facac91d002dc9adce85fa",
            "profile_key": "baab015f2f9c350ab610fddd3986c53",
            "range_key": 3000,
            "key10": "New",
            "key9": null,
            "key8": null,
            "key7": null,
            "key6": null,
            "key5": null,
            "key4": "Shipping",
            "key3": null,
            "key2": null,
            "key1": "Additional info",
            "key": null,
            "body": "{\"name\":\"Alice\",\"vehicle\":\"Mercedes\"}"
        }
    ],
    "country": "se"
}'
Responses
STATUS 201 - application/json Returns information and record keys for the newly created records.
Example
[
  {
    "country": "se",
    "key": "d1c2e12cfeababc8b95daf6902e210b1",
    "record_key": "d1c2e12cfeababc8b95daf6902e210b1",
    "profile_key": "4274e510a2f41aeb9e8e0f8b56ff6c2",
    "range_key": 2000,
    "range_key1": 2000,
    "body": "{\"name\":\"John\",\"vehicle\":\"Audi\"}",
    "key1": "Additional info",
    "key2": null,
    "key3": null,
    "key4": "Shipping",
    "key5": null,
    "key6": null,
    "key7": null,
    "key8": null,
    "key9": null,
    "key10": "New"
  },
  {
    "country": "se",
    "key": "69f6a71405facac91d002dc9adce85fa",
    "record_key": "69f6a71405facac91d002dc9adce85fa",
    "profile_key": "baab015f2f9c350ab610fddd3986c53",
    "range_key": 3000,
    "range_key1": 3000,
    "body": "{\"name\":\"Alice\",\"vehicle\":\"Mercedes\"}",
    "key1": "Additional info",
    "key2": null,
    "key3": null,
    "key4": "Shipping",
    "key5": null,
    "key6": null,
    "key7": null,
    "key8": null,
    "key9": null,
    "key10": "New"
  }
]
STATUS 400 - application/json Failed request that has not passed validation. The error details will be in the response.
STATUS 401 - This error status is returned when the request is unauthorized.
STATUS 5** - Server error.
Updating multiple records
POST /api/records/batch/update
Request body
Please see the example of the request structure.
Example
{
  "search_key": "record_key",
  "country": "string",
  "records": [
    {
      "key": "string",
      "record_key": "string",
      "body": "string / string in the JSON format",
      "precommit_body": "string",
      "profile_key": "string",
      "parent_key": "string",
      "range_key": 0,
      "range_key1": 0,
      "range_key2": 0,
      "range_key3": 0,
      "range_key4": 0,
      "range_key5": 0,
      "range_key6": 0,
      "range_key7": 0,
      "range_key8": 0,
      "range_key9": 0,
      "range_key10": 0,
      "service_key1": "string",
      "service_key2": "string",
      "service_key3": "string",
      "service_key4": "string",
      "service_key5": "string",
      "key1": "string",
      "key2": "string",
      "key3": "string",
      "key4": "string",
      "key5": "string",
      "key6": "string",
      "key7": "string",
      "key8": "string",
      "key9": "string",
      "key10": "string",
      "key11": "string",
      "key12": "string",
      "key13": "string",
      "key14": "string",
      "key15": "string",
      "key16": "string",
      "key17": "string",
      "key18": "string",
      "key19": "string",
      "key20": "string",
      "expires_at": "2021-04-07T07:15:44.435Z"
    },
    {
      "key": "string",
      "record_key": "string",
      "body": "string / string in the JSON format",
      "precommit_body": "string",
      "profile_key": "string",
      "parent_key": "string",
      "range_key": 0,
      "range_key1": 0,
      "range_key2": 0,
      "range_key3": 0,
      "range_key4": 0,
      "range_key5": 0,
      "range_key6": 0,
      "range_key7": 0,
      "range_key8": 0,
      "range_key9": 0,
      "range_key10": 0,
      "service_key1": "string",
      "service_key2": "string",
      "service_key3": "string",
      "service_key4": "string",
      "service_key5": "string",
      "key1": "string",
      "key2": "string",
      "key3": "string",
      "key4": "string",
      "key5": "string",
      "key6": "string",
      "key7": "string",
      "key8": "string",
      "key9": "string",
      "key10": "string",
      "key11": "string",
      "key12": "string",
      "key13": "string",
      "key14": "string",
      "key15": "string",
      "key16": "string",
      "key17": "string",
      "key18": "string",
      "key19": "string",
      "key20": "string",
      "expires_at": "2021-04-07T07:15:46.435Z"
    }
  ]
}
cURL request
curl --request POST \
  --url 'https://{restApiURLAddress}/api/records/batch/update' \
  --header 'Authorization: Bearer <ACCESS_TOKEN>' \
  --header 'Content-Type: application/json' \
  --data '{
    "records": [
        {
            "record_key": "d1c2e12cfeababc8b95daf6902e210b1",
            "profile_key": "4274e510a2f41aeb9e8e0f8b56ff6c2",
            "range_key": 2000,
            "key10": "New",
            "key9": null,
            "key8": null,
            "key7": null,
            "key6": null,
            "key5": null,
            "key4": "Shipping",
            "key3": null,
            "key2": null,
            "key1": "Additional info",
            "key": null,
            "body": "{\"name\":\"John\",\"vehicle\":\"Audi\"}"
        },
        {
            "record_key": "69f6a71405facac91d002dc9adce85fa",
            "profile_key": "baab015f2f9c350ab610fddd3986c53",
            "range_key": 3000,
            "key10": "New",
            "key9": null,
            "key8": null,
            "key7": null,
            "key6": null,
            "key5": null,
            "key4": "Shipping",
            "key3": null,
            "key2": null,
            "key1": "Additional info",
            "key": null,
            "body": "{\"name\":\"Alice\",\"vehicle\":\"Mercedes\"}"
        }
    ],
    "country": "se"
}'
Responses
STATUS 200 - application/json Returns information and record keys of updated records.
Example
[
  {
    "country": "se",
    "key": "d1c2e12cfeababc8b95daf6902e210b1",
    "record_key": "d1c2e12cfeababc8b95daf6902e210b1",
    "profile_key": "4274e510a2f41aeb9e8e0f8b56ff6c2",
    "range_key": 2000,
    "range_key1": 2000,
    "body": "{\"name\":\"John\",\"vehicle\":\"Audi\"}",
    "key1": "Additional info",
    "key2": null,
    "key3": null,
    "key4": "Shipping",
    "key5": null,
    "key6": null,
    "key7": null,
    "key8": null,
    "key9": null,
    "key10": "New"
  },
  {
    "country": "se",
    "key": "69f6a71405facac91d002dc9adce85fa",
    "record_key": "69f6a71405facac91d002dc9adce85fa",
    "profile_key": "baab015f2f9c350ab610fddd3986c53",
    "range_key": 3000,
    "range_key1": 3000,
    "body": "{\"name\":\"Alice\",\"vehicle\":\"Mercedes\"}",
    "key1": "Additional info",
    "key2": null,
    "key3": null,
    "key4": "Shipping",
    "key5": null,
    "key6": null,
    "key7": null,
    "key8": null,
    "key9": null,
    "key10": "New"
  }
]
STATUS 400 - application/json Bad request when it has not passed validation. The error details will be in the response.
STATUS 401 - This error status is returned when the request is unauthorized.
STATUS 5** - Server error.
Searching for records
POST /api/records/find
Request body
| Parameters | Type | Example | Description |
|---|---|---|---|
country | ISO country code (lowercase) | sg (equals to Singapore) | Country where a new record is looked up. You can use different countries. |
filter | object | See the example. | Specify the criteria for filtration within the filter object.You can look up records by any of record fields. For the full list of supported fields, please see the Available record fields section. |
options | object | See the example. | Specify the criteria for returning the search results:limit, offset, sort |
limit | integer | 10 | Sets the maximal number of search results. It is passed as a part of the options object. |
offset | integer | 50 | Specifies the offset (pagination) of records from which the record lookup is performed. It is passed as a part of the options object. |
sort | array | Specifies the sorting order of records against a specific field. The sorting can be performed by the following fields: range_keyN, created_at, updated_at,expires_at,keyN.The order in which you specify fields within the sort array will affect the sorting order of records. It is passed as a part of the options object. |
Please see the example of the request structure.
Example
{
  "country": "string",
  "filter": {
    "key": "string",
    "record_key": "string",
    "profile_key": "string",
    "range_key": 0,
    "range_key1": 0,
    "range_key2": 0,
    "range_key3": 0,
    "range_key4": 0,
    "range_key5": 0,
    "range_key6": 0,
    "range_key7": 0,
    "range_key8": 0,
    "range_key9": 0,
    "range_key10": 0,
    "key1": "string",
    "key2": "string",
    "key3": "string",
    "key4": "string",
    "key5": "string",
    "key6": "string",
    "key7": "string",
    "key8": "string",
    "key9": "string",
    "key10": "string",
    "key11": "string",
    "key12": "string",
    "key13": "string",
    "key14": "string",
    "key15": "string",
    "key16": "string",
    "key17": "string",
    "key18": "string",
    "key19": "string",
    "key20": "string",
    "service_key1": "string",
    "service_key2": "string",
    "service_key3": "string",
    "service_key4": "string",
    "service_key5": "string",
    "version": 0,
    "search_keys": "string"
  },
  "options": {
    "limit": 0,
    "offset": 0,
    "sort": [
      {
        "range_key1": "asc"
      },
      {
        "range_key2": "asc"
      },
      {
        "range_key3": "asc"
      },
      {
        "range_key4": "asc"
      },
      {
        "range_key5": "asc"
      },
      {
        "range_key6": "asc"
      },
      {
        "range_key7": "asc"
      },
      {
        "range_key8": "asc"
      },
      {
        "range_key9": "asc"
      },
      {
        "range_key10": "asc"
      },
      {
        "created_at": "asc"
      },
      {
        "updated_at": "asc"
      },
      {
        "expires_at": "asc"
      },
      {
        "key1": "asc"
      },
      {
        "key2": "asc"
      },
      {
        "key3": "asc"
      },
      {
        "key4": "asc"
      },
      {
        "key5": "asc"
      },
      {
        "key6": "asc"
      },
      {
        "key7": "asc"
      },
      {
        "key8": "asc"
      },
      {
        "key9": "asc"
      },
      {
        "key10": "asc"
      },
      {
        "key11": "asc"
      },
      {
        "key12": "asc"
      },
      {
        "key13": "asc"
      },
      {
        "key14": "asc"
      },
      {
        "key15": "asc"
      },
      {
        "key16": "asc"
      },
      {
        "key17": "asc"
      },
      {
        "key18": "asc"
      },
      {
        "key19": "asc"
      },
      {
        "key20": "asc"
      }
    ]
  }
}
Example 2
{
  "country": "sg",
  "filter": {
    "key1": ["k1234", "k1235"],
    "key2": ["John", "Jane"]
  },
  "options": {
    "limit": 10,
    "offset": 50
  }
}
or
{
  "country": "sg",
  "filter": {
    "search_keys": "abc"
  }
}
or
{
  "country": "sg",
  "filter": {
    "search_keys": "abc",
    "range_key1": [1, 2]
  }
}
cURL request
//FINDS A RECORD BY THE SPECIFIED CRITERIA

curl --request POST \
  --url 'https://{restApiURLAddress}/api/records/find' \
  --header 'Authorization: Bearer <ACCESS_TOKEN>' \
  --header 'Content-Type: application/json' \
  --data '{
    "country": "se",
    "filter": {
        "range_key": 3000,
    "key4": "Shipping",
    "profile_key": "baab015f2f9c350ab610fddd3986c53",
    "record_key": "69f6a71405facac91d002dc9adce85fa"
    },
    "options": {
        "limit": 10,
    "offset": 0
    }
}'

//FINDS RECORDS THAT HAVE THE range_key FIELD WITHIN => 1000 AND <= 4000 RANGE

curl --request POST \
  --url 'https://{restApiURLAddress}/api/records/find' \
  --header 'Authorization: Bearer <ACCESS_TOKEN>' \
  --header 'Content-Type: application/json' \
  --data '{
    "country": "se",
    "filter": {
        "range_key": {"$gte":1000, "$lte":4000},
        "key4": "Shipping",
        "profile_key": "baab015f2f9c350ab610fddd3986c53",
        "record_key": "69f6a71405facac91d002dc9adce85fa"
    },
    "options": {
        "limit": 10,
        "offset": 0
    }
}'

//FINDS RECORDS WHOSE THE range_key FIELD TAKES ONE OF THE SPECIFIED VALUES

curl --request POST \
  --url 'https://{restApiURLAddress}/api/records/find' \
  --header 'Authorization: Bearer <ACCESS_TOKEN>' \
  --header 'Content-Type: application/json' \
  --data '{
    "country": "se",
    "filter": {
        "range_key": [1000, 4000],
        "key4": "Shipping",
        "profile_key": "baab015f2f9c350ab610fddd3986c53",
        "record_key": "69f6a71405facac91d002dc9adce85fa"
    },
    "options": {
        "limit": 10,
                                "offset": 0
    }
}'

//FINDS RECORDS AND SORTS THEM BY FIELD IN ASCENDING/DESCENDING ORDER

curl --request POST \
  --url 'https://{restApiURLAddress}/api/records/find' \
  --header 'Authorization: Bearer <ACCESS_TOKEN>' \
  --header 'Content-Type: application/json' \
  --data '{
    "country": "se",
    "filter": {
        "range_key": [1000, 4000],
        "key4": "Shipping",
        "profile_key": "baab015f2f9c350ab610fddd3986c53",
        "record_key": "69f6a71405facac91d002dc9adce85fa"
    },
    "options": {
        "limit": 10,
        "offset": 0,
        "sort":[{"key1":"asc"}, {"key2": "desc"}]
    }
}'
Responses
STATUS 200 - application/json Returns information about the found record or records.
This status is also returned when no records matching the search criteria are found.
Example
{
  "data": [
    {
      "country": "se",
      "key": "69f6a71405facac91d002dc9adce85fa",
      "record_key": "69f6a71405facac91d002dc9adce85fa",
      "parent_key": null,
      "profile_key": "baab015f2f9c350ab610fddd3986c53",
      "range_key": 3000,
      "range_key1": 3000,
      "range_key2": null,
      "range_key3": null,
      "range_key4": null,
      "range_key5": null,
      "range_key6": null,
      "range_key7": null,
      "range_key8": null,
      "range_key9": null,
      "range_key10": null,
      "body": "{\"name\":\"Alice\",\"vehicle\":\"Mercedes\"}",
      "precommit_body": null,
      "key1": "Additional info",
      "key2": null,
      "key3": null,
      "key4": "Shipping",
      "key5": null,
      "key6": null,
      "key7": null,
      "key8": null,
      "key9": null,
      "key10": "New",
      "key11": null,
      "key12": null,
      "key13": null,
      "key14": null,
      "key15": null,
      "key16": null,
      "key17": null,
      "key18": null,
      "key19": null,
      "key20": null,
      "service_key1": null,
      "service_key2": null,
      "attachments": [],
      "created_at": "2021-03-26T11:57:45.000Z",
      "updated_at": "2021-03-26T11:57:45.000Z",
      "version": 0
    }
  ],
  "meta": {
    "count": 1,
    "limit": 10,
    "offset": 0,
    "total": 1
  }
}      "updated_at": "2020-11-21T12:05:28.000Z"
        }
    ],
    "meta": {
        "count": 2,
        "limit": 100,
        "offset": 0,
        "total": 2
    }
}
STATUS 400 - application/json Bad request when it has not passed validation. The error details will be in the response.
STATUS 401 - This error is returned when the request is unauthorized.
Aggregating records
POST /api/records/aggregate
Please see the example of the request structure.
Example
{
  "next": "string",
  "metrics": {
    "additionalProp1": {
      "func": "sum",
      "key": "string"
    },
    "additionalProp2": {
      "func": "sum",
      "key": "string"
    },
    "additionalProp3": {
      "func": "sum",
      "key": "string"
    }
  },
  "filter": {
    "key": "string",
    "record_key": "string",
    "profile_key": "string",
    "parent_key": "string",
    "range_key": 0,
    "range_key1": 0,
    "range_key2": 0,
    "range_key3": 0,
    "range_key4": 0,
    "range_key5": 0,
    "range_key6": 0,
    "range_key7": 0,
    "range_key8": 0,
    "range_key9": 0,
    "range_key10": 0,
    "key1": "string",
    "key2": "string",
    "key3": "string",
    "key4": "string",
    "key5": "string",
    "key6": "string",
    "key7": "string",
    "key8": "string",
    "key9": "string",
    "key10": "string",
    "key11": "string",
    "key12": "string",
    "key13": "string",
    "key14": "string",
    "key15": "string",
    "key16": "string",
    "key17": "string",
    "key18": "string",
    "key19": "string",
    "key20": "string",
    "key21": "string",
    "key22": "string",
    "key23": "string",
    "key24": "string",
    "key25": "string",
    "service_key1": "string",
    "service_key2": "string",
    "service_key3": "string",
    "service_key4": "string",
    "service_key5": "string",
    "version": 0,
    "search_keys": "string",
    "created_at": "2022-08-30T07:41:54.490Z",
    "updated_at": "2022-08-30T07:41:54.490Z"
  },
  "group_by": {
    "limit": 0,
    "keys": [
      "string"
    ]
  }
}
Within the metrics section, you can define the aggregation parameters:
| Argument | Description |
|---|---|
additionalPropN | You can declare the aggregated metric, for example, total_sales_amount, record_count, or total_revenue. |
func | You can define the aggregation function to apply:count - cannot take additional arguments. Counts the number of records.sum - can take additional arguments. Summarizes values against a specific record’s key. You need to pass additional argument for summarization:* key - the record’s key name which values should be summarized. Only numeric fields (range_keyN) can be summarized. |
next | You can use the pagination when the number of groups within the returned aggregation exceeds 100 groups. In this case, the REST API will return the next value in the first response. You need to use this value to query the next batch of groups and update this value with the value from the prior response every time you query a subsequent batch of groups. |
cURL request
curl --request POST \
  --url 'https://{restApiURLAddress}/api/records/aggregate' \
  --header 'Authorization: Bearer <ACCESS_TOKEN>' \
  --header 'Content-Type: application/json' \
  --data '{
    "metrics": {
      "total_revenue": {
        "func": "sum",
        "key": "range_key3"
      },
      "total_tax": {
        "func": "sum",
        "key": "range_key4"
      },
      "transaction_count": {
        "func": "count"
      }
  },
    "filter": {
        "range_key2": {"$gte":1000, "$lte":4000},
        "key4": "Order with Shipping"
    },
    "options": {
        "limit": 100,
        "offset": 0
    }
}'

  //URL EXAMPLE
  https://se-restapi-mt-01.incountry.io/api/records/aggregate
When you query the next batch of groups within the aggregation, you can pass only the next value within the request:
curl --request POST \
  --url 'https://{restApiURLAddress}/api/records/aggregate' \
  --header 'Authorization: Bearer <ACCESS_TOKEN>' \
  --header 'Content-Type: application/json' \
  --data '{
    "next": "ZGluZyBkb25nIGNoaW5nIGNob25n",
}'

  //URL EXAMPLE
  https://se-restapi-mt-01.incountry.io/api/records/aggregate
Responses
STATUS 200 - JSON This response returns the results of aggregation and summarization.
Example
{
  "data": {
    "additionalProp1": {
      "group": {
        "keys": {
          "additionalProp1": "string",
          "additionalProp2": "string",
          "additionalProp3": "string"
        }
      },
      "metrics": {
        "additionalProp1": 0,
        "additionalProp2": 0,
        "additionalProp3": 0
      }
    },
    "additionalProp2": {
      "group": {
        "keys": {
          "additionalProp1": "string",
          "additionalProp2": "string",
          "additionalProp3": "string"
        }
      },
      "metrics": {
        "additionalProp1": 0,
        "additionalProp2": 0,
        "additionalProp3": 0
      }
    },
    "additionalProp3": {
      "group": {
        "keys": {
          "additionalProp1": "string",
          "additionalProp2": "string",
          "additionalProp3": "string"
        }
      },
      "metrics": {
        "additionalProp1": 0,
        "additionalProp2": 0,
        "additionalProp3": 0
      }
    }
  },
  "meta": {
    "next": "string"
  },
  "errors": [
    "string"
  ]
}
STATUS 401 - The request is unauthorized.
STATUS 403 - Search by keys is not available for the storage. The permissions is denied..
STATUS 409 - File storage for the requested country is not supported/available.
STATUS 413 - The request payload is too large.
STATUS 415 - Unsupported request content type.
STATUS 422 - Validation of input parameters has failed.
STATUS 429 - The number of allowed requests has been exceeded.
STATUS 5** - Server error.
Deleting a record
DELETE /api/records/{country}/{key}
Request parameters
| Parameters | Type | Value | Description |
|---|---|---|---|
country | ISO country code (lowercase) | sg | Country where the record is stored. |
key | string/array | k1234 | Unique primary key (record_key) for record identification |
cURL request
curl --request DELETE \
  --url 'https://{restApiURLAddress}/api/records/{country}/{key}' \
  --header 'Authorization: Bearer <ACCESS_TOKEN>' \

  //URL EXAMPLE
  https://se-restapi-mt-01.incountry.io/api/records/se/d1c2e12cfeababc8b95daf6902e210b1
Responses
STATUS 204 - plain This response is returned when the record has been successfully deleted.
STATUS 401 - This response is returned when the request is unauthorized.
STATUS 404 - plain This response is returned when the record is not found.
STATUS 5** - Server error.
Deleting multiple records
POST /api/records/batch/delete
Request body
| Parameters | Type | Example | Description |
|---|---|---|---|
filter | object | See the example. | Specify the criteria for deletion within the filter object. Currently only deletion by record_key is supported. |
record_key | array | See the example. | Array of records that are subject to removal. |
Please see the example of the request structure.
Example
{
  "filter": {
    "record_key": [
      "string"
    ]
  }
}
cURL request
curl --request POST \
  --url 'https://{restApiURLAddress}/api/records/batch/delete' \
  --header 'Authorization: Bearer <ACCESS_TOKEN>' \
  --header 'Content-Type: application/json' \
  --data '{
      "filter": {
        "record_key": [
          "d1c2e12cfeababc8b95daf6902e210b1",
          "d1cg88ecfeababc8b95daf690g4210b1",
          "f7fg88ecfeababc8b95daf690gf8s7dd"
        ]
      }

  //URL EXAMPLE
  https://se-restapi-mt-01.incountry.io/api/records/batch/delete
Responses
STATUS 204 - plain This response is returned when records have been successfully deleted.
STATUS 400 - application/json Bad request when it has not passed validation. The error details will be in the response.
STATUS 401 - This response is returned when the request is unauthorized.
STATUS 5** - Server error.
Rehashing values of a record
Recalculates tokens or hashes for a record’s fields. You can recalculate tokens or hashes for all values within a record or just specific fields.
POST /api/records/rehash
Request body
| Parameters | Type | Example | Description |
|---|---|---|---|
dtk | string | DTK key (96-character alphanumeric) | Specify the deterministic tokenization key (DTK). |
keys | string[] (array of values) | Specify one or multiple profile_key of records that you want to retokenize or rehash. | |
rules | array | Specify fields and redaction algorithms for recalculation. See the request example for details and the list of supported functions. |
Please see the example of the request structure.
Example
{
      dtk: '<DETERMINISTIC_TOKENIZATION_KEY>',
      keys: [
        '<profile_key1>',
        '<profile_key2>',
      ],
      rules: {
        <field_name>: {
          strategy: '{strategy_name}',
          strategyOptions: {
          <LIST_STRATEGY_OPTIONS>
        }
    }
cURL request
curl --request POST \
  --url 'https://{restApiURLAddress}/api/records/rehash' \
  --header 'Authorization: Bearer <ACCESS_TOKEN>' \
  --header 'Content-Type: application/json' \
  --data '{
      dtk: 'some_deterministic_key',
      keys: [
        'pk1',
        'pk2',
      ],
      rules: {
        first_name: {
          strategy: 'alphaNumeric',
        },
        nickname: {
          strategy: 'masking',
          strategyOptions: {
            type: 'alphanumeric',
          },
        },
        address: {
          strategy: 'alphaNumericPersistent',
          strategyOptions: {
            length: 20,
          },
        },
        email: {
          strategy: 'formula',
          strategyOptions: {
            formula: {
              fn: 'dtkSha256',
              transforms: [
                'trim',
                'toLowerCase',
              ],
              format: '[A-Za-z0-9]{15}@redacted.com',
            },
          },
        },
        age: {
          strategy: 'numeric',
        },
        service_key: {
          strategy: 'fixed',
          strategyOptions: {
            value: 'fixed_value',
          },
        },
        null_field: {
          strategy: 'alphaNumericPersistent',
          strategyOptions: {
            length: 20,
          },
        },
      },
    };
      }

  //URL EXAMPLE
  https://se-restapi-mt-01.incountry.io/api/records/rehash
Supported functions
| Redaction strategy (tokenization or rehashing function) | Strategy options | Description |
|---|---|---|
alphaNumeric | length: 32The default length is 32. You can change for any other length. | Applies an alpha-numeric hash to a string containing letters and numbers. The produced alphanumeric string varies during every redaction. |
alphaNumericLowerCase | length: 32The default length is 32. You can change for any other length. | Applies a lower-case alphanumeric hash to a string containing letters and numbers. |
alphaPrepended | length: 32The default length is 32. You can change for any other length. | Applies a prefix comprised of a single letter. |
email | length: 20 | Applies an email-pattern string, e.g. dsf34fsdf@redactedemail.com. The produced email-pattern string varies during every redaction. |
plain | n/a | Forwards the original value. |
one | n/a | Applies '1' ( a single digit). |
zero | n/a | Applies '0' (a single digit). |
numeric | n/a | Applies a random numeric value of the length equal to the original value. |
dateISO | n/a | Applies a random date in the ISO format. |
defaultDateISO | n/a | Applies a default date in the default ISO format (1970-01-01T00:00:00Z). |
fixed | value: 'fixed_value' | Applies any hardcoded value. If you select this option, in the Value box, enter the value that should be applied by default. |
alphaNumericPersistent | length: 20(value from the 1-64 range is acceptable) | Applies an alpha-numeric hash that remains the same for the same alphanumeric string during every redaction. |
emailPersistent | length: 20(value from the 20-64 range is acceptable) | Applies an email-pattern string that remains the same for the same email address during every redaction. |
formula | <br>formula: {<br> fn: 'dtkSha256' or 'sha256',<br> transforms: [<br> 'trim',<br> 'toLowerCase',<br> ],<br> format: '[A-Za-z0-9]{15}@redacted.com',<br>}<br> | Applies a formula that can be tailored to product a value matching a specific format. |
masking | type: 'alphanumeric' or 'email' | Masks the value depending on the input value and type. |
Responses
STATUS 200 - This response is returned when records have been successfully rehashed.
STATUS 400 - Incorrect records were provided.
STATUS 401 - This response is returned when the request is unauthorized.
STATUS 415 - This response is returned when the unsupported request content type was provided.
STATUS 419 - This response is returned records were not synchronized with the InCountry Vault.
STATUS 429 - This response is returned when the number of requests has exceeded limits.
STATUS 5** - Server error.
Management of attachments
InCountry DRaaS provides two storages for storing attachments:
-
database storage - a proprietary large object storage on the basis of the PostgreSQL database.
-
object storage - a generic S3 cloud object storage that integrates with the InCountry DRaaS. Currently, only Alibaba Cloud object storage is supported.
You can manage attachments stored in the InCountry Vault, as follows:
-
upload new attachments
-
update attachments
-
download specific attachments
-
delete attachments
-
query a list of attachments for a specific record
Available attachment fields
This fields are available for attachments stored in the database storage only.
| Field | Type | Specifics |
|---|---|---|
file_id | string | Unique identifier of an attachment. |
filename | string | Name of an attachment. |
hash | string | Hash of f an attachment. |
mime_type | string | MIME type of an attachment. |
size | string | Size of an attachment in bytes. |
created_at | string(date-time) | Timestamp when an attachment was uploaded to the InCountry Vault. |
updated_at | string(date-time) | Timestamp when an attachment was updated in the InCountry Vault. |
download_link | string | Link to download an attachment from the InCountry Vault. |
Uploading attachments (database)
POST /api/records/{country}/{key}/files
Request parameters
All the request parameters are required.
| Parameters | Type | Value | Description |
|---|---|---|---|
country | string (ISO country code (lowercase)) | sg | Country which a new attachment is uploaded to. |
key | string | att1234 | A record key of the record which the attachment is associated with. |
file | string | @company_logo.png;type=image/png | A name of the attachment for upload. |
The request body should be a binary string of the file you are uploading.
cURL request
curl --request POST \
  --url 'https://{restApiURLAddress}/api/records/{country}/{id}/files' \
  --header 'Authorization: Bearer <ACCESS_TOKEN>' \
  --header 'Content-Type: multipart/form-data; boundary=---011000010111000001101001' \
  --form 'file=@"{file local path}"'

//URL EXAMPLE
https://se-restapi-mt-01.incountry.io/api/records/se/d1c2e12cfeababc8b95daf6902e210b1/files

//LOCAL PATH TO FILE EXAMPLE
--form 'file=@"/Users/John/Projects/files/index.html"'
Responses
STATUS 201 - JSON This response is returned when the attachment has been successfully uploaded.
Example
{
    "file_id": "5416a334-6ce6-4e3b-9a0d-464cb417c094",
    "filename": "index.html",
    "hash": "78701b482fc9738e26f32254bbe7d71990f5025a9b728046a280a3822cdf5cad",
    "mime_type": "application/x-sh",
    "size": 279,
    "created_at": "2021-03-26T11:36:44.000Z",
    "updated_at": "2021-03-26T11:36:44.000Z",
    "download_link": "https://se-mt-01.incountry.io/v2/storage/records/se/310459560d9e757d6e51be45a5aad862fbb81c52d72a026e75d21366ac223a40/attachments/5416a334-6ce6-4e3b-9a0d-464cb417c094"
}
STATUS 401 - This response is returned when the request is unauthorized.
STATUS 5** - Server error.
Uploading attachments (object storage)
To upload your attachment, first, you need to receive the upload URL and parameters using the following endpoint:
POST /api/records/{record_key}/attachments/upload-url
Request parameters
All the request parameters are required.
| Parameters | Type | Value | Description |
|---|---|---|---|
record_key | string | att1234 | A record key of the record which the attachment is associated with. |
Within the request body, you need to pass two parameters, as follows:
| Parameters | Type | Value | Description |
|---|---|---|---|
expiration | integer | 60 | Time to expiration of the upload URL issued by the object storage for file upload. The minimal value is 30 seconds, maximal value is 32,400 seconds. |
filename | string | original_file_name_to_save.txt | Name of the file which you want to upload to the object storage. |
cURL request
curl --request POST \
  --url 'https://{restApiURLAddress}/api/records/{record_key}/attachments/upload-url' \
  --header 'Authorization: Bearer <ACCESS_TOKEN>' \
  --data '{
    "expiration": 60,
    "filename": "original_file_name_to_save.txt"
  }'

// URL EXAMPLE
https://se-restapi-mt-01.incountry.io/api/records/x56s5f98fs98f/attachments/upload-url
Responses
STATUS 200 - JSON The upload URL with upload parameters was created successfully.
Example
{
  "action": "string",
  "file_id": "string",
  "method": "string",
  "form_data": {
    "key": "string",
    "Expires": "2022-11-17T13:07:56.608Z",
    "policy": "string",
    "Signature": "string",
    "OSSAccessKeyId": "string",
    "x-oss-security-token": "string",
    "callback": "string",
    "success_action_status": "string",
    "Content-Disposition": "string"
  }
}
This endpoint returns the form action (URL to upload an attachment (POST)) and form data parameters for attachment upload using the PostObject operation. Then you must construct the PostObject request using the received response (detailed in the Responses section) and pass all form_data parameters with the file itself. See the example of the request below:
Example
POST / HTTP/1.1
Host: incountry-attachments-uuid1.oss-cn-shanghai.aliyuncs.com
Content-Length: 344606
Content-Type: multipart/form-data; boundary=9431149156168

--9431149156168
Content-Disposition: form-data; name="key"
5a5c698a-8117-4725-a4bf-7dfa5f36f2ef/awesomerecordkey/tony-eos-546-file1-test2

--9431149156168
Content-Disposition: form-data; name="Expires"
2022-11-17T13:07:56.608Z

--9431149156168
Content-Disposition: form-data; name="success_action_status"
200

--9431149156168
Content-Disposition: form-data; name="OSSAccessKeyId"
STS.NUUfc27****

--9431149156168
Content-Disposition: form-data; name="policy"
eyJleHBpcmF0aW9uIjoiMjAyMi0xMS0xN1QxMzowNzo1Ni42MDhaIiwiY29uZGl0aW9ucyI6W3siYnVja2V0IjoiaW5jb3VudHJ5LWF0dGFjaG1lbnRzLXV1aWQxIn0sWyJjb250ZW50LWxlbmd0aC1yYW5nZSIsMSwxMDQ4NTc2MDBdLFsiZXEiLCIka2V5IiwiNWE1YzY5OGEtODExNy00NzI1LWE0YmYtN2RmYTVmMzZmMmVmL2F3ZXNvbWVyZWNvcmRrZXkvdG9ueS1lb3MtNTQ2LWZpbGUxLXRlc3QyIl0sWyJlcSIsIiRzdWNjZXNzX2FjdGlvbl9zdGF0dXMiLCIyMDAiXSx7ImNhbGxiYWNrIjoiZXlKallXeHNZbUZqYTFWeWJDSTZJbWgwZEhCek9pOHZQSEpsYzNSaGNHbGZhRzl6ZEQ0dllYQnBMM0psWTI5eVpITXZQR052ZFc1MGNuaytMenh5WldOdmNtUmZhMlY1UGk5aGRIUmhZMmh0Wlc1MGN5OWpZV3hzWW1GamF5SXNJbU5oYkd4aVlXTnJRbTlrZVNJNkludGNJblpsYm1SdmNsd2lPaUJjSW1Gc2FWd2lMQ0JjSW1KMVkydGxkRndpT2lCY0lpUjdZblZqYTJWMGZWd2lMQ0JjSW05aWFtVmpkRndpT2lCY0lpUjdiMkpxWldOMGZWd2lMQ0JjSW5OcGVtVmNJam9nWENJa2UzTnBlbVY5WENJc0lGd2liV2x0WlZSNWNHVmNJam9nWENJa2UyMXBiV1ZVZVhCbGZWd2lmU0lzSW1OaGJHeGlZV05yUW05a2VWUjVjR1VpT2lKaGNIQnNhV05oZEdsdmJpOXFjMjl1SW4wPSJ9XX0=

--9431149156168
Content-Disposition: form-data; name="Signature"
Cn7t9Cz70aby****

--9431149156168
Content-Disposition: form-data; name="x-oss-security-token"
CAIS9wF1q6Ft5B2yfSjIr5bgLdmG2plsjpqvZGThjG8SdPdD14nNhTz2IHtNfXVpAugZs************

--9431149156168
Content-Disposition: form-data; name="callback"
eyJjYWxsYmFja1VybCI6Imh0dHA6Ly8yNmIxLTMxLTIyMy0xMjQtMTQ2Lm5ncm9rLmlvL2NhbGxiYWNrIiwiY2FsbGJhY2tCb2R5Ijoie1widmVuZG9yXCI6IFwiYWxpXCIsIFwiYnVja2V0XCI6ICR7YnVja2V0fSwgXCJvYmplY3RcIjogJHtvYmplY3R9LCBcInNpemVcIjogJHtzaXplfSwgXCJtaW1lVHlwZVwiOiAke21pbWVUeXBlfSwgXCJldGFnXCI6ICR7ZXRhZ319IiwiY2FsbGJhY2tCb2R5VHlwZSI6ImFwcGxpY2F0aW9uL2pzb24ifQ==

--9431149156168
Content-Disposition: form-data; name="Content-Disposition"
attachment;filename=original_file_name_to_save.txt

--9431149156168
Content-Disposition: form-data; name="file"; filename="original_file_name_to_save.txt"
Content-Type: text/plain
abcdefg

--9431149156168--
-
The last form field must be the file. No particular order is required for other form fields.
-
The key of a form field cannot exceed 8 KB and the value of a form field cannot exceed 2 MB.
STATUS 400 - Invalid file data has been provided.
STATUS 401 - Access is denied.
STATUS 404 - The record with the provided record key has not been found.
STATUS 409 - The object storage for the requested country is not supported.
STATUS 415 - An unsupported request content type.
STATUS 422 - The request parameters have not passed validation.
STATUS 429 - Too many requests have been executed.
STATUS 5** - Server error.
Downloading attachments (database)
GET /api/records/{country}/{key}/files/{file_id}
Request parameters
All the request parameters are required.
| Parameters | Type | Value | Description |
|---|---|---|---|
country | string (ISO country code (lowercase)) | sg | Country where the attachment is stored. |
key | string | att1234 | A record key of the record which the attachment is associated with. |
file_id | string (binary) | The file identifier of the attachment stored on the InCountry platform. |
cURL request
curl --request GET \
  --url 'https://{restApiURLAddress}/api/records/{country}/{id}/files/{file_id}' \
  --header 'Authorization: Bearer <ACCESS_TOKEN>' \

//URL EXAMPLE
https://se-restapi-mt-01.incountry.io/api/records/se/d1c2e12cfeababc8b95daf6902e210b1/files/d4f0a504-82a6-40b7-b153-1ec81d2f5ae0
Responses
STATUS 200 - plain This response is returned when the attachment has been provided for download.
Example
{
  "file_id": "string",
  "filename": "string",
  "hash": "string",
  "mime_type": "string",
  "size": 0,
  "created_at": "2021-02-10T07:29:32.611Z",
  "updated_at": "2021-02-10T07:29:32.611Z",
  "download_link": "string"
}
STATUS 401 - The request is unauthorized.
STATUS 5** - Server error.
Downloading attachments (object storage)
This endpoint creates and returns the download URL for attachment downloading, with it metadata in the response. To download the attachment, you need then to perform a GET request against the download_url value from the response.
GET /api/records/{record_key}/attachments/{attachment_id}/download-url?expiration=60
Request parameters
The record_key and file_id request parameters are required.
| Parameters | Type | Value | Description |
|---|---|---|---|
record_key | string | att1234 | A record key of the record which the attachment is associated with. |
file_id | string | dfjfd87897fs4d6 | Identifier of the attached file you want to download. |
expiration | integer | 60 | Time to expiration of the download URL issued by the object storage for file upload. The minimal value is 30 seconds, the maximal value is 32,400 seconds. |
cURL request
curl --request GET \
--url 'https://{restApiURLAddress}/api/records/{record_key}/attachments/{file_id}/download-url?expiration=60' \
--header 'Authorization: Bearer <ACCESS_TOKEN>' \
//URL EXAMPLE
https://se-restapi-mt-01.incountry.io/api/records/f5ds4687s7t9e7te/attachments/e45r87er98ere78/download-url?expiration=60
Responses
STATUS 200 - JSON The attachment downloading URL with metadata was received successfully.
Example
{
  "download_url": "string",
  "expires": "2023-06-27T09:28:21.021Z",
  "created_at": "2023-06-27T09:28:21.021Z",
  "file_id": "string",
  "filename": "string",
  "mime_type": "string",
  "size": 0,
  "hash": "string",
  "updated_at": "2023-06-27T09:28:21.021Z",
  "download_link": "string",
  "vendor": "string"
}
STATUS 401 - Access is denied.
STATUS 404 - The record with the provided record key has not been found.
STATUS 409 - The object storage for the requested country is not supported.
STATUS 415 - An unsupported request content type.
STATUS 422 - The request parameters have not passed validation.
STATUS 429 - Too many requests have been executed.
STATUS 5** - Server error.
Updating an attachment (object storage)
To update the uploaded attachment, you must follow the same steps as when uploading a new file and specify the already created file_id in the request for upload-url.
POST /api/records/{record_key}/attachments/{file_id}/upload-url
Request parameters
All the request parameters are required.
| Parameters | Type | Value | Description |
|---|---|---|---|
record_key | string | att1234 | A record key of the record which the attachment is associated with. |
file_id | string | dfjfd87897fs4d6 | Identifier of the attached file you want to download. |
Within the request body, you need to pass two parameters, as follows:
| Parameters | Type | Value | Description |
|---|---|---|---|
expiration | integer | 60 | Time to expiration of the upload URL issued by the object storage for file upload. The minimal value is 30 seconds, maximal value is 32,400 seconds. |
filename | string | original_file_name_to_save.txt | Name of the file which you want to upload to the object storage. |
cURL request
curl --request POST \
  --url 'https://{restApiURLAddress}/api/records/{record_key}/attachments/{file_id}/upload-url' \
  --header 'Authorization: Bearer <ACCESS_TOKEN>' \
  --data '{
    "expiration": 60,
    "filename": "original_file_name_to_save.txt"
  }'

//URL EXAMPLE
https://se-restapi-mt-01.incountry.io/api/records/fd4s7f97s9e7r9d9fs/attachments/sfd98f7s98d7fsd7/upload-url
Responses
STATUS 200 - JSON The upload URL with upload parameters was created successfully.
Example
{
  "action": "string",
  "file_id": "string",
  "method": "string",
  "form_data": {
    "key": "string",
    "Expires": "2023-06-27T10:20:27.091Z",
    "policy": "string",
    "Signature": "string",
    "OSSAccessKeyId": "string",
    "x-oss-security-token": "string",
    "callback": "string",
    "success_action_status": "string",
    "Content-Disposition": "string"
  }
}
STATUS 400 - Invalid file data has been provided.
STATUS 401 - Access is denied.
STATUS 404 - The record with the provided record key has not been found.
STATUS 409 - The object storage for the requested country is not supported.
STATUS 415 - An unsupported request content type.
STATUS 422 - The request parameters have not passed validation.
STATUS 429 - Too many requests have been executed.
STATUS 5** - Server error.
Deleting attachments (database)
DELETE /api/records/{country}/{key}/files/{file_id}
Request parameters
All the request parameters are required.
| Parameters | Type | Value | Description |
|---|---|---|---|
country | string (ISO country code (lowercase)) | sg | Country where the attachment is stored. |
key | string | att1234 | A record key of the attachment. |
file_id | string | The file identifier of the attachment stored in the InCountry Vault. |
cURL request
curl --request DELETE \
  --url 'https://{restApiURLAddress}/api/records/{country}/{id}/files/{file_id}' \
  --header 'Authorization: Bearer <ACCESS_TOKEN>' \

// URL EXAMPLE
https://se-restapi-mt-01.incountry.io/api/records/se/d1c2e12cfeababc8b95daf6902e210b1/files/d4f0a504-82a6-40b7-b153-1ec81d2f5ae0
Responses
STATUS 204 - plain This response is returned when the attachment has been successfully deleted.
STATUS 401 - This response is returned when the request is unauthorized.
STATUS 5** - Server error.
Deleting attachments (object storage)
This method deletes all attachments pertaining for a specific record in the object storage.
DELETE /api/records/{record_key}/attachments
Request parameters
All the request parameters are required.
| Parameters | Type | Value | Description |
|---|---|---|---|
record_key | string | att1234 | A record key of the attachment. |
cURL request
curl --request DELETE \
  --url 'https://{restApiURLAddress}/api/records/{record_key}/attachments' \
  --header 'Authorization: Bearer <ACCESS_TOKEN>' \

// URL EXAMPLE
https://se-restapi-mt-01.incountry.io/api/records/fsd7f9s8d7f98s7df8/attachments
Responses
STATUS 204 - plain The attachments have been successfully deleted.
STATUS 401 - Access is denied.
STATUS 404 - The record with the provided record key has not been found.
STATUS 409 - The object storage for the requested country is not supported.
STATUS 415 - An unsupported request content type.
STATUS 422 - The request parameters have not passed validation.
STATUS 429 - Too many requests have been executed.
STATUS 5** - Server error.
Querying attachments for a specific record (object storage)
GET /api/records/{record_key}/attachments
Request parameters
| Parameters | Type | Value | Description |
|---|---|---|---|
record_key | string | att1234 | A record key of the attachment. |
offset | integer | 10 | Offset is the position in the dataset of a particular record. By specifying offset, you retrieve a subset of records starting with the offset value. Offset normally works with limit. |
limit | integer | 100 | Limit determines how many records to retrieve starting from the offset. |
cURL request
curl --request GET \
  --url 'https://{restApiURLAddress}/api/records/{record_key}/attachments?limit=100&offset=0' \
  --header 'Authorization: Bearer <ACCESS_TOKEN>' \

// URL EXAMPLE
https://se-restapi-mt-01.incountry.io/api/records/fsd456fsd8f4d54f/attachments?limit=100&offset=50
Responses
STATUS 200 - JSON The list of attachments pertaining to a specific record is returned.
STATUS 401 - Access is denied.
STATUS 404 - The record with the provided record key has not been found.
STATUS 409 - The object storage for the requested country is not supported.
STATUS 415 - An unsupported request content type.
STATUS 422 - The request parameters have not passed validation.
STATUS 429 - Too many requests have been executed.
STATUS 5** - Server error.